Understanding Asset Deployment
This chapter covers the following topics:
- Overview of Understanding Asset Deployment
- About Asset Deployment
- About Asset Deployment Transactions
- About Partial Installation and In-Service Conditions
- Selecting the Location for the Item Instance
- Using the Item Instance Deployment Page
Overview of Understanding Asset Deployment
This topic group describes how to deploy assets using Oracle Asset Tracking.
About Asset Deployment
Asset deployment is a capability of Oracle Asset Tracking. The purpose of asset deployment is to signal the completion of operational tasks, to update item statuses in Oracle Install Base, and to initiate the asset creation and update processes in Oracle Projects and Oracle Assets.
Oracle Asset Tracking can be integrated with external systems. Oracle Asset Tracking provides an interface API as well as the Asset Deployment window for an external workforce management application to transmit transaction parameters to Oracle Asset Tracking.
For an overview of the asset operations and their dependence on Oracle Asset Tracking usage codes, see About Asset Processing for Normal and Depreciable Inventory Items.
From a user perspective, usage codes no longer appear. The user views operational status codes.
Asset deployment topics are as follows:
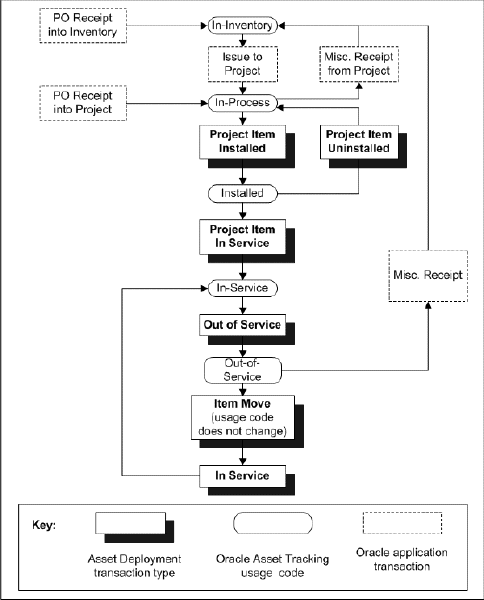
About Asset Deployment Transactions
The diagram that follows shows the life cycle flow of an item instance, with the asset deployment and Oracle application transactions that change the Oracle Asset Tracking usage codes for the item instance. Asset deployment transactions in item instance life cycle flow.
Asset Deployment Actions in Item Instance Life Cycle Flow
About Partial Installation and In-Service Conditions
When material is issued from inventory to a project, a cost expenditure is created in Oracle Projects that includes the quantity and the cost of material. Oracle Asset Tracking creates the appropriate expenditures in Oracle Projects after the equipment is placed in service. Further processing by Oracle Projects programs creates assets based on these expenditures.
You can capitalize some or all of the material assigned to a project. For example, assume that ten items have been issued to the project. A technician installs five and then places only three items in service. This means that only three (or a cost expenditure equal to 3 times the unit cost) are capitalized immediately. Expenditure will be capitalized only after the associated equipment (asset) is deployed in service.
Selecting the Location for the Item Instance
In all the asset deployment transactions, to accurately track an item instance, you must select the current location of the item instance.
There are a number of options that are common to all the selections for the location of an item instance.
The value for the location can be an internal site or an external party site.
When entering location information, you must first select a Location Type from the following list:
-
HZ Location
-
Internal Site
-
Party Site
If you select either HZ Location or Internal Site for the Location Type, then you must select a location into the Location field. The list of values for the Location field depends on your selection of Location Type:
-
If you select HZ Location, then the list of values for the Location field displays the Addresses as set up in the Trading Community Architecture (TCA) locations.
-
If you select Internal Site, then the list of values for the Location field shows only locations related to an enterprise organization.
If you select Party Site for the Location Type, then you must select a party into the Party field.
Using the Item Instance Deployment Page
Use this procedure to use the Item Instance Deployment page.
To use the Item Instance Deployment page
-
Using the Asset Tracking Super User responsibility, navigate to Assets and then select Deployment.
The Item Instance Deployment page appears.
-
Select an action from the list.
You can choose one of the following actions:
-
Install: You can install material issued to the project at a specific location.
When an instance is issued to a project, the operational status code is Not Used. After you install it, the application updates the operational status code to Installed.
-
Move: You can move an item instance from one location to another.
The operational status does not change.
-
Project Transfer: You can transfer an item instance from one project to another if the operational status is Not Used or Installed.
Oracle Projects reverses the expenditure item from the origin project, using the Net Zero Adjustment functionality, and then creates a new expenditure item for the destination project.
-
Put Into Service: You can put an item in service if it is still in a project (operation status Not Used), Installed, or Out Of Service.
-
Retirement: You can retire an item instance operationally (the instance is expired), or both operationally and functionally (the corresponding fixed asset is also retired from the books). You can enter the removal costs and the proceeds from sales only if the item instance is capitalized.
-
Take Out Of Service: You can take an item instance out of service only if the operational status is Not Used or In Service.
-
Un-Install: You can un-install an asset if the operational status is Installed.
-
-
Enter your search criteria. You can limit the search results by entering data into the following fields:
-
Item Instance
-
Item
-
Asset Number
-
Purchase Order Number
-
External Reference
-
Serial Number
-
Current Location Type
-
Operational Status
-
System
-
-
Click the Go button.
The search results appear in the lower portion of the page.
Note: If you want to change your search criteria, then click the Clear button and enter the new criteria.
-
To perform an action:
-
Select the associated checkbox for a row in the results table.
Note: You may select more than one.
-
Click the button in the Select Object block.
Note: The button that you see in the Select Object block is tied to the action that you selected for your search. For example, if you selected the action Move, then the Move button appears in the Select Object block.
The page associated with the action that you selected appears, For example, if you selected the action Move, then the Move: Item Instance page appears.
-
-
Update the fields for the action that you selected. The following provides an overview of each of the action detail pages.
-
Install: Item Instance
-
Enter a value in the Source Reference Number field.
-
Enter a date in the Source Reference Date field.
-
Update the number in the Transaction Quantity field. The transaction quantity cannot exceed the actual quantity.
-
Select a value from the Location Type LOV.
-
Select a value from the Location LOV.
-
-
Move: Item Instance
-
Enter a value in the Source Reference Number field.
-
Enter a date in the Source Reference Date field.
-
Update the number in the Transaction Quantity field. The transaction quantity cannot exceed the actual quantity.
-
Select a value from the Location Type LOV.
-
Select a value from the Location LOV.
-
-
Project Transfer: Item Instance
-
Enter a value in the Source Reference Number field.
-
Enter a date in the Source Reference Date field.
-
Update the number in the Transaction Quantity field. The transaction quantity cannot exceed the actual quantity.
-
Select a value from the To Project Number LOV.
-
Select a value from the To Task Number LOV.
-
-
Put Into Service: Item Instance
-
Enter a value in the Source Reference Number field.
-
Enter a date in the Source Reference Date field.
-
Update the number in the Transaction Quantity field. The transaction quantity cannot exceed the actual quantity.
-
Enter a date in the Placed Into Service field.
-
-
Retirement: Item Instance
-
Enter a value in the Source Reference Number field.
-
Enter a date in the Source Reference Date field.
-
Update the number in the Transaction Quantity field. The transaction quantity cannot exceed the actual quantity.
-
Enter an amount in the Cost of Removal field.
-
Enter an amount in the Proceeds of Sale field.
-
Select the Operational check box, if appropriate.
-
Select the Financial check box, if appropriate.
-
Select an asset from the Asset Number LOV.
-
Enter a date in the Retirement Date field.
-
-
Take Out Of Service: Item Instance
-
Enter a value in the Source Reference Number field.
-
Enter a date in the Source Reference Date field.
-
Update the number in the Transaction Quantity field. The transaction quantity cannot exceed the actual quantity.
-
-
Un-Install: Item Instance
-
Enter a value in the Source Reference Number field.
-
Enter a date in the Source Reference Date field.
-
Update the number in the Transaction Quantity field. The transaction quantity cannot exceed the actual quantity.
-
-
-
Click the Apply button.
A confirmation message appears.
-
Click the Done button to return to the Deployment Search page.