Flow Manufacturing
This chapter explains how to use Flow Manufacturing in Work in Process.
This chapter covers the following topics:
- Overview of Flow Manufacturing
- Setting Up Flow Manufacturing
- Flow Schedules
- Work Order-less Completions Window
- Performing Work Order-less Completions
- Scrapping Flow Schedule Assemblies
- Overview of the Flow Workstation
- Selecting the Line and Line Operation
- The Flow Workstation Branches and Tabs
- Flow Workstation Transactions
- Linearity, Load, and Properties of the Line
- Open Schedules and Events
- Buttons on Open Schedule Tabs
Overview of Flow Manufacturing
Flow Manufacturing is a set of manufacturing processes and techniques designed to reduce product cycle time through line design and line balancing, reduce product costs by minimizing inventories and increasing inventory turns, and to enhance product quality through total quality control. It is significantly different from other manufacturing processes in that it is a just-in-time (JIT) or demand-based "pull" system that manufactures to customer order.
A Multi-Mode Environment
Integrating Flow Manufacturing with other Oracle Applications such as Work in Process enables you to operate in a multi-mode environment. This means that you can concurrently implement Discrete, Repetitive, and Flow manufacturing methods in the same or different inventory organizations by plant, product family, assembly line, or process. For example, you can produce some of your product families in the Flow environment and others in the Discrete environment.
Mixed-Model Production
Flow Manufacturing uses dedicated assembly lines that are designed to support the manufacture of product families through mixed-model production. Mixed-model production enables you to produce any item in a product family in any sequence and in a lot size of one. To ensure optimum resource utilization and the smooth flow of materials, lines are designed to minimize bottlenecks, to eliminate non value-added tasks, and to integrate quality inspections into the process.
When setting up Flow Manufacturing assembly lines, the goal is to set up balanced lines that enable you to meet the expected demand in the shortest possible time. Using "pull" manufacturing, materials flow through the line at a steady rate (known as TAKT time), starting with the final assembly operation.
Mixed-model production is driven by Flow schedules, rather than by Discrete work orders, and uses existing Flow routings. Schedules are sequenced based on customer orders, and component material is managed, and replenished at its point-of-use by kanban bins and signals.
Kanban Material Replenishment
In Oracle Flow Manufacturing, you can both plan and execute kanbans, a method of just-in-time material replenishment that can be applied to the production of items with relatively constant demand and medium to high production volume. Kanban material replenishment is a self-regulating pull system that uses replenishment signals (kanbans) to pull the minimum amount of material possible into production bins when needed to meet demand.
When material is needed, a kanban signal is sent electronically or manually to feeding operations and/or external suppliers. A supplier kanban may automatically trigger a purchase order to a supplier, while an internal kanban results in an inter-organizational transfer.
Related Topics
Kanban Planning and Execution, Oracle Flow Manufacturing User's Guide
Line Scheduling Workbench Options Window, Oracle Flow Manufacturing User's Guide
Product Synchronization, Oracle Flow Manufacturing User's Guide
Pull Sequence Window, Oracle Flow Manufacturing User's Guide
Flow Manufacturing Integration with Work in Process
Integrating Flow Manufacturing with Work in Process has simplified production execution. The following overviews provide you with a brief introduction to the Flow Manufacturing features provided in Work in Process:
Work Order-less Assembly Completions and Returns
You can complete and return flow schedules and unscheduled flow assemblies without having to create a work order. When you perform a WIP Assembly Completion, operation pull, assembly pull, and push components are backflushed and resources and overheads are charged. For a WIP Assembly Return, operation pull, assembly pull, and push components are returned to inventory and resource and overhead transactions are reversed. You perform these transactions on the Work Order-less Completions window, which you can open from both the Flow Manufacturing and Work in Process menus.
Quality Data Collection during Work Order-less Completions
You can collect quality results data when you complete Flow schedules and unscheduled assemblies on the Work Order-less Completions window. When you set up a collection plan to associate with a Work Order-less completion transaction, you can specify mandatory quality data collection, in which case, the user must enter quality results before completing the transaction. You also can specify that quality data is collected automatically in the background. Detailed information on setting up collection plans for recording quality data during transactions is available in the Oracle Quality User's Guide.
Assembly Scrap and Return of Scrap
You can scrap and return from scrap both scheduled and unscheduled assemblies at any operation. This can be performed for assemblies where no routing exists. Operation and assembly pull, and push components at events prior to the scrap line operation are automatically backflushed. You can substitute components at any operation on or prior to the scrap operation. You can specify a scrap account for scrap and return from scrap transactions.
Component Substitutions
You can add, delete, and substitute components that are not normally associated with the assembly you are building.
Component Backflush
Operation Pull, assembly Pull, and Push components are automatically backflushed when you complete a Flow schedule. Conversely, when you return Flow assemblies, reversing transactions are created. Bulk and supplier components are not backflushed. The bills for phantom components are exploded and the phantom's components are backflushed when transactions are saved.
For Mobile Applications work orderless completions, Pull components requiring additional information such as lot or serial number, can be over or under issued. The Work in Process parameter, Allow Quantity Changes During Backflush, provides this ability. See: Backflush Supply Subinventories and Locators
Production Kanban Replenishment
You can use kanban signals to create a discrete job, repetitive schedule, or Flow schedule (or you can use existing job or schedule) to replenish production kanbans whose supply status is Empty or In Process. Production kanbans for discrete jobs or repetitive schedules are replenished when assemblies are completed through the Completion or Move Transaction form. Production kanbans for scheduled and unscheduled flow assemblies are completed on the Work Order-less Completion form.
You can complete an assembly into the subinventory or locator specified by the kanban. The first assembly completed automatically updates the supply status of its production kanban to Full.
Lot and Serial Number Control
You can specify lot, serial, and lot and serial number information for assemblies and components when you perform Work Order-less Completion transactions. You also can set the WIP Lot Selection Method parameter to specify whether lot controlled components are selected manually or automatically during backflush transactions. If you specify manual selection, you select which lots are used; if you specify automatic selection, lots are selected on the basis of their inventory expiration or receipt date. See: Backflush Parameters and Lot and Serial Number Backflushing.
ATO (Assemble-to-Order) Reservations
You can accept a customer order, generate a Flow schedule, and complete it using a Work Order-less Completion transaction. Components are automatically reserved to satisfy that specific sales order.
Sales Order Reservations
You can reserve the assemblies being built on a Flow schedule to a sales order. One or more Flow schedules can be used to satisfy a sales order. Sales order lines cannot be satisfied by both discrete jobs and Flow schedules.
Inventory Transaction Open Interface
You can load work order-less completion transaction information from external systems - such as bar code readers and other data collection devices - into the Inventory Transaction Open Interface. When this data is processed, it is validated, and invalid records are marked so that you can correct and resubmit them
Mobile Manufacturing
Oracle Mobile Manufacturing is the component of Oracle Mobile Supply Chain Applications used for Oracle Work in Process transactions. The interface of a mobile client device with a networked computer system is used to create transactions. You can perform Flow Manufacturing completion and scrap transactions, and work order-less completions.
Related Topics
Performing Work Order-less Completions
Completing and Returning Assemblies
Line Scheduling Workbench Options Window, Oracle Flow Manufacturing User's Guide
Product Synchronization, Oracle Flow Manufacturing User's Guide
Pull Sequence Window, Oracle Flow Manufacturing User's Guide
Setting Up Flow Manufacturing
-
For a listing of setups within Work in Process that affect flow manufacturing see: Setup Check List
-
For additional information about parameters and accounting classes see: WIP Parameters and WIP Accounting Classes
-
For a listing of profile options that affect Flow manufacturing see:Profile Option Descriptions
-
For information on setting up flow routings see: Creating a Flow Routing, Oracle Flow Manufacturing User's Guide
-
For information on defining scheduling rules see: Defining Scheduling Rules, Oracle Master Scheduling/MRP and Oracle Supply Chain Planning User's Guide
-
For information on creating standard events see: Defining Flow Manufacturing Standard Events, Oracle Flow Manufacturing User's Guide
-
For information on creating flow lines see Overview of the Graphical Line Designer Workbench, Oracle Flow Manufacturing User's Guide
Flow Schedules
Flow schedules are production schedules for assemblies produced on Flow Manufacturing lines. They are created to meet planned production orders and/or sales orders. You can link sales orders to flow schedules, and you also have the option to reserve the schedule's completed assemblies to the associated sales order.
You create flow schedules on the Flow Manufacturing Line Scheduling Workbench. Flow schedules are scheduled within a line and optionally within a schedule group. Once you create a flow schedule, you can use the Work Order-less Completions window to perform completion, return, and scrap transactions.
Related Topics
Line Scheduling Workbench Options Window, Oracle Flow Manufacturing User's Guide
Flow Schedule Completions
You perform completion transactions for flow schedules in the Work Order-less Completions window. At the time of completion, material is automatically backflushed and resources and overheads are charged. You can create completion transactions for:
-
Assemblies for flow schedules created in Flow Manufacturing, or created to replenish production kanbans
-
Scheduled and unscheduled assemblies
You can also use kanban signals to create a flow schedule completion when the kanban card status is changed to Full (notifies you that the order has been filled).
Related Topics
Performing Work Order-less Completions
Flow Schedule Reservations
You can use assemblies that have been completed into Inventory through work order-less completions to satisfy sales orders. Unlike discrete manufacturing, these sales orders are not required to be assemble-to-order (ATO) sales orders.
For both scheduled and unscheduled sales orders, you specify that assemblies from a single flow schedule can fill multiple sales orders. For scheduled flow schedules only, you can specify that assemblies from a single sales order satisfy multiple flow schedules.
You can designate the sales order to the schedule when it is created in the Line Scheduling Workbench. This sales order is for reference and does not create a reservation.
Note: If you are using Oracle Mobile Supply Chain Applications for your work order-less completions transactions, only configured to order (CTO) flow schedules are reserved to designated sales orders.
Reserving Sales Orders
As you complete flow schedules that reference ATO sales orders in the Work Order-less Completions window, the Reserve option defaults to enabled but can be disabled. If the flow schedule is linked to a sales order for a non-ATO item, the Reserve option defaults to disabled.
Note: Discrete jobs cannot be used to satisfy an ATO sales order if a flow schedule has been created to satisfy it.
You can only reserve a quantity that is less than or equal to the open quantity of a sales order. Because completions that are being processed may affect this quantity, the system checks to see that all pending completions for that flow schedule are processed first.
The item required, completion subinventory, locator, revision, and demand class specified in the sales order line are the same as the values entered at the time of completion.
Once the a link between the flow schedule and the sales order is established and the reservation is made, the work order status is changed to Work Order Open if the earlier order status was Manufacturing Released. The supply reservation created will have a different delivery ID so you will need to obtain the new delivery ID from MTL_DEMAND, and create a reservation in On-Hand inventory. You will need to create hard reservations for each of the lots specified in the transaction.
Returning Reserved Assemblies
You can only return assemblies to flow schedules if no reservation between the flow schedule and sales order exists. Therefore, to return an assembly that was reserved to a flow schedule, you must first break the reservation in on-hand inventory.
Kanban Replenishment
You can use kanban signals to create a discrete job, repetitive schedule, or flow schedule (or you can use an existing one) to replenish production kanbans whose supply status is Empty or In Process. Production kanbans for discrete jobs or repetitive schedules are replenished when assemblies are completed through the Completion or Move Transaction form. Production kanbans for scheduled and unscheduled flow assemblies are completed on the Work Order-less Completion form.
You can complete an assembly into the subinventory or locator specified by the kanban. The first assembly completed automatically updates the supply status of its production kanban to Full.
Related Topics
Kanban Planning and Execution, Oracle Flow Manufacturing User's Guide
Pull Sequence Window, Oracle Flow Manufacturing User's Guide
Work Order-less Completions Window
You can do all of the following on the Work Order-less Completions window:
-
Complete unscheduled or scheduled assemblies to Inventory
-
Return unscheduled or scheduled assemblies from Inventory
-
Scrap assemblies from and return scrapped assemblies to any operation
-
Explode the assembly's bill of material and add, delete, and change components-and review items under lot and serial number control
-
Specify lot, serial, and lot and serial information for assemblies and components.
-
Create material reservations for assemblies that are linked to sales orders
-
Replenish production kanbans
If Oracle Mobile Supply Chain Applications is installed, you can use a mobile client device networked with a computer system to complete or return unscheduled and scheduled assemblies to inventory, and return unscheduled assemblies. See: Work Order-Less Transactions, Oracle Mobile Supply Chain Applications User's Guide.
If Oracle Warehouse Management is installed, you can perform work order-less completions into license plate numbers (LPN). License plate numbers are identifiers for tracking both inbound and outbound material - providing genealogy and transaction history for each license plate. For work order-less return transactions, you must first unpack the LPN before performing the assembly return transaction See: Explaining License Plate Management, Oracle Warehouse Management User's Guide
Component Backflushing and Resource Transactions
When you complete assemblies in this window, components are automatically backflushed. Resources that are specified as item based, when you perform return transactions all resource charges are reversed. For lot based resources, return transactions do not reverse charges.
When adding a component through the Material Transaction interface, with an operation sequence that does not exist on the routing, the backflush transaction is still processed with the invalid operation sequence.
Lot and Serial Components
Backflush completions for components under lot number control can be identified manually or automatically depending on how the WIP Backflush Lot Selection Method parameter is set.
For backflush components under serial, or lot and serial control, you can manually identify which lot and serial number combinations to backflush using the Lot/Serial action in the Components window. If you return assemblies using this window, you must always identify the lot, serial, and lot or serial numbers of the components being returned to inventory.
See: Lot and Serial Backflushing and Material Parameters.
Flow Schedule Completions
On the Routings window in Oracle Bills of Material, in the WIP tabbed region-the Count Point and Autocharge flags are enabled and not modifiable. Therefore, resources are set up to be charged.
If an operation and event combination is disabled, the resources linked to those departments are not charged. However, components tied to those operations and events are backflushed.
If the event is not assigned to a line operation, the resource and material associated with that operation is charged when performing completion and scrap transactions.
When performing scrap transactions, all components are backflushed in the line operations prior to, and including, the line operation scrapped.
For component quantity changes using desktop assembly completions—the Backflush window displays for component information for supply type Push, and Pull components requiring additional information such as lot or serial number. You can change the transaction quantity when the Work in Process parameter, Allow Quantity Changes During Backflush, is enabled. For Mobile Applications work orderless completions, Pull components requiring additional information can also be over or under issued when this parameter enabled. See: Material Parameters
Collecting Quality Results Data
If Oracle Quality is installed and at least one qualified collection plan exists, both the Enter Quality Results option on the Tools menu and the Quality button on the toolbar are enabled. When mandatory collection plans are used, quality results data must be entered and saved before you can save your transaction. See: Using Oracle Quality with Oracle Work in Process, Oracle Quality User's Guide.
Sales Order Reference Information
Sales order line information defaults only for open and active sales order statuses. Otherwise the Sales Order field is null on the Work Order-less Completions window. The following information applies to sales order defaults on this window:
-
Sales order information does not default if the original sales order line associated with the Flow schedule is cancelled or closed.
-
You can create reservations for assemblies linked to sales orders.
-
When completing unscheduled assemblies, you can select sales orders that are open for standard items or configured items in at least one of the order lines.
-
Sales order lines selected should not be linked to a discrete job.
-
If the sales order has been split into several sales order lines, the new lines do not display on the Work Order-less Completions window.
-
If the sales order has been split into new sales order lines, and only one order line is valid, that new line displays on the Work Order-less Completions window.
-
For Flow schedules with sales order reservations, you can reserve overcompletion quantities. This is set in the item master attributes for the following values:
-
Overcompletion Tolerance Type and Overcompletion Tolerance Value in the Work In Process Attribute Group
-
Over Shipment Tolerance in the Order Management Attribute Group
If the overcompletion quantity is within the over shipment tolerance value, the quantity is reserved to the sales order within that tolerance amount.
-
Serial Number Validations for Unscheduled and Flow Schedule Completions
For a serialized item returned to stock, validations occur to prevent re-issuing to a different flow schedule. At the time of completion, serialized assemblies and components for flow schedules are available from stock if they have the following values set in the Serial Numbers window in Oracle Inventory:
-
Flow Schedule Work Order-less Completions
State value: Defined but not used.
State value: Issued out of stores. This is restricted to serial numbers that were previously returned to the same flow schedule that you are completing.
-
Unscheduled Work Order-less Completions
State value: Defined but not used.
State value: Issued out of stores. This is restricted to serial numbers that were previously transacted for an unscheduled work order-less return.
Maintaining Serial Number Information, Oracle Inventory User's Guide
See: Serial Number Validations for Component Returns and Assembly Completions
Non-updatable Fields
The following table lists the fields that cannot be updated in the Work Order-less Completions window:
| WIP Assembly Completion | WIP Assembly Return | Scrap | Return from Scrap | |
|---|---|---|---|---|
| Unscheduled Assemblies | Build Sequence | Build Sequence | Build Sequence, Subinventory/Locator, Lot/Serial button | Build Sequence, Subinventory/Locator, Lot/Serial button |
| Scheduled Flow Schedule | Assembly, Line, Schedule Group, Build Sequence, Schedule Number, Accounting Class, Project/Task | Assembly, Line, Schedule Group, Build Sequence, Schedule Number, Accounting Class, Project/Task | Assembly, Line, Schedule Group, Build Sequence, Schedule Number, Accounting Class, Project/Task, Subinventory/Locator, Lot/Serial button | Assembly, Line, Schedule Group, Build Sequence, Schedule Number, Accounting Class, Project/Task, Subinventory/Locator, Lot/Serial button |
| Unscheduled Assemblies with a Kanban Reference | Build Sequence, Subinventory/Locator | DISALLOWED | DISALLOWED | DISALLOWED |
| Scheduled Flow Schedule with a Kanban | Build Sequence, Subinventory/Locator | DISALLOWED | DISALLOWED | DISALLOWED |
| Unscheduled Assemblies with a Sales Order Reference | Build Sequence | DISALLOWED | Build Sequence, Subinventory/Locator, Lot/Serial button | Build Sequence, Subinventory/Locator, Lot/Serial button |
| Scheduled Flow Schedule with a Sales Order Reference | Build Sequence | Assembly, Line, Schedule Group, Build Sequence, Schedule Number, Accounting Class, Project/Task, Subinventory/Locator, Lot/Serial button | Assembly, Line, Schedule Group, Build Sequence, Schedule Number, Accounting Class, Project/Task, Subinventory/Locator, Lot/Serial button | Assembly, Line, Schedule Group, Build Sequence, Schedule Number, Accounting Class, Project/Task, Subinventory/Locator, Lot/Serial button |
Related Topics
Work Order-less Completion Transaction Types
| Variable | Description |
|---|---|
| WIP assembly completion | Receive completed assemblies into inventory. If backflush components are under lot or serial number control, the lots and serial control numbers to backflush must be identified. Lots for backflush components under lot number control can be identified manually or automatically based on how the WIP Backflush Lot Selection parameter is set. See: Material Parameters. For backflush components under serial number control or manual lot control, you must manually identify which serial numbers or lot numbers to backflush using the lot/serial number action in the Components window. |
| WIP assembly return | Return assemblies from inventory. All operation pull, assembly pull and push components are automatically returned to inventory. If the returned components are under lot or serial number control, the lots and serial numbers to return must be identified using the Lot/Serial action in the Components window. |
| WIP scrap transactions | Scrap assemblies at any operation. You can scrap assemblies even if the assembly does not have a routing. When this is done, the Scrap Operation defaults to 1. All operation pull, assembly pull and push components are backflushed when a flow schedule assembly is scrapped. If the WIP Require Scrap Account parameter is set to Yes, and a scrap account is entered, the system debits this account and credits the elemental accounts associated with the flow schedule through the operation at which the assemblies are scrapped. Resource and overhead cost elements at scrap operations that are non-autocharge operations are also charged. However resource and overhead cost elements at the non-autocharge operations prior to the scrap operation are not charged. If you do not provide a scrap account, the cost of scrap remains in the flow schedule until job or period close and is then written off as a variance. You must enter a scrap account if the Require Scrap Account parameter is enabled. See: Move Transaction Parameters. |
| WIP return from scrap | Return assemblies from scrap. If you enter a reversing scrap transaction, the system credits this account and debits the job or schedule elemental accounts through the operation at which the assemblies are returned. |
Performing Work Order-less Completions
To complete or return scheduled or unscheduled assemblies:
-
Navigate to the Work Order-less Completions window.

-
Select a Transaction Date and time.
The system date is defaulted but can be overridden with a date that is not greater than the current date, and falls within an open accounting period.
Use the Refresh Date button if you want to change the Transaction Date after entering data on this window. This enables you to change the date without losing information already selected.
-
Select the WIP assembly completion or WIP assembly return Transaction Type. See: Work Order-less Completion Transaction Types
-
If you are completing a scheduled assembly, select the Scheduled check box.
-
You can select any assembly that has it's Build in WIP attribute set in Oracle Inventory. If a primary bill of material, primary routing, or both exist for this assembly, they are defaulted. See: Defining Items, Oracle Inventory User's Guide and Work In Process Attribute Group, Oracle Inventory User's Guide.
If you select a Schedule Number first, the information associated with that schedule is defaulted. If you select an assembly before selecting a schedule, you can only select schedules that are building that assembly.
You an also choose engineering items if the WIP:See Engineering Items profile option is set to Yes.
If you select a Sales Order and Order Line, the assembly is defaulted.
-
Select a production Line.
You can select any active production line. Production lines are optional.
If you select a Schedule Number before selecting a Production Line, the information associated with that schedule is defaulted. If you override the defaulted production line, all defaults are cleared. If you select a production line before selecting a schedule, you can only select schedules that are being build on that production line.
-
Select a Schedule Group. See: Defining Schedule Groups.
You can assign unscheduled Flow completions to any active schedule group. If you are completing a scheduled assembly, this field will default from the schedule number. The schedule group is optional.
If you select a Schedule Number before selecting a Schedule Group, the information associated with that schedule is defaulted. If you select a schedule group before selected a schedule, you can only select schedules that belong to that schedule group.
Also, if the transaction type is a WIP assembly completion, the applicable Project, Task, Sales Order Line, Sales Order Delivery, and Kanban ID are defaulted.
-
Enter a Schedule Number.
When completing unscheduled assemblies, you can assign a unique, alphanumeric Schedule Number to an unscheduled assembly. If you do not enter a Schedule Number, and a prefix has been specified for the WIP:Discrete Job Prefix profile option, a default Schedule Number is assigned by the automatic sequence generator when you press the tab key. When completing scheduled assemblies, select from the List of Values.
-
If the transaction type is a WIP assembly completion, you can select a Sales Order and an Order Line on that Sales Order.
When completing unscheduled assemblies, you can select a Sales Order and Order Line that is for the selected assembly. You can only select sales orders that are open and that have either a standard item or a configured item in at least one of their order lines. Also, the order line selected should not be linked to a discrete job.
When completing a scheduled assembly that was created by scheduling a sales orders, this field will default from the schedule number.
-
If you have selected a Sales Order/Order Line, you can enable the Reserve option to create a reservation. See: Reserving Available Inventory, Oracle Inventory User's Guide.
If the Sales Order and Order Line selected is for an assemble-to-order (ATO) item, the Reserve option is automatically enabled but can be disabled. If the Sales Order/Order Line is for a non-ATO item, the Reserve option, it can be, enabled.
-
Select a unit of measure in the UOM field. See: Overview of Units of Measure, Oracle Inventory User's Guide.
-
Enter a transaction Quantity. For scheduled completions, the transaction quantity will default to the schedule number.
-
Select a Completion Subinventory and, if required, a Locator. Several rules apply to these fields for defaulted information:
-
If a completion subinventory/locator was specified on the routing, it is defaulted but can be overridden. See: Completion Subinventory and Locator Fields, Oracle Bills of Material User's Guide.
-
The Completion Subinventory/Locator is defaulted from any existing Sales Order and Sales Line values.
-
If you have selected a Kanban Number, the completion subinventory/locator for that kanban, if specified, is defaulted and cannot be changed.
-
The Locator field information defaults from any applicable project and task combination entered.
-
If you entered a default Completion Subinventory on the item routing, the Completion Subinventory/Locator is defaulted. You can create a reservation for the quantity completed, the subinventory/locator/lot information for the previous reservation is overridden.
-
Completion locators are required if the Locator Control Parameter in Oracle Inventory is set to require a locator.
-
-
When you select an assembly, the primary bill of material for the assembly is defaulted. If there is more than one revision for the primary bill of material, the transaction date is used to determine the bill revision and revision date.
If you set the WIP:Exclude ECOs profile option to None, engineering change orders with Open statuses, as well as those with Release, Schedule, and Implement statuses, are considered when the bill of material is exploded. See: Overview of Engineering Change Order, and Defining Engineering Change Orders in the Oracle Engineering User's Guide.
-
Select a BOM revision Date and time.
You can select a BOM revision date other than the one determined by the transaction date and time.
-
Select a Routing Revision. See: Item and Routing Revisions, Oracle Bills of Material User's Guide.
When you select an assembly, the primary routing for the assembly is defaulted. If there is more than one revision for the primary routing, the transaction date is used to determine the routing revision and revision date.
-
Select a Routing revision Date and time.
You can select a routing revision date other than the one determined by the transaction date and time.
-
Select a BOM Alternate bill of material.
You can select an alternate bill if alternates have been defined for the assembly you are building.
-
You can select a routing alternate if alternates have been defined for the assembly you are building.
-
Select a Project, and if required, a Task.
You can only select a project if the current organization's Project References Enabled parameter is set in Oracle Inventory. You must select a task if the Project Control Level parameter is set to Task and you have entered a project number. See: Organization Parameters Window, Oracle Inventory User's Guide.
Note: The default information in these fields cannot be changed if an existing schedule, sales order and line, or kanban number is entered.
You can only select a project if the current organization's Project References Enabled Parameter is set in Oracle Inventory.
-
If the transaction type is a WIP assembly completion and the specified Flow schedule does not reference a Sales Order/Order Line, you can select a Kanban Number for replenishment.
See: Completions to Kanbans with Supply Statuses of Full.
When you select a kanban, the quantity for that kanban is defaulted. If a completion subinventory/locator for the kanban have been specified, they are also defaulted.
-
See: WIP Accounting Class Defaults and Discrete Accounting Classes.
You can select any active Standard Discrete accounting class. If you have defined a defaulting account class using the Default Discrete Class Parameter, that accounting class is defaulted but can be overridden. See: Discrete Parameters and Discrete Accounting Classes.
-
The Demand Class is defaulted from the Sales Order/Order Line, but can be overridden. You can select any enabled and active demand class. See: Overview of Demand Classes, Oracle Master Scheduling/MRP and Oracle Supply Chain Planning User's Guide and Creating Demand Classes, Oracle Master Scheduling/MRP and Oracle Supply Chain Planning User's Guide.
-
Optionally, select a transaction Reason code. See: Defining Transaction Reasons, Oracle Inventory User's Guide.
-
Optionally, enter a transaction Reference.
References can be used to identify transactions on standard reports. They can be up to 240 characters of alpha numeric text.
-
If you are completing assemblies under lot, serial, or lot and serial control, choose Lot/Serial. See: Assigning Lot Numbers, Oracle Inventory User's Guide and Assigning Serial Numbers, Oracle Inventory User's Guide.
-
Save your work.
Note: Assembly Pull, Operation Pull, and Push components are automatically backflushed. Bulk and supplier components are not backflushed. The bills for Phantoms are exploded and the Phantom components are backflushed.
The system backflushes these components from the supply subinventory/locator assigned to the components on the bill of materials or the one specified in the Components window. If no supply subinventory/locator is assigned to the bill components, the system pulls components from the supply subinventory/locator defined for the item. If no item supply subinventory/locator is defined at the item level, items are pulled from the default supply subinventory/locator as determined by the Supply Subinventory and Supply Locator parameters. See: Backflush Parameters.
To complete multiple flow schedules:
-
Navigate to the Work Order-less Completion window.
-
Change the date and time to the completion date and time desired.
-
Choose Retrieve.
-
Enter the retrieve criteria. Line is a required field, all others are optional.
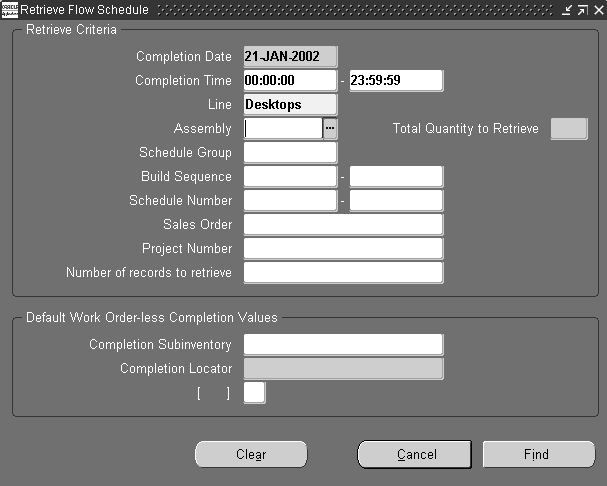
-
Optionally, enter default completion sub-inventory, locator, and flex field information.
-
Choose Retrieve.
-
A window will appear informing you how many records will be retrieved. Choose OK to retrieve them all, choose Cancel to return to the Retrieve window and change your criteria.
Note: Items under lot and serial control cannot be retrieved and must be entered individually using the Work Order-less Completions window. If any other items cannot be retrieved, you will receive an error. Other errors are usually caused by an incorrect or missing completion sub-inventory on a routing. To permanently fix the errors, return to all routings and ensure a completion sub-inventory and locator are entered. To temporarily fix it, you can return to the retrieve screen and enter a default completion sub-inventory and locator.
-
If there are schedules retrieved that you do not want to complete, highlight them and delete them.
-
Add any other scheduled or non-scheduled items you wish to complete at the same time, and choose Save.
For component transactions including adding deleting changing, or specifying lot/serial information
-
Choose the Components button.
The Components window appears, displaying the exploded bill of material for this assembly.
-
Select the component item at which to make the change.
-
Modify the editable fields you want to change.
-
In all transactions, optionally you can select the transaction Reason code. See: Defining Transaction Reasons, Oracle Inventory User's Guide.
-
In all transactions, optionally you can enter a transaction Reference.
References can be used to identify transactions on standard reports. They can be up to 240 characters of alpha numeric text.
To change a component
-
Select the component to be replaced, and select the value you want to substitute.
-
Change the quantity, if required.
The quantity you enter here is the total quantity for the completion. The Revision for the substitute is defaulted based on the transaction date. The supply subinventory/locator are defaulted from the item. See: Defining Items, Oracle Inventory User's Guide and Work In Process Attribute Group, Oracle Inventory User's Guide.
If there is no supply subinventory/locator at the item level, the supply Subinventory, and if required, the Supply Locator, are defaulted based on the values entered for the WIP Supply Subinventory and Supply Locator parameters. See: Material.
-
Save your work.
To add a component
-
From the File menu, select New.
A new row displays in the Components window.
-
Select the Operation where the component will be used.
If the assembly has no routing, the system displays 1 as the default operation sequence. This value cannot be updated.
-
Select a component to add and enter a quantity.
The Revision and Supply Subinventory/Locator, are defaulted the same as for a Substitute.
-
Save your work.
To delete a component
-
Select the component you want to take out, delete, and save your work.
To enter lot and serial number information for a component.
-
Components under lot or serial number control are indicated when Lot/Serial button is available. Select a component, then choose the Lot/Serial button.
See: Assigning Lot Numbers, Oracle Inventory User's Guide and Assigning Serial Numbers, Oracle Inventory User's Guide.
To resubmit transactions that fail to process
-
You can resubmit transactions that fail to process using the Transaction Open Interface window in Oracle Inventory.
To add, delete, or change components or specify component lot/serial information:
-
Select the Operation at which to make the substitution.
If the assembly has no routing, the system displays 1 as the default operation sequence. This value cannot be updated.
-
Select a substitution Type from the following options:
Add: Add a component at the operation.
Delete: Delete a component from the operation.
Change: Substitute one component for another at the operation.
Lot/Serial: Specify lot/serial number information for items.
If you are scrapping assemblies, and the substitution type is changed, deleted, or lot or serial, the event operation sequence selected must precede the scrap line operation in the routing network.
If you are Changing a component, you must select the component to be replaced, select a Substitute component and enter a Quantity. The quantity you enter here is the total quantity for the completion. The Revision for the substitution is defaulted based on the transaction date. The supply subinventory/locator are defaulted from the item..
If you are Adding a component, select a component to add and enter a Quantity. The Revision and supply Subinventory.Locator, are defaulted the same as for a Substitute.
If you are Deleting a component, select the component to delete.
To enter Lot/Serial information for a component, select a component then choose the Lot/Serial button. See: Assigning Lot Numbers, Oracle Inventory User's Guide and Assigning Serial Numbers, Oracle Inventory User's Guide.
-
Optionally, select a transaction Reason code. See: Defining Transaction Reasons, Oracle Inventory User's Guide.
-
Optionally, enter a transaction Comment.
Comments can be used to identify transactions on standard reports. They can be up to 240 characters of alpha numeric text.
-
Choose Done to save your work.
To resubmit transactions that fail to process:
-
You can resubmit transactions that fail to process using the Inventory Transactions Open Interface window in Oracle Inventory.
Related Topics
Scrapping Flow Schedule Assemblies
You can use the Work Order-less Completions window to scrap scheduled and unscheduled Flow assemblies. Specifically, you can do all of the following:
-
Scrap assemblies at any operation in the routing, which in turn causes all Assembly Pull, Operation Pull, and Push components to be backflushed and all resources charged
-
Return assemblies to Flow schedules that have been scrapped (this creates reversing resource charge and component backflush transactions)
Scrap and return from scrap transactions are disallowed if either the Flow schedule or unscheduled assembly references a kanban.
To scrap or return from scrap unscheduled Flow assemblies:
-
Select the WIP Scrap transaction or WIP Return from Scrap transaction type. See: Work Order-less Completion Transaction Types.
-
Specify an Assembly, production Line, Schedule Group, or optionally generate a Schedule Number, assembly bill and routing information. When scrapping and returning scrap, you cannot enable the Reserve option, or select a Completion Subinventory/Locator, Project/Task, or Kanban number.
-
Select a Scrap Line Operation Sequence.
-
Select a Discrete Accounting class.
The scrapped assemblies are written off against the accounts associated with this class.
-
If the WIP Require Scrap Account parameter is set, you must enter a scrap account number or an account Alias. If you do not specify that a scrap account is required, it is optional. See: Move Transaction Parameters and Defining Account Aliases, Oracle Inventory User's Guide.
-
Optionally specify a Demand Class, a Reason, for the Scrap transaction, and enter a Comment about the transaction.
Overview of the Flow Workstation
The Flow Workstation provides you with immediate access to critical Flow Manufacturing production information. It enables you to track the flow of work throughout the shop floor and to complete scheduled and unscheduled assemblies directly from the workstation. It also provides you with detailed component, resource, and property information on flow schedules, unscheduled assemblies and their events, and operation instructions and other attachments.
Features of the Flow Workstation
The Flow Workstation enables you to:
-
View the linearity, load, and properties of the selected line
-
View a line operation's open schedules and events, and unscheduled assemblies
-
View detailed information on the components and resources required for schedules and events
-
Obtain the kanban locations of components required at an operation
-
Complete flow schedules and unscheduled assemblies
-
Complete line operations
-
Request kanban replenishment
-
Obtain operating instructions, diagrams, component attachments, and other information attached to assemblies and events
-
Enter quality data at specific points in the routing
Related Topics
Product Synchronization, Oracle Flow Manufacturing User's Guide
Product Flow Manufacturing Line Balance, Oracle Flow Manufacturing User's Guide
Overview of the Graphical Line Designer Workbench, Oracle Flow Manufacturing User's Guide
Pull Sequence Window, Oracle Flow Manufacturing User's Guide
Flow Workstation Window
The Flow Workstation window consists of two panes. The left pane displays the workstation directory chooser or navigator in tree format. The right pane displays one or more tabs of detailed information that correspond to the branch that you select from the tree.
The workstation's left pane displays a hierarchical listing of the workstation's contents. Since its structure is analogous to a tree with branches, it is referred to as the workstation tree. The tree displays four branches (levels) of information. When you select a branch (this highlights the branch), information relevant to that branch is displayed on tabs in the right pane of the workstation. When you launch the Flow Workstation, it immediately displays the tabs for the first event of the first scheduled line operation.
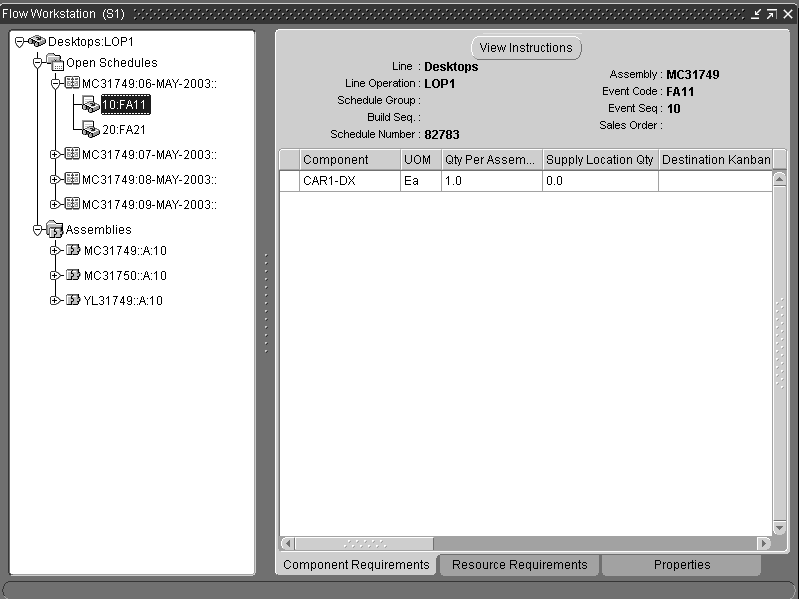
The workstation's right pane displays one or more tabbed regions of detailed information pertaining to the branch that you select on the tree. The information on the tabs is displayed either in tables, lists, or in graph format, so that you can quickly assess the status of the schedule or assembly. See: Flow Workstation Tree and Tabbed Regions for detailed information on each of the workstation branches and tabs.
There are tabs available to:
-
Open windows directly from the workstation so that you can perform common transactions, such as Work Order-less Completion transactions and kanban replenishment.
-
View attachments previously appended to a job, such as drawings and instructions. See: View Instructions
Viewing the Flow Workstation Tree
Dynamic information: the information on the tree is dynamically created when you launch the workstation. You also can update the display at any time by choosing the Refresh tool (curved arrow icon on the toolbar). As schedules are completed, they are automatically removed from the tree so that only current schedules are displayed.
Choice of Formats: you can choose to view the information on the tree in Vertical (the default), Interleaved (horizontal), or Org Chart (organization chart) format. These choices are available through tools on the toolbar or as menu selections under the View menu.
Wider View: in order to view the tree in Interleaved or Org Chart format, you may need to widen the left pane to see the full display. There are two ways that you can do this: you can use your mouse to drag the right side of the pane towards the right side of the window, or you can hide the tabbed regions so that the window's full width can be used to display the contents of the left pane. As follows:
To hide the right pane of the workstation:
Select the View menu, then remove the check mark from the Node Properties check box. The tabs in the right pane are hidden, and the contents of the left pane fill the window area.
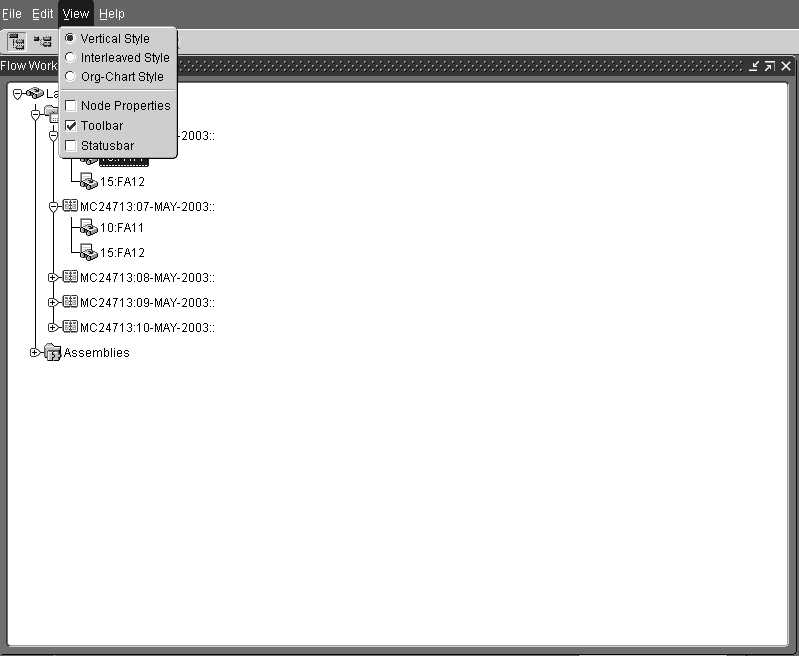
To again display the right pane of the workstation:
Select the View menu, then place a check mark in the Node Properties check box. The tabs in the right pane are again displayed.
Flow Workstation Toolbar
The following tools are located on the toolbar directly below the workstation menus. From left to right, they are:
-
Vertical Style: the default; displays the branches of the navigation tree vertically
-
Interleaved Style: displays the branches of the navigation tree horizontally
-
Org Chart Style: displays the branches of the navigation tree in the same format as a standard corporate organization chart
-
Refresh: use this tool to refresh (update) the workstation display
-
Pin Tab: use this tool to place the active tabbed region in a separate window that remains on top of and separate from the workstation
-
Replenish Kanban: use this tool to replenish kanbans
-
Enter Quality Results: use this tool to access the Enter Quality Results window, it is enabled if there is an exiting collection plan
Selecting the Line and Line Operation
The Flow Workstation displays information for only one line and line operation at a time. When you select the workstation from the menu, a window opens for selecting the line and line operation for schedules and assemblies you want to view. You can enter a range of dates and a schedule group-allowing you to filter and view schedules for a particular shift or date.
Note: You must first define line operations in order to use the Flow Workstation.
To launch the Flow Workstation:
-
Navigate to the Flow Workstation. The Flow Workstation Startup window displays.
-
In the Line field, select a line from.
-
In the Line Operation field, select a line operation.
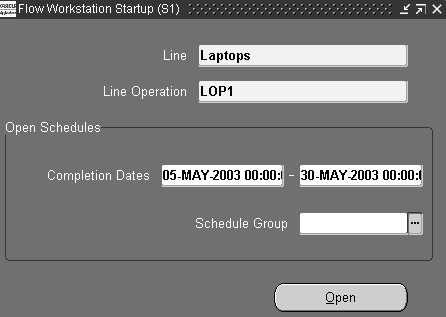
-
In the Open Schedules region, enter a range of dates in the Completion Dates fields.
This allows you to filter and view schedules for a particular shift or date.
-
In the Schedule Group field, select a value from the list of values.
This identifier groups schedules for scheduling and releasing purposes. Schedules within a schedule group can be sequenced.
-
Choose Open.
The Flow Workstation displays.
The Flow Workstation Branches and Tabs
The first and topmost branch on the Flow Workstation tree displays the name of the line and line operation that you selected when you launched the workstation. The main branches:
-
The Open Schedules branch displays all of the flow schedules at that operation
-
The Assemblies branch displays all of the unscheduled flow assemblies at that operation
Expanding any branch in the Open Schedule or Assembly branches, displays branches for that schedule's or assembly's events. When you select (highlight) a branch, corresponding tabbed regions of information about that branch are immediately displayed in the right frame of the workstation. When you launch the workstation, it automatically displays the first event of the first open schedule:
The following table lists the workstation branches and the corresponding tabbed regions of information that are displayed.
| Flow Workstation Branch | Corresponding Tabbed Region Displayed |
|---|---|
| Line and Line Operation | Linearity, Load, Properties of the entire line |
| Open Schedules | Blank Tab |
| Individual Schedules | Component Requirements, Resource Requirements, and Properties for each assembly scheduled at the line operation |
| Schedule Events | Component Requirements, Resource Requirements, Properties for each assembly's events |
| Assemblies | Blank Tab |
| Individual Assemblies | Component Requirements, Resource Requirements, Properties for each unscheduled assembly assigned to the line operation |
| Assembly Events | Component Requirements, Resource Requirements, Properties for each assembly's events |
Branch Naming Conventions
Branch titles contain sections of information identifying the branch. Each section in the branch name is separated by a colon (if two colons appear together, no information is available for the section):
-
Topmost branch: Displays first the name of the line, then the line operation code. For example: FlowLine01:Op20
-
Open Schedules branches: Display the Assembly, Schedule Completion Date, Schedule Group, and Build Sequence. For example: Assy01:25-SEP-99:Grp1:20
-
Assemblies branches: Display the Assembly Number, Assembly Description, Routing Revision, and Event Sequence. For example: Assy01:Bike:B:20
-
Events branches: Display the Event Sequence and Event Code. For example: 40:STO2
Flow Workstation Transactions
On the Flow Workstation, you have access to common shop floor transactions: you can request kanban replenishment, and you can perform line operation and schedule completions.
Kanban Replenishment
The flow Workstation provides access to windows for replenishing kanbans. Choose the Replenish Kanban icon on the toolbar, see: Flow Workstation Toolbar. When you choose Replenish Kanban, the Find Kanban window opens. Enter search criteria and choose Find to display the Kanban Cards Summary window.
Related Topics
Kanban Planning and Execution, Oracle Flow Manufacturing User's Guide
Pull Sequence Window, Oracle Flow Manufacturing User's Guide
Accessing the Planning Region, Oracle Flow Manufacturing User's Guide
Accessing the Production Region, Oracle Flow Manufacturing User's Guide
Defining Kanban Cards, Oracle Inventory User's Guide
Overview of Kanban Replenishment, Oracle Inventory User's Guide
Line Operation, Schedule, and Assembly Completions
On the Flow Workstation, you can complete both line operations and flow schedules directly from the workstation. Choose the appropriate transaction, either Complete Line Operation or Complete Schedule. Both functions are available on the Component Requirements, Resource Requirements, and Properties tabs for all open schedules.
Complete Line Operations
Choose Complete Line Operation to open the Complete Line Operation window and move assemblies to the next operation. Completing the line operation removes the assemblies from the current line operation's list of open schedules on the workstation tree. It does not trigger any cost or inventory transactions. See: Complete Line Operation button.
Important: Selecting the Complete Line Operation button does not complete the schedule nor does it perform any material transactions. If you are working on the last operation of the schedule, you have the option to complete the schedule using the Work Order-less Completions window.
Complete Schedules
Choosing Complete Schedule displays the Work Order-less Completions window to complete an open schedule. If you are at the last operation on a schedule, you are prompted to complete the schedule. You can choose another time to complete the schedule. See: Complete Schedule button, and Performing Work Order-less Completions.
Complete Assemblies
You can complete assemblies by choosing Complete Assembly. Choosing this button opens the Work Order-less Completions window in unscheduled mode (the Scheduled check box is not selected), so that you can perform a Work Order-less Completion transaction to complete the assembly.
Performing a Work Order-less Completion transaction automatically backflushes components and charges resource and overhead costs. Once the assembly has been completed, it is removed from the line operation's list of unscheduled Assemblies. See: Buttons on Open Schedule Tabs.
Integration with Oracle Quality
If collection plans exist for line operation completions, you can enter quality data within the Flow Workstation. You can enter results for mandatory collection plans or optional collection plans at specific points on a routing. This feature also prevents completing the line operation if there are remaining mandatory collections plans. When the collection plan data is entered, and the completion transaction is saved - the quality data is also saved.
The Quality icon on the toolbar of the Flow Workstation is enabled when Oracle Quality is enabled for the organization, and a collection plan exists for the line operation:
-
If the collection plan is mandatory, the Enter Quality Results window from Oracle Quality, automatically displays when you choose Complete Line Operation.
-
If the collection plan is optional, choose the Quality icon on the toolbar to display this window.
Related Topics
Complete Line Operation Button.
Entering Quality Results Directly, Oracle Quality User's Guide
Setting Up Collection Plans for Line Operation Completion Transactions, Oracle Quality User's Guide
Linearity, Load, and Properties of the Line
Selecting the topmost branch of the tree (Line:Line Operation), displays three tabbed regions of information in the right pane - the Linearity, Load, and Properties tabs. The information on these tabs can help you manage production across the entire line.
Related Topics
Product Synchronization, Oracle Flow Manufacturing User's Guide
Product Flow Manufacturing Line Balance, Oracle Flow Manufacturing User's Guide
Linearity Tab
One of the goals of Flow Manufacturing is to produce a constant quantity of products. Linearity determines how close your production matches the production schedule, and the Flow Workstation provides you with immediate access to that information.
When you select the topmost branch of the tree, the Linearity tab is the first tab displayed. Its two graphs, Planned vs Actual and Mix, enable you to determine if production is meeting linearity.
Both the Planned vs Actual and Mix graphs chart the linearity for the entire line, not just the line operation selected. The graphs automatically display the last week of production, but you can select your own range of dates to view. If you change the dates of the graph, choose Redraw Graph to refresh the display.
Planned And Actual Graph
The Planned vs Actual graph compares the cumulative actual quantity completed on the line to the quantity that was scheduled to be completed during the past week or a defined date range.
-
The cumulative quantity completed is the total combined number of scheduled and unscheduled units completed on the line for each date.
-
The cumulative quantity scheduled is the total combined number of units scheduled to be produced on the line for each date, displayed on the Line Scheduling Workbench.
Both scheduled and completed quantities accumulate the units over the date range. For example, the data point on the graph for the first day shows the values for that day only. The data point for the second day, shows the combined data values for the first and the second day, and so on.

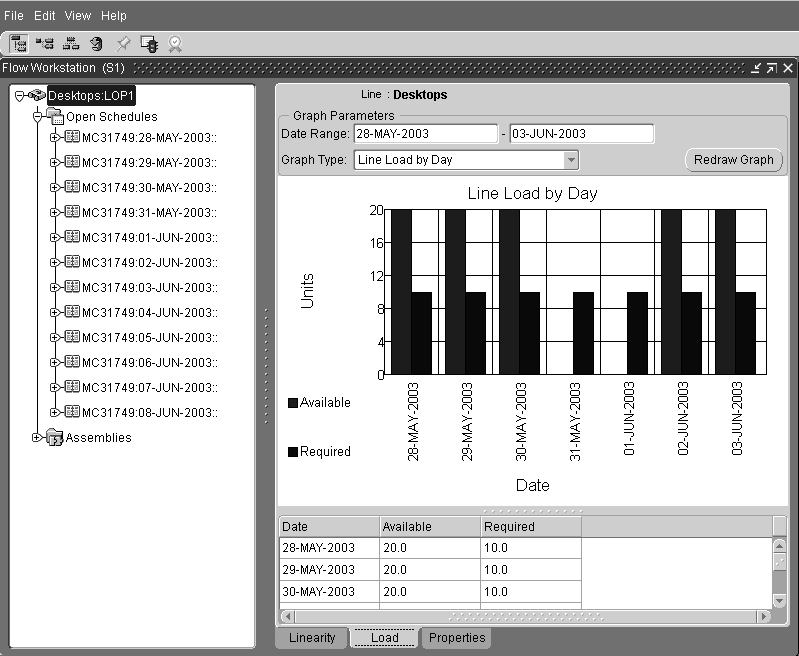
The information from the graph is also displayed in a table below the graph including Date, Scheduled Quantity, Completed Quantity, Difference (between the scheduled and actual quantities), and Variance Percent.
Mix Graph
The Mix graph displays the linearity percentage of the product mix on the line over time, based on the assembly being built. The information on this graph is beneficial for lines that produce multiple products. Its linearity calculation measures the difference (differential or deviation) between the number of units scheduled to be completed and the number of units actually completed for each product. It compares it to the total planned quantity for all products. The differential is calculated for each assembly built on the line, and then the differentials are summed.

The variance (the sum of the differences between what is scheduled and what is completed) is calculated using this formula:
Linearity = (1 - (sum of differentials/total planned quantity) * 100
The following charts shows an example of this calculation:
| Day One Assemblies | Scheduled Quantity | Actual Quantity | Differential |
|---|---|---|---|
| Assembly 1 | 20 | 18 | 2 |
| Assembly 2 | 20 | 19 | 1 |
| Assembly 3 | 20 | 23 | 3 |
| Total | 60 | 60 | 6 |
| Day Two Assemblies | Scheduled Quantity | Actual Quantity | Differential |
|---|---|---|---|
| Assembly 1 | 20 | 22 | 2 |
| Assembly 2 | 20 | 16 | 4 |
| Assembly 3 | 20 | 22 | 2 |
| Total | 60 | 60 | 8 |
Linearity for Day 1 = (1 - (6/60)) * 100 = 90%
Linearity for Day 2 = (1 - (8/60)) * 100 = 87%
Load Tab
The Load tab provides you with two graphs that compare the load on the line to the line's capacity either by completion date or by line operation resource. Both graphs show the load and capacity for the entire line, not just for the line operation selected when you opened the workstation. The Line Load by Day graph calculates the load on the entire line for each day. The Cumulative Load by Line Operation Resource graph calculates the load for each line operation resource over a date range that you define. If you define your own date range, you must choose the Redraw Graph button to refresh the display.
Line Load by Day Graph
The Line Load by Day bar graph calculates the load (required hours) versus the capacity (available hours) of the entire line by completion date. For each completion date in the date range, it displays two bars, one representing the load, and the other representing the capacity of the entire line.
Cumulative Load by Line Operation Resource Graph
The second graph on the Load tab, the Cumulative Load by Line Operation Resource graph, compares the load for the entire line to the capacity of the line at each line operation resource. For each line operation resource, the graph displays two bars: one that shows the cumulative load on the resource assigned to the line operation, and the other that shows the cumulative capacity of the resource assigned to the line operation for the date range defined.
Even though you select a single line operation to view when you open the workstation, the graph looks at the load placed on the resource from the entire line in order to present a more accurate picture of the resource's availability. For example, on a welding line where the graph displays the load on the line's ArcWeld, SubWeld, and Welder. If the Welder is required for 10 hours at Operation 10 and 10 hours at Operation 20, the total load on the Welding resource, 20 hours, is displayed.
Properties Tab
The Properties tab displays the following information about the line operation that you selected when you opened the workstation: the line, line description, operation code, operation description prompt, and the minimum transfer quantity.
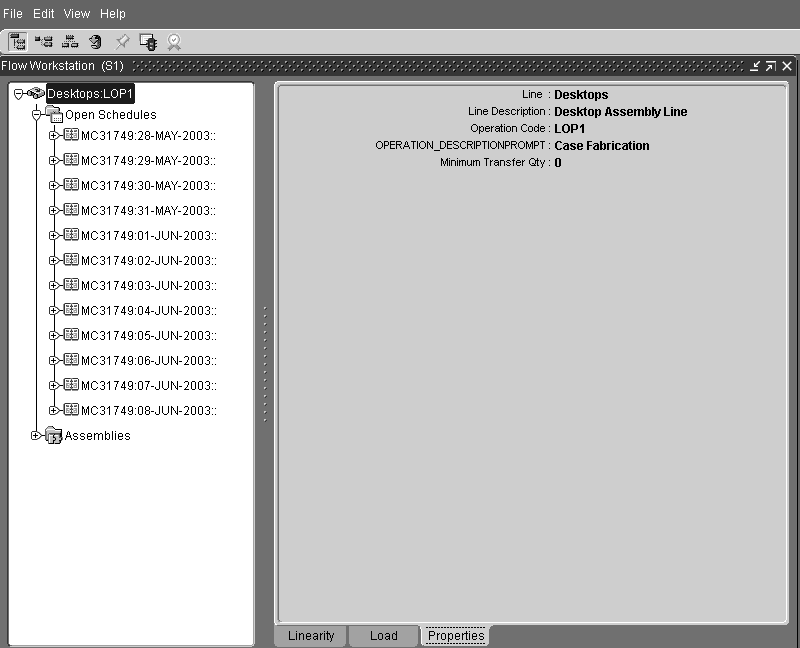
Note: An application program interface (API) enables customized attributes to display on the Properties tab. See: Customized Display for Properties Tabbed Region.
Open Schedules and Events
The Flow Workstation displays all of the open schedules, unscheduled assemblies, and events for the line operation selected.
There are three tabs of information for each open schedule, unscheduled assembly, and event listed: Component Requirements, Resource Requirements, and Properties. The Complete Line Operation and Complete Assembly buttons enable you to reduce your list of open schedules as you complete the schedules at your line operation.
The Open Schedules branch is used to display all assemblies scheduled for work at that line operation. When you select an open schedule, the events for that operation are displayed - along with component and resource requirements.
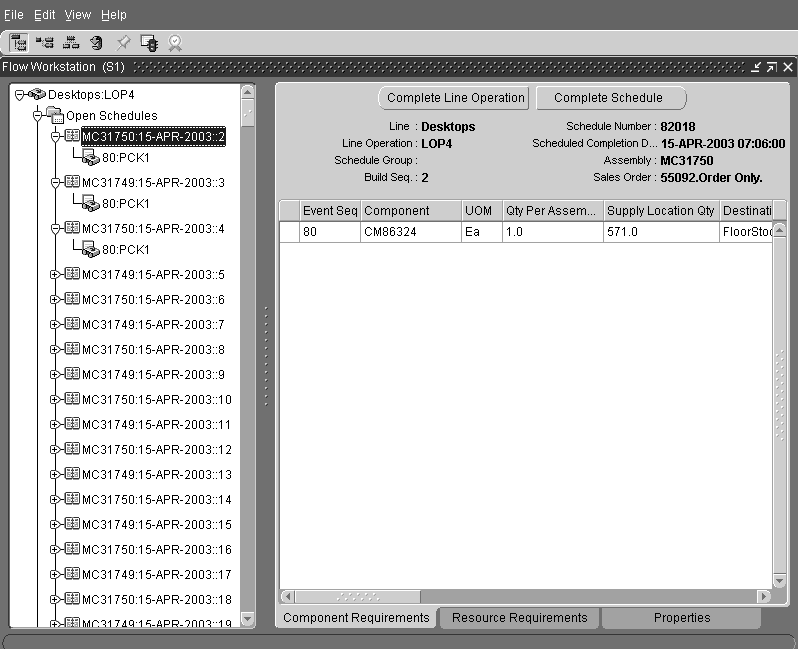
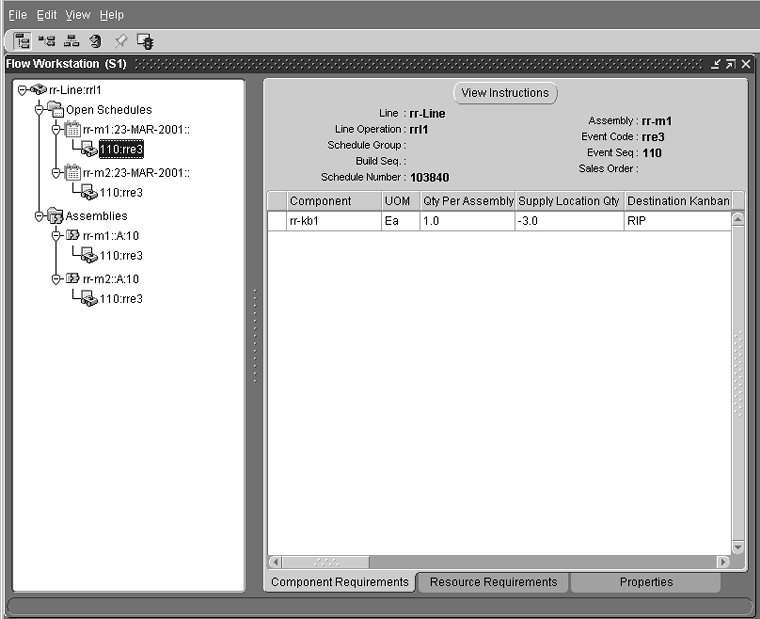
Open Schedule Component Requirements Tab
The Component Requirements tab for open schedules lists all of the components required at the line operation to make the particular assembly. It provides you with details on the line and line operation, as well as information on each required component.
The following information on the assembly's components is listed: Event Sequence, Component, Unit of Measure, Quantity Per Assembly, Supply Location Quantity, Destination Kanban Subinventory, Destination Kanban Locator, Supply Kanban Subinventory, Supply Kanban Locator, and Description.
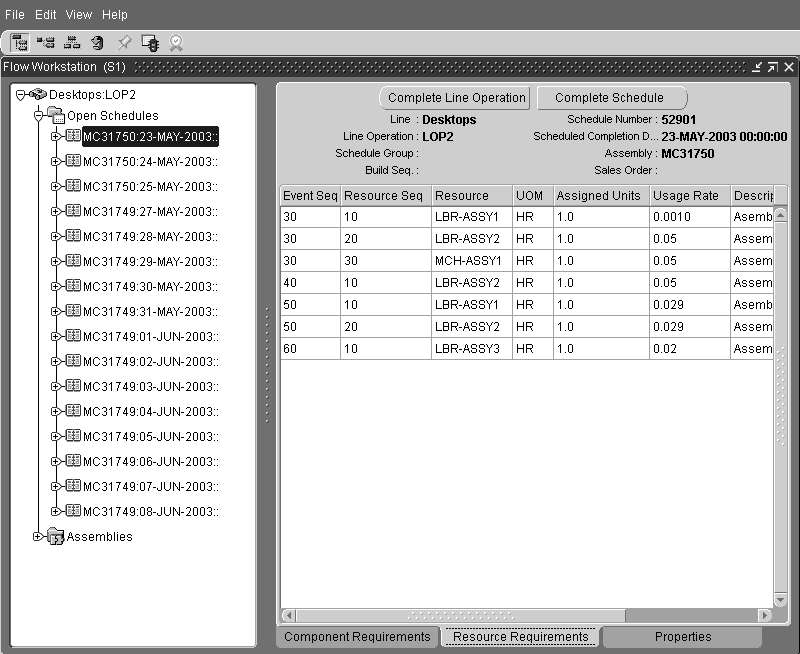
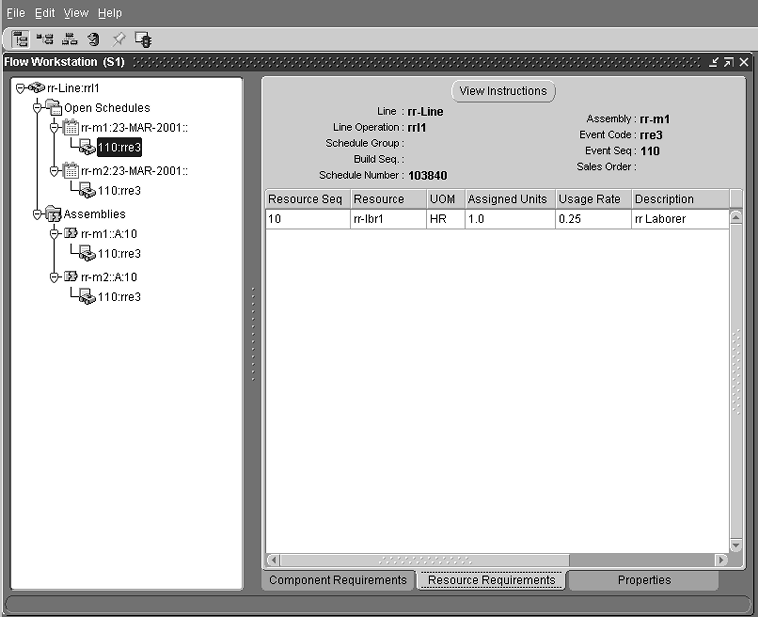
Open Schedule Resource Requirements Tab
The Resource Requirements tab lists all of the resources that are required to manufacture the particular assembly that you selected from the tree. In addition to detailed information on each required resource, the tab also provides you with information on the line and line operation.
The following information is included in this region: Event Sequence, Resource Sequence, Resource, Unit of Measure, Assigned Units, Usage Rate, Description.
Open Schedule Properties Tab
The Properties tab provides you with the following information on the Line and Line Operation and assembly: line, line operation, schedule group, build sequence, schedule number, scheduled completion date, assembly, assembly description, scheduled quantity, unit number, Bill of Material (BOM) revision, alternate BOM designator, routing revision, alternate routing designator, project, task, and sales order.
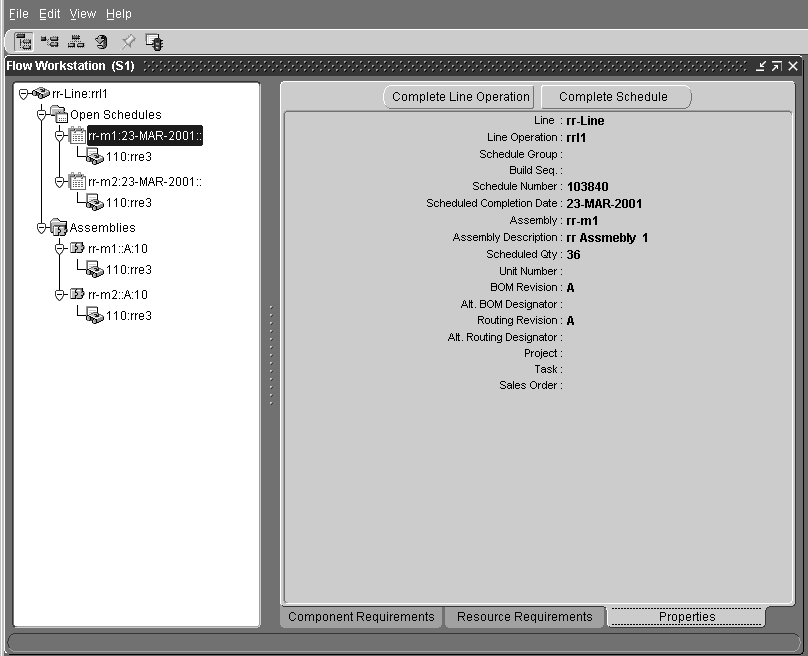
Note: An application program interface (API) enables customized attributes to display on the Properties tab. See: Customized Display for Properties Tabbed Region.
Open Schedule Events
Selecting a schedule from the list of open schedules displays the events (tasks) required to produce that assembly at that operation. For example, events for the Paint operation, might be: Sand, Paint, Finish. Each event is supported by three tabs of information: Component Requirements, Resource Requirements, and Properties.
In addition, if an attachments are associated with the assembly or any of its components, you can download them by choosing the View Instructions.
Related Topics
Defining Flow Manufacturing Standard Events, Oracle Flow Manufacturing User's Guide
Event Component Requirements Tab
The Component Requirements tab for scheduled assembly events lists all of the components required at this event to produce the assembly. The tab lists details of the line and line operation and information on each required component.
You can view the following information in this region:
-
Unit of Measure (UOM)
-
Quantity per Assembly
-
Supply Location Quantity
-
Destination Kanban Subinventory
-
Destination Kanban Locator
-
Supply Kanban Subinventory
-
Supply Kanban Locator
-
Description
Event Resource Requirements Tab
The Resource Requirements tab for scheduled assembly Events lists all of the resources required at this event to produce the particular assembly.
The tab's table provides you with the following information on the resources needed at that event including:
-
Resource Sequence
-
Resource
-
Unit of Measure (UOM)
-
Assigned Units
-
Usage Rate
-
Description
Event Properties Tab
The Properties tab for scheduled assembly Events lists the following information on the line and line operation: line, line operation, schedule group, build sequence, schedule number, assembly, event code, event description, event sequence, effectivity date, disable date, project, task, and sales order.
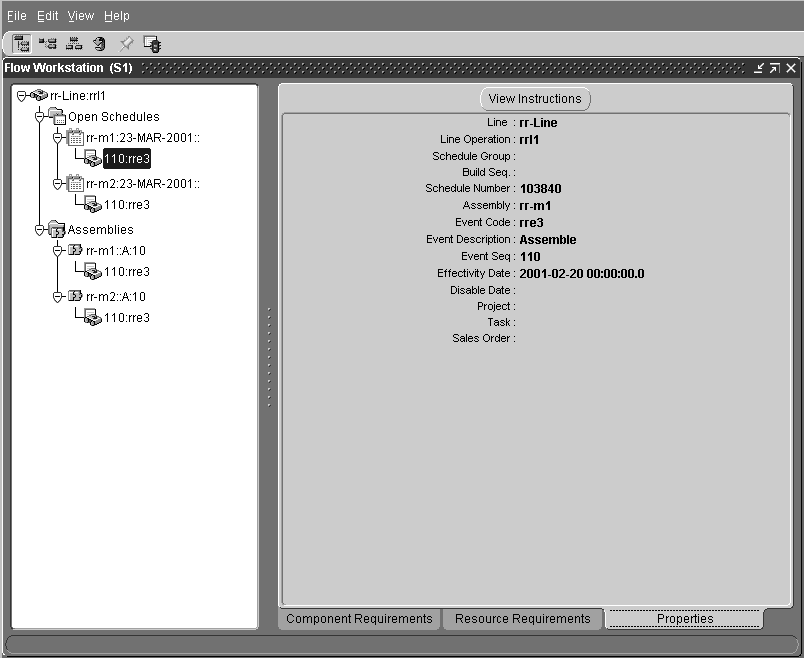
Note: An application program interface (API) enables customized attributes to display on the Properties tab. See: Customized Display for Properties Tabbed Region.
Buttons on Open Schedule Tabs
The Complete Line Operation and Complete Schedule buttons enable you to perform transactions directly from the workstation. View Instructions enables you to download attachments associated with schedules and components.
Completing Line Operations
Complete Line Operation enables you to complete a line operation by removing it from the list of open schedules and placing it on the list of open schedules for any other operation.
Note: Completing a line operation does not complete the schedule, nor does it trigger inventory transactions or charge costs. If you want to complete a schedule, you must use the Work Order-less Completions window.
When you choose Complete Line Operation, the Complete Line Operation window opens for selecting another operation for completion. If you are at the last line operation, you will be prompted to complete the schedule. If you choose to complete it, the Work Order-less Completions window automatically opens. See: Performing Work Order-less Completions.
The Flow Workstation is integrated with Oracle Quality. If collection plans exist for line operation completions, you can enter quality data. See: Integration with Oracle Quality., and Setting Up Collection Plans for Line Operation Completion Transactions, Oracle Quality User's Guide
-
On the Flow Workstation tree, select the open schedule.
-
On any of the tabbed regions displayed in the right frame of the workstation, select the Complete Line Operation button. The Complete Line Operation window opens.
If a mandatory collection plan exists for this line operation, the Enter Quality Results window from Oracle Quality automatically displays. You can also enter optional collection plan data by choosing the Quality icon on the toolbar. See: Entering Quality Results Directly, Oracle Quality User's Guide.

-
In the Next Line Operation field, select the number of the line operation that you want to move the assembly to from the field's list of values (you can move it to a previous line operation).
-
Select OK to complete the line operation and close the window. The schedule is removed from the list of Open Schedules on the workstation tree.
Completing Schedules
The Complete Schedule button is displayed on the Open Schedule Component Requirements, Resource Requirements, and Properties tabs. Selecting this button opens the Work Order-less Completions window. When you complete a schedule using the Work Order-less Completions window, components and costs are automatically backflushed and charged.
See: Performing Work Order-less Completions.
View Instructions
You can View Instructions from the Events and Properties tabs, This enables you to view any attachments that were previously associated with an open schedule or event's components and resources. Attachments may include operating instructions, drawings, memos, web pages, or any other kind of information.
When you choose View Instructions a web page displays a list of the available attachments. Select any of the attachments listed.
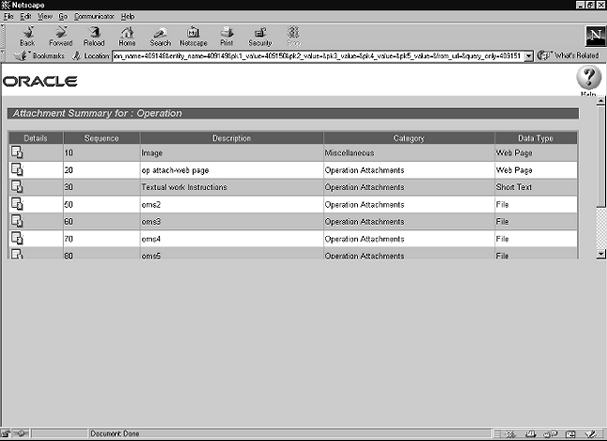
Note: If a resource, assembly, or component is associated with an attachment, an icon of a paper clip is visible next to its name.