Setup Parameters
This chapter covers the following topics:
Project Manufacturing Parameters
Use the Project Manufacturing Parameters window to enter all Project Manufacturing setup information at the inventory organization in a single place. The Project Manufacturing Parameters window includes the following setup attributes:
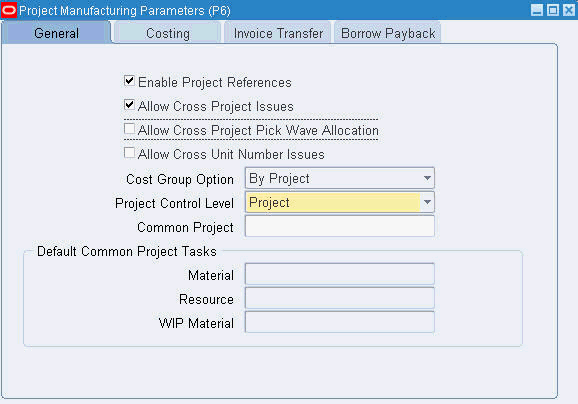
General
-
Enable Project References
-
Allow Cross Project Issues
-
Allow Cross Unit Number Issues
-
Allow Cross Project Pick Wave Allocation
-
Cost Group Option
-
Project Control Level
-
Common Project
-
Common Project Tasks
-
Material
-
Resource
-
WIP Material
-
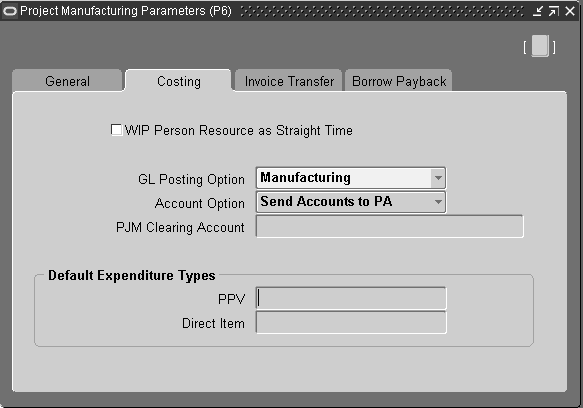
Costing
-
WIP Person Resource as Straight Time
-
GL Posting Option
-
PJM Clearing Account
-
Default Expenditure Types
-
PPV
-
Direct Item
-
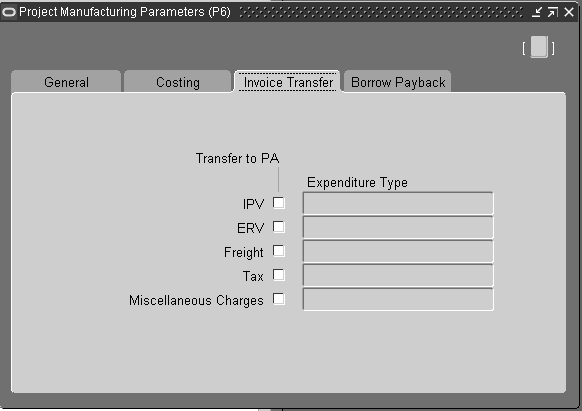
Invoice Transfer
-
Default IPV Expenditure Type
-
Default ERV Expenditure Type
-
Default Freight Expenditure Type
-
Default Tax Expenditure Type
-
Default Miscellaneous Invoice Charges Expenditure Type
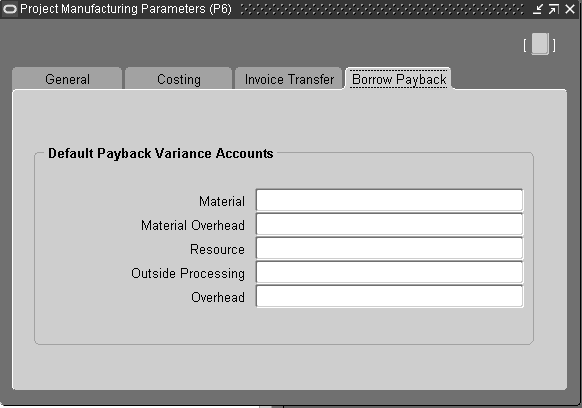
Borrow Payback
-
Default Payback Variance Accounts
-
Material
-
Material Overhead
-
Resource
-
Outside Processing
-
Overhead
-
Note: Project Manufacturing functionality is not available with Oracle Shop Floor Management and Oracle Process Manufacturing organizations.
To set up the General Attributes
-
Navigate to the Project Manufacturing Parameters window.
-
Optionally, select Enable Project References check box.
This enables Project References for the organization. You can associate project number and, optionally, task numbers with various supply and demand entities in the organization.
Note: If the LCM Enabled check box is selected in the Inventory Organization Parameters window, you cannot select the Enable Project References check box in the PJM Parameters window.
-
Optionally check Allow Cross Project Issues check box.
Check this box to allow cross project issues for projects belonging to the same planning in the inventory organization, and to allow cross unit issues based on Warehouse Management picking rules in a Warehouse Management organization.
Allow Cross Project Issues enables you to issue material from one Project or Task to another Project or Task during Component Issue/Return to a discrete job or repetitive schedule or flow schedule or Sales Order Pick (but not during Sales Order Issue). The two projects should belong to the same planning group but can be from different cost groups.
If no planning group is defined for the organization, Allow Cross Project Issues will allow material issues between all projects and tasks for the organization. Note that should both projects have no planning group associated, the projects are considered as belonging to same planning group.
-
Optionally check Allow Cross Unit Number Issues check box.
Check this box to allow cross unit number issues for projects belonging to the same planning in the inventory organization, and to allow cross unit issues based on Warehouse Management picking rules in a Warehouse Management organization.
-
Optionally check Allow Cross Project Pick Wave Allocation check box.
Check this box to allow Cross Project Sales Order Pick Wave Allocation based on WMS Picking Rules if using WMS Org.
-
Select the Cost Group Option. You can designate your cost group by project or by inventory. This should be set to Project if you want to use Project cost group based accounting. This should be set to inventory if you want to use cost group accounting based on inventory. Recommended setting for PJM Orgs using Oracle Projects for Cost Collection is “Project”.
-
Select the control level for the inventory organization: project or task.
If you enable Project References and choose the Project Control Level, you can associate projects and, optionally, tasks with the supply and demand entities.
If you enable Project References and choose the Task Control Level, you must associate tasks when you associate a project with supply and demand entities.
-
Optionally, select a Common Project.
Select a project which has been defined in Oracle Projects. If you do not use Oracle Projects, you do not need to perform this setup.
Selecting a common project enables you to track the cost of manufacturing transactions that are not associated with a specific project. This enables you to budget for common costs and to view commitments and actual, and budgeted costs for your common project on the standard Project Status Inquiry. You can set up a different Common Project for each inventory organization.
When you run the Cost Collector, the Common Project value set up on the PJM Organization Parameters window is assigned to all transactions related to common items. The common cost group cost of each item is used for common transactions. Tasks are assigned for common project transactions based on the Task Auto Assignment Rules for the common project. See: Setup for Common Project in Task Auto Assignment.
-
Select a Material task if you selected a common project.
This field is available only if Work in Process is installed, and Cost Collection is enabled for the current organization This rule becomes the default Material rule in the Task Auto Assignment rules window.
-
Enter a Resource task if you selected a common project.
This field is available only if Work in Process is installed, and Cost Collection is enabled for the current organization This rules becomes the default Resource rule in the Task Auto Assignment rules window.
-
Select a WIP Material task if you selected a common project.
This field is available only if Work in Process is installed, and Cost Collection is enabled for the current organization. This rule becomes the default WIP Material rule in the Task Auto Assignment rules window.
-
Save your work.
To set up Costing attributes
-
Navigate to the PJM Organization Parameters window and select the Costing tab region.
-
Optionally select the WIP Person Resource as Straight Time checkbox. Checking this box allows you to transfer WIP Resource employee transactions to Oracle Projects as WIP Straight Time. If you select this option, you can include WIP Straight Time hours in Oracle Projects’ summarization of hours for billing calculations. You can use Oracle Projects Burden Schedules to apply overhead to WIP Straight Time transactions.
See Work in Process Resource Employee Transactions, Oracle Cost Management User's Guide.
-
Choose your GL Posting Option. The choices are Manufacturing and Projects. This should be set to Projects if you want to use Oracle Projects as the single source for posting all transactions (manufacturing and non manufacturing) to the General Ledger. When you select the option to post the General Ledger in Oracle Projects, you can use Projects Burden Schedules to apply overhead to Project Manufacturing transactions. If you select this option and continue to apply overhead in Manufacturing, the overhead amount will be imported into Projects as raw (not burdened) cost.
See Applying Overhead Rate by Oracle Projects, Oracle Cost Management User's Guide.
-
If you selected Projects as your GL Posting Option, you must select an Account Option If you set this to Use AutoAccounting, All accounts are derived using the accounting rules engine in Oracle Projects. Inventory transactions are transferred to Projects as Inventory with No Accounts and WIP transactions are transferred as WIP with No Accounts. If you set this option to Send Accounts to PA – Cost Group and WIP Accounting Class valuation accounts are transferred to Projects. Inventory transactions are transferred to Projects as Inventory with Accounts and WIP transactions are transferred as WIP with Accounts.
-
Select your PJM Clearing Account. You must set an account as the PJM Clearing account when using the AutoAccounting. The PJM clearing account is used for balancing debit or credit when the user performs project transfer transactions.
-
Enter a Purchase Price Variance (PPV) Default Expenditure Type. This field is updateable only if you are in an organization that uses standard costs.
-
Enter a Direct Item Default Expenditure Type. This field is updateable only if you are in an Enterprise Asset Management enabled organization.
To set up Invoice Transfer attributes
-
Navigate to the PJM Organization Parameters window and select the Invoice Transfer tab region. You must check these boxes if you wish to transfer any invoice charges for an invoice charge type. For each box you check, you must select an expenditure type for the appropriate invoice charge type.
-
Optionally, check the IPV check box, and enter the default Expenditure Type.
Select an expenditure type that has been associated with expenditure type class Inventory. This value is defaulted into the Project Parameters window for each project and can be updated for a project.
If an Invoice Price Variance generates when approving an inventory/shopfloor related invoice, the Invoice Charge transfer process uses the IPV expenditure type defined in the Project Parameters window along with the IPV amount, IPV account and Expenditure Organization to transfer the IPV amount for the project to Oracle Projects.
-
Optionally, check the ERV check box, and enter the default Expenditure Type.
Select an expenditure type associated with expenditure type class Inventory. This value is defaulted into the Project Parameters window for each project and can be updated for a project.
If an Exchange Rate Variance is generated when approving an inventory/shopfloor related invoice, the Invoice Charge transfer process uses the ERV expenditure type defined in the Project Parameters along with the ERV amount, ERV account from Oracle Payables and Expenditure Organization to transfer the ERV amount for the project to Oracle Projects.
-
Optionally, check the Freight check box and enter the default Expenditure Type.
Select an expenditure type associated with expenditure type class Inventory. This value defaults into the Project Parameters window for each project and can be updated for a project.
If you use Receipt based Matching for your Invoice, and enter Freight on the distribution when approving an inventory / shop floor related invoice, the Invoice Charge transfer process uses the Freight expenditure type defined in the Project Parameters window along with the freight amount, freight account from Oracle Payables and expenditure organization from the purchase order to transfer the freight amount for the project to Oracle Projects.
-
Optionally, check the Tax check box, and enter the default Expenditure Type.
Select an expenditure type associated with expenditure type class Inventory. See: . This value defaults into the Project Parameters window for each project and can be updated for a project.
If a distribution is generated for Tax when performing receipt based matching for an inventory/shop floor related invoice, the Invoice Charge transfer process uses the ERV expenditure type defined in the Project Parameters window along with the miscellaneous amount and account from invoice distributions and expenditure organization from the purchase order to transfer the Miscellaneous charge for the project to Oracle Projects.
-
Optionally, check Default Miscellaneous Charges check box, and enter Expenditure Type check.
Select an expenditure type associated with expenditure type class Inventory. This value defaults into the Project Parameters window for each project and can be updated for a project.
If a distribution generates for Miscellaneous Charge when you perform receipt based matching for an inventory/shop floor related invoice, the Invoice Charge transfer process uses the Miscellaneous Charge tax expenditure type defined in the Project Parameters window along with the tax amount, tax account defined in Oracle Payables and Expenditure Organization from the purchase order to transfer the tax amount for the project to Oracle Projects.
-
Save your work.
To set up Borrow Payback Attributes
-
Navigate to the PJM Organization Parameters window and select the Borrow Payback tab region.
-
Optionally, enter the Default Payback Variance Accounts.
Select elemental payback variance accounts from the list of valid accounts to be used as default for all projects for the inventory organization. This set of accounts defaults to the cost group and can be updated for each cost group. The difference between the average cost at the time of payback and the original borrowing cost posts to this set of accounts for the borrowing project cost group. See: Cost Structure, Oracle Cost Management User's Guide.
-
Save your work.
Related Topics
Project Manufacturing Controls
Project Manufacturing Controls
The PJM Organization Parameter window includes conditional logic to enable/disable fields and tab pages based on other organization settings. The following table illustrates the PJM organization parameters controls.
When you check the Enable Project References check box for a new inventory organization, or change the Enable Project References check box to checked from unchecked in an existing inventory organization, the window invokes an API to modify the stock locator FlexField to add Project and Task segments.
Related Topics
Project Manufacturing Parameters
Expenditures, Oracle Project Costing User Guide.
Locators in Project Manufacturing
Locator Flexfield
Oracle Project Manufacturing reserves segment19 and segment20 of the Stock Locator key flexfield to store the project and task numbers. You should not attempt to modify these two segments.
If you are installing Oracle Project Manufacturing for the first time, the system automatically enables segment19 and segment20 of the Stock Locator key flexfield when you create the first inventory organization and check the Enable Project References check box. You can then enable additional segments to reflect your physical stock location layout.
If you are installing Oracle Project Manufacturing in an existing Oracle Applications installation and currently use segment19 and segment20 of the Stock Locator key flexfield, change the current flexfield schema and use other segments. The system does not support automatic conversion.
Project Locator
A project locator is a locator with a project or project and task reference. It is also a logical partition of a physical location. Project locators are used to track project hard pegged material. Project inventory needs to be stocked in a project locator and needs to be transacted in and out of a project locator. Since locators can be dynamically created, it is not necessary to predefine project locators.
Common Locator
A common locator is a locator without a project or project and task reference. It is also a real, physical location. Common locators are used to track common (soft pegged) material.
Note: Although a project locator is a logical partition, the system still regards it as a physical locator for physical and cycle counting.
Example
Project locators differ from common locators by the existence of values in the project and task segments in the flexfield definition of the Locator. If the structure of the physical location is Row/Rack/Bin, the structure of the Locator flexfield would be Row/Rack/Bin/Project/Task. For example, the concatenated value for a common item in Row 1, Rack 4, Bin 2 would be 1/4/2// while the concatenated value for a project item in Row 1, Rack 4, Bin 2, Project C4501, Task 2.1 would be 1/4/2/C4501/2.1.
Use of Locator
Use project locators to track inventory by project. If an inventory item needs to be identified by project, you need to turn Locator Control on for the item.
Since locators can be created dynamically (Locator Control = Dynamic Entry Allowed at item level), you do not need to predefine all project locators. Oracle Project Manufacturing provides defaulting and validation logic in order to keep the use of project locators transparent.
Related Topics
Inventory Attribute Group, Oracle Inventory User's Guide
Defining Stock Locators, Oracle Inventory User's Guide