Engineering Change Orders
This chapter covers the following topics:
- Overview of Engineering Change Orders
- User Profile Options
- ECO Departments
- Transfer or Copy from within an ECO
- ECO Life Cycle
- ECO Approvals
- Customizing the Standard Approval Process
- The ECO Approval Item Type
- Summary of the ECO Approval Process
- ECO Approval Process Activities
- Defining Engineering Change Orders
- Creating an ECO
- Viewing ECO Approval Status
- Rescheduling an ECO or Revised Items
- Changing the ECO Status
- Defining Implementation Costs
- Defining an ECO Revision
- Defining ECO Revised Items
- Viewing ECO Schedule History
- Viewing Item Revisions
- Viewing Routing Revisions
- Defining Revised Operations
- Defining Revised Resources
- Defining Revised Components
- Assigning or Deleting Substitute Components
- Assigning Reference Designators
- Attaching Files to ECOs
- Transfer to Manufacturing from an ECO
- Copy to Manufacturing from an ECO
- Mass Changing ECOs
- Implementing ECOs
- Automatic Implementation
- Cancelling ECOs and Revised Items
- Viewing ECO Schedules
- Use Up ECOs
- MRP Planning for ECOs
- Unreleased Item Revisions in Oracle Work in Process
- Implementation of ECOs on Jobs and Schedules
- Purging ECOs
- Engineering Change Orders Field Reference
Overview of Engineering Change Orders
Engineering Change Orders (ECOs) enable you to control new item revisions and bill of material changes. With one ECO you can group several bill of material changes that affect one or more bills.
You can define ECOs for all types of items and bills, including:
-
Manufacturing and engineering items
-
Bills and their components
-
Planning, model, option class, and standard items
-
Primary and alternate bills of material
An ECO specifies changes to one or more items that are logically related to each other, such as a new product introduction. Each ECO specifies changes for one or more revised items and each revised item can have one or more revised components.
Depending on the ECO type, an ECO can update only the manufacturing bills or both manufacturing and engineering bills.
You can add either engineering or manufacturing items as components on engineering bills. However, you can only add manufacturing items as components on manufacturing bills.
You can transfer or copy engineering items, bills, and routing to manufacturing as part of an ECO.
Revised Items
Revised items can be either items or bills. If a revised item is a bill, you can change the item revision and component information (revised components). If a revised item defines a new bill, you can create revised components by copying an existing bill.
Engineering changes can be defined by date and or model/unit number effectivity. You should assign an effective date and model / unit number for each revised item on an ECO. Engineering uses this information to implement the ECO and to identify past due ECOs. Each time you change a revised item's effective date, Engineering adds an entry to list effective date changes. You can also specify an early effective date that determines the earliest date that you can manually implement a change. If you do not enter an early effective date, you can manually implement the change at any time. You can reschedule an ECO by entering a new effective date. A date effective revised item can only have date effective revised components.
A unit effective revised item can have both unit and/or date effective components. All unit effective revised items must have a from end item unit number specified, if the effectivity profile is set to Unit effectivity. The from end item unit number will be null and non-updatable for date effective revised items. The to end item unit number field will also be null and non-updatable for revised components of date effective revised items If you are implementing a ECO for a unit effective component, the from unit number needs to be specified in the revised item block and the to unit number needs to be specified in the revised components block.
Note: There are two conditions under which revised items are not implemented: if the early effective date is greater than the current date, and if the user does not have access to the item type of the revised item. For example, if the revised item is a model item and the user does not have access to model items, the revised item is not implemented. The same is true for option class, planning, and standard items.
You can control whether Oracle Master Scheduling/MRP plans your proposed changes before implementation. If you have engineering changes that are firm, but whose effective date is in the future, you may want planning to consider those changes. You can choose to plan changes on any pending ECO regardless of the ECO status. Changes to the ECO status or the revised item status will automatically update the MRP active attribute. However, you can always manually set the MRP active attribute as desired.
For each revised item, you can also specify whether Engineering should update work in process material requirements. When you implement such an ECO revised item, Engineering automatically re-explodes and updates the bill of material for all unreleased jobs and repetitive schedules for that item.
Engineering also updates repetitive schedules with statuses of Released, Complete, or On hold accordingly.
Revised Components
You can add, change, or delete bill of material components and their attributes. The components and their attributes have the same restrictions as when you define a bill using Oracle Bills of Material. For example, you can only add components that are standard, model, or option class items for revised items that are model items.
Revised Operations
You can define an ECO for Operations. You can add, disable, and change Department information, Effective dates, Minimum Transfer quantities, and many other attributes.
Revised Resources
You can define an ECO for Resources. You can add, change, and disable resource information.
Revisions
When you enter a revised item on an ECO, Engineering displays the current and latest revision of the item. The latest revision could be higher than the current revision if the latest revision is on a pending ECO.
Engineering uses the ENG: Require Revised Item New Revision to control new item revisions for each engineering change. If engineering changes always correspond to new item revisions, set this profile option to Yes. Doing so will force a new item revision for all revised items on an ECO. When you require new item revisions, you can track all engineering changes to an item by revision. For example, you can group related design changes on an ECO and roll revisions for each item to reflect the latest design.
If you define related ECOs at different times, set this profile option to No so you increment the revision only once. You can then define one ECO to change the revised item revision and other ECOs that do not change the item revision. Minor changes that do not affect form, fit, or function of an item may not require new revisions.
Transfer and Copy to Manufacturing
You can transfer or copy entities to manufacturing. Transfer and copy transactions must proceed through the required approval cycles before they are implemented. The system captures all transfer and copy transactions for future reference.
ECO Access Control
Oracle Engineering controls the access to ECOs and the changes you can specify on them using profile options, security functions, item types, ECO types, and ECO departments.
ECO Types
For each ECO type, you specify if it can update engineering items. Only users whose profile option indicates they can update engineering items can choose ECO types that update engineering items.
Related Topics
Implementation of ECOs on Jobs and Schedules
Copy Engineering Items to Manufacturing
Transfer Engineering Items to Manufacturing page
Bill / Component Validation Rules, Oracle Bills of Material User's Guide
User Profile Options
User profile options control the types of items you can revise on an ECO. You can specify whether a user or responsibility can revise model and option class items, planning items, standard items, or engineering items on ECOs.
Engineering uses the following four profile options to control the types of items you can change on an ECO:
-
ENG: Engineering Item Change Order Access (engineering items)
-
ENG: Model Item Change Order Access (model and option class items)
-
ENG: Planning Item Change Order Access (planning items)
-
ENG: Standard Item Change Order Access (standard items)
Engineering enforces security for engineering items by letting only the users who are allowed to update engineering items choose ECO types that update engineering items. In addition, to update engineering bills of material for manufacturing items, you must choose ECO types that update engineering items.
Each time you try to add a revised item to an ECO, Engineering checks to see if you can update that item based on its BOM Item Type and your profile options.
For example, you might define several ECO types that can update manufacturing items, and only define one type that can update engineering items.
You might also specify profile options to control access to BOM item types by user, as shown in the following table:
| User | ECO Department | Standard Item Access | Planning Item Access | Model / Option Class Item Access | Engineering Item Access |
|---|---|---|---|---|---|
| Joe | Product Engineering | Yes | No | No | Yes |
| Mary | Mfg. Engineering | Yes | No | Yes | No |
| Fred | Customer Service | No | No | Yes | No |
| Sue | Material Planning | No | Yes | No | No |
| Dave | Production | Yes | No | Yes | No |
In the example, Joe can create ECOs that update standard items. Mary can create ECOs that update manufacturing standard items and model / option class items. But Mary is not allowed to update engineering items.
Profile Settings for Changing Bills Only With ECOs
To limit user's access to bills of material only through ECOs, set the following Bills of Material profile options to No:
-
BOM: Standard Item Access
-
BOM: Planning Item Access
-
BOM: Model Item Access
And the following Engineering profile options to Yes:
-
ENG: Standard Item Change Order Access
-
ENG: Planning Item Change Order Access
-
ENG: Model Item Change Order Access
-
ENG: Engineering Item Change Order Access.
Profile Settings for Changing Bills With or Without ECOs
With the same seven profile options listed above all set to Yes, bills can be changed with or without ECOs.
ECO Departments
You can assign users to departments and secure each ECO to a department so that only those users can access the ECO. If you do not specify a department for an ECO, any user can access it. If you do not assign a user to a department, they can access all ECOs. Setting the ENG: Mandatory ECO Departments to Yes requires you to specify a responsible department on every ECO.
You can update the responsible department as you release an ECO from the current ECO department. For example, if Product Engineering releases an ECO to Manufacturing Engineering, they can reassign the responsible department so it becomes visible and updatable to users assigned to the Manufacturing Engineering ECO department.
Related Topics
Engineering Profile Options and Security Functions
Oracle Bills of Material Profile Options, Oracle Bills of Material User's Guide
Access Control by Item Type, Oracle Bills of Material User's Guide
Transfer or Copy from within an ECO
You can transfer or copy engineering items, bills and routing to manufacturing from an ECO. When you transfer or copy an item, a bill or a routing to manufacturing, it passes through the necessary approval cycles and is implemented like other revised item changes. You can perform transfer or copy on only approved ECOs.
You can schedule transfer or copy transactions the same way you schedule revised items on an ECO. When the schedule date arrives, the items, bills and routings are automatically transferred or copied to manufacturing.
When transfer or copy of items is done through an ECO, the system captures the transaction history for future reference. It also give you the flexibility of creating all transactions when identified, and you may implement them at a later date.
Related Topics
Transfer Items to Manufacturing from an ECO.
Copy Items to Manufacturing from an ECO: page.
Transferring or Copying Engineering Items, Bills, and Routings.
Copying Bill and Routing Information, Oracle Bills of Material User's Guide.
ECO Life Cycle
Engineering uses two ECO status fields to control the ECO life cycle: ECO Status and ECO Approval Status. See: ECO Statuses.
You can change the status of an ECO. You can open, hold, release, schedule, implement, or cancel a revised item or an ECO. Engineering does not let you set the ECO Status field to Implemented or Scheduled if the approval status has not been set to Approved.
The following table illustrates a typical ECO life cycle:
| Sequence | Action | Approval Status | ECO Department |
|---|---|---|---|
| Start creating new ECO | Hold | Not Submitted for Approval | Mfg. Engineering |
| Complete data entry | Open | Not Submitted for Approval | Mfg. Engineering |
| Submit approval process | n/a | Approval Requested | Mfg. Engineering |
| Oracle Workflow controls approval process | n/a | Approval Requested | Mfg. Engineering |
| Approve and release | Released | Approved | Production |
| Production updates date | Scheduled | n/a | Production |
| Effective date arrives | Implemented | n/a | Production |
Related Topics
ECO Approvals
ECOs can be approved in three ways, two of which require an approval process. The third requires no approval process.
First, the ECO, based on the ECO type in combination with the ECO priority, can be associated with an Oracle Workflow process. Once approval is granted, Workflow automatically updates the approval status.
Second, a simple approval list can be used, which sends an Oracle Alert to all those listed requesting their approval. Once approved, you must manually update the approval status. This approval option does not require an Oracle Workflow process.
The third method is to use neither of the above; the ECO needs no formal approval process and is given the status of Approved.
If the ECO is associated with an Oracle Workflow process, only Workflow may set the status to Approved. If the ECO has an approval list, you must set the status to Approved manually after the ECO has been approved by the appropriate member(s) on the approval list.
If neither is used, the ECO is set to Approved but can be manually rejected.
The following table describes the conditions under which the different approval statuses can be used:
| Condition | Valid Approval Statuses |
|---|---|
| No approval list / no workflow approval process | Approved (default), Rejected |
| Approval list | Not Submitted for Approval (default), Ready to Approve (Oracle Alert fires), Approval Requested, Rejected, Approved |
| Workflow approval process | Not Submitted for Approval, Approval Requested, Rejected, Approved, Processing Error |
Workflow for ECO Approvals
Most organizations have some form of approval process before engineering change orders (ECOs) are implemented. By using Oracle Workflow, the approval process can be customized to meet each organization's needs.
Business rules for the approval of ECOs are defined in a workflow process. For each ECO, Workflow manages adherence to these business rules, including:
-
submission of the completed ECO for approval via Workflow
-
enforced approval process for an ECO type
-
communication of messages via Notification Viewer, electronic mail, or web browser
-
review of ECO from Notification Viewer
-
automatic processing of user responses and update of system
-
workflow status indicator for ECOs
-
usage of current approval lists (roles) in the workflow process.
Once the ECO is created, Workflow takes over processing.
When Workflow is in control of the approval process, the ECO approval status is set to Approval Requested. Before the approval status is changed, the workflow approval process can be aborted.
Workflow manages the approval process until the entire approval flow is complete. Only then is the ECO approval status updated to either Approved or Rejected. If an error occurs during the Workflow approval process, the approval status is set to Processing Error.
ECO Approval List Setup
Workflow can use roles whenever an activity involves several users. Approval lists defined in Engineering can be used to create roles. Roles are made up of either one approval list or one employee previously defined with the Enter Person window.
The ECO workflow approval process will notify all persons in the role, regardless if the role is defined using an approval list or an individual employee.
To approve (or reject) the ECO, approvers must respond to the notification. If the approver has an Oracle Applications Object Library account, they can respond to ECO approval requests using either a web browser or the Notification Viewer. If not, the approver can respond via electronic mail, provided their address is defined in the Enter Person window.
ECO Types and Priorities Setup
ECO types can be associated with a workflow process. If you do not associate an ECO type with a workflow process, there can be no workflow approval process for ECOs using that ECO type. If there is an approval list, the ECO cannot be associated with a process.
ECO types that are associated with a workflow process can optionally be associated with an ECO priority. If so, ECOs that use the type/priority combination are approved via Workflow. Doing so enables workflow approval processes to be ranked according to priority.
ECO Approval
The only user intervention required for a workflow approval process is for individual approvers to respond to an ECO approval notification. Once the process is complete, Workflow automatically updates the ECO approval status.
Related Topics
Customizing the Standard Approval Process
Once you install Oracle Engineering, you can view the Standard Approval Process in a Process window using Oracle Workflow Builder.
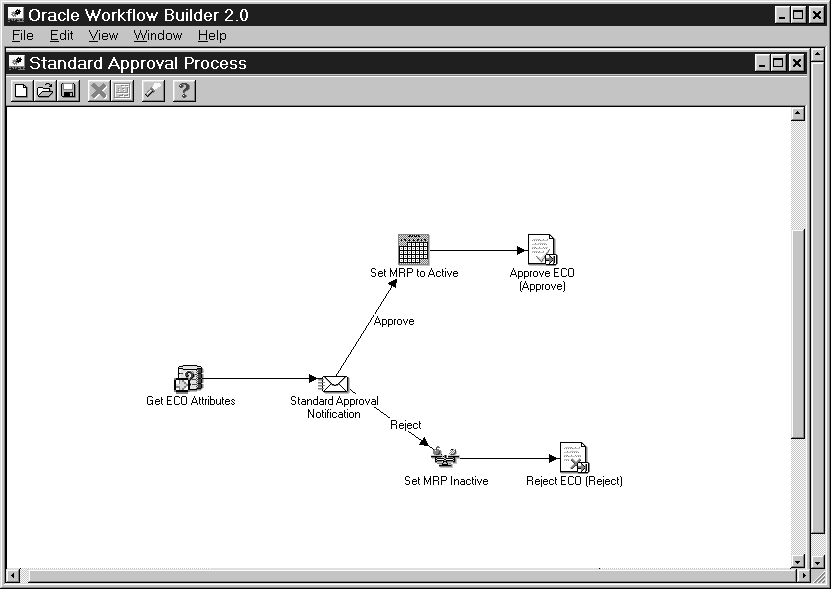
To Display the Standard Approval Process in Oracle Workflow Builder
-
Choose Open from the File menu, and connect to the database where you installed Oracle Engineering.
-
Select the ECO Approval item type.
-
Expand the data source, then the ECO Approval item type branch within that data source.
-
Expand the Processes branch within ECO Approval then double-click on the Standard Approval Process activity to display the diagram of the process in a Process window.
Required Modifications
You must make the following modifications to the Standard Approval Process before you can use it to initiate a workflow:
-
Specify an Approval for the ECO Approval Process
-
Choose Load Roles From the Database from the File menu. Select the role you wish to use for an approval.
Note: A role can represent a person or a group of persons. You must have already defined approvers and/or approval lists in Oracle Engineering.
-
Select the Standard Approval Notification activity to view its properties.
-
Enter Constant as the Performer Type. Select a Performer from the adjacent list of values.
-
Select OK to save your changes.
-
Although you can use the Standard Approval Process as is, you may want to customize the process further to accommodate your organization's specific needs.
Creating a New Custom Process
You can use the Standard Approval Process for your ECO approvals or create you own approval process using Oracle Workflow. You must install Oracle Workflow to create your own approval process.
Related Topics
ECO Approval Process Activities
The ECO Approval Item Type
The ECO Approval process is associated with an item type called ECO Approval. This item type represents the domain of all processes and activities used in the ECO Approval process and used by Oracle Engineering.
The following table presents ECO approval item type attributes:
| Display Name | Description | Type | Length |
|---|---|---|---|
| Approval Status | ECO Approval Status | Text | 80 |
| Attribute1 | Attribute1 | Text | 150 |
| Attribute2 | Attribute2 | Text | 150 |
| Attribute3 | Attribute3 | Text | 150 |
| Attribute4 | Attribute4 | Text | 150 |
| Attribute5 | Attribute5 | Text | 150 |
| Attribute6 | Attribute6 | Text | 150 |
| Attribute7 | Attribute7 | Text | 150 |
| Attribute8 | Attribute8 | Text | 150 |
| Attribute9 | Attribute9 | Text | 150 |
| Attribute10 | Attribute10 | Text | 150 |
| Attribute11 | Attribute11 | Text | 150 |
| Attribute12 | Attribute12 | Text | 150 |
| Attribute13 | Attribute13 | Text | 150 |
| Attribute14 | Attribute14 | Text | 150 |
| Attribute15 | Attribute15 | Text | 150 |
| Attribute Category | Attribute Category | Text | 30 |
| ECO | Engineering Change Order | Text | 30 |
| Change Type | Change Type | Text | 10 |
| ECO Dept Code | ECO Department Code | Text | 3 |
| ECO Dept Name | ECO Department Name | Text | 60 |
| ECO Description | ECO Description | Text | 2000 |
| ECO Status | ECO Status | Text | 80 |
| Estimated Eng Cost | Estimated Engineering Cost | Number | n/a |
| Estimated Mfg Cost | Estimated Manufacturing Cost | Number | n/a |
| Full Name | Change Requestor | Text | 240 |
| Initiation Date | ECO Initiation Date | Date | n/a |
| Organization Code | Organization Code | Text | 3 |
| Organization Name | Organization Name | Text | 60 |
| Org ID | Organization ID | Number | n/a |
| Priority Code | ECO Priority Code | Text | 10 |
| Reason Code | ECO Reason Code | Text | 10 |
| Rev ID | Revision ID | Number | n/a |
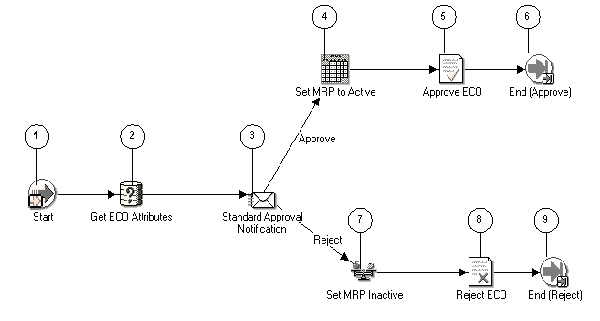
Summary of the ECO Approval Process
The ECO Approval process consists of nine unique activities as displayed in the process diagram. The ECO Approval workflow begins when you submit an approval requisition from the ECO form in Oracle Engineering. The workflow begins at node 1 with the start activity. At node 2, the function gets all required ECO attributes and sets the item attributes. The ECO Approval status is changed to Approval Requested at node 3 and users on the approval list are notified of the ECO. If the user approves the ECO, the MRP Active ECO attribute is set to YES at node 4 and the approval status is set to Approved at node 5. If the user rejects the ECO, the MRP active attributes is set to NO at node 7 and the ECO approval status is set to Rejected at node 8. The workflow process ends either at node 6 or at node 9 depending on whether the user approves the ECO.
The following diagram illustrates what is described in the text above.
ECO Approval Process Activities
This section provides a description of each activity in the process, listed by the activity's display name. Following is the legend for the information displayed, and immediately followed is the list of activities.
Start (Node 1)
This is a standard function activity that simply marks the start of the process.
-
Function - WF_STANDARD.NOOP
-
Result Type - None
-
Required - Yes
-
Prerequisite Activities - None
-
Item Attributes Set by Function - None
-
Item Attributes Retrieved by Function - None
Get ECO Attributes (Node 2)
This function gets all required ECO attributes and sets the item attributes.
-
Function - ENG_WORKFLOW_API_PKG.GET_ECO_ATTRIBUTES
-
Result Type - None
-
Required - Yes
-
Prerequisite Activities - None
-
Item Attributes Set by Function - CHANGE_NOTICE
-
ECO_DESCRIPTION
-
ECO_STATUS
-
INITIATION_DATE
-
PRIORITY_CODE
-
REASON_CODE
-
ESTIMATED_ENG_COST
-
ESTIMATED_MFG_COST
-
ATTRIBUTE_CATEGORY
-
ATTRIBUTE1
-
ATTRIBUTE2
-
ATTRIBUTE3
-
ATTRIBUTE4
-
ATTRIBUTE5
-
ATTRIBUTE6
-
ATTRIBUTE7
-
ATTRIBUTE8
-
ATTRIBUTE9
-
ATTRIBUTE10
-
ATTRIBUTE11
-
ATTRIBUTE12
-
ATTRIBUTE13
-
ATTRIBUTE14
-
ATTRIBUTE15
-
APPROVAL_STATUS
-
ORGANIZATION_CODE
-
ORGANIZATION_NAME
-
FULL_NAME
-
CHANGE_TYPE
-
ECO_DEPT_NAME
-
ECO_DEPT_CODE
-
-
Item Attributes Retrieved by Function - None
Standard Approval Notification (Node 3)
This is a standard approval notification that requests approval from users on the approval list.
-
Message - Standard Approval Message
-
Result Type - ECO Approval
-
Required - Yes
-
Prerequisite Activities - Standard Approval Message
-
Expand Roles - No
-
Notification Function - None
Set MRP to Active (Node 4)
After the user has approved the ECO, this function sets the MRP Active attribute to on for revised items with status of Open and Scheduled. This can be used to create MRP demand when the ECO's approval status is updated to Approved.
-
Function - ENG_WORKFLOW_API_PKG.SET_MRP_ACTIVE
-
Result Type - None
-
Required - Yes
-
Prerequisite Activities - Standard Approval Notification
-
Item Attributes Set by Function - None
-
Item Attributes Retrieved by Function - None
Approve ECO (Node 5)
This function sets the status of the ECO to Approved.
-
Function - ENG_WORKFLOW_API_PKG.APPROVE_ECO
-
Result Type - None
-
Required - No
-
Prerequisite Activities - Standard Approval Notification
-
Item Attributes Set by Function - None
-
Item Attributes Retrieved by Function - None
End (Approve) (Node 6)
This function ends the ECO approval process with a status of Approved.
-
Function - WF_STANDARD.NOOP
-
Result Type - None
-
Required - No
-
Prerequisite Activities - None
-
Item Attributes Set by Function - None
-
Item Attributes Retrieved by Function - None
Set MRP Inactive (Node 7)
After the user has rejected the ECO, this function sets the MRP Active attributes to off for revised items with status of Open and Scheduled.
-
Function - ENG_WORKFLOW_API_PKG.SET_MRP_INACTIVE
-
Result Type - None
-
Required - Yes
-
Prerequisite Activities - Standard Approval Notification
-
Item Attributes Set by Function - None
-
Item Attributes Retrieved by Function - None
Reject ECO (Node 8)
This function sets the status of the ECO to Rejected.
-
Function - ENG_WORKFLOW_API_PKG.REJECT_ECO
-
Result Type - None
-
Required - No
-
Prerequisite Activities - Standard Approval Notification
-
Item Attributes Set by Function - None
-
Item Attributes Retrieved by Function - None
End (Reject) (Node 9)
This function ends the ECO approval process with a status of Rejected.
-
Function - WF_STANDARD.NOOP
-
Result Type - None
-
Required - No
-
Prerequisite Activities - None
-
Item Attributes Set by Function - None
-
Item Attributes Retrieved by Function - None
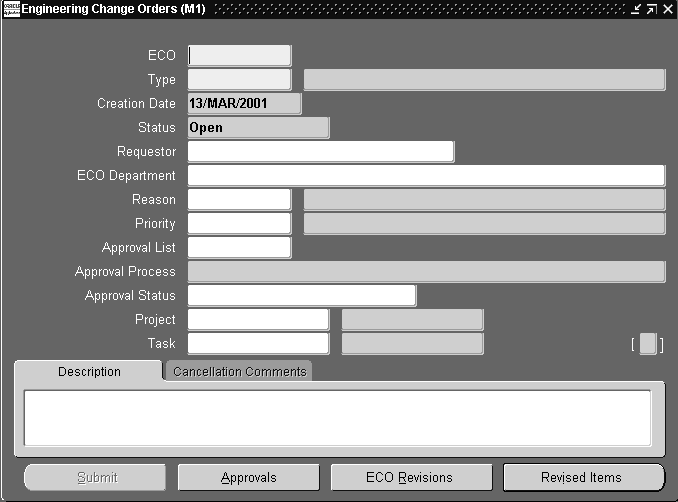
Defining Engineering Change Orders
An engineering change order (ECO) controls item revisions and bill of material changes. ECOs specify changes to one or more items and each of these items can have one or more revised components.
To define Engineering Change Orders
-
Navigate to the Engineering Change Orders window.
-
Create the ECO. See: Creating an ECO.
-
Assign an ECO approval list and status. See: Viewing ECO Approval Status.
-
Define implementation costs. See: Defining Implementation Costs.
-
Define an ECO revision. See: Defining an ECO Revision.
-
Define revised items. See: Defining ECO Revised Items.
-
Review ECO scheduling. See: Viewing ECO Schedule History.
-
Review item revisions. See: Viewing Item Revisions.
-
Define revised components. See: Defining Revised Components.
-
Review substitute components and reference designators. See: Assigning or Deleting Substitute Components and Assigning Reference Designators.
-
Optionally, attach files to ECOs. See: Attaching Files to ECOs.
-
Submit the ECO for approval or set approval status to Ready to Approve.
-
Transfer or Copy the ECO to manufacturing See: Transfer to Manufacturing from an ECO page and Copy to Manufacturing from an ECO page .
Related Topics
Rescheduling an ECO or Revised Items
Engineering Change Order Detail Report
Transferring or Copying Engineering Items, Bills, and Routings
Creating an ECO
An ECO's approval status must be Approved before the ECO can be implemented.
Note: If the approval status is Approval Requested, you cannot modify the ECO. If the approval status is Approved and the ECO is modified, the approval status will be set back to Not Submitted for Approval.
When ECO types are defined, they can optionally be associated with a priority as they are being associated with an Oracle Workflow process. When creating the ECO, if the selected ECO type / priority combination matches a defined ECO type/priority combination, the associated workflow process defaults. The approval status is set to Not Submitted for Approval until the Submit button is chosen. If there is no match between entered values and existing ECO type / priority combinations, the approval status is set to Approved and you can enter an approval list.
You can create, update and delete ECOs for the current organization, or for the current organization and all subordinate organizations in a given organization hierarchy.
You can use ECO propagate function to implement ECO in all eligibles across organization.
To create an ECO
-
Navigate to the Engineering Change Orders window.
-
Enter an alphanumeric ECO identifier. If you use ECO autonumbering, the next identifier is defaulted.
-
You can only select ECO types that can revise engineering items and bills if the ENG: Engineering Item Change Order Access profile option is set to Yes. If the selected ECO type updates engineering and manufacturing items and bills, any new bills defined on the ECO are engineering bills.
-
Indicate whether to process the ECO across all organizations within the given organization hierarchy, or for the current organization.
Note: If the checkbox is clear, then the ECO applies to the current organization. If the checkbox is selected and a value is provided in the Organization Hierarchy field, then the ECO propagate function allows ECO to be applied to the current organization and all subordinate organizations under the given organization hierarchy structure.
Important: The Organization Hierarchy driver fields apply to the ECO Header, ECO Revisions, Revised Items, Revised Components, Reference Designators and Substitute Components.
-
Optionally, enter the ECO department responsible for the ECO.
This can be used to transition the ECO from one department to another, for example, from manufacturing engineering to operations. For new ECOs, the default is derived from the ENG: ECO Department profile option.
If you specify that each ECO must have an ECO department, that is, the ENG: Mandatory ECO Departments profile option is set to Yes, then you must specify a responsible department.
Access to ECOs by ECO department is as follows:
-
You can only view and update ECOs with the same ECO department as your ENG: ECO Department profile option.
-
If you do not have a value for the profile option ENG: ECO Department, you can query and update any ECO.
-
Any user can query and update ECOs with no department reference.
-
-
Optionally, enter or select a priority for the ECO.
Note: If the ECO type and the priority combination are associated with an Oracle Workflow process, you cannot use an approval list.
-
If a workflow process is not associated with the ECO, you can enter an approval list. If you do not enter an approval list, the ECO approval status defaults to Approved without any kind of approval process.
-
Choose the ECO Revisions button to define ECO revisions. See: Defining an ECO Revision.
-
Choose the Revised Items button to define revised items. See: Defining ECO Revised Items.
-
Select the ECO status from the Tools menu. See ECO Statuses.
If the ECO status is Implement or Cancelled, the date of either status change is displayed.
-
If a workflow process is associated with the ECO, choose the Submit button to start the process.
Related Topics
Unreleased Item Revisions in Oracle Work in Process
Implementation of ECOs on Discrete Jobs and Repetitive Schedules
Engineering Profile Options and Security Functions
Creating Organization Hierarchies, Using Oracle HRMS-The Fundamentals
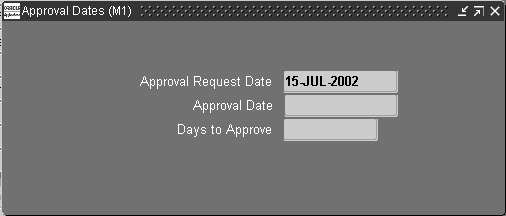
Viewing ECO Approval Status
If an approval list is used, the approval status can only be changed manually, pending formal approval from a list member.
If a workflow process is associated with the ECO (based on the ECO type / priority combination), the approval status is changed automatically.
If neither a list nor a process is used, you must manually select either Approved or Rejected.
To view approval dates
-
Select View Dates from the Tools menu. The approval request date, the approved date (if applicable), and the days to approve are displayed for reference.
To view workflow approval status
-
If a workflow process is associated with an ECO, Select View Approvals from the Tools menu to view the approval status of the ECO.
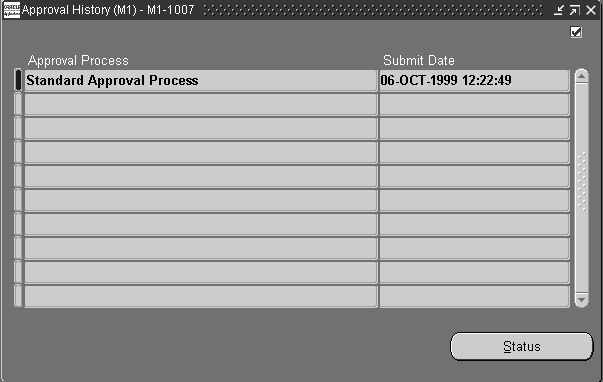
-
Highlight the desired Approval Process, and select the Status button.
Related Topics
Rescheduling an ECO or Revised Items
You can reschedule ECOs or ECO revised items unless their status is Cancelled or Implemented.
Important: Rescheduling does not change the ECO or revised item status, only the dates.
To reschedule an ECO or Revised Items
-
Choose Reschedule from the Tools menu from either the Engineering Change Orders window or the Revised Items window.
-
Do one of the following:
-
Choose OK to save your work.
If you entered this window from the Engineering Change Orders window, choosing OK will reschedule all pending revised items (those with the status of Open, Hold, Schedule, or Release) for this ECO.
If you entered this window from the Revised Items window, this will reschedule only the selected revised item.
Related Topics
Overview of Function Security, Oracle E-Business Suite System Administrator's Guide
Implementing Function Security, Oracle E-Business Suite System Administrator's Guide
Changing the ECO Status
You can change the ECO status and the ECO revised item's status to Open, Hold, Release, Schedule, Implement, or Cancel.
The approval status of an ECO must be Approved before the ECO can be implemented.
The following table describes the conditions regarding Workflow under which the status can be changed:
| Status | Without Workflow | With Workflow: Before Approval | With Workflow: After Approval | With Workflow: Approval in Process |
|---|---|---|---|---|
| Open | Yes | Yes | Yes | No |
| Hold | Yes | Yes | Yes | No |
| Released | Yes | Yes | Yes | No |
| Scheduled | Yes | No | No | No |
| Rescheduled | Yes | Yes | Yes | No |
| Cancel | Yes | Yes | Yes | No |
| Implement | Yes | No | Yes | No |
To change the ECO status
-
Navigate to the Engineering Change Orders window.
-
From the Tools menu, choose the status (Open, Hold, Release, Schedule, Implement, or Cancel). See: ECO Statuses.
-
If you are cancelling the ECO, select the Cancel Comments pop list to enter comments.
-
Save your work.
Related Topics
Starting the AutoImplement Manager
Engineering Profile Options and Security Functions
Defining Implementation Costs
Estimate the implementation costs to engineering and to manufacturing of the ECO. Oracle Engineering uses this information only for the purpose of reference.
To define manufacturing and engineering costs
-
Go to Tools menu and choose Enter Costs.
-
Enter a cost for engineering
-
Enter a cost for manufacturing.
Defining an ECO Revision
-
Navigate to the ECO Revisions window. Do this by choosing the ECO Revisions button from the Engineering Change Orders window.
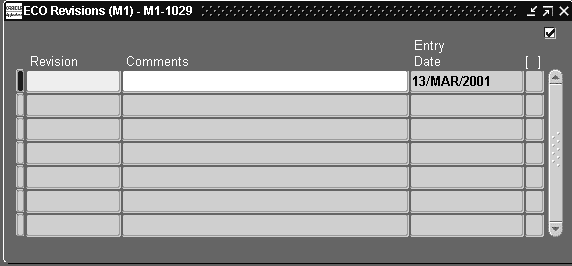
-
The date that you entered the ECO is displayed for reference.
-
Save your work.
Defining ECO Revised Items
Each ECO can list one or more revised items whose form, fit, or function needs revision.
Any revised item can have an associated bill of material. You can create a bill for a revised item (if one does not exist) by copying it from another bill or by adding components to it.
To define revised items
-
Navigate to the Revised Items window. Do this by choosing the Revised Items button from the Engineering Change Orders window.
-
Enter or select an item to change with this ECO.
Note: You can create a bill for the item (if one does not exist) by choosing the Components button and adding components in the Revised Components window.
-
Optionally, enter an alternate for the item. You can create or update alternate bills using an ECO.
-
Optionally, enter a new revision for the revised item.
This must be greater than or equal to the current revision. If you create or update an alternate bill of material, you cannot assign a new item revision.
You must enter a new revision for the revised item if you set the ENG: Require Revised Item New Revision profile option to Yes.
-
Optionally, enter an item Description.
You do not have the ability to enter an item description if you enter an alternate for the item.
-
Optionally, enter a Routing Revision.
This must be greater than or equal to existing revisions. You cannot enter any revisions if you selected a Model/Unit effectivity item in the Item field. If you entered a revised item that should not have routings, then the Routing Revision field will be disabled.
-
Enter an effective date for the item and component changes.
This date is used to implement the revised item and identify past due revised items.
If you select a use-up date for this item and its components, a record is created that indicates this revised item is based on the use-up date of the item. If the MRP planning process computes a new use-up date before this revised item is implemented, Engineering automatically sends an alert to the planner.
-
Choose a status for the ECO revised item from the Tools menu. See: ECO Revised Item Statuses.
Note: You can set the revised item status to Hold, Released, Implemented, or Cancelled only if the ECO status is Open. Otherwise, the revised item status defaults from the ECO status.
If the ECO has a Workflow process and the item or its components are changed, the revised item's status is changed from Scheduled to Open and the approval status is changed to Not Submitted for Approval.
-
Indicate whether the revised item is MRP Active, that included in the planning process. The default is No if the Status is Hold; Yes if the Status is Open, Release, or Schedule.
If the ECO lists engineering changes and has an effective date in the future, you may want the planning process to consider those changes.
-
Open the Item Details tabbed region and view the description and the user-defined item type for that item.
-
Optionally, open the Dates tabbed region and enter the Early Effective date. This is the earliest date you can manually implement the revised item.
If applicable, the Cancelled date for the changes of the revised item and its components, or the Implemented date for the revised item is displayed.
The Implemented field indicates the date the revised item was implemented and the Implemented By field indicates either that the revised item was implemented manually from the Tools menu or implemented automatically.
-
Open the Use Up Details tabbed region and do the following:
-
If not already selected, enter the item whose use-up date is tied to the revised item effective date. The use-up item can be the revised item itself or a component of the revised item.
-
View the use-up item associated with the use-up date selected as the effective date.
-
View the name of the MRP plan to use for determining item use-up dates.
-
-
Open the Routing Details tabbed region and do the following:
-
Indicate whether CTP is enabled. This attribute is derived from the routing header information if the revised item has existing routing information. If routing information does not exist, routing header information is created automatically when you enable this attribute.
-
Enter a priority value for this item.
-
Choose a valid subinventory.
-
Enter Locator information. If the completion subinventory does not have a valid location, or the revised item's Locator Control attribute is set to No Control, then this field is disabled. If the revised item's Locator Control attribute is set to Dynamic Entry, then this field is enabled.
-
-
Open the Work in Process tabbed region and indicate whether to update WIP requirements for unreleased jobs or schedules when the revised item is implemented.
-
Select a disposition for inventory and work in process inventory affected by the ECO. See: Disposition.
-
Open the Cancel Details tabbed region to view the cancellation date and cancel comments.
-
Choose the History button to view revised item effective date history and track schedule changes to the revised item. Choose the Revisions button to view item revisions. Choose the Components button to add, change, or disable components.
Related Topics
Defining Material Dispositions
Viewing ECO Schedule History
View revised item effective date history and track schedule changes to revised items.
To view ECO schedule history
-
Navigate to the History window. Do this by choosing the History button from the Revised Items window.
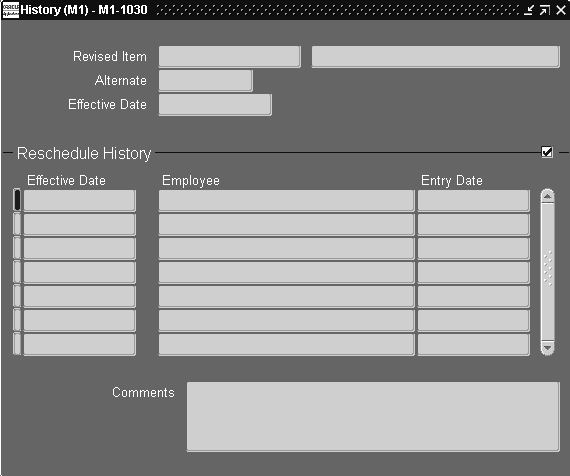
A history of all previous effective dates and their entry date is listed for the revised item.
-
View the employee who initiated the change to the effective date and any comments describing the change to the effective date.
Related Topics
Engineering Change Order Detail Report
Viewing Item Revisions
-
Navigate to the Item Revisions window. Do this by choosing the Revisions button from the Revised Items window.
-
Review the displayed information:
The revision, the effective date and time, the implementation date, the initiation date, and the ECO are displayed for information purposes.
Note: : When creating an item revision, to support revision identification, you can specify both Revision Code and Revision Label. You can then quickly review an item revision by selecting this combination from the Item Revisions drop down list in the Revisions page.
Related Topics
Viewing Routing Revisions
-
Navigate to the Routing Revisions window. Do this by choosing the Routing Revisions button from the Revised Items window.
-
Review the displayed information:
The revision, the effective date and time, the implementation date, and the related ECO are displayed for information purposes.
Related Topics
Defining Revised Operations
Enter, disable, and update information for a revised item's operations.
To define revised operations
-
Navigate to the Revised Operations window. Do this by choosing the Operations button from the Revised Items window.
-
Enter or select an action to take:
Add: Add an operation and the operation's resources. If there is no existing operation, then a new routing header should be created.
Change: Change operation attribute and resource information.
Disable: Disable the operation from the revised item's bill. The resources which are associated with the operation should be disabled.
-
Enter the Operation Sequence Number of the target operation. If you selected the Add action, enter a new operation sequence number. If you selected the Change or Disable actions, enter an existing operation sequence number.
-
Indicate whether this operation will be referenced if you selected the Add action. If you selected a standard operation, then this flag is turned on automatically. If you selected the Change action, then this flag is disabled.
-
Enter the Department Code. If you selected the Add action, or the Change action and a standard operation, enter an existing department code.
-
Enter the date the operation is to be disabled in the Disable Date field. If you selected the Disable action, the system date is entered automatically.
-
Indicate whether this operation is option dependent if you selected the Add action, or the Change action and did not select the reference flag.
-
Enter the Operation Lead Time if you selected the Add or Change actions. If an operation lead time is smaller than zero or greater than 100, then an error message will be shown.
-
Open the WIP tabbed region and enter the following attributes:
-
If you selected the Add action, or the Change action and did not select the reference flag, you can update the Count Point flag.
-
If you selected the Add action, you can update the Autocharge flag.
-
If you selected the Add action, or the Change action and did not select the reference flag, you can update the Backflush flag.
-
If you selected the Add action, or the Change action and did not select the reference flag, you can enter the Minimum Transfer Quantity.
-
-
Open the Operation Yield tabbed region and do the following:
-
Enter the Yield if you selected the Add or Change actions. Operation Yield is applicable to lot-based jobs, and is used to track variances between estimated and actual scrap absorption. See: Defining a Department, Oracle Bills of Material User's Guide
-
Enter the Cumulative Yield if you selected the Add or Change actions. See: Yield, Oracle Bills of Material User's Guide.
Note: These fields can be updated for operations belonging to lot-based routings, and are applicable for Shop Floor Management enabled organizations.
-
Related Topics
Item and Operation Sequence, Oracle Bills of Material User's Guide
Effective Date Fields, Oracle Bills of Material User's Guide
Defining Revised Resources
Enter or disable information for a revised operation's resources.
If the Reference Flag in the Revised Operations window is selected, then you cannot add or disable resources.
To define revised resources
-
Navigate to the Operation Resources window. Do this by choosing the Revised Resources button from the Revised Operations window.
-
Enter or select an action to take:
Add: Add a resource to the operation.
Change: Change existing resource information.
Disable: Disable the resource from the operation. Designate an existing resource sequence number.
-
Enter the Resource Sequence Number. If you selected the Add action, enter a new resource sequence number. If you selected the Disable action, enter an existing resource sequence number.
-
Enter the Resource Code. If you selected the Add action, select a resource belonging to the selected department in the Revised Operations window.
Note: The UOM field is derived from the Resource attribute and is read-only.
-
Enter the Basis Type. If you selected the Add or Change actions, select Item or Lot. See: Basis, Oracle Bills of Material User's Guide.
-
Enter the Usage Rate or Amount if you selected the Add or Change actions. Once you enter or change this value, the Inverse will be calculated automatically.
-
Enter the Inverse Rate or Amount if you selected the Add or Change actions. Once you enter or change this value, the Usage will be calculated automatically.
-
Open the Scheduling tabbed region and do the following:
-
Indicate whether this resource is available 24 hours. Once selected, you cannot update this value.
-
If you selected the Add or Change actions, enter a Schedule Sequence Number.
-
Enter the number of units assigned to this resource.
-
Select the Schedule option. Available options are Yes, No, Prior, and Next.
-
If you selected the Add or Change actions, enter the Offset percentage. This number should be greater than or equal to zero, and less than or equal to 100.
-
Indicate whether this is the principle resource in the operation, if you selected the Add or Change actions.
-
Enter the Setup Type Code for this resource.
-
-
Open the Costing tabbed region and do the following:
-
Select an Action. You can Add or Change costing information. Costing information must be defined for each resource.
-
Select whether to cost at the standard rate.
-
Select a Charge Type if you selected the Add action. If you selected the Change action, you can change the Charge Type but cannot enter an autocharge type of PO Move or PO Receipt for a resource without Outside Processing enabled. You can select Manual or WIP Move.
-
Related Topics
Defining Revised Operations, Oracle Engineering User's Guide
Item and Operation Sequence, Oracle Bills of Material User's Guide
Defining Revised Components
Enter and update change information for a revised item's components.
To define revised components
-
Navigate to the Revised Components window. Do this by choosing the Components button from the Revised Items window.
-
Enter or select an action to take:
Add: Add a component to the revised item's bill of material. If a bill does not already exist, adding components creates one.
Change: Change usage information for the component of the revised item's bill.
Disable: Disable the component from the revised item's bill.
-
Enter a component on the bill.
-
Do the following:
-
If you are changing component information, enter the old operation sequence where the component is currently assigned.
-
If you are changing the component's operation sequence, enter a new operation sequence (from the routing) for the component of the revised item. The default is 1 for components being added where no routing exists.
-
Enter the item sequence of the item on the bill of material. The default is the next highest item sequence.
-
Enter the component quantity used by this particular revised item. For components you are changing, you can see the old component's quantity in the Old Quantity field when you change or disable a component. In ECO form, when disabling a component the value in Old Quantity field is defaulted into New Quantity field, and 1 for components you are adding.
-
For components you are adding or changing, enter an inactive date for the revised component.
-
-
Review the item's description, revision, and whether it is an engineering item in the Item Details tabbed region.
-
Open the Component Details tabbed region and do the following:
-
Enter the planning percent for optional components on model and option class bills, and all components on planning bills. Oracle Master Scheduling/MRP uses planning percentages for planning bill explosions. You can enter quantities over 100 percent to overplan. See: Planning Percent, Oracle Bills of Material User's Guide.
-
Enter a component yield factor. You cannot enter component yield for an option class item or for any components of a planning bill. The default is 1, indicating 100% yield. See: Yield, Oracle Bills of Material User's Guide.
-
Indicate whether to include the cost of this component in the cost of its parent item for the cost rollup.
-
View the component item type and status.
-
-
Open the Material Control tabbed region and select a supply type, a subinventory, and a locator. See: Supply Type, Oracle Work in Process User's Guide and Subinventory and Locator, Oracle Bills of Material User's Guide.
-
Open the Order Entry tabbed region and do the following:
-
Indicate whether to Check ATP. See: Check ATP, Oracle Bills of Material User's Guide.
-
Indicate whether the component is optional and mutually exclusive. See: Mutually Exclusive and Optional, Oracle Bills of Material User's Guide.
-
For optional components, enter the minimum and maximum sales order quantities. See: Minimum and Maximum Quantities, Oracle Bills of Material User's Guide.
-
Select a basis. See: Basis, Oracle Bills of Material User's Guide.
-
-
Open the Shipping tabbed region and indicate whether the component should be listed on shipping documents, required to ship, or required for revenue. See: Shipping Details, Oracle Bills of Material User's Guide.
-
If the component is cancelled, open the Cancel Details tabbed region. Once the component is cancelled, you can no longer update any information about the revised component on this ECO.
Note: You can cancel revised components by choosing Cancel from the Tools menu.
-
Choose the Substitutes button to open the Substitute Components window. Choose the Designators button to open the Reference Designators window.
Related Topics
Assigning Reference Designators
Assigning or Deleting Substitute Components
Item and Operation Sequence, Oracle Bills of Material User's Guide
Effective Date Fields, Oracle Bills of Material User's Guide
Assigning or Deleting Substitute Components
Assign or delete suggested substitute items for the revised component. You can assign any number of substitute items to each bill component and you can assign the same substitute item to more than one component.
To assign or delete substitute components
-
Navigate to the Substitute Components window. Do this by choosing the Substitutes button from the Revised Components window.
-
Enter an action: add a substitute item to, or delete a substitute item from the revised component.
-
Enter or select a substitute item for the revised component. This must be a manufacturing item.
-
Enter the quantity of the substitute item needed to replace the full component quantity.
This can differ from the bill usage quantity of the component. The default is the usage quantity of the component.
Assigning Reference Designators
To assign reference designators to the revised component
-
Navigate to the Reference Designators window. Do this by choosing the Designators button from the Revised Components window.
-
Indicate whether to relate component quantity to the number of reference designators.
Off: Assign any number of reference designators to each component (the default). The number of reference designators is independent of the component quantity. With Quantity Related unchecked, if the usage quantity of the component is four, you could, for example, define six or more reference designators.
On: Use one reference designator per usage of the component. The component usage quantity must be a positive integer in order for you to use this option. When the bill requires a quantity of four of a given component, you assign four reference designators to that component, one for each usage.
The number of reference designators implemented for the revised component is displayed. This value is 0 until the ECO is implemented.
Also, the total number of reference designators currently defined for the revised component is displayed.
-
Select an action: add to or delete a range of reference designators from the revised component.
Engineering enables you to view a prefix, suffix, and number range to assign to a sequence of reference designators.
Related Topics
Creating Reference Designators, Oracle Bills of Material User's Guide
Attaching Files to ECOs
You can attach text and files, such as spreadsheets, graphics, and OLE objects to engineering change orders.
For example, an attached file may include comments, such as a graphical representation of the bill structure or detailed instructions.
To attach files to ECOs
Related Topics
Working With Attachments, Oracle E-Business Suite User's Guide
Transfer to Manufacturing from an ECO
You can transfer engineering items, bills and routing to manufacturing from within an ECO.
To transfer entities to manufacturing from within an ECO
-
Select the Transfer Button from the Engineering Change Orders window.
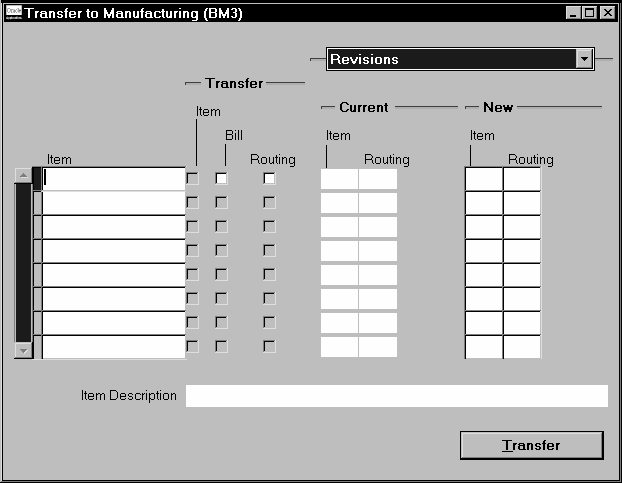
-
Enter an Item and select Bill and Routing if applicable.
-
Enter the Effective Date of the item.
-
Enter the Early Effective date if applicable.
-
Select the Revisions tabbed region.
-
Select the Selections tabbed region.
-
Select the Selection Option from the list. The available selections are:
All: All past, current or future components and or operation steps associated with the assembly.
Current: All current components and or operation steps associated with the assembly that are effective on the Selection Date.
Future and Current: All current and future components and or operation steps associated with the assembly.
-
Enter the Selection Date.
-
Enter the Unit Number if applicable.
-
Save your work.
-
Select the History button to view the transaction history.
Related Topics
Transferring or Copying Engineering Items, Bills, and Routings
Copy to Manufacturing from an ECO
Copying Bill and Routing Information, Oracle Bills of Material User's Guide
Copy to Manufacturing from an ECO
You can copy engineering items, bills and routings to manufacturing from within an ECO.
To copy entities to manufacturing from within an ECO
-
Select the Copy Button from the Engineering Change Orders window.
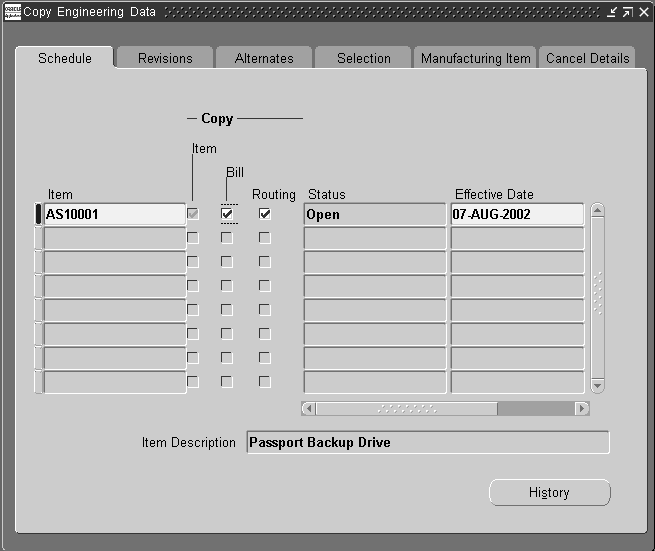
-
Enter an Item and select Bill and Routing if applicable.
-
Enter the Effective Date of the item.
-
Enter the Early Effective date if applicable.
-
Select the Revisions tabbed region. For information on the Revisions tabbed region and the Alternates tabbed, See:Transferring or Copying Engineering Items, Bills, and Routings
-
Select the Selections tabbed region.
-
Select the Selection Option from the list. The available selections are:
All: All past, current or future components and or operation steps associated with the assembly.
Current: All current components and or operation steps associated with the assembly that are effective on the Selection Date.
Future and Current: All current and future components and or operation steps associated with the assembly.
-
Enter the Selection Date.
-
Enter the Unit Number if applicable.
-
Select the Manufacturing Items tabbed region.
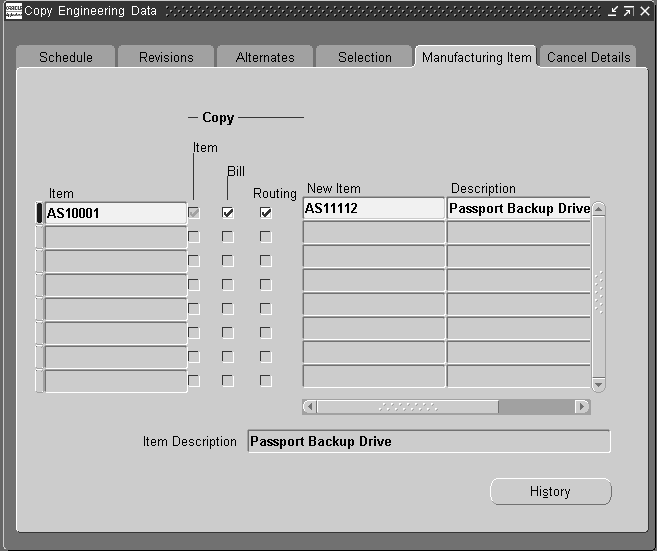
-
Enter a new item name and description.
-
Save your work.
-
Select the History button to view the transaction history.
Related Topics
Transferring or Copying Engineering Items, Bills, and Routings
Transfer to Manufacturing from an ECO
Copying Bill and Routing Information, Oracle Bills of Material User's Guide
Mass Changing ECOs
You can define a mass change to add, delete, or replace a component, alter a component quantity or yield, or change other component information. You can mass change all using bills of material or choose a subset of bills by item range, item category, or item type.
Engineering lets you create an ECO based on your parent item and component criteria. A mass change ECO lists all using assemblies that meet your search criteria as revised items, and assigns all component changes as revised components. You can manage and implement each revised item, or the entire ECO, the same way you maintain revised items you manually assign to an ECO.
Note: In Bills of Material, mass changes take place immediately. However, in Engineering, an ECO is created that must be implemented to take effect.
To mass change ECOs
-
Mass change the bills of material as needed. Be sure to set ECO options.
Related Topics
Engineering Profile Options and Security Functions
Mass Changing Bills of Material, Oracle Bills of Material User's Guide
Implementing ECOs
When you implement an ECO, each revised item's status is marked as "implemented"; you can no longer reschedule it. You can implement all revised items on an ECO, or implement each revised item on a different date. Engineering only lets you implement ECOs that do not have an approval status of Rejected, or do not have an ECO status of Hold or Cancelled. Once you implement an ECO or revised item, you can no longer make any revised item changes.
You can manually implement revised items on an ECO or you can automatically implement each revised item on its effective date. Engineering updates the actual implementation date for each revised item when it is implemented. When all of the revised items on an ECO have been implemented, the ECO is completely implemented and can be purged.
Engineering implements an ECO over time from the earliest revised item effective date to the latest revised item effective date. When you spread multiple changes across several ECOs, you should ensure that the effective date ranges for the ECOs do not overlap. For example, if you implement changes to a bill of material across many ECOs, you should make sure that the revised item effective dates do not overlap. If you implement one change using the current revision, you should implement all other changes to the current revision before you implement changes against future revisions.
Important: You must implement new revisions in ascending order. If you implement a later revision for an item on one ECO, Engineering ensures that you implement any subsequent revisions for the item in ascending order.
Manual Implementation
For an ECO, you can specify whether to implement all or specific revised items. An ECO can be implemented today, but will not make the changes to the revised items effective until the date specified on the change order.
Automatic Implementation
To AutoImplement a revised item on an ECO, you mark the revised item status as 'scheduled' and specify an effective date. You can schedule all revised items on an ECO for auto-implementation, or schedule each revised item individually. Engineering automatically implements scheduled changes on their effective dates.
You can automatically implement scheduled ECOs in the current organization, or the current organization including all subordinate organizations. You have the ability to specify the organization hierarchy name, since the current organization can be accessed from more than one organization hierarchy. You can also automatically implement scheduled ECOs in all organizations having the same item master organization as the current organization, and if they are accessible by the user responsibility.
Start the AutoImplement Manager process so Engineering implements scheduled changes daily.
To manually implement an ECO
-
Enter or select an ECO to implement.
-
Choose Implement from the Tools menu. Doing so automatically changes the status of all revised items.
To manually implement a revised item on an ECO
-
Select a revised item to implement.
-
Choose Implement from the Tools menu.
Note: A warning message appears if the ECO does not have a Workflow process and the revised item's effective date is in the future.
To automatically implement an ECO
-
Navigate to the Engineering Change Order window.
-
Enter or select an ECO to implement.
-
Set the ECOs status and/or the status of revised items to Scheduled.
-
Save your work.
-
Start the AutoImplement Manager.
The following parameters are provided:
-
All Organizations
-
Organization Hierarchy
Note: If the All Organizations parameter is set to Yes, then processing is done for all organizations having the same item master organization as the current organization. If All Organizations is set to No, and a value is provided in the Organization Hierarchy field, then processing is done for the current organization and all subordinate organizations. If the Organization Hierarchy field is left blank, then the ECO is implemented only for the current organization. For processing, an organization must be accessible by the user responsibility. You can specify a periodic schedule for the concurrent program. In this case, the user should set the processing interval, start date, and end date.
-
Related Topics
Engineering Profile Options and Security Functions
Starting the AutoImplement Manager
Implementation of ECOs on Discrete Jobs and Repetitive Schedules
Creating Organization Hierarchies, Using Oracle HRMS-The Fundamentals
Cancelling ECOs and Revised Items
You can cancel an entire ECO, a revised item on an ECO, or the individual revised components on an ECO before it is implemented. When you cancel an ECO, you can enter comments that explain the reason for cancellation.
Cancelling an entire ECO cancels all the revised item changes and the changes to their associated revised components. Cancelling a specific revised item cancels only the changes that affect that item and its revised components. Once you cancel an ECO you cannot update it, but you can view a cancelled ECO.
Cancelling a revised component only affects that revised component for that revised item. The cancel date and comments about the cancelled component can be viewed in the Revised Components window, Cancel Details tab.
To cancel the entire Engineering Change Order
-
Navigate to the Engineering Change Order window.
-
Find the ECO to cancel.
-
Choose Cancel from the Tools menu.
-
Save your work.
-
Cancel the ECO, its revised items, and the associated revised components by choosing Cancel from the Tools menu.
-
Cancel a revised item by choosing the Revised Items button on the Engineering Change Orders window, and choosing Cancel from the Tools menu.
-
Cancel a revised component by choosing the Components button from the Revised Items window and choosing Cancel from the Tools menu.
-
-
Save your work.
To cancel an ECO's revised items
-
Find the ECO containing revised items to cancel.
-
Choose the Revised Items button.
-
Select the revised items to cancel.
-
Choose Cancel from the Tools menu.
-
Save your work.
To cancel components of a revised item
-
Find the ECO containing components of revised items to cancel.
-
Choose the Revised Items button.
-
Select the revised item containing components to cancel.
-
Choose the Components button.
-
Select the components to cancel.
-
Choose Cancel from the Tools menu.
-
Save your work.
Related Topics
Engineering Profile Options and Security Functions
See Material Requirements Planning in the Oracle Master Scheduling/MRP User's Guide
Viewing ECO Schedules
View ECO information, including scheduling information, pending and implemented ECOs, approval status, revised item status, and so on.
To view ECO schedules
-
Enter search criteria in the Find ECOs window
-
Select how to sort ECOs-by ECO identifier then effective date, or by effective date then ECO identifier.
-
Optionally, enter revised item information:
-
Choose the Find button to find ECOs based on your search criteria.
This opens the View ECOs folder window which has three tabbed regions, each containing specific ECO information: Revised Items, ECO Details, and Use Up.
-
Choose the New and Open buttons to navigate to the Engineering Change Orders window. Using the New button enables you to create a new ECO; using the Open button enables you to view an existing ECO.
Related Topics
Using Query Find, Oracle E-Business Suite User's Guide
Using Query Operators, Oracle E-Business Suite User's Guide
Searching For Information, Oracle E-Business Suite User's Guide
Performing Query-by-Example and Query Count, Oracle E-Business Suite User's Guide
Defining Engineering Change Orders
Customizing the Presentation of Data in a Folder, Oracle E-Business Suite User's Guide
Use Up ECOs
Oracle Master Scheduling/MRP automatically computes and stores the use-up date for each item it plans on each MRP plan. The use-up date is the date when on-hand quantity is exhausted based on projected gross requirements. It calculates the use-up date by applying any on-hand quantity in inventory (supply) against any gross requirements (demand). When calculating the date, it does not consider scheduled receipts or repetitive schedules as supply.
Revised Item Effective Dates Linked to Use-Up Dates
When you define a revised item on an ECO, you can base the revised item effective date on the use-up date of another item.
When you define a revised item on an ECO, you can select the use-up date for all components of the revised item and the use-up date of the revised item itself for all MRP plans that include those items. Doing so will default the plan name and use-up item. The revised item effective date is now linked to a use-up date.
Alternatively, for a revised item, you can select a use-up item, which can be any component of the revised item or the revised item itself. But since the plan name is not specified, the revised item effective date is not linked to a use-up date.
Use-Up Alerts
Engineering uses Oracle Alert to automatically notify planners whenever the MRP planning process computes a new use-up date for an item if it is a use-up item for an ECO revised item. For example, if revised item A specifies item B as its use-up item (so the revised item effective date for A equals B's use-up date), then if the MRP planning process computes a different use-up date for B, Oracle Alert notifies the planner for A that B's use-up date no longer equals the revised item effective date for A.
Related Topics
Overview of Planning Logic, Oracle Master Scheduling/MRP User's Guide
Reviewing the Horizontal Plan, Oracle Master Scheduling/MRP User's Guide
MRP Planning for ECOs
Oracle Master Scheduling/MRP lets you consider unimplemented ECOs when you plan material requirements and considers use-up date changes in some cases.
Unimplemented ECO Revised Items Planning
When you define an ECO, specify whether the MRP planning process should plan for an ECO revised item. This lets you order material and plan resources that you need to build a future revision in advance. When the MRP planning process explodes requirements for a planned order based on a planned order start date, it generates requirements considering component changes introduced on ECO revised items so specified.
Use-up ECOs Planning
The planning process automatically changes revised item effective dates and considers those new effective dates in the current MRP plan only when the use-up date changes and the revised item is the use-up item. The planning process then uses the updated effective date for component changes when it explodes requirements for planned orders.
Related Topics
Material Requirements Planning, Oracle Master Scheduling/MRP User's Guide
Unreleased Item Revisions in Oracle Work in Process
In Work in Process, you can open discrete jobs or schedules considering pending engineering changes. Each user can define a job with released, scheduled, and implemented engineering changes, but you can control whether a user or a responsibility can define a job considering unreleased engineering changes.
If you set the WIP: Exclude Open ECOs profile option to Yes, Work in Process sees the effects of only released, scheduled, and implemented ECO revised items when you choose a revision or revision date and when Work in Process explodes the bill of material. Work in Process also considers open (unreleased) ECOs if you set this profile option to No.
Related Topics
Overview of Discrete Manufacturing, Oracle Work in Process User's Guide
Overview of Repetitive Manufacturing, Oracle Work in Process User's Guide
Implementation of ECOs on Jobs and Schedules
You can indicate whether to update work in process requirements when you implement an ECO revised item. When you implement the revised item that is set to update work in process, the bill of material is automatically re-exploded and updated for all unreleased discrete jobs and repetitive schedules for the item.
If you have updated component material requirements for the unreleased job or schedule, you lose these updates after you implement the revised item.
Released, Complete, and On hold Repetitive Schedules
For repetitive schedules, if you have not moved assemblies beyond the Queue intraoperation step of the first operation, Work in Process automatically regenerates the bill and component requirements for the repetitive schedule to include the effects of the ECO.
If you have moved assemblies beyond the Queue intraoperation step of the first operation, when you implement the ECO, Work in Process splits the schedule into two schedules that take the place of the original schedule. The first schedule uses the original bill and the second new schedule uses the revised bill that includes any revised item or component changes. Work in Process assigns the two new schedules a status of Released, Complete, or On hold, depending on the status of the original schedule.
The schedule splits based on the number of assemblies in process (moved past the Queue intraoperation step of the first operation if you are using routings) on the original routing. That number is rounded up to the nearest day so that you can finish your day's work using the original bill. The next day production starts using the revised bill and a new schedule.
The following example best illustrates this procedure.
Example
Released Schedule:
-
Production rate = 50 per day
-
Process days = 4 days
-
Total quantity of schedule = 200 units
-
Throughput = 1 day
The following diagram illustrates the original schedule:
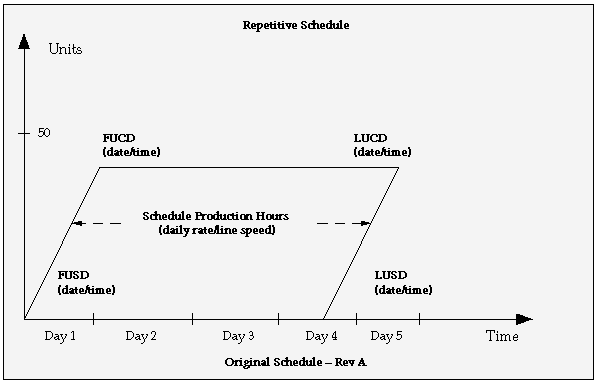
Shop floor distribution of assemblies before the implementation of the ECO for the original schedule:
-
80 units spread in the routing beyond queue of the first operation
-
120 units in queue of the first operation
Original schedule dates:
-
First unit start date = Day 1
-
First unit complete date = Day 2
-
Last unit start date = Day 4
-
Last unit complete date = Day 5
Since the daily quantity is 50, this means that production is in its second day. Therefore, if you implement the ECO now, the schedule splits after the second day's work is completed.
If you implement a change order for the item on Day 3 (Today), the shop floor distribution of assemblies following the implementation of the ECO are:
New Schedule 1 = 100 total units
-
20 units in queue of the first operation
-
80 units spread in the routing beyond queue of the first operation. These 80 units are located exactly where they were before the implementation of the ECO.
New Schedule 2 = 100 total units
-
100 units in queue of the first operation. The reason that there are only 100 assemblies and not 120 assemblies is that only two process days remain in the schedule; therefore, only two process days worth of assemblies can be put into new schedule 2.
Schedule dates following the implementation of the ECO:
New Schedule 1:
-
First unit start date = Day 1
-
First unit complete date = Day 2
-
Last unit start date = Day 2
-
Last unit complete date = Day 3
New Schedule 2:
-
First unit start date = Day 3
-
First unit complete date = Day 4
-
Last unit start date = Day 4
-
Last unit complete date = Day 5
The following diagram illustrates the split schedule:

All material that you issued to the original schedule remains with new schedule 1. Material requirements for new schedule 1 are changed to match the new number of assemblies to complete. Material requirements for the altered assembly are exploded for new schedule 2 for the number of assemblies assigned to the new schedule 2.
Related Topics
Overview of Discrete Manufacturing, Oracle Work in Process User's Guide
Overview of Repetitive Manufacturing, Oracle Work in Process User's Guide
Purging ECOs
You can purge fully implemented engineering change information from the database. You can choose a range of ECOs and a date. Engineering purges all fully implemented or cancelled ECOs on or before that date.
When you purge ECOs, Engineering removes all implemented and cancelled ECOs as of that date from the database, along with all related information (except for the revision history of the bill itself). You cannot view or report ECO information once you purge it.
To purge an ECO
-
Navigate to the Purge Engineering Change Order window. See: Submitting a Request, Oracle E-Business Suite User's Guide.
-
Enter a range of ECOs to purge.
-
Indicate whether to purge implemented ECOs.
-
Indicate whether to purge cancelled ECOs.
-
Enter a date on or before which all implemented and/or cancelled ECOs are purged.
Engineering Change Orders Field Reference
This section describes the use of certain major fields.
ECO Statuses
Whenever this status is updated, the status of all revised items is also updated.
| Open | The ECO is not complete; you can still make changes. MRP Active is defaulted to on. |
| Hold | The ECO cannot be implemented. The status of all pending revised items is set to Hold. MRP Active defaults to off. |
| Release | The entire ECO is released from the currently responsible ECO department. The status of all pending revised items is set to Released. MRP Active defaults to on. |
| Schedule | The ECO is scheduled for auto-implementation. An ECO can only have this status if the approval status is Approved. MRP Active defaults to on. |
| Implement | The ECO is implemented manually. You can no longer make changes to an implemented ECO. |
| Cancel | No more changes allowed. All unimplemented revised items are cancelled. |
Note: If the organization hierarchy is selected when creating an ECO, the ECOs having approval process will be propagated with an 'Open' status.
ECO Revised Item Statuses
These statuses are updated by changes to the ECO status.
| Open | Changes to the revised item are still in process or not complete. The MRP active attribute will be updated to Yes. This is the default. |
| Hold | Changes to the revised item are on hold; you cannot implement them. |
| Release | Changes to the revised item have been released and can be implemented manually. The revised item has not been scheduled for auto-implementation. |
| Schedule | The revised item is scheduled for auto-implementation. You can only set the revised item to Schedule if the ECO status is Approved. The MRP active attribute is updated to on. |
| Implement | The revised item has been implemented manually or automatically. You cannot list additional changes for implemented revised items. |
| Cancel | The revised item has been cancelled. |
ECO Approval Statuses
If you do not tie an Oracle Workflow process to the ECO, the only valid approval status is No Approval Needed.
| Not Submitted for Approval | The ECO has not been submitted to the Workflow approval process. |
| Approval Requested | Engineering has started the Workflow process. |
| Rejected | Cannot schedule or implement the ECO or any revised items. |
| Approved | Approved for release, to schedule, or to implement. |
| Processing Error | Indicates that an error occurred while Workflow was processing the ECO approval. |
| Ready to Approve | Generate an approval Alert. |
Disposition Field
These values describe the disposition of inventory and work in process inventory affected by an engineering change order (ECO).
| No change required | The ECO does not affect the revised item in WIP and inventory. This is the default. |
| Scrap WIP and inventory | Scrap the revised item in WIP and inventory when you implement the revised item. |
| Scrap only inventory | Scrap the revised item only in inventory when you implement the revised item. |
| Scrap only WIP | Scrap the revised item only in WIP when you implement the revised item. |
| Rework inventory and WIP | Rework the revised item in WIP and inventory when you implement the revised item. |
| Rework only inventory | Rework the revised item only in inventory when you implement the revised item. |
| Rework only WIP | Rework the revised item only in WIP when you implement the revised item. |
| Exhaust WIP and inventory | Use the revised item until you exhaust WIP and inventory for the item. |
| Exhaust only WIP | Use the revised item until you exhaust WIP for the item. |
| Exhaust on serial number | Use the revised item until it reaches a particular serial number. |