Setting Up
This chapter provides information on setting up Oracle Bills of Material.
This chapter covers the following topics:
- Related Product Steps
- Setup Steps
- Defining Bills of Material Parameters
- Creating Alternates
- Creating Custom Deletion Statements and Constraints
- Creating a Department Class
- Defining a Department
- Assigning Resources to a Department
- Defining a Resource
- Defining Resource Setup Information
- Using the Workday Calendar
- Defining Lookups
- Assigning View-only Privileges to Forms
- Bills of Material Profile Options
- Subscribing to Bills of Material Business Events
Related Product Steps
The following steps may need to be performed to implement Oracle Bills of Material. These steps are discussed in detail in the Overview of Setting Up sections of other Oracle product user's guides.
-
Performing system-wide setup tasks such as configuring concurrent managers and printers
-
Managing data security, which includes setting up responsibilities to allow access to a specific set of business data and complete a specific set of transactions, and assigning individual users to one or more of these responsibilities
-
Setting up Oracle Workflow
-
Defining items in Oracle Inventory. See: Defining Items, Oracle Inventory User's Guide.
Setup Steps
Some of the steps listed are Required and some are Optional. You need to perform Optional steps only if you plan to use the related feature or complete certain business functions.
While you can set up Oracle Bills of Material in many different ways, and defer optional set up steps until you are ready to use the corresponding functionality, we recommend you use the order suggested in the following list.
For each step, a Context section indicates whether you need to repeat the step for each set of books, set of tasks, inventory organization, HR organization, or other operating unit under Multiple Organizations.
-
Set Profile Options (Required)
Profile options specify how Oracle Bills of Material controls access to and processes data. In general, profile options can be set at one or more of the following levels: site, application, responsibility, and user.
Oracle Bills of Material users use the Personal Profile Values form to set profile options only at the user level. System administrators use the System Profile Values form to set profile options at the site, application, responsibility, and user levels. See: Oracle Bills of Material Profile Options.
Context: Perform this step once for each entity, that is, organization operating unit, business group, or legal entity.
-
Define Exception Templates (Optional)
You can define your own exception templates. When you assign an exception template to your workday calendar, you can assign workday exceptions to account for plant workday differences-such as holidays, scheduled maintenance, or extended downtime.
Context: Perform this step once per installation.
-
Define and Build your Workday Calendar (Required)
You define a workday calendar for one or more organizations, and assign an exception set to each calendar. For each workday calendar and exception set, you assign a list of holidays or workday exceptions. You then define shifts for your workday calendar, and assign any shift workday exceptions.
After you define your workday calendar information, you build your workday calendar with the exception set. If you associate one calendar with multiple organizations, you can build your workday calendar with multiple exception sets to account for workday differences across organizations.
Important: If you use Oracle Master Scheduling/MRP, choose the calendar options 445 weekly quarter pattern or 544 weekly quarter pattern if you want to report MRP information in weeks and months. Otherwise, if you choose 13 period calendar or Regular calendar months, you can only report MRP information in monthly buckets.
Context: Perform this step once per installation.
-
Assign Workday Calendar to Organization (Required)
You assign a workday calendar and exception set to each of your organizations. You can share the same workday calendar across organizations with either the same or a different exception set for each organization.
Default: If you skip this step, <enter value here> will be used as the default value.
Context: Perform this step once per organization.
-
Define Bill of Material Parameters (Required)
You assign the maximum number of bill of material levels for bill explosions, loop checks and implosions. For assemble to order manufacturers, you assign configuration item information.
Oracle Cost Management does require that you assign values to each parameter if you compute an organization's manufacturing costs based on bill of material and routing information defined in Oracle Bills of Material.
Context: Perform this step once per organization.
-
Define Department Classes (Optional)
You can define department classes to group departments and to identify manufacturing cells. This information is for your reference only.
Context: Perform this step once per organization.
-
Define Resources (Optional)
You can define a resource as anything of value, except material and cash, required to manufacture, cost, and schedule products. Resources include people, tools, labor purchased from a supplier, and physical space.
Context: Perform this step once per organization.
See: Defining a Resource.
-
Define Resource Setup Information (Optional)
Define resource setup information to create a performance model for machines and resources that includes time needed to change from one setup to another.
Context: Perform this step once per organization.
-
Define Resource Groups (Optional)
You can group department resources by resource group to facilitate bill of resource generation and capacity planning in Oracle Capacity.
Context: Perform this step once per installation.
See: Defining a Resource.
-
Define Competencies for Resources
You can define competencies for resources while assigning employees to the resources. The competency, skill levels and qualification must match the requirements for the resource. You can only add those resources that meet the requirements to the resource instance. The skill definition of the resource cannot be changed if there are employee instances assigned to the resource.
Note: If you want to change the skills for the resource, then delete all employee instances for the resource and then change the skills.
-
Define Competencies for Routings
Define the competencies required for both standard and non-standard operations and update competencies as required.
-
Define Competencies for Standard Operations
You can define the competencies of the resource to perform the operation.
-
Define Simulation Sets (Optional)
You can group deviations to available resource capacity for resource shifts and use each set in shop floor scheduling and capacity planning.
Context: Perform this step once per installation.
See: Defining a Resource.
-
Define Locations (Optional)
You define delivery locations for departments with outside processing resources.
Context: Perform this step once per organization.
See: Defining a Resource.
-
Define Departments (Optional)
You can define departments as areas within your organization where you perform work and/or collect costs.
Context: Perform this step once per organization.
See: Defining a Department.
-
Assign Resources and Resource Shifts to Departments (Optional)
You can assign resources to a department and then assign shifts to those resources. You can group department resources by resource group, and assign a simulation set with capacity modifications for each resource shift.
Default: If you skip this step, <enter value here> will be used as the default value.
Context: Perform this step once per organizational department.
-
Define Overheads (Optional)
You can define resource overhead by using the Define Overhead form. Each overhead sub-element has a default basis, default activity, and absorption account. The overhead absorption account offsets your corresponding overhead cost pool in the general ledger.
Context: Perform this step once per organizational resource.
See: Defining a Resource.
-
Associate Overheads with Departments (Optional)
You can assign overhead rates or amounts to your department by cost type and department. The cost rollup uses the assigned basis type to allocate the overhead charge. The cost rollup assigns the activity to the calculated overhead cost. You can define pending rates and use the cost rollup/update process to change the pending rates to Frozen overhead rates.
Context: Perform this step once per organizational department.
See: Defining a Department.
-
Define Alternates (Optional)
You can define any number of alternate names that you use when you create alternate bills of material and routings. You use alternate bills and routings to produce an identical product using a different bill or routing. You can apply the same alternate name to a bill of material and a routing.
Context: Perform this step once per organization.
-
Define Standard Bill of Material Comments (Optional)
You can define any number of standard bill of material comments that you can assign to your bills of material.
Context: Perform this step once per organization.
-
Define Standard Instructions (Optional)
You can define any number of operation instructions that you can assign to a routing operation or standard operation.
Context: Perform this step once per organization.
-
Define Change Order Types (Optional)
You can define mass change order types, using your own terminology, to describe mass changes to your manufacturing bills of material.
Default: If you skip this step, Oracle shipped change order types will be used as the default value.
Context: Perform this step once per installation.
-
Define Delete Statements and Constraints (Optional)
Oracle Bills of Material provides a list of rules to determine if an item, bill of material or routing can be deleted and a list of delete instructions. Each rule insures data integrity across all Oracle Manufacturing applications. You can add to this list with your own business rules to further restrict the entities that can be deleted. You write each of your delete constraints as a SQL select statement that either prevents or lets a user delete an item, bill, or routing. Once the delete constraint selects the data to be deleted, the delete statement provides the SQL delete statement used to delete the selected data.
Default: If you skip this step, Oracle shipped delete constraints and statements will be used as the default values.
Context: Perform this step once per organization.
-
Define Lookups (Optional)
Oracle Applications provides a consolidated method across all applications for defining codes. Bills of Material codes you can define include:
-
Bonus Codes
-
Scrap Codes
-
Resource Down Codes
-
Resource Capacity Change Reasons
Context: Perform this step once per organization.
See: Defining Lookups.
-
-
Assign View-only Privileges to Forms (Optional)
The system administrator can assign view-only privileges to certain forms by user. For example, most users do not need the ability to define or update department information. The system administrator can restrict all but the user who maintains department information from adding or updating departments, while still enabling everyone to view the Departments window.
Context: Perform this step once per responsibility.
Defining Bills of Material Parameters
Use bill of material parameters to define modes of operation and default values for an organization that affect functions such as bill definition, bill deletion, and assemble-to-order configuration numbering.
Define bill of material parameters for each organization in which you use bills or routings. (Bill parameters are specific to, and must be defined for, each organization.) Doing so ensures access to resource, outside processing, and overhead cost information for certain cost management functions.
To define bill of material parameters
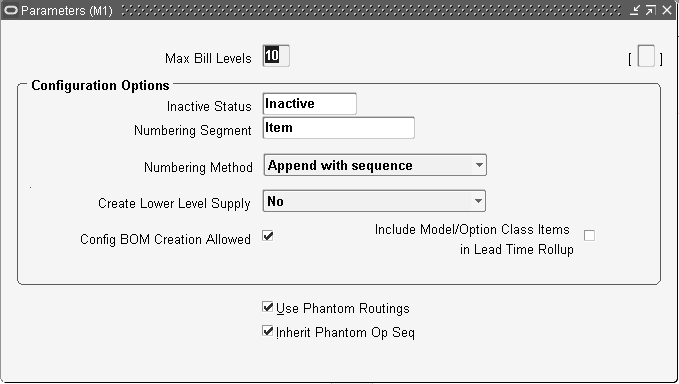
For configurations only
All fields in the Configuration Options box apply only to configured items. See: BOM Parameters, Oracle Configure to Order Process Guide, for more detailed information about each field.
-
Enter the numbering segment to use when creating configuration item numbers.
-
Select an automatic or user defined numbering method. A unique configuration item number is automatically assigned based on the numbering method you select:
Append Sequence: Appends a sequence number to the item segment you entered for the numbering segment.
Replace with Sequence: Replace the item segment you entered in the numbering segment with a sequence number.
Replace with Order, Line Number: Replace the item segment you entered for numbering segment with the sales order and line number.
User Defined: Allows you to define a numbering scheme that meets your business needs.
-
Select one of the following in the Create Lower Level Supply field:
-
No (default value)
The system creates supply only for the top level assemble to order (ATO) item or configuration.
-
Auto Created Configuration Items Only
Creates supply for any lower level configuration generated because of the specific sales order configuration.
Note: This option does not create supply for any lower level configuration that was matched to a preconfigured item.
-
Auto Created Configuration Items and ATO Items
Creates lower level supply for all ATO items, preconfigured items, and autocreated configured items.
Note: Supply is created even for ATO items set up as standard mandatory components on the model bill. Only use this option if you do not expect to have inventory on hand for your ATO items and preconfigured items.
This parameter indicates whether or not the system creates supply for lower level configurations and assemble to order items when progressing an order on-line in Oracle Order Management, or when using the Autocreate FAS batch program.
-
-
Check the Config BOM Creation Allowed box to allow the creation of configuration bills of material in the organization.
Check this box in all organizations in which you plan to manufacture or purchase your configurations. Uncheck the box in those organizations where a model BOM exists, but a configuration BOM is not necessary. For example, leave the box unchecked for an Order Management validation organization that is not a manufacturing organization.
-
Check the Include Model/Option Class Items in Lead Time Rollup box to include models and option classes when rolling up cumulative lead times.
If you leave this box unchecked, the cumulative lead time calculations are not performed for model or option classes.
For all bills of material
-
If you would like Work in Process to maintain the individual operation sequence numbers for phantom subassemblies, and to charge their resource and overhead costs to the parent or higher level assembly, you set the following two parameters in Oracle Bills of Material:
Use Phantom Routings: Set this parameter to specify whether phantom routing resources and overhead costs (including those for outside processing resources assigned to phantom routing operations) are charged to the parent or higher level assembly. Setting this parameter also implies department inheritance for resources; thus, phantom resources can be used by departments that they are not owned by or assigned to as a borrowed resource. You set the parameter at the inventory organization level and it then applies to all phantoms within a single inventory organization. These are its two values:
-
Yes: If you select this value, phantom routing components and resources and overheads are included in the cost of the higher level assembly. Routing resource costs are also included in capacity planning.
-
No: This is the default. This value specifies that only components are included in the higher assembly's cost, not resources and overheads.
Inherit Phantom Op Seq: Set this parameter to specify whether phantom subassembly components inherit the operation sequence number of their parent or higher level assembly, or maintain their own operation sequence number. This parameter is set at the inventory organization level, and applies to all phantoms within a single inventory organization. The parameter has these two values:
-
Yes: This is the default. This value specifies that phantom subassembly components inherit the operation sequence number of their parent or higher level assemblies.
-
No: If you select this value, phantom subassembly components maintain their own operation sequence numbers.
-
Related Topics
Overview of Configure To Order
Bills of Material Parameters Report
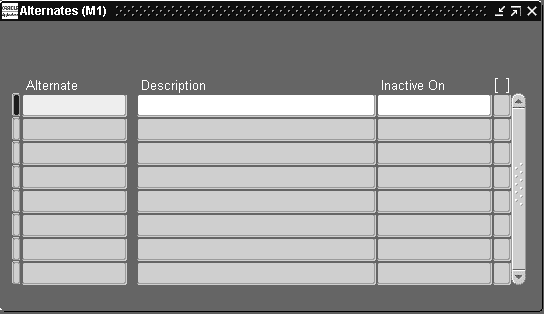
Creating Alternates
An alternate bill describes an alternate list of component items that produce an assembly. An alternate routing describes an alternate manufacturing process that produces an assembly.
To create or update an alternate
-
Navigate to the Alternates window.
-
Enter an alphanumeric string to describe a unique alternate.
-
Enter a date that the alternate is inactive on. As of the inactive date, you can no longer assign the alternate to a bill of material or routing.
Related Topics
Primary and Alternate Bills of Material
Primary and Alternate Routings
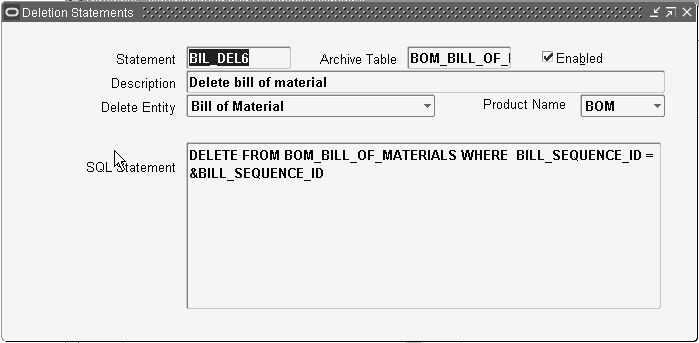
Creating Custom Deletion Statements and Constraints
You can create custom deletion statements to specify from which database table to delete data that meets the deletion constraint criteria. Create custom deletion constraints to enforce your unique business rules. Custom deletion constraints identify the rows in a table that meet certain conditions for deletion.
Oracle provides seeded deletion statements and constraints, which you can view using the Deletion Statements and Deletion Constraints windows. You cannot modify seeded deletion statements and constraints, though.
To create a custom deletion constraint
-
Navigate to the Deletion Constraints window.
-
Enter a name for the deletion constraint.
-
Indicate whether the constraint is enabled. An enabled deletion constraint means that it is in effect when the delete concurrent program runs.
-
Select the kind of delete entity the constraint applies to: item, bill, routing, component, or operation.
-
Select the name of the product that applies to this deletion constraint.
The Product Name field enables you to group deletion constraints by product.
-
Enter the SQL Select Statement that the delete concurrent program is to execute. You cannot update SQL statements for predefined deletion constraints.
-
Indicate whether to delete if there are rows found or no rows found by the SQL Select Statement.
-
Enter a failure message from Oracle Application Object Library's message dictionary to display if the delete fails.
To create a custom delete statement
-
Navigate to the Deletion Statements window.
-
Enter a name for the deletion statement.
-
Indicate whether the statement is enabled. An enabled deletion statement means that it is in effect when the delete concurrent program runs.
-
Select the kind of delete entity the statement applies to: item, bill, routing, component, or operation.
-
Select the name of the product that applies to this deletion statement.
The Product Name field enables you to group deletion statements by product.
-
Enter the SQL Delete Statement that the delete concurrent program is to execute. You cannot update SQL statements for predefined deletion statements.
Related Topics
Deleting Items, Bills, Routings, Components, and Operations
Deletion Constraints and Statements
Creating a Department Class
Use department classes to group departments for shop floor scheduling and control, and to identify manufacturing cells and flexible machine centers. Department classes are used for reporting purposes.
To create a department class
-
Navigate to the Department Classes window.
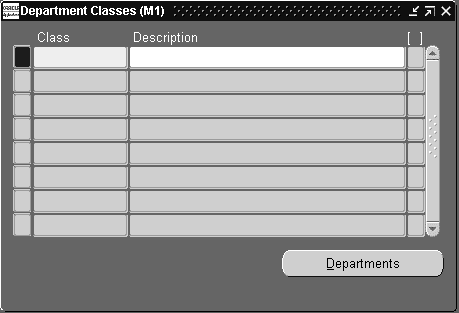
-
Enter text that uniquely describes the department class. For example, you could use ASSY to group all final assembly departments.
-
Choose the Departments button to display the departments assigned to this department class and the dates when these departments can no longer be assigned to routing operations.
Note: Assign departments to classes when you define departments.
Related Topics
Defining a Department
A department is an area within your organization that consists of one or more people, machines, or suppliers, where you want to collect costs, apply overhead, and compare load to capacity. You assign a department to each operation in a routing, and assign resources that are available for that department.
When you define a department, you specify any department overhead costs and the resources that are available. You can enter multiple resources for each department. For each resource, you can specify the shifts that the resource is available. For each resource shift, you can also specify capacity modifications that change the available hours per day, units per day, or workdays.
To define a department
-
Navigate to the Departments window.

-
Enter a name for the department unique for the organization.
-
Optionally, enter a department class. See: Creating a Department Class.
-
Enter a project expenditure organization.
-
Optionally, enter an inactive date on which you can no longer assign this department to routing operations.
-
Enter the Scrap Account in order to charge the departments that have scrapped material. This field is displayed for Shop Floor Management enabled organizations.
-
Enter the Estimated Absorption Account to estimate the expected scrapped material. This field is displayed for Shop Floor Management enabled organizations that have enabled estimated scrap accounting. See: Defining Parameters, Oracle Shop Floor Management User's Guide.
-
Choose the Rates button to view the overhead rates for the department.
-
Choose the Resources button to assign and update resources to the department.
Note: If you have Oracle Warehouse Management installed, the Departments form is used to group resources that may be needed together, to perform tasks. For example, a warehouse may define a refrigerated picking department, which has all the machine and manual resources associated to it that are required to perform a refrigerated picking task. A warehouse can also use a picking department, or a generic task department with all resources associated that are used for warehouse task management. See: Set Up Departments, Oracle Warehouse Management Implementation Guide.
Related Topics
Assigning Resources to a Department
Assigning Resources to a Department
To assign resources to a department
-
Navigate to the Resources window. You can do this by choosing the Resources button from the Departments window.
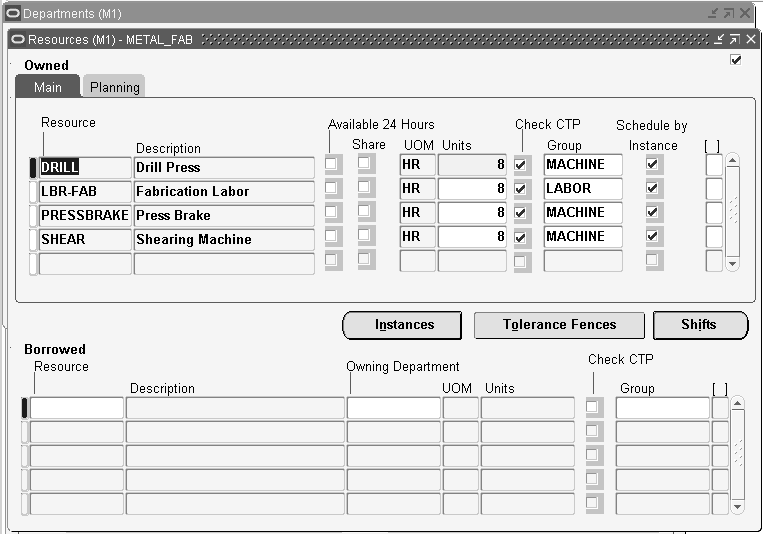
The Resources window is split into owned and borrowed resources.
-
Optionally, for owned resources, indicate whether the resource is available 24 hours a day. You cannot assign shifts to a resource that is available 24 hours a day.
-
For owned resources, indicate whether this department can hare the resource and capacity with other departments.
-
Enter the number of capacity units (resource units) available for this department, for example, the number of machines for a machine resource.
Each resource can be assigned to any number of departments; multiple resources can be assigned to each department.
-
Optionally, select the Check CTP check box. The Check CTP check box tells the system to use this resource in a Capable to Promise (CTP) check. See: Capable to Promise, Oracle Master Scheduling/MRP and Oracle Supply Chain Planning User's Guide.
-
Optionally, enter a resource group for the resource in this department.
-
Optionally, choose the Instances button to indicate if the department resource should be scheduled to the instance level (specific employee name or piece of equipment). See: Defining a Resource.
Caution: You can only schedule machine type resources by instance, not labor type resources.
-
Enter an expenditure type for the resource.
-
For owned resources that are not available 24 hours, choose the Shifts button to assign and update shift information for the resource. See: To assign shift information for the resource.
To plan for resources assigned to a department
If you are using Oracle Capacity or Oracle Advanced Supply Chain Planning to ensure that you have sufficient capacity to meet your production requirements, then enter resource availability information in the Planning tab. All fields in this tab are optional.
-
Enter an exception set. The exception sets that you assign help identify capacity problems. See: Exception Sets, Oracle Advanced Supply Chain Planning Implementation and User’s Guide.
-
Select an ATP rule from the list of values. See: Functional Setup for ATP Based on Collected Data, Oracle Global Order Promising Implementation and User's Guide.
-
Enter the utilization and efficiency percentage for the resource. Use these values to calculate the available hours for a resource. See: Resource Efficiency and Utilization, Oracle Advanced Supply Chain Planning Implementation and User’s Guide.
-
Enter the sequencing window (in days) to consider when optimizing the sequence of jobs running on a resource with sequence dependent setups. See: Sequence Dependent Steps, Oracle Advanced Supply Chain Planning Implementation and User's Guide.
You can optionally define each resource instance (specific employee name or piece of equipment) eligible for use.
If the resource is a person resource, only certain people may be qualified to act as the resource. For example, only certain people are trained to operate a drill press. Before you can specify person resource instances, you must perform the following tasks:
-
Optionally, define the person resource skills needed in the Resources window, Skills region (see: Defining a Resource).
-
Specify the employees that have the necessary skills for the resource (see: To group employees by resource).
If the resource is an equipment resource, only certain serial-numbered equipment items are usable as the resource. Before you can specify equipment resource instances, you must perform the following tasks:
-
Create an equipment item by selecting the Equipment attribute in the Organization Item window, Physical Attributes tab (see: Defining Items , Oracle Inventory User's Guide).
-
Set up serial number control for the equipment item (see: Setting Up Serial Number Control, Oracle Inventory User's Guide).
-
Define the equipment item as an equipment type for the resource (see: To group similar types of equipment by resource).
-
Find the resources assigned to a department by navigating to the Departments window, then choosing Resources.
-
Select a resource, then choose Instances.
The Instances window contains different fields depending upon whether you select an equipment or person resource.
-
If you select an equipment resource:
-
Enter the equipment item that acts as the resource.
-
Enter the serial number of the specific resource instance. Valid serial numbers for the equipment item appear in the list of values.
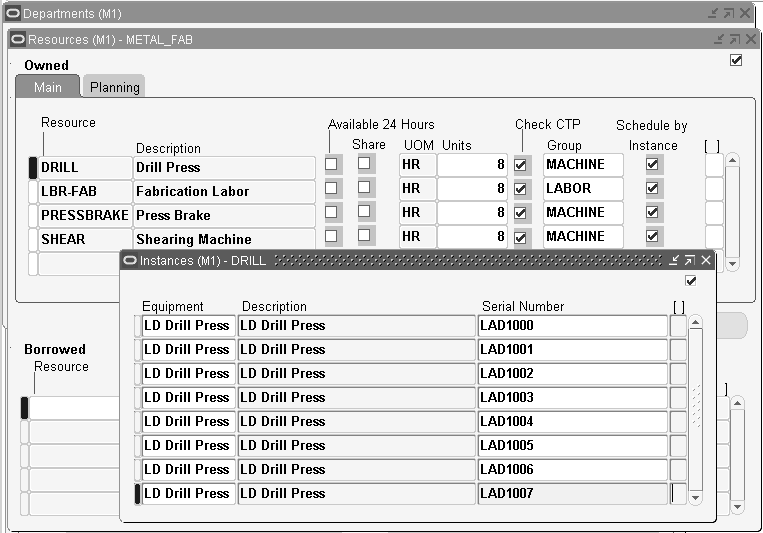
-
-
If you select a person resource, enter the employee number of the person that acts as the resource.
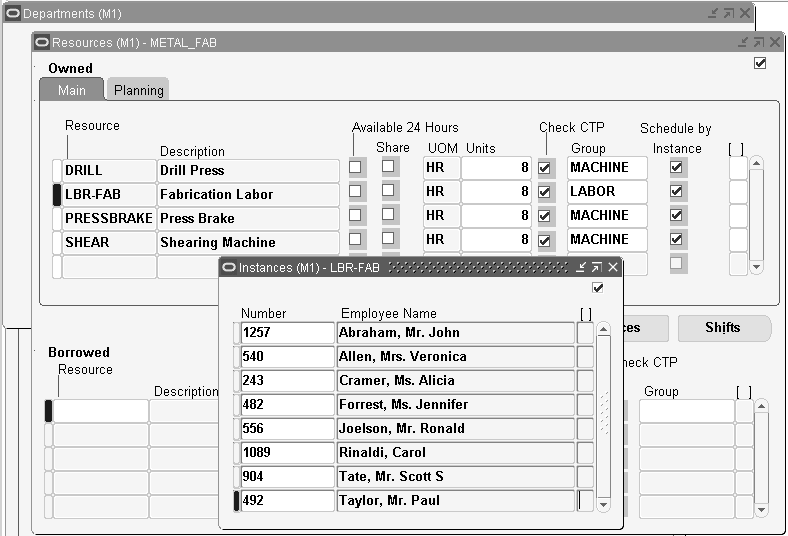
-
Save your work.
Important: The number of resource instances must match the number of units specified in the Resources window.
To assign shift information for the resource
-
Navigate to the Shifts window. Do this by choosing the Shifts button from the Resources window.
-
Enter a shift number to assign to the resource.
The shifts available to assign to the resource are those assigned to the workday calendar assigned to the organization.
-
Choose the Capacity Changes button to define capacity changes for a shift.
Capacity modifications can add or delete a day, or add or reduce capacity for a shift.
-
Navigate to the Capacity Changes window. Do this by choosing the Capacity Changes button from the Shifts window.
-
Enter or select a simulation set for the capacity change. Use simulation sets for capacity requirements planning in Oracle Capacity. See: Creating Simulation Sets, Oracle Capacity User's Guide.
-
Select the action to take for the department resource:
Add: Adds a workday and capacity changes.
Delete: Deletes a workday for this department resource.
Add or Reduce Capacity: Add or reduce capacity for a resource shift. The capacity change can fall outside a shift time, so you can add time to a shift. To reduce capacity, enter negative numbers.
-
Enter the number of resource units to increase or decrease capacity (if applicable). Make sure to use a negative number if you are reducing capacity.
-
Enter an effective date and time from which the capacity change starts. If you are adding or reducing capacity, you must also enter a date and time on which the change is no longer in effect.
If you are adding a shift's workday, this is the date of the new workday. If you are deleting a shift's workday, this is the date of the deleted workday. If you are changing capacity, this is the first day the resource shift's capacity changes.
-
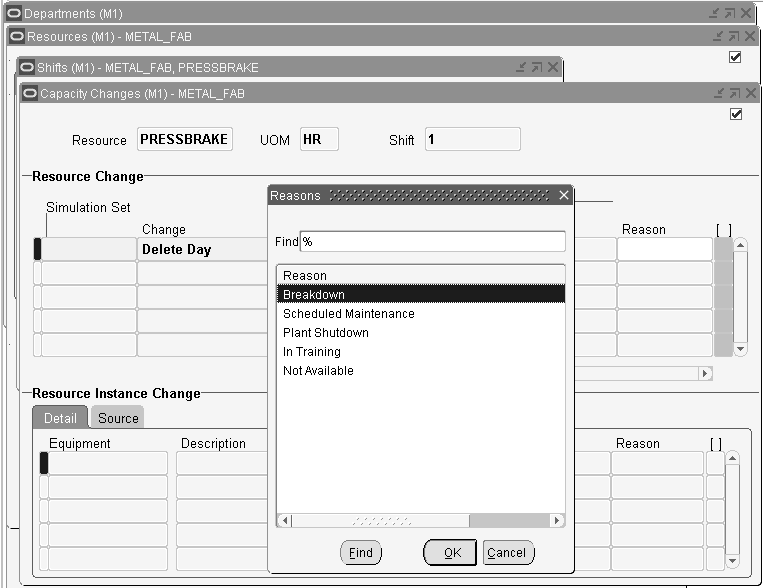
Select the reason for the resource capacity change from the list of values. See: To define a reason for a resource capacity change.
-
Review the Resource Instance Change region for information on the specific equipment capacity changes.
Detail Tab
These fields identify the resource instances impacted by the capacity change.
Source Tab
This tab provides detailed information (the downtime source, organization, work order, and operation) about resource downtime due to scheduled maintenance at the resource instance level.
For the resource downtime information to appear in the Source tab, you must execute the Load Production Equipment Maintenance Downtime process. See: Production Equipment Downtime, Oracle Enterprise Asset Management User's Guide.
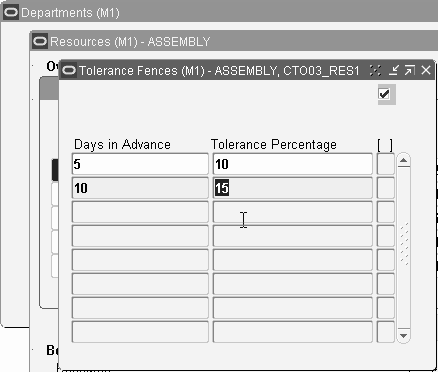
To define the resource tolerance
Situations arise where an excess load needs to be placed on a resource. Use the Tolerance Fences window to define the acceptable excess load (tolerance percentage) for each resource, based on the number of days in advance of the need.
-
Navigate to the Tolerance Fences window by choosing Tolerance Fences from the Resources window.
-
Enter the number of days in advance of the resource need.
-
Enter the acceptable excess load (tolerance percentage) for the resource given the number of days in advance of the manufacturing capacity need.
-
If the tolerance percentage changes as the number of days in advance changes, then enter as many combinations of days in advance and tolerance percentage as needed.
-
Save your work.
Related Topics
Cost Management Profile Options and Security Functions, Oracle Cost Management User's Guide
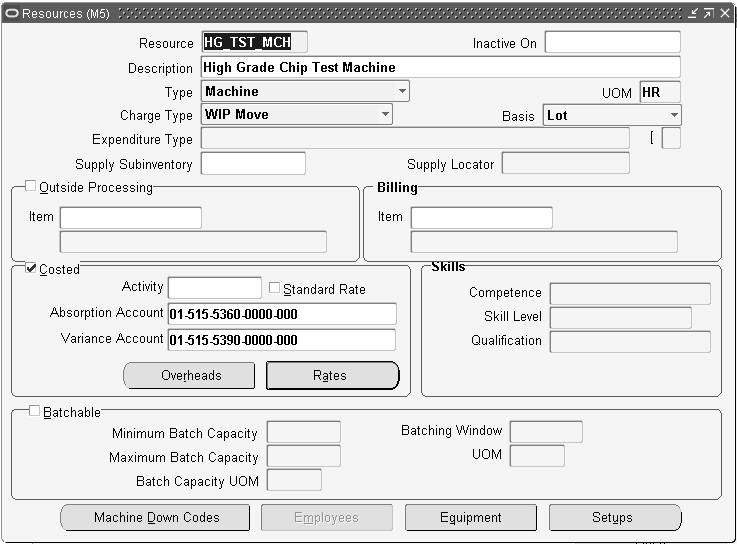
Defining a Resource
Use resources to define the time an assembly spends at an operation and the cost you incur at the operation. A resource is anything you require to perform, schedule, or cost, including but not limited to: employees, machines, outside processing services, and physical space. A resource and usage rate for all scheduled activities is required in a routing. Scheduled resources can include queue, setup, run, and move time.
When you define your departments, you assign the resources available in each department and the shifts that each resource is available. For each operation you define, you specify a department and list of resources and usages. An operation can use any resource that is available in the department, but you do not need to use all resources assigned to the department.
If you have Oracle Manufacturing installed, you can use Resource batching. Resource batching enables you to use resources across multiple jobs. By using a single resource to process multiple jobs simultaneously, you can prevent a resource from being underutilized. Work scheduled using resource batching is characterized by equivalent work performed with the same manufacturing processes. See: Setting Up Batch Resources, Oracle Advanced Supply Chain Planning Implementation and User’s Guide.
Prerequisites
- Before you can define resources, set up your units of measure and unit of measure conversion rates. Some resources may represent currency such as a fixed charge resource, but currency resources cannot be scheduled since their unit of measure is not time-based.
- Set the site level profile option BOM: Hour UOM to hold the unit of measure that represents an hour. Oracle Work in Process prevents you from scheduling resources whose unit of measure is not in the same unit of measure class as the hour unit or measure and has no conversions defined to the hour unit or measure.
To define a resource
-
Navigate to the Resources window.
-
Enter a resource name unique to the organization to describe the resource. For example, you could assign AS1 to signify assembler grade 1, or WE for welder.
-
Optionally, enter an inactive date after which you can no longer assign this resource.
-
Select a resource type: Amount, Currency (the set of books currency as defined in Oracle General Ledger), Machine, Miscellaneous, Person, or physical Space.
-
Enter a unit of measure (UOM) that describes how you measure the resource. (You can update this if the BOM: Update Resource UOM profile option is set to Yes.)
Note: This field is protected from changes if this resource is used for any operation with the Scheduled field set to Yes, and if you have previously set it as a time-based UOM. See: To assign a resource to a routing operation.
-
Select a charge type. When an operation is completed, Oracle Work in Process records the units applied to the job or repetitive schedule in the resource unit of measure for all resources you charge manually or automatically. See: Charge Types.
-
Select a basis type by which to charge and schedule the resource.
Item: Charge and schedule the resource where the resource usage quantity is the amount required per assembly unit you make.
Lot: Charge and schedule the resource where the resource usage quantity is the amount required per job or schedule.
-
Select an expenditure type for this resource.
If the Project Cost Collection Enabled parameter is set in the Organization Parameters window, you must associate the resource with an expenditure type. See: Organization Parameters Window, Oracle Inventory User's Guide and Assigning Project Parameters, Oracle Project Manufacturing User's Guide.
You can only select expenditure types that belong to the Work in Process expenditure type class. Expenditure types are defined in Oracle Projects. See: Expenditure Types, Defining Expenditure Types, and Expenditure Type Classes in the Oracle Projects Implementation Guide.
-
Optionally, enter the supply subinventory if the resource is a machine.
The system uses the supply subinventory specified for the resource if the routing does not specify a supply subinventory.
-
Optionally, enter the supply locator if the resource is a machine.
The system uses the supply locator specified for the resource if the routing does not specify a supply locator.
-
Indicate whether to enable the outside processing resource, and if so, enter its item number.
Important: If you specify PO Move or PO Receipt, Oracle Purchasing uses this item when it creates requisitions for your outside processing resource. See: Overview of Shop Floor Control, Oracle Work in Process User's Guide and Outside Processing, Oracle Work in Process User's Guide.
-
If this resource services requests for maintaining assets, you can optionally enter the billable item in the Billing region Item field.
Oracle Enterprise Asset Management (eAM) can use Oracle Bills of Material resources to service requests for asset maintenance. Identifying the billable item for the resource enables eAM to determine the cost of work performed by the resource for the item. See: Viewing Cost Information, Oracle Enterprise Asset Management User's Guide.
-
Enable the Costed check box to collect and assign costs to this resource, and if so, optionally enter an activity for the resource.
You cannot view costing information if the Privilege To View Cost Information function is excluded from the responsibility. You cannot update costing information if, in addition, the Privilege To Maintain Cost Information function is excluded.
You can use activities to group resource charges for cost reporting purposes. See: Defining Activities and Activity Costs in Oracle Cost Management User's Guide.
-
If the resource is costed, indicate whether to charge jobs and repetitive schedules based on a standard rate you define.
Or, disable Standard Rate to enter a rate to charge the resource in Work in Process for an internal resource, or derive the rate from the purchase order for an outside processing resource. For outside processing resources, if you charge a job or repetitive schedule at the standard rate, a purchase price variance is computed and posted to the rate variance account. If you charge for all other resources, if you charge a job or repetitive schedule at the actual rate, a resource rate variance is computed and posted to the rate variance account.
-
If this resource is costed, enter an absorption account (general ledger account) used to offset resource charges earned in work in process.
At period end, you normally compare this account to the resource charges in the general ledger.
For outside processing resources, the default is the receiving valuation account from Oracle Purchasing, as defined in the receiving options.
Important: For outside processing resources, do not change the default receiving valuation account. When you receive an outside processing purchase order, Oracle Purchasing credits the inventory AP accrual account and debits the receiving valuation account. Bills of Material then debits the work in process outside processing account and credits the receiving valuation account. If you change the above default account, your receiving valuation account will have an incorrect balance.
-
If this is a person type resource, enter the skill necessary for a particular person to act as this resource. Define the skill needed by selecting from the following fields' lists of values:
-
Competence
-
Skill Level
-
Qualification
See: Creating a Competency Profile, Talent Management, Workforce Sourcing, Deployment, and Talent Management Guide (US) for more information on competence, skill level, and qualification.
See: To group employees by resource to select employees that meet the skill requirements.
-
-
If this resource is costed, enter a variance account (general ledger account) to accumulate resource rate variances for a job or repetitive schedule. For outside processing resources, this is the purchase price variance account.
-
If you have Oracle Manufacturing installed, you can use Resource batching. To enable resource batching, select the Batchable check box in the Batchable region. This enables the other batch fields. See: Setting Up Batch Resources, Oracle Advanced Supply Chain Planning Implementation and User’s Guide.
Note: The Batchable region is disabled when the Basis field is set to Item.
-
Enter the maximum number units to be batched in the Maximum Batch Capacity field.
-
Enter the minimum number of units to be batched in the Minimum Batch Capacity field
-
Select the unit of measure for the batch capacity from the list of values available in the Batch Capacity UOM field.
-
Enter the time value for the batching process in the Batching Window field.
-
Select the time unit of measure available in the UOM field.
Note: The UOM list of values only appears if you enter Time in the BOM: Time Unit of Measure Class profile option User Value field. See: Bills of Material Profile Options.
To define cost type and resource rate associations
-
Navigate to the Resource Costs window. Do this by choosing the Rates button from the Resources window.
Note: You cannot view costing information if the Privilege To View Cost Information function is excluded. You cannot update costing information if, in addition, the Privilege To Maintain Cost Information function is excluded.
-
Enter or select a cost type to associate with each resource overhead rate.
-
Enter the Resource Unit Cost, that is, the resource's current standard cost per UOM.
To associate overheads with resources
-
Navigate to the Resource Overhead Associations window. Do this by choosing the Overheads button from the Resources window.
Note: You cannot view costing information if the Privilege To View Cost Information function is excluded from the responsibility. You cannot update costing information if, in addition, the Privilege To Maintain Cost Information function is excluded.
-
Enter or select the cost type for the resource.
The Allow Updates check box indicates whether the cost type is defined as updatable.
-
Enter or select the overhead to associate with the resource.
For example, you could assign resource cost as dollars per hour. If you enter a new resource, you can directly enter a frozen unit cost. However, you cannot directly update the frozen unit cost for a previously entered resource.
To group similar types of equipment by resource
You can define Equipment Types to group similar types of resources. For example, you can define an Equipment Type of Forklift.
-
Navigate to the Equipment Types window. Do this by choosing the Equipment button from the Resources window. You can choose the Equipment button if the Resource is a Machine type.
-
Enter an Item Number in the Equipment field.
-
Save your work.
Note: If you have Warehouse Management installed, you can use the Resources form to define a class of manual or machine resources. For example, a forklift machine resource is indicated by entering the resource name and description, as well as which equipment items are capable of performing pallet picking. See: Set Up Equipment Resources, Oracle Warehouse Management Implementation Guide.
To group employees by resource
You can define the roles which represent what an employee can do for a required task. For example, a role could be defined as Cycle Counter, or a Case Picker. See: Entering a New Person (People Window), Oracle Human Resources Management Systems Workforce Sourcing, Deployment, and Talent Management Guide (Global).
-
Navigate to the Employees window. Do this by choosing the Employees button from the Resources window. You can choose the Employees button if the Resource is a Person type.
-
Select an Employee from the list of values to associate with the resource.
If you defined skills in the Resources window, then only those employees that have the competence, skill level, and qualification required for the resource appear in the list of values.
-
Save your work.
Note: If you have Warehouse Management installed, you can use the Resources form to define employees qualified for each resource. For example, a hazardous materials manual resource is indicated by entering the resource name and description, as well as which employees are capable of performing hazardous material tasks. See: Set Up Warehouse Employee Resources, Oracle Warehouse Management Implementation Guide.
To define a reason for a resource capacity change
You can assign a reason for a resource capacity change in the Capacity Changes window (see: To define capacity changes) by selecting the reason from a list of values. Define the reasons for this list of values in the Resource Capacity Change Reasons window.
The resource capacity change reasons list of values are defined as lookups. Lookup codes must be decided upon and defined during the implementation process. For more information about lookups, see: Application Utilities Lookups and Application Object Library Lookups, Oracle Applications online help.
-
Navigate to the Resource Capacity Change Reasons window.
-
Enter a numeric Code for the resource capacity change reason. Oracle recommends that you enter values in increments of 10, enabling you to easily add codes later.
-
Enter the Meaning of the code, for example, Breakdown.
-
Enter a Description for the code.
-
Optionally enter a Tag to categorize lookup values. This field is for information purposes.
-
The Effective From Date defaults as the system date, but you can update this. Optionally enter a Effective To Date to indicate an expiration of the code.
-
Select the Enabled check box to enable this code for Bills of Material.
-
Save your work.
Related Topics
Defining a Cost Type, Oracle Cost Management User's Guide
Setting Up Inventory Standard Costing, Oracle Cost Management User's Guide
Cost Management Profile Options and Security Functions, Oracle Cost Management User's Guide
Defining Resource Setup Information
You can create a performance model for machine and resource setups to include time from one setup to another, including the time required to perform the work. If one of your scheduling objectives is to sequence or group jobs based on their required setup, you can also include a penalty factor—or weighted value—in the scheduling calculation. See: Penalty Factors, Oracle Manufacturing Scheduling User's Guide.
Resources defined in the Operation Resources window can have multiple setup types. You can define these setup types with an identifying user code or a numerical value.
Any two setup types within a resource can have a transition time and a transition penalty, which means that the scheduler needs the specified time to transition from the former setup to the latter. Also in doing so a certain transition penalty is incurred. This penalty is used to weigh the relative merits of doing the setup versus delaying the job versus cycle time.
The setups for a resource are independent of the department that the resource belongs to.
The setup type for a particular operation resource is defined in the Operation Resources window. This data displays in the Resource Requirements window during routing explosion. Setup resources and resource instances are only exploded during scheduling.
To define machine and resource setup types
-
Navigate to the Setup Types window.
-
In the Code field, enter a unique value for this setup type. Optionally you can enter descriptive information in the Description field.
For example, you may have different codes for setting up and tear down of paint color changes.

-
Save your work.
To assign setup times to resources
-
Navigate to the Resources window.
-
Select your resource.
-
Choose Setups.
The Setups window displays.
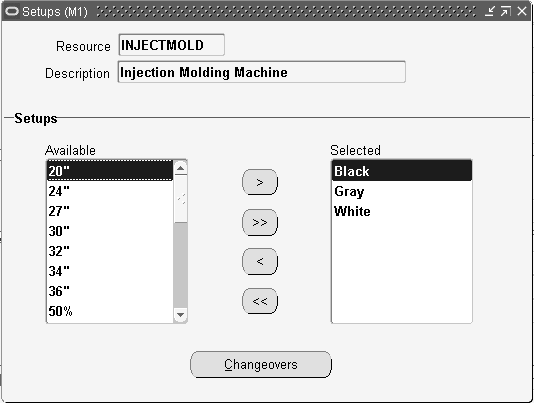
-
Select the setups for which you want to define changeovers.
To select a setup, use the arrow button to move the setup from the Available column to the Selected column. Use the double arrow button to move all setups from the Available column to the Selected column.
-
Save your work.
-
Choose Changeovers to access the Changeover Times window.
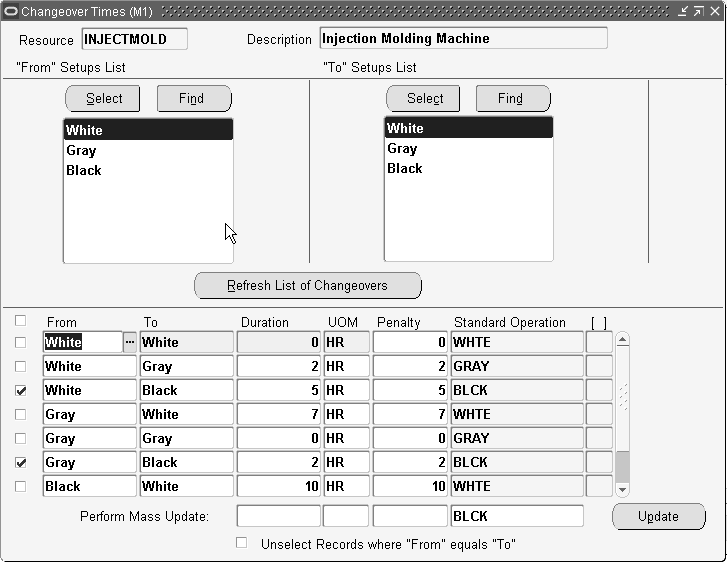
-
In the "From" Setups List, choose one of the following buttons to select the setup types you want to change from.
-
Select: Use this button to select the setup from the list of available setup types. The Select button is most useful if the setup type list is short, making the setup you want to select easy to find. Use the arrow button to move the setup type you want to change from to the Selected Setup Types column.
-
Find: Use this button to find the setup in a long list of available setup types.
-
-
In the "To" Setups List, use the Select or Find button to select the setup types you want to change to.
-
In the From and To fields, list all combinations of changeovers from one setup type to another setup type.
Optionally, use the Refresh List of Changeovers button to automatically generate a list of all potential changeover combinations in the From and To fields.
Tip: If the changeover duration, penalty, and standard operation from any setup type to a particular setup type is the same, then select <any> in the From setup type list of values. For example, changing over from any paint color to white requires the same amount of time and incurs the same penalty no matter what color you are changing from. In this case, enter <any> in the From field and White in the To field.
-
Enter the time it will take to perform the changeover in the Duration field and enter the unit of measure for the duration in the UOM field.
-
Assign a penalty to the changeover if there is one.
-
Select a Standard Operation (optional). See: Creating a Standard Operation.
-
If you need to update many changeovers that have the same duration, unit of measure, penalty, or Standard Operation values, use the Perform Mass Update function.
-
Select the check box next to the rows you want to update. If you want to update all rows, select the first check box. Use the Unselect Records where "From" equals "To" box to uncheck those rows where the From and To field entries are the same.
-
In the Perform Mass Update fields, enter values only in those fields that you want to update. For example, if you only want to update the penalty in the checked rows, then only enter a value in the Perform Mass Update Penalty field.
-
Choose Update.
-
-
Save your work.
Using the Workday Calendar
A workday calendar defines the valid working days for a manufacturing organization and consists of repeating pattern of days on and days off and exceptions to that pattern. This allows you to, for example, designate a normal workday as a scheduled downtime day, or designate a holiday as a workday.
You can define one or more workday calendars and assign them to any number of organizations, and any number of organizations can share a calendar. You can specify the start and end dates, and the weekend schedule for each calendar.
Repeating Workday Patterns
You can also define a series of repeating workday patterns for a given calendar. For example, you have a repeating two-week pattern where you work five days the first week, and three days the second week. Or, you have a repeating pattern of 17 consecutive workdays, followed by four days off. When you build the calendar, Oracle Bills of Material automatically determines the valid workdays for you, based on the patterns you specify.
You can also specify repeating workday patterns for shifts (see below).
Workday Exceptions
There are three ways to apply exceptions to the workday calendar:
-
selecting individual exception days
-
loading them from an exception template, another calendar, and another calendar shift
-
copying a set of exceptions from another calendar
An exception template allows you to create groups of exception dates and apply them to different calendars. You can define multiple workday exception templates that define different holidays and scheduled down times for different organizations. Multiple exception templates can be applied to the same calendar. As each template is applied, new exception dates are added to the exception list for that calendar.
Conflicts on a particular date between one template and another are resolved as follows:
-
if the exception date already exists in the target calendar, it is not copied
-
if the exception on day falls on a workday, the exception is copied but is redundant and has no effect on the calendar
-
if the exception off day falls on a non-workday, the exception is copied but is redundant and has no effect on the calendar
This allows you to define different holidays or scheduled down times, for example, for organizations in different countries. Different organizations can use the same calendar, but apply different exception dates. In addition, you can apply the same exception dates to different organizations.
You can optionally define exception templates, lists of exception dates, before you set up your workday calendar. Then when you define your calendar, you can choose an exception template, and apply its exception dates to that calendar.
Shifts
For a given workday calendar, you can specify any number of shifts. Each shift can have a different weekend schedule and a list of specific work interval start and end times. For both calendars and shifts, you can assign sets of workday exceptions and repeating workday patterns.
Shifts inherit workday exceptions and workday patterns from the base calendar. Shift exceptions can either add to or override those of the base calendar.
If an exception on the base calendar changes, those shifts that do not have an overriding exception on that date will automatically reflect the change. Those shifts that do have an overriding exception on that date will not reflect the change and must be changed manually if they are to reflect the change in the base calendar.
Shift exceptions are applied to a calendar the same way as workday calendar exceptions by selecting individual exception days, by defining exception templates, or by copying a set of exceptions from another shift.
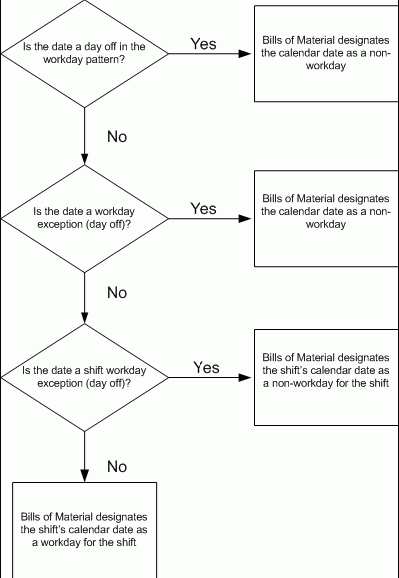
The following diagram illustrates the steps Bills of Material uses to determine workdays from an organization's workday calendar and exception template information.
Organizations
For each organization, you specify the calendar to use. All scheduling functions use the calendar you specify. Detailed scheduling uses specific resource availability information by department and shift to schedule resources. Dynamic lead time offsetting, however, uses an organization's workday calendar and does not consider shift information.
To create a workday exception template:
Exception templates define and group deviations to your workday calendar, such as holidays, downtime, or scheduled maintenance.
When defining a workday calendar, specify which days (or shifts) are on and off. The workday calendar, in combination with the exceptions to it, determine the work pattern for each organization.
-
Navigate to the Exception Templates window.

-
Enter a date on which this template becomes inactive.
-
Enter all exception dates, and indicate whether each is an on or off workday.
To create a workday calendar:
A workday calendar consists of a start date, and end date, and on and off days that follow one or more defined workday patterns. A workday calendar can also include shift information and exception dates, such as holidays or scheduled down time.
Use a workday calendar for forecasting and planning material requirements, use shift information for job scheduling, and capacity analysis.
Workday exceptions identify deviations to the workday calendar. Shift exceptions identify deviations for a shift.
Important: Shift exceptions take precedence over workday exceptions. (This is only relevant if a workday exception and a shift exception overlap.)
To assign workday exceptions to a workday calendar or calendar shift, either select them intuitively from the Calendar Dates (or Shift Calendar Dates) window, or apply them from an existing template, calendar, or shift.
-
Navigate to the Workday Calendar window.
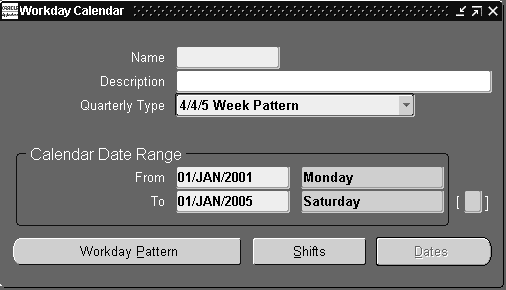
-
Enter a name for the workday calendar.
-
Select a quarterly calendar type:
4/4/5 Week Pattern: Two four-week periods followed by one five-week period.
5/4/4 Week Pattern: One five-week period followed by two four-week periods.
Calendar Months: Twelve periods per year based on calendar months.
13 Periods: Thirteen four-week periods per year.
Note: If you use Oracle Master Scheduling/MRP, choose the 4/4/5 Weekly Pattern or the 5/4/4 Weekly Pattern to report MRP information in weeks and months. Otherwise, if you choose the 13 Periods calendar or Calendar Months, you can only report MRP information in monthly buckets.
-
Enter a date range for the workday calendar. The default end date is four years from the start date.
Note: Days on and off are calculated based on the start date and the day of the week. For example, if you want a standard five day workweek to start on 01-JAN, you must enter the start date as the Monday before 01-JAN (unless 01-JAN falls on a Monday).
Note: Set profile option BOM: Week and Period Start Day, to determine the start date. This profile option works in conjunction with the Workday Calendar. See: Bills of Material Profile Options.
-
Continue creating the workday calendar by choosing one of the following buttons:
Workday Pattern: Set workdays on or off.
Shifts: Assign shifts to the workday calendar.
Dates: Review your work so far and its effect on the workday calendar. Do this before you build or rebuild the workday calendar you are now creating. (You can only do this after you have defined a workday pattern.)
Once you have created a workday pattern, assigned shifts, assigned workday and shift exceptions, and reviewed your work, you must build the calendar and assign it to an organization.
-
Save your work.
To copy a calendar or shifts:
You can copy the entire calendar, including workday patterns, exceptions, and all or none of its specific shift information. Or, you can copy a specific shift, including the workday patterns, exceptions, and shift times.
Exactly what is copied depends upon how you navigate to the Copy window:
-
From the Workday Calendar, Calendar Dates, and Workday Patterns windows, all workday patterns, all exceptions, and selected shift information are copied.
-
From the Shifts, Shift Times, Shift Dates, or Shift Workday Patterns windows, the shift workday patterns, shift exceptions, and all shift times for the specified shift are copied.
Note: If you copy calendar information to an existing calendar, all new information is appended to the existing calendar; existing information, in other words, is retained.
-
Navigate to the Copy window. Do this by choosing Copy from the Tools menu.
-
If you are copying calendar information, enter the calendar to copy information from and indicate if you want none, all, or specific shift information. If you select a specific shift, enter the shift number.
If you are copying shift information, enter the calendar you want to copy the shift information from and the specific shift number.
To create a workday pattern:
-
Navigate to the Workday Patterns (or Shift Workday Patterns) window. You can do this by choosing the Workday Pattern button from either the Workday Calendar or Shifts window.
-
Enter a sequence number in which the workday patterns are applied when the calendar is built.
-
Enter the number for consecutive workdays on and off. For example, if you want Monday through Friday on and Saturday and Sunday off, enter 5 for Days On and 2 for Days Off.
-
Enter a description for the sequence.
Repeat the previous three steps for each workday pattern to create. All defined sequences are repeated for the duration of the workday calendar. If there are two sequences, sequence 1 will be in effect first, then sequence 2, then 1 again, and so on.
For example, assume that sequence 1 is 5 on and 2 off, and sequence 2 is 4 on and 3 off. The calendar shows 5 on, 2 off, 4 on, and 3 off.
-
Save your work. Doing so ensures that you can view calendar dates.
To create shifts and shift times:
-
Navigate to the Shifts window. You can do this by choosing the Shifts button from the Workday Calendar window.
-
Choose the Times button to open the Shift Times window.
-
Enter the start and stop times for each shift.
You can enter multiple start and stop times, but the start and stop times for a shift cannot overlap.
If you create a shift without first creating a workday pattern, a default workday pattern of 5 days on and 2 days off is created. You can then update that workday pattern.
-
Save your work.
To select workday or shift exceptions:
-
Navigate to the Calendar Dates window (or Shift Calendar Dates window). Do this by choosing the Dates button from the Workday Calendar window.
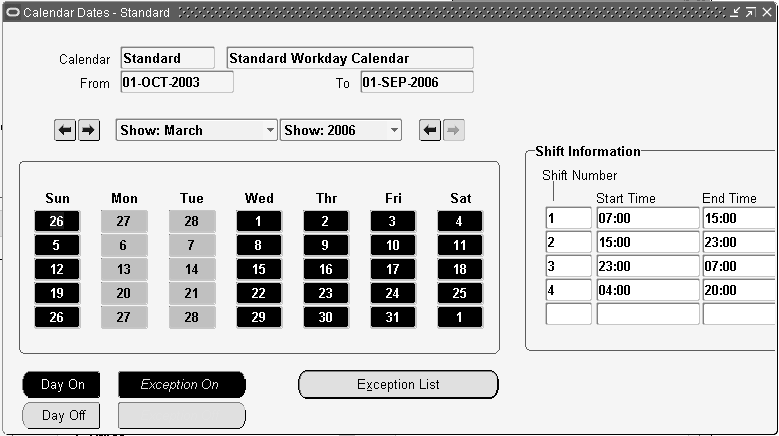
-
Select individual days of the month to toggle them on or off. Days you change become either workday or shift exceptions, depending on how you entered the window.
The shift information displayed is specific to the date selected.
-
Save your work.
To load existing workday or shift exceptions:
-
Navigate to the Exceptions window. Do this by choosing the Exception List button from the Calendar Dates window.
-
Chooses the Load button and select whether existing exceptions should be applied from a template, a calendar, or a shift.
If you select Template, enter a template name.
If you select Calendar, enter a calendar name.
If you select Shift, enter the calendar name that the shift belongs to and the shift number.
-
When finished, choose OK to save your work.
To review the calendar:
-
Navigate to the Calendar Dates window (or Shift Calendar Dates window). Do this by choosing the Dates button from either the Workday Calendar or Shifts windows.
To build the workday calendar:
Caution: Rebuilding an existing workday calendar affects all organizations that reference the same calendar and exception template. Changes to your workday information impacts your material plans, capacity plans, scheduling, and any other function in Oracle Manufacturing that uses the workday calendar. (This does not apply if you are building a calendar for the first time.)
-
From the Tools menu, choose Build (or Rebuild).
To import bills and routings:
The Bill and Routing Interface program enables you to import bill and routing information.
Imported bills include revision, component, substitute component, and reference designator information.
Imported routings include routing revision, operation, instruction, and resource information. The Routing Open Interface program imports network routings (see: Creating a Routing Network, Oracle Flow Manufacturing User's Guide and Creating a Network Routing, Oracle Shopfloor Management User's Guide) as well as single routings.
See: The Bills of Material Object Interface chapter and Integrating Your Systems, Oracle Manufacturing APIs and Open Interfaces Manual.
-
Indicate whether to include all organization codes in the bill of material and routing interface tables, or just the current organization.
Important: If you specify just the current organization, rows in the interface tables that do not have either an organization code or an organization ID assigned are ignored.
-
Indicate whether to import routings from the interface tables.
-
Indicate whether to import bills of material from the interface tables.
-
Indicate whether to delete processed rows from the bill of material and routing interface tables.
-
Indicate whether to import bills of material and routings for only a certain batch ID.
Tip: You can segment your import data by assigning a batch identifier to each segment. This enables you to break apart large data sets and process them concurrently, which improves data loading efficiency.
Related Topics
Organization Parameters Window, Oracle Inventory User's Guide
Defining Lookups
The following lookup types are accessible from the Bills of Material menu:
-
Bonus codes
-
Scrap codes
-
Resource down codes
Warning: If you had entered an alphanumeric value for a BOM Resource down code in the Resource Down Codes Lookups window, then you cannot attach any down code to a resource while creating the resource from the Resources window.
-
Resource capacity change reasons
Optionally, define the lookups for each lookup type.
To define lookups:
-
For information on defining lookups, see: Application Utilities Lookups and Application Object Library Lookups, Oracle Applications online help.
Related Topics
To define a reason for a resource capacity change
Resource Down Codes, Oracle Shop Floor Management User's Guide
Scrap Codes, Oracle Shop Floor Management User's Guide
Bonus Codes, Oracle Shop Floor Management User's Guide
To create a standard operation for a Shop Floor Management enabled organization
Assigning View-only Privileges to Forms
The system administrator can choose to exclude certain responsibilities from adding or updating information by function. Even though the system administrator excludes the function from a responsibility's menu, the responsibility retains view-only privileges for the function. The functions that can be excluded are:
-
Bills of Material: Update (Bills of Material window)
-
Workday Calendars: Update (Workday Calendar window)
-
Delete Constraints: Update (Deletion Constraints window), including:
-
Deletion Statements
-
-
Delete Groups: Update (Deletion Groups window)
-
Exception Templates: Update (Exception Templates window)
-
Departments: Update (Departments window)
-
Resources: Update (Resources window)
-
Product Family: Update (Product Families window)
-
Standard Operations: Update (Standard Operations window), including:
-
Standard Event
-
Line Operations
-
Standard Process
-
-
Routings: Update (Routings window), including:
-
Engineering Flow Routings
-
Engineering Lot Based Routings
-
Engineering Routings: Transfer
-
Engineering Routings
-
Flow Routings
-
Routings: Delete
-
Maintenance Routings
-
Lot Based Routings
-
Routings: LeadTimes
-
To assign view-only privileges to forms
-
Navigate to the Responsibilities window.
Find the responsibility name for which you want to restrict window access.
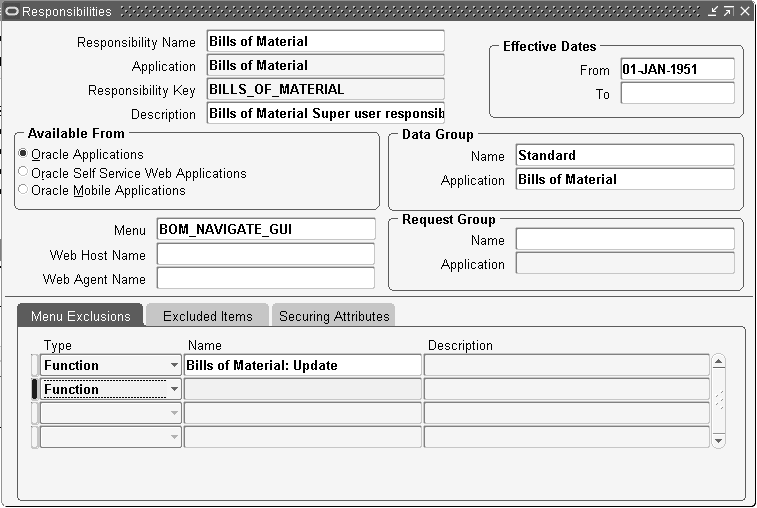
-
In the Menu Exclusions tab, Type field, select Function from the list of values.
-
Search for and select the name of the function that you want to make view-only.
-
Navigate to the Users window.
Find the user name to which you want to assign the responsibility containing the view-only function(s).
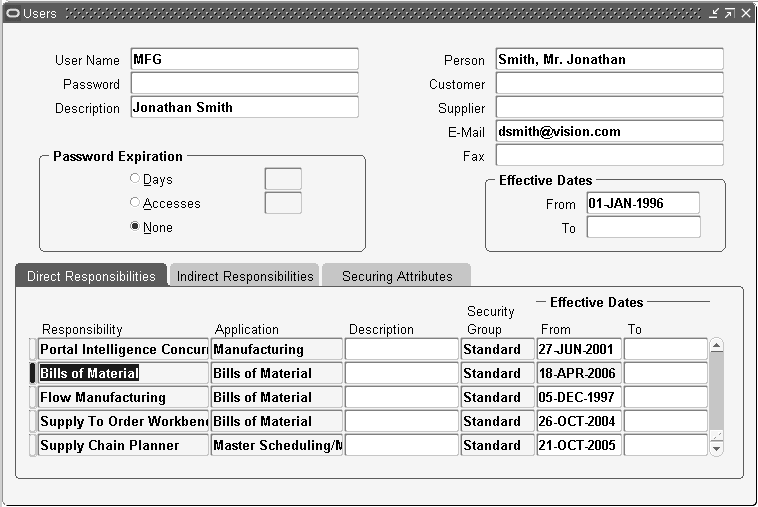
-
In the Direct Responsibilities tab, find and select the responsibility containing the view-only function(s).
-
Save your work.
Note: When you select the view-only menu option from the responsibility menu, the menu option and the window name appear with the word "View" in front of it. For example, if you made the Bills of Material: Update function view-only in the Bills of Material responsibility, then the menu option appears as View Bills and the window name appears as View Bills of Material.
Related Topics
Overview of Function Security, Oracle E-Business Suite System Administrator's Guide - Security
Bills of Material Profile Options
During implementation, you set a value for each user profile option to specify how Bills of Material controls access to and processes data.
The system administrator sets up and maintains profile values.
Profile Option Settings
You can set or view profile options in Oracle Bills of Material. The following table includes some profile options from other applications that are used by Oracle Bills of Material. The second column, User, references the user, while the next four columns, User, Resp, App, and Site, reference the System Administrator. The last two columns, Required and Default Value, reference requirements.
| Profile Option | User | User | Resp | App | Site | Required? | Default Value |
|---|---|---|---|---|---|---|---|
| BOM: Automatic Reservations | - | + | + | + | + | Optional | Yes |
| BOM: Check for Duplicate Configuration | - | 0 | 0 | 0 | + | Optional | No |
| BOM: Component Item Sequence Increment | - | + | + | + | + | Optional | 10 |
| BOM: Configuration Item Delimiter | - | 0 | 0 | 0 | + | Optional | No |
| BOM: Configuration Item Type | - | 0 | 0 | 0 | + | Optional | No |
| BOM: Days Past Before Starting Cutoff of Order Management Bills | - | 0 | 0 | 0 | + | Optional | 0 |
| BOM: Default Bill of Material Levels | - | + | + | + | + | Optional | 1 |
| BOM: Default WIP Supply Values for Components | - | 0 | 0 | 0 | + | Optional | Yes |
| BOM: Hour UOM | - | 0 | 0 | 0 | + | Optional | 1 |
| BOM: Inherit Option Class Operation Sequence Number | - | 0 | 0 | 0 | + | Optional | No |
| BOM: Model Item Access | - | + | + | + | + | Optional | Yes |
| BOM: Perform Lead Time Calculations | - | 0 | 0 | 0 | + | Optional | No |
| BOM: Planning Item Access | - | + | + | + | + | Optional | Yes |
| BOM:Save Configurator Details Flag | - | + | + | + | + | Not used | (blank) |
| BOM: Standard Item Access | - | + | + | + | + | Optional | Yes |
| BOM: Update Resource UOM | - | 0 | 0 | 0 | + | Optional | No |
| BOM: Week or Period Start Day | - | + | + | + | + | Optional | Monday |
+ You can update the profile option.
- You can view the profile option value but you cannot change it.
0 You cannot view or change the profile option value.
Profile Option Descriptions
BOM: Automatic Reservations
Indicates whether the system will attempt to automatically reserve existing on hand inventory after matching a configuration. During Autocreate Configuration, if a match has been found and this profile is set to Yes, CTO will attempt to reserve on hand inventory for any order line having a schedule date within the OM: Reservation Time Fence. If progressing the order via the workflow, a message will display with details of the match and reservation performed. If you are using the batch program, the log file provides details of the match and reservations performed.
BOM: Check for Duplicate Configuration
Indicates whether to search for an existing duplicate configuration rather than create a new item.
BOM: Component Item Sequence Increment
Indicates the value by which to increment the sequence of the component item on the bill.
BOM: Configuration Item Delimiter
Indicates a character used to separate the order and line numbers when you replace the base model's segment value with the order number/line number.
BOM: Configuration Item Type
Indicates the item type of the new configuration items that the create configuration program creates.
BOM: Days past for starting cutoff of Order Entry bills
Indicates the starting revision date used in the Order Management explosion.
BOM: Default Bill of Material Levels
Indicates the number of explosion levels to use as a default for bill of material indented explosions.
BOM: Default WIP Supply Values for Components
Indicates whether to default WIP Supply Type, WIP Supply Subinventory, and WIP Supply Locator from item master for a component item when defining a bill. If set to No, WIP reads the item master.
BOM: Hour UOM
Indicates the unit of measure that represents an hour. You cannot schedule resources whose unit of measure is not in the same class as the hour unit of measure.
BOM: Inherit Option Class Operation Sequence Number
Indicates whether to allow components on model bills to inherit operation information from parent items.
BOM: Model Item Access
Indicates whether a holder of this responsibility can define and update bills of material for model and option class items.
BOM: Perform Lead Time Calculations
Indicates whether to perform lead time calculations when you autocreate configuration items.
The profile option will be at the system level. The first value of the profile option would include the calculation: Lead time (days) = Lead time (Hours) /24 always and the second value would calculate lead time as: Lead time (days) = Lead time (Hours) /Line hours (Stop Time- Start Time of the Production Line).
BOM: Planning Item Access
Indicates whether a holder of this responsibility can define and update bills of material for planning items.
BOM: Resource Usage Rounding Value
Resource Usage Rounding Value is a profile that is created to set the rounding off value for resource usage and inverse. You can update the profile option at the system administrator level only.
BOM: Save Configurator Details Flag
Not used.
BOM: Standard Item Access
Indicates whether a holder of this responsibility can define and update bills of material for standard items.
BOM: Update Resource UOM
Indicates whether you can update the resource unit of measure.
BOM: Week or Period Start Day
Indicates whether the workday calendar starts on a weekly or period basis. This profile option works in conjunction with the Workday Calendar. See: Overview of Workday Calendar.
For example, the BOM: Week or Period Start Day profile is set to Monday. Your Workday Calendar is set to start on January 1, which is a Friday, with a five days on/two days off work day pattern. After building the calendar, the system creates a start day of the following Monday, January 4.
Related Topics
Setting Your Personal User Profile, Oracle E-Business Suite User's Guide
Common User Profile Options, Oracle E-Business Suite User's Guide
Profile Options in Oracle Application Object Library, Oracle E-Business Suite System Administrator's Guide
Defining Items, Oracle Inventory User's Guide
Overview of Function Security, Oracle E-Business Suite System Administrator's Guide
Implementing Function Security, Oracle E-Business Suite System Administrator's Guide
Subscribing to Bills of Material Business Events
Using Oracle Workflow, you can automatically trigger actions based on the following Oracle Bills of Material business events:
-
bill of material creation
-
modification to a bill of material header, component, or component attribute
-
bill of material deletion
-
error during a bill of material deletion
-
creation or modification of a substitute component, reference designator, or component operation
-
component deletion using a delete group
-
error during a component deletion
Examples of actions you can trigger include issuing notifications or launching a workflow.
Business Event Examples
The following scenarios show how subscribing to a business event can simplify business processes:
-
A business needs to notify a contract manufacturer each time a bill of material changes. The business can set up Oracle Workflow to automatically send the contract manufacturer an email each time this occurs.
-
A business maintains bills of material in the master organization. Every time a bill of material is created in the master organization, the business needs to copy the bill or create a common bill in the child organizations.
For more information about setting up and subscribing to business events, see the related topics listed below.
Related Topics
Managing Business Events, Oracle Workflow Developer's Guide
Defining Procedures and Functions for Oracle Workflow, Oracle Workflow Developer's Guide