Displaying the Model
This chapter covers the following topics:
- Model Structure and Generated User Interfaces
- Refreshing a User Interface
- Controlling the Content of a User Interface
- Runtime Navigation
- The Configuration Summary Page
- Displaying Prices and Available to Promise Dates
- Multiple Language Support and the Runtime User Interface
Model Structure and Generated User Interfaces
When you generate a UI that is based on the Model’s structure, the UI Master Template you select determines what types of UI elements are generated for each node in the Model. These UI elements include all option selection controls such as Check Boxes, Drop-down Lists, Radio Buttons, Item Selection Tables, and so on. UI templates are explained in Introduction to User Interface Templates .
The Model’s structure determines the initial structure of a generated UI, as well as the initial sequence in which UI Pages appear when viewing the UI structure in the User Interface area of the Workbench, and at runtime. The Model’s structure also determines how UI elements are initially displayed on each UI Page.
For example, if Component A contains 5 Option Features, each Feature appears in Component A’s UI Page in the same order as they appear in the Model structure: the UI control for the first child Feature in the structure appears at the top of the UI Page, followed by the second, and so on.
After generating a UI, you can modify the order and appearance of UI Pages and their content in the UI area of the Workbench. For details, see Introduction to the User Interface Area of the Workbench .
BOM and Non-BOM Model Structure
Model structure nodes generally fall into two categories: BOM nodes and non-BOM nodes (a non-BOM nodes is one you create in Configurator Developer). Therefore, all UI Master Templates have BOM Content and Non-BOM Content settings. These settings are described in Introduction to User Interface Templates .
All Model structure that you create in Configurator Developer under a BOM Model appears before any child BOM nodes in the Model’s structure. Therefore, when you generate a UI, any guided buying or selling content appears before the BOM content when viewing the UI in the User Interface area of the Workbench, and at runtime (for example, in a UI that provides step-by-step navigation). This behavior is usually preferable to displaying non-BOM content at the end of a UI, but you can modify the order in which UI content appears in the User Interface area of the Workbench, if necessary.
Model Structure and Effectivity
The effectivity defined within a Model affects whether nodes appear in the runtime UI (or the Model Debugger). For example:
-
Nodes that are not available because of their effective date or the Usage(s) to which they are assigned do not appear in a runtime UI.
-
Any links, buttons, images, and action buttons that control navigation to an ineffective (hidden) UI Page do not appear in a runtime UI. If you defined a Configurator Extension to navigate to a page but that page is not effective in the runtime UI, Oracle Configurator displays a message that tells the end user why it is not available.
-
If a Model contains References to another Model and that Model is not effective, none of the referenced objects appear in the UI.
For more information, see Introduction to Effectivity.
Refreshing a User Interface
While unit testing and debugging a configuration model and a UI, you must refresh the UI to ensure that any changes to the Model structure appear at runtime. When you refresh a UI, Configurator Developer refers to the latest version of the UI Master Template that was used to generate the UI and then adds, deletes, or modifies existing UI elements based on how the Model structure has changed. Refreshing a UI also updates any referenced UIs that need to be refreshed.
You can use the Refresh Enabled setting to prevent an entire UI or specific UI elements from being refreshed. For details, see The Refresh Enabled Setting.
You can refresh all of a Model’s UIs in the General area of the Workbench, or refresh one UI at a time in the User Interface area of the Workbench. For details, see:
Refreshing a UI is required when the Model structure changes in:
-
Configurator Developer
-
Oracle Bills of Material - In this case, refreshing the BOM Model is required for the changes to appear in Configurator Developer.
If changes to the Model structure are minimal, refreshing the UI is sufficient. If the Model structure has changed extensively, Oracle recommends that you create a new UI. For details, see:
Changes that Require a User Interface to be Refreshed
This section lists the kinds of changes to the Model structure that require a User Interface to be refreshed, and describes what occurs when you refresh the UI.
A User Interface must be refreshed when:
Refer to the following sections for details.
See also Changes that Do Not Require a User Interface to be Refreshed.
Nodes are Added to the Model
You can create Model structure in:
-
Configurator Developer, by manually creating nodes or copying existing nodes
-
Oracle Bills of Material, by adding items to an imported BOM Model and then refreshing the BOM Model
A Model node’s Include in Generated UI setting also affects whether Configurator Developer creates UI elements for new nodes when you refresh the UI. For example, this setting is set to No (not selected) for Feature X when you create the UI. Therefore, no UI element is created for Feature X. You edit Feature X, select Include in Generated UI, and then save the change. When you refresh the UI, Configurator Developer creates a new element for Feature X.
Conversely, if a UI element exists for a Model node and you change the node’s Include in Generated UI setting from Yes to No, Configurator Developer deletes its corresponding element when you refresh the UI.
Sequence of Model Structure and UI Elements after UI Refresh
When you add nodes to the Model structure and then refresh a UI, Configurator Developer creates the new UI elements in the same order and location in which the nodes appear in the Model structure (this assumes that the Include in Generated UI setting is selected for the new nodes). In other words, Configurator Developer updates the UI so that the elements appear in the same location as they would in a new UI that is generated from the Model structure. This is also the case when you move nodes within the Model structure and then refresh the UI. See Nodes are Moved within the Model.
You can change the order in which UI elements appear at runtime by editing the UI in the User Interface area of the Workbench.
UI Refresh and Maximum Elements Per Page
When you create a UI that is based on the Model structure, a Model node with many children may be split into several UI Pages. This is controlled by the Maximum Number of Model Elements per Page setting in the UI Master Template.
When you add new nodes to the same parent node, the number of UI elements per UI Page may exceed the UI Master Template setting after you refresh the UI. For example, Component C1 has 75 Features, and the Maximum Number of Model Elements per Page setting in the UI Master Template is 25. When you generate the UI, Configurator Developer splits C1 into three UI Pages with 25 UI controls (one for each Feature) on each Page. You then add 3 Text Features to Component C1 and then refresh the UI. Component C1’s last UI Page now contains 28 UI elements.
If you reorder C1’s children (the Text Features) before refreshing the UI, the UI elements created when you refresh the UI may appear on C1’s first, second, or third UI Page. See Sequence of Model Structure and UI Elements after UI Refresh.
Examples of Adding Model Structure and then Refreshing a UI
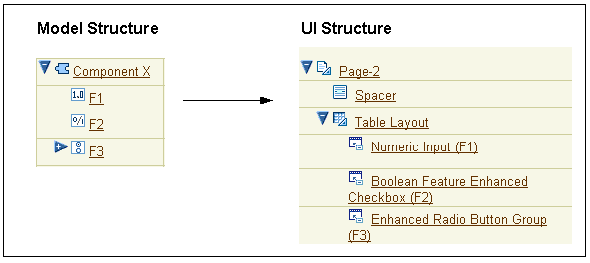
Creating Model Structure
-
In Model A, Component X has three children: F1, F2, and F3.
-
You generate a UI that is based on the Model structure.
Configurator Developer generates a UI Page for Component X and UI elements for each of Component X’s children. In the UI structure, the child elements appear under the Table Layout Region as shown in User Interface Generated from Model Structure.
User Interface Generated from Model Structure
-
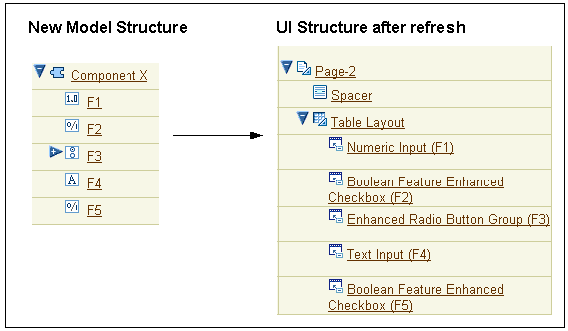
In the Model structure, you add Features F4 and F5 to Component X.
-
You refresh the UI.
Using the same UI Master Template that was used to create the UI, Configurator Developer creates new UI elements for each new Feature and adds them as children of the Table Layout Region that appears under Component X’s UI Page. See User Interface after UI Refresh.
User Interface after UI Refresh
Creating UI Content for Nested Components
-
In a UI that is based on the Model structure, Page 1 exists for Component C1.
-
In the UI structure, you create a UI Page called Page 2 and specify Component C1 as its Associated Model Node.
The Associated Model Node setting is explained in User Interface Elements and Associated Model Nodes .
-
In the Model structure, you create Component C2 as a child of Component C1, and create several Features beneath C1.
-
You refresh the UI.
If the UI Master Template specifies that nested components are added to their parent’s Page, Configurator Developer adds the elements that represent Component C2 and its children to Page 1.
If the UI Master Template setting specifies that new Pages are created for nested Components, then Configurator Developer generates a UI Page for Component C2. This Page follows Page 1 in the UI.
The UI Master Template setting referred to in the previous paragraphs is described in Defining Custom Pagination and Layout.
For more information, see How the UI Master Template is used when Refreshing a User Interface.
Nodes are Moved within the Model
When you move a node from one location in the Model structure to another, or change the order of nodes beneath their parent, you must refresh the UI. When you refresh the UI, Configurator Developer updates the UI structure so it reflects the Model structure.
Consider the following examples.
Moving a Node that is Associated with a UI Page
-
You move a node that is associated with a UI Page (for example, a Component) from one location in the Model to another.
-
You refresh the UI.
Configurator Developer updates the navigation Menu, Page Links, and the UI Page element as necessary to reflect the node’s new location in the Model structure.
-
You create a Check Box element and associate it with a Boolean Feature.
-
You move the Boolean Feature to a different parent in the Model structure (for example, from Component C1 to Component C2).
-
You refresh the UI.
If the Check Box’s new parent element is refresh-enabled, Configurator Developer moves the Check Box from its previous location in the UI to its parent’s UI Page. If the Check Box’s new parent element is not refresh-enabled, the Check Box remains in its current location in the UI.
Nodes are Deleted from the Model
When you delete a UI element’s associated Model node and then refresh the UI:
-
If refresh is enabled for the element, Configurator Developer deletes the element and any of its children.
-
If refresh is disabled for the element, the element remains in the UI but it is disassociated from its Model node and is read-only at runtime. In other words, its Associated Model Node setting becomes null.
A UI element that has no associated Model node appears at runtime, but it is read-only. For example, an Oracle Configurator end user cannot use an Enhanced Check Box element to select an option at runtime if it has no associated Model node. You can modify the element by specifying a new associated Model node, or delete the element if you do not want it to appear in the UI.
Configurator Developer also disassociates an element from its associated Model node when you refresh the UI after the node is moved out of the UI Page’s scope. For details, see Associated Model Nodes and Page Scope.
Nodes are Modified in Certain Ways
Changes to Model nodes that occur in Configurator Developer and require a UI to be refreshed include:
-
The Include in Generated UI setting changed
-
The Enable Option Quantities setting changed on an Option Feature
-
The Maximum Selections value changed to or from ’1’ on an Option Feature
-
The Instantiability setting on a Model Reference or Component changed. For example:
-
From Required Single Instance to Optional Single Instance
-
From Optional Single Instance to Required Single Instance
-
From Multiple or Variable Instances to either Required Single Instance or Optional Single Instance
-
Changes to Model nodes that occur in Oracle Bills of Material and require a UI to be refreshed (after the BOM Model is refreshed) include:
-
The Maximum Quantity changed to or from ’1’ on any BOM node
-
The Mutually Exclusive setting changed for a BOM Model or BOM Option Class
All of the changes listed in this section (except the one related to the Include in Generated UI setting) cause a different template to be used to display the modified node when you refresh the UI. For details, see:
Changes that Do Not Require a User Interface to be Refreshed
If the Model structure has not changed in any way since you generated or refreshed a UI, you do not have to refresh it. You also do not have to refresh a UI after editing it to see your changes at runtime. Editing a UI is described in Editing a User Interface.
Refreshing a UI is also not required if a UI Content Template that the UI refers to has changed. A UI that references a UI Content Template dynamically renders the template’s content at runtime, so any changes to the template appear automatically. For more information about UI templates, see Introduction to User Interface Templates.
How the UI Master Template is used when Refreshing a User Interface
Refreshing a UI creates new UI elements or modifies existing elements based on the latest version of the UI Master Template that was used to create the UI. Therefore, changes to the Master Template that occur since you created the UI will be reflected in any new UI content after you refresh the UI.
Refreshing the UI also updates elements for nodes that have changed since the UI was generated or refreshed and require a different template to display them at runtime. For details, see:
When you refresh a UI, Configurator Developer checks the UI Master Template to determine:
-
Which UI Content Template to use to display any new or modified nodes
-
Whether Configurator Developer copies UI Content Templates as page content (UI elements), or incorporates them into the UI by creating Template References
The Template Usage setting is described in Specifying How a User Interface Uses Content Templates.
If the UI Master Template specifies that a UI element is created as page content, Configurator Developer creates a new UI element to replace the existing element when you refresh the UI. For example, the Maximum Selections for an Option Feature changes from 3 to 1. When you refresh the UI, the Enhanced Checkbox Group for that node is replaced with a Enhanced Radio Button Group.
If the Master Template specifies that the template should be incorporated by reference into the UI, the resulting Template Reference refers to a different UI Content Template after the UI is refreshed. For example, a Template Reference that is associated with a BOM Option Class refers to the Multi-Select BOM Item Table template. The Mutually Exclusive setting for this BOM node changes from No to Yes in Oracle Bills of Material, and the BOM Model is refreshed. When you refresh the UI, the Template Reference now refers to the Single-Select BOM Item Table template.
The Refresh Enabled Setting
The Refresh Enabled setting is available in the details page for the UI Definition and specific UI elements. For details, see:
Warning: Use caution when disabling refresh for a UI or a specific UI element. When you refresh a UI, Configurator Developer performs validation that can detect potential issues and help you to resolve them. If UI refresh is disabled, you may be unaware of a problem with the UI and receive an error or observe unexpected behavior at runtime.
Refresh Enabled Setting: User Interface Level
The Refresh Enabled setting in the UI Definition’s details page controls whether Configurator Developer checks the UI to see if it must be refreshed before the Model can be unit tested or published. The UI Definition is explained in User Interface Definition.
If UI refresh is disabled in the UI Definition details page, the UI does not appear in the General area of the Workbench as a UI that must be refreshed, regardless of whether the Model structure has changed. See UI Refresh Status. Therefore, the UI is not refreshed when you refresh all of a Model’s UIs from the General area of the Workbench. However, you can override this setting and refresh the UI from the User Interface area of the Workbench at any time.
By default, the Refresh Enabled setting at the UI level is selected for UIs that are based on the Model structure, and empty UIs. (For a description of each type of UI, see Introduction.)
Refresh Enabled Setting: UI Element Level
The Refresh Enabled setting appears in the details page of the following UI elements:
-
UI Pages
-
Layout Regions
-
Template References
-
Page Flows
-
Menus
For details about these elements, seeIntroduction to User Interface Structure and Design.
When you create a UI that is generated from the Model structure, refresh is enabled for all of the UI elements listed above by default. Refresh is also enabled for all manually-created UI elements by default, unless the element’s parent is not refresh enabled. In this case, refresh is also disabled for the new element.
You may want to disable UI refresh on a specific element if you want to maintain the element and prevent Configurator Developer from overriding any of your changes.
For example, you may create a region that displays Model content in a highly customized way, or you may want to prevent Configurator Developer from removing or updating a specific UI Template Reference when you refresh a UI. For example, a Model Reference’s instantiability changes from Required Single Instance to Multiple or Variable Instances. If you want the UI Template Reference to continue to refer to the same template, deselect the Refresh Enabled setting in the element’s details page.
If you deselect Refresh Enabled for a UI element, Configurator Developer does not update the element or any of its children when you refresh the UI. This is true even if refresh is enabled for any of the element’s children. If refresh is enabled for the parent element but not for its child, then Configurator Developer updates only the parent element.
UI Template References and UI Refresh
For background information about UI Template References, see User Interface Template References.
It is possible for the target of a Template Reference to change to a different UI Content Template when you refresh the UI. This occurs only when the Template Reference’s associated Model node has changed such that the template that was originally the Template Reference’s target is no longer appropriate for displaying the node at runtime.
For example, the Template Reference that is associated with an Option Feature has the Dynamic Drop-down Control template as its target. You change the Feature’s Maximum Selections value from 1 to 3, and then refresh the UI. Configurator Developer checks the UI Master Template and changes the Template Reference’s target to the Enhanced Checkbox Group template. This is because the Option Feature now corresponds to the "Multi- Select" setting in the UI Master Template, and continuing to display the node using a drop-down control would allow end users to select only one of the Feature’s Options at runtime.
The following changes do not cause the target of a Template Reference to change when you refresh a UI (these changes occur when editing a UI):
-
You change a Template Reference’s target (that is, you specify a different UI Content Template)
In this case, refreshing the UI does not change the target back to the original template, even if the new target does not match the template specified for the Model node in the UI Master Template.
-
You change a Template Reference’s Associated Model Node setting (that is, you specify a different Model node)
In this case, refreshing the UI does not change the target to a different template, even if the new node’s type does not match the template specified for that node in the UI Master Template.
Configurator Developer does not "undo" your UI edits when refreshing a UI. In other words, when you refresh a UI, Configurator Developer updates the UI to reflect changes you make to the Model structure, not changes you make when editing the UI. For details, see Changes that Require a User Interface to be Refreshed.
Elements Created from a UI Content Template and UI Refresh
Before reading this section, you should understand how UI elements are created from UI Content Templates. For details, see Creating UI Content from a User Interface Content Template.
Refreshing a UI replaces existing UI content that was created using a UI Content Template only when both of the following are true:
-
The node specified as the Associated Model Node for the region’s root node was modified
-
The modified node now corresponds to a different setting (and template) in the UI Master Template
In this case, Configurator Developer replaces the existing content with the content of the UI Content Template that is specified by the UI Master Template for the node’s new type.
For example, you create UI content using the Multi-Select BOM Item Table with Header UI Content Template and select a BOM Option Class as the root element’s Associated Model Node (the root element for the Multi-Select BOM Item Table is a Flow Layout). You then edit the root element (the Flow Layout), enable UI refresh, and set its Associated Model Node to an Option Feature that has a Maximum Selections value of 3. When you refresh the UI, Configurator Developer replaces the UI content with the content of the Enhanced Checkbox Group UI Content Template (since this is the template specified for the Multi-Select Option Features setting in the UI Master Template).
If you delete the root element’s associated Model node, then Configurator Developer deletes the UI element and its children (that is, the entire region) when you refresh the UI. If you move the root element’s associated Model node, then Configurator Developer moves the element and its children to reflect the node’s new location in the Model structure when you refresh the UI. See Sequence of Model Structure and UI Elements after UI Refresh.
If you delete or move the root element’s associated Model node, and the root element is not refresh-enabled, then Configurator Developer disassociates the element and the Model node when you refresh the UI. In this case, the UI element will be read-only at runtime and you may want to delete the element or assign it to a different Model node.
Controlling the Content of a User Interface
There may be portions of a Model’s structure that you do not want to display in the User Interface. For example, you define a Component that is a collection of Totals used in calculations required by the configuration. You use these nodes when testing your runtime Configurator, but do not want your end users to see them.
To prevent Configurator Developer from generating a UI element for a node or its children, open the node for editing in the Structure area of the Workbench, and then, in the node’s details page, deselect Include in Generated UI. This ensures that Configurator Developer does not generate UI elements for the node or any of its children when you generate or refresh the UI. If you deselect this setting after generating a UI, Configurator Developer deletes the node’s associated UI element when you refresh the UI. For details, see Changes that Require a User Interface to be Refreshed.
You can also dynamically hide or show UI elements at runtime based on conditions that you define. This is explained in Runtime Conditions and User Interface Elements.
A UI element does not appear in the UI if its associated Model node is not effective at runtime. A Model node’s effectivity takes precedence over any display condition that may be defined for its associated UI element. For more information, see Model Structure and Effectivity.
User Interface templates determine the default content of a UI that is based on the Model structure. For details, see Introduction to User Interface Templates.
By default, some Global Links appear in the runtime Oracle Configurator. If you do not want these links to appear, see Preventing Global Links from Appearing at Runtime.
Runtime Navigation
The UI Master Template you select when generating a UI determines the UI’s primary navigation style. The available styles include step-by-step, side menu, subtab, and Model tree. For details, see the description of each predefined UI Master Template in User Interface Master Templates.
You can also provide additional navigation capabilities by creating navigation buttons or links to UI Pages. Refer to the following sections for more information:
At runtime, the primary navigation controls available in a UI may change when a referenced Model’s navigation style is different from the parent Model’s. See Alternate Navigation Defined in a Referenced Model’s UI.
Alternate Navigation Defined in a Referenced Model’s UI
The generated UI for a Model uses the Single Level Menu primary navigation style. The UI for one of its child (referenced) Models was generated using a different UI Master Template that uses the step-by-step navigation style. At runtime, when an end user navigates into the child Model (for example, by using a drilldown control), the first Page in the Page Flow is displayed and the Menu for navigating through the parent Model is replaced by a set of Back and Next buttons for navigating through the child Model. After configuring the child Model, the end user clicks either a Cancel button or an Apply button to return to the parent Model. Clicking Apply saves all of the changes made in the child Model. while clicking Cancel cancels any pending changes.
In this example, clicking the Back button only displays the previous Page in the flow; it does not enable the end user to return to the parent Model.
For more information, see Integrating Referenced User Interfaces.
Using a Web Browser’s Forward and Back Controls
The runtime Oracle Configurator supports the use of a Web browser’s Forward and Back navigation controls. However, it is recommended that end users use the navigation controls provided in the generated UI, such as the navigation tree, a menu of Page Links, or Back and Next buttons (in a UI that provides step-by-step navigation).
When an Oracle Configurator end user navigates using the browser’s Back or Forward button, a warning message indicates that the page data has expired. At this point, the end user must resubmit the data (for example, by clicking Refresh), and then confirm the action to continue.
The Configuration Summary Page
The Configuration Summary page lists all items that an Oracle Configurator end user has selected during a configuration session, as well as any items that are invalid or unsatisfied. An end user can navigate to this page at any time to, for example, review all selections when configuring an item or at the end of a session before saving the configuration. The predefined UI Master Templates display Cancel, Return to Configuration, and Finish buttons on this page by default.
For more information about unsatisfied items, see Status Indicator Images.
When you generate a UI that is based on the Model’s structure, the predefined UI Master Template you select displays a Preview Configuration button on each UI Page at runtime. You can also enable end users to navigate to the Configuration Summary page by creating a UI control and assigning the Go to Preview Page action to it. For details, see User Interface Actions.
By default, all Items in the CZ schema’s Item Master that have the Orderable check box selected appear in the Configuration Summary page. For details about this setting, see Orderable Items.
The predefined Summary Page UI Content Templates are described in Summary Page Templates.
Displaying Prices and Available to Promise Dates
By default, prices and Available to Promise (ATP) information does not appear in a runtime Oracle Configurator that is launched from a host application or when unit testing a configuration model from Configurator Developer (in other words, using the Model Debugger or a generated UI). To enable prices or ATP in either of these environments, you must first define several profile options. For details, see the Oracle Configurator Installation Guide.
If pricing and ATP are enabled, some additional setup is required to display prices and Available to Promise (ATP) information when unit testing. For details, see Displaying Pricing Information and ATP Dates when Unit Testing.
For more information about integrating prices and ATP with Oracle Configurator, see the Oracle Configurator Implementation Guide.
For important information about displaying pricing and ATP using UI Content Templates, see Displaying Pricing and ATP Using a UI Content Template.
Multiple Language Support and the Runtime User Interface
If you have implemented Multiple Language Support (MLS), you can create a single UI to use with multiple languages, or create a different UI for each language in which you do business.
For more information, seeIntroduction to Multiple Language Support.