Configuring Solver Options
This chapter covers the following topics:
- Accessing Scenario Specific Solver Options
- Setting Up General Solver Options
- Setting Up Resource Business Objectives
- Setting Up Campaign Run Optimization (CRO)
Accessing Scenario Specific Solver Options
To access the Solver Options window:
-
From the Model Workspace, right-click a scenario.
-
Select Solver Options.
You also can use the Solver Options button from the schedule views to access the Solver Options window.
Setting Up General Solver Options
This section provides an overview of general options, scheduling work orders according to units of effort, resource criticality, and discusses how to set up general solver options.
General Options Overview
Production Scheduling can govern the scheduling of operations that exist upstream from a bottleneck operation in a routing. For example, consider a routing with five operations: saw, weld, heat, assembly, and test and pack. The bottleneck resource is the oven, which is required for the heating operation. The routing and operations are displayed in the following diagram:

When Production Scheduling creates operations to satisfy demand, it posts earliest date and available date constraints that are associated with the operations. The operations are scheduled in a just in time (JIT) manner, according to their available date. This scheduling behavior is governed by any precedence constraints in the routing and can occur only if precedence constraints permit JIT to available date.
In this example, the saw and weld operations could have been made earlier in the process, however, these operations are scheduled to align with the bottleneck operation, heat. This is the default behavior in Production Scheduling.
Due to the bottleneck created by the oven, the demand is scheduled late. A solve yields the schedule displayed in the following diagram:
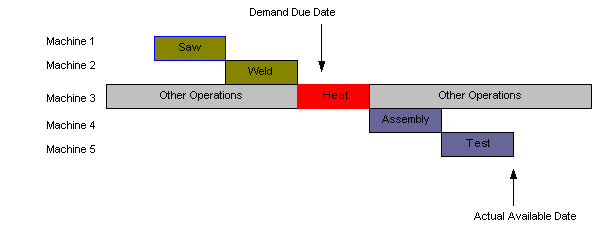
Using the solver option, JIT to Due Date, you can pull the saw and weld operations forward and generate a schedule resembling the one in this diagram:
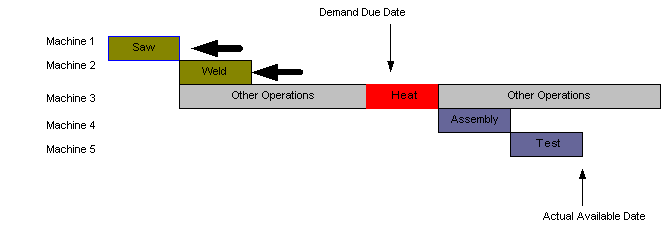
Upstream operation pulled forward
With the saw and weld operations pulled forward, the upstream operations are placed at a point that provides you with a more efficient way to manually schedule the remaining operations in the routing to a time earlier in the process. This helps to make the demand on time and is effective if you want to schedule operations close to the demand due date rather than close to the bottleneck operation on the routing.
Note: This tactic may result in a longer makespan for a routing if this solver option is set to Due Date. For example, in the example, if the solver places upstream operations earlier in the scheduling horizon and if the solver cannot move the bottleneck operation without manual intervention, the makespan is longer for this demand.
Scheduling Work Orders According to Units of Effort Overview
This section provides an overview of scheduling work order operations and discusses these scenarios:
-
A schedule that has the Units of Effort option disabled on the routing.
-
A schedule that has the Units of Effort option enabled and adjacent operations disabled on the routing.
-
A schedule that has both the Units of Effort and the adjacent Operations Preferred options enabled on the routing.
Scheduling Work Order Operations
In each of these examples, producing Item A requires three operations: Operation A, Operation B, and Operation C. Operation A runs on Machine 1 for three hours; Operation B runs on Machine 2 for one hour; Operation C runs on Machine 3 for two hours. The lot multiple is 20 and Item A takes six hours to produce in this schedule. The routing is shown in the following diagram:
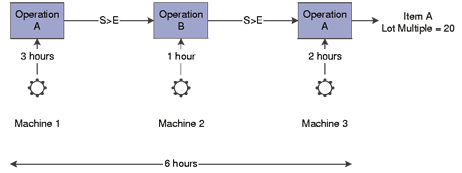
Basic routing for producing Item A
Scenario 1: A Schedule That Has the Units of Effort Flag Disabled on the Routing
For this scenario, assume the following:
-
Order due date: January 1, 4:00 p.m.
-
Horizon start: January 1, 8:00 a.m.
-
Order quantity: 80
-
Enable Units of Effort: NO
The number of hours that each machine can run per operation is:
| Machine Number | Runs per Operation |
|---|---|
| Machine 1 | 1-12 hour operation |
| Machine 2 | 1-4 hour operation |
| Machine 3 | 1-8 hour operation |
This diagram demonstrates the routing schedule with the Schedule Work Order operation according to the Units of Effort option disabled:
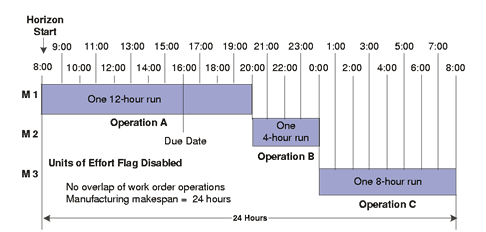
With this option disabled, there is no overlap on work order operations. It takes 24 hours to produce Item A.
Scenario 2: A Schedule That Has the Units of Effort Flag Enabled and Adjacent Operations Disabled on the Routing
For this scenario, assume the following:
-
Order due date: January 1, 4:00 p.m.
-
Horizon start: January 1, 8:00 a.m.
-
Order quantity: 80
-
Enable Units of Effort: YES
The number of hours that each machine can run per operation is:
| Machine Number | Runs per Operation |
|---|---|
| Machine 1 | 4-3 hour operations |
| Machine 2 | 4-1 hour operations |
| Machine 3 | 4-2 hour operations |
The following diagram demonstrates the routing schedule with the Schedule Work Order operation according to their Units of Effort option enabled:
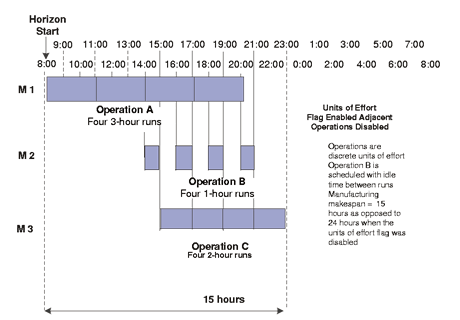
Routing schedule with units of effort flag enabled adjacent operations flag disabled
By enabling the scheduling to apply work order units of effort, substantial benefits are realized:
-
Manufacturing makespan is substantially reduced; manufacturing time is reduced from 24 hours to 15 hours.
-
Material consumption and production is more accurate.
-
Resource utilization is more accurate.
Scenario 3: A Schedule That Has Both the Units of Effort and the Adjacent Operations Preferred Flags Enabled on the Routing
For this scenario, assume the following:
-
Order due date: January 1, 4:00 p.m.
-
Horizon start: January 1, 8:00 a.m.
-
Order quantity: 80
-
Enable Units of Effort: YES
-
Adjacent operations: YES
Note: You cannot enable adjacent operations unless the Units of Effort option is enabled.
The number of hours that each machine can run per operation is:
| Machine Number | Runs per Operation |
|---|---|
| Machine 1 | 4-3 hour operations |
| Machine 2 | 4-1 hour operations |
| Machine 3 | 4-2 hour operations |
The following diagram demonstrates the routing schedule with both the Schedule Work Order operation according to their Units of Effort and Schedule Adjacent Operations options enabled:
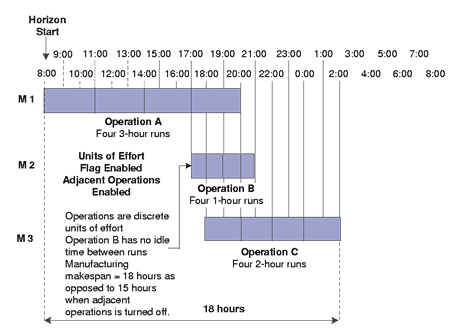
By enabling both work order units of work and adjacent operations flags, you have sacrificed some makespan to keep operations on Machine 2 together. Without adjacent operations enabled, total manufacturing time was 15 hours. With adjacent operations on, total manufacturing time is 18 hours, but you have removed idle time on Machine 2.
Planned Start and Planned End Times
Because of the nature of work orders, a given operation within a work order cannot be split into several instances. This can pose problems when operations are broken down into their individual units of work. For example, Operation B becomes Operation B1, Operation B2, and Operation B3. Planned start time and Planned end time fields in the Operations tab of the Work Order Editor address this issue. The difference between the two fields is in the logic of how the dates are rolled up into these fields.
When a work order is not broken down into its units of effort, the start and end dates reflect the start and end times of the operation, respectively. However, when a work order is broken down into its units of effort, the planned start date reflects the start time of the first operation instance, Operation B1, and the Planned End Date is the end time of the last operation instance, Operation B3, as illustrated in the following graphic:

When the Work Order units of effort is enabled, the number of routing instances that are scheduled to fulfill the work order quantity, is displayed in the work order header. The number takes into account the routing lot multiple that is required to perform this calculation. For example, if a work order for a routing is for 50 units and the lot multiple is 25, the quantity is displayed in the work order header.
Note: The number of routing instances that are schedule to fulfill the work order quantity is displayed only if units of effort is enabled. If this feature is not enabled, the field shows a one ("1").
This field always appears as an integer value and is rounded up if a work order is entered in a non-lot multiple quantity.
Resource Criticality Overview
Production Scheduling has the ability to configure whether the solver first addresses earliest or most resource criticality during solve sequencing. Resource contention, or criticality, is a measurement that occurs in the solver when two or more operations compete for the same resource at a given point in time in the scheduling horizon. The more operations that need to be scheduled on that resource at that given point in time coupled with its capacity, the higher the resource contention or probability that constraints will be violated. In Production Scheduling, you can set whether the solver first addresses earliest contention or most contention resource criticality during solver sequencing.
Focusing and resolving the most critical constraints in the horizon has generally been regarded as the most effective scheduling strategy to resolve floating bottlenecks when sequencing operations. Addressing the more critical problems first results into the problems being broken down into smaller subproblems which are easier to resolve.
Solving in this fashion provides high quality results for most Production Scheduling client models. However, sometimes resolving the highest levels of criticality in the horizon first may not necessarily be optimal from a scheduling perspective, but rather addressing the earliest instances of resource criticality may be more efficient in some cases, such as (but not limited to):
-
Routings that contain recursive resources that are considered manufacturing bottlenecks.
-
Coupled with the recursiveness, a mixture of crewed and noncrewed operations that also require these bottleneck resources.
-
Preferred run times for noncrewed operations during non-business hours (for example, evenings and weekends).
It is recommended to implement this feature following the guidelines above and to run some trials with this option enabled and disabled to understand the differences in schedule quality.
Setting Up General Solver Options
To modify the Solver Options for a scenario:
-
From the Model Workspace, right-click the scenario and select Solver Options.
-
From the General tab, complete these fields:
Solver Options - General Tab Field Description Build Strategy When you define demand policies, you can use the Build Strategy field to configure how Production Scheduling fulfills demand.
Select JIT to indicate that items are scheduled for production in a just in time fashion. When this option is selected, demands are fulfilled with production occurring as close to the due date as possible. The JIT build strategy is useful if you want to avoid storing inventory.
Select Pre-Build to indicate that the solver schedules production at the earliest available opportunity. When this option is selected production is generally started at the beginning of the schedule horizon.Note: Pre-Build strategy must be used for scheduling Work Orders in the context of a Visit.
Resource Capacity Horizon Define the resource capacity horizon duration and unit of measure. Enable Supply Tolerance Offset Select to indicate that supply tolerance offset should be used. If this option is selected, there will be no net new production recommendations generated at any level in the BOM (for example, only work order supply production will be scheduled). If there is insufficient work order supply, inventory will be automatically added to prevent levels from falling below zero (demand is permitted to be shorted). A Production Scheduling log message is generated to indicate what inventory quantity adjustments were made. Using this feature assumes work order supply is sufficient to meet demand. Relax Purchased Items Beyond Lead Time When this option is enabled, the order multiple is internally set to a very large value and effectively ignored beyond lead time - one will see the addition of a new red line in the item graph to represent the time of the item. Beyond the lead time, the item graph is shaded to indicate infinite supply.
This option allows you to control whether or not purchase item multiples are respected beyond supplier lead time or not. Keeping these "relaxed" helps solve performance and is generally recommended.
Relax Purchased Items Beyond Lead Time is set to Yes by default. If the option is set to No, the item graph is displayed taking into account the order multiples.Allow Firm Dates to violate Earliest Start Date Select this option if work order operations have firm start dates (Firm Start or Firm Range status) and you want to allow operations to be scheduled before the work order Earliest Start Date. Default value is unchecked. Adjust Post Horizon Demand Quantity When enabled, this feature uses the "Demand Satisfaction Date" provided by the integrated planning system and allows the solver to remove this demand at the end of the schedule horizon. This feature compensates for late demands that may not have associated work order production in a given scenario. Scheduling Work Order operations according to their unit of effort From the drop-down menu, select one of these options: -
Yes to enable units of effort.
This option indicates that Production Scheduling should cross reference the work order to the corresponding routing lot multiple. This results in the work order being divided into lot sized quantities for more flexible sequencing, reduced manufacturing makespan, and accurate item consumption profiles.
-
No to disable units of effort.
-
Select by Routing to schedule selected routings by units of effort.
When this option is selected, you must configure the applicable routing properties.
See "Setting Routing Properties," Creating Production Scheduling Models, Production Scheduling.
See "Scheduling Work Orders According to Units of Effort Overview," Configuring Solver Options, Production Scheduling.Adjacent operations referred Select this option if you want to enable adjacent operations.
See "Scheduling Work Orders According to Units of Effort Overview," Configuring Solver Options, Production Scheduling. -
-
To open the Solve Sequence page, click Solve Sequence.
-
Click OK to save and close the Solver Options page.
Setting Up Resource Business Objectives
This section provides information on the following topics:
-
Scheduling resource and groups of resources overview.
-
Accessing the solve sequence window.
-
Creating solve sequence stages.
-
Changing solve sequence stages.
-
Remove solve sequence stages.
-
Rename solve sequence stages.
Scheduling Resources and Groups of Resources Overview
From a resource perspective, Production Scheduling generically considers all crews, machines, tool capacity and calendar constraints simultaneously when sequencing operations. Focusing in on and resolving the most critical constraints in the scheduling horizon has generally been regarded as the most effective scheduling strategy to resolve multistage floating bottleneck problems when sequencing operations. Addressing the more critical problems first results in the sequencing problems being broken down into smaller subproblems, which are usually easier to resolve.
It is sometimes desirable to be able to dictate which resources the solver should focus on first when creating a schedule as opposed to having the solver simultaneously consider all constraints and potentially jump between resources when contention levels stipulate this behavior. Supporting resources may be considered secondary in terms of the priority of having their constraints considered during the solve process.
Production Scheduling explicitly allows users to dictate to the solver which resource or group of resources should be focused on and in what order they should be considered. This approach enables scheduling in an incremental fashion by means of some simple configurations in the application. It is also possible to stop the solver after a particular solve stage to review the schedule or make manual scheduling changes.
Determining the priorities by which the solver will address resources or groups of resources is achieved by setting up solver stages. The stages are "lined up" in the order in which the solver will address them.
Resources within a schedule can be assigned to solver sequence stages. Solver sequence stages determine the order in which the solver activates constraints during a solve. Different solve parameters can be specified by stage so, for example, Stage 1 can be solved using the build strategy Pre-Build and the other stages can be solved using JIT. By including resources in a stage, you can set the priorities in which the resources are addressed and solved by the solver. The solver addresses Stage 1, followed by Stage 2, Stage 3, and so on. Resources that are not included in a solve stage are scheduled last.
Finally, with solve stages you can enable multi-stage Campaign Run Optimization.
If no solver sequence stages are set up, the solver considers all resource constraints simultaneously.
Example of Using Solver Sequence Stages
The following example demonstrates scheduling resources and resource groups, using a general flow of product through a factory, starting with the Mounter and ending with the Tape and Reel resources.
The data for this example is taken from the Semiconductor model, which is shipped with the Production Scheduling application.
The flow of resources is shown below:
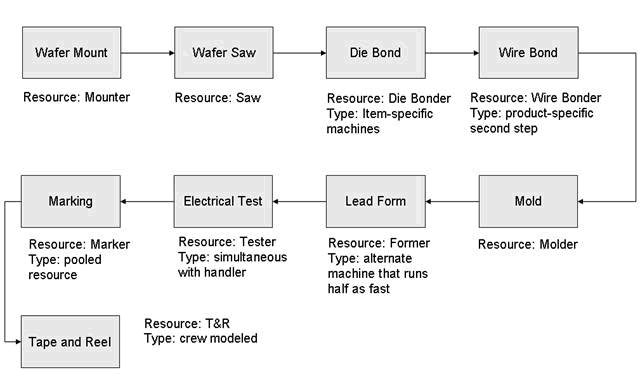
General flow of a product through a factory
The manufacturing processes are set up to resemble the routing shown in the preceding diagram. Demands have been entered for the various products.
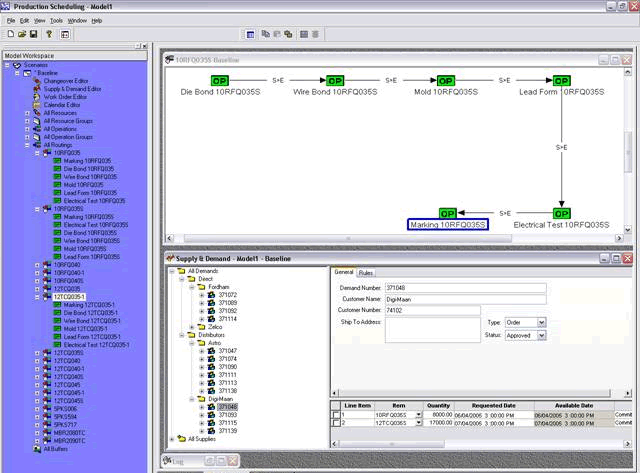
Routing an incremental schedule
By running a solve with all constraints enabled, the demand fulfillment is really poor on a first pass schedule, as illustrated in the following screen shot.

Demand fulfillment after a solve
Looking at the Resource Gantt the electrical testing machine is the dominating bottleneck resource in the factory:
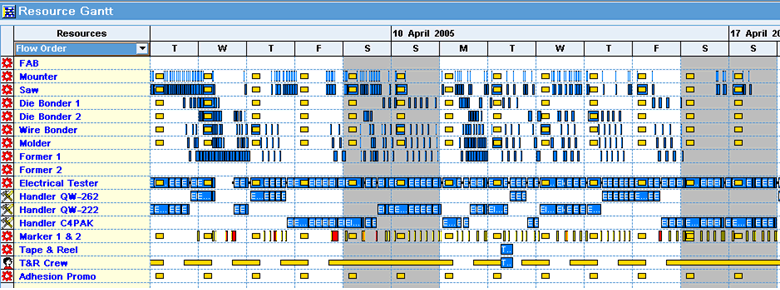
Resource Gantt
By using this feature, you can create a schedule by first solving the bottleneck resource, and then incrementally enabling upstream constraints, followed by downstream constraints.
To set up your schedule to incrementally solve for resources, you need to define the solver sequence and assign the appropriate resources to the respective stages. Create the remaining solve stages and assign the resources appropriately. In this case, the solve stages downstream resources incrementally in order of precedence, followed by working backwards, upstream, from the Electrical Test machine as illustrated.
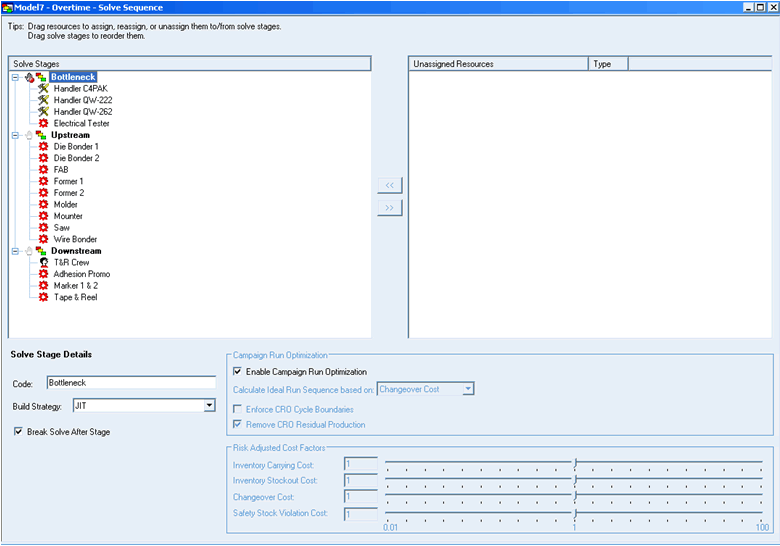
Creating the remaining solve stages
A break is inserted after the first solve stage to allow for schedule review and possible manual scheduling intervention.
Note: All resources that are not assigned to a solve stage are solved last with constraints enabled.
After re-solving with solve stages, the solve will stop at each break. From here, the schedule can be reviewed and changed by manually scheduling.
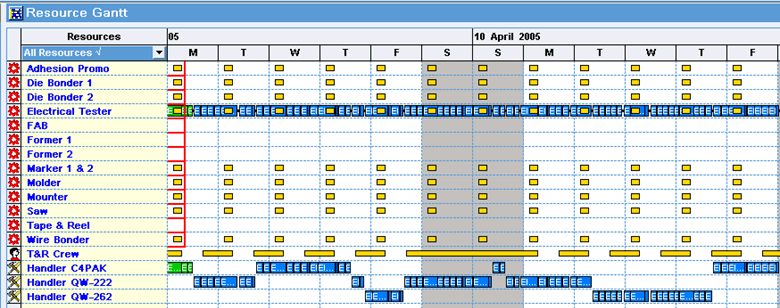
Resource Gantt review after solve break
After making a manual scheduling change, a repair solve is required to reflect the manual change after which the solve can be resumed by clicking the Resume Solve button on the toolbar where it will stop at the next solve break if defined.
After resuming the solve, the demand fulfillment, shown below, has increased significantly on the first pass schedule as illustrated in the following screen shot:

However, the Electrical Test machine is still the bottleneck as shown in the following Resource Gantt:
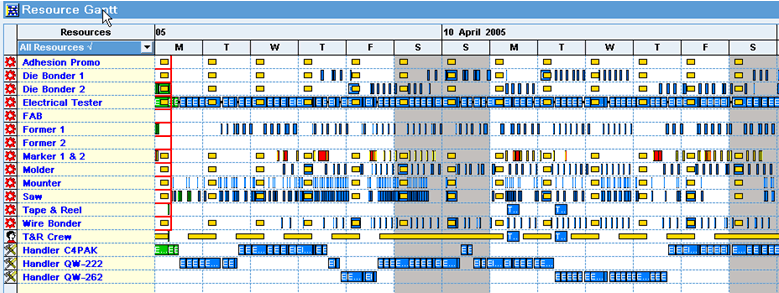
By looking at the key performance indicators (KPIs) view, shown below, you can see the improvements from both a customer service perspective and changeover minimization perspective. In all cases, fill rates are higher using the incremental approach, total stockouts and stockout time is lower, and time lost due to changeovers is lower.

There is no black and white answer as to when the best time to use this functionality may be. Generally, if you are not satisfied with the first schedule using the generic solve logic, it may be a good idea to try incremental schedules for various solver trials. The following are some general guidelines:
-
Solve the dominating bottlenecks in the first solve stage.
-
Work your way downstream by resource, keeping alternate resources in the same solve stages.
-
Once you reach the end, work your way back upstream from the bottleneck resource.
The optimal sequence will result from testing various solve stage permutations and the order in which resources are solved.
Accessing the Solve Sequence Window
To access to Solve Sequence window, right-click on the Scenario from the Model Workspace and select Solve Sequence. The Solve Sequence window appears.
Creating Solve Sequence Stages
The Solve Sequence window is used to create, modify and delete Solve Stages. It allows you to assign a resource to the appropriate solve stage. This feature allows you to determine the order in which a solve is generated to resolve bottlenecks and other issues to meet your needs. The left side of the Solve Sequence window is used to define solve stages for your scenario. The right side of the window displays all resource that can be assigned to a solve stage.
To create a new solver sequence stage:
-
From the Model Workspace, right-click the scenario, and select Solve Sequence.
-
To add a solve stage, click the Add Solve Stage from the toolbar, or right-click in the Solve Stage region and select Add Solve Stage. A new solve stage appears in the Solve Stage region.
-
To rename the stage, select a solve stage and enter the solve stage name in the Code field in the Solve Stage Details area. You can also right-click a solve stage select Rename, and enter a new name.
-
Use the Build Strategy option to assign the solve stage as Pre-built or JIT.
-
To have the solve stopped upon completing the solve stage, select the Break Solve After Stage option. The solve is stopped at the solve stage, allowing you to review the schedule and make manual scheduling changes, if required.
-
If necessary, define the Campaign Run Optimization options for the solve stage. The Campaign Run Optimization options will be enabled if there is an applicable resource in the respective solve stage, otherwise the options are not applicable. This features allows you to define specific campaign run options to the solve stage, and these can differ from the Solver Option window settings defined for the scenario.
See "Setting Up Campaign Run Options," Configuring Solver Options, Production Scheduling.
-
If necessary, define the Risk Adjusted Cost Factors for the solve stage. Use this feature to define specific risk factors to the solve stage, and these can differ from the Solver Option window settings defined for the scenario.
See "Risk Adjusted Costs," Configuring Solver Options, Production Scheduling.
-
Create additional solve stages as needed and define their solve stage details.
-
Drag and drop an unassigned resource to a Solve Stage or perform the following:
-
Select a solve stage.
-
Select an unassigned resource and click <<. The resource appears under the solve stage on the Solve Stages regions.
-
Repeat the process until you have assigned the resources to the appropriate solve stage. Resources are arranged alphabetically when they are assigned to a solve stage. The order is not indicative of a work order process.
-
-
If you want to move an assigned resource to a different Solve Stage, drag and drop the resource to the appropriate solve stage.
-
To remove a resource from a solve stage, select the resource and click >>. The resource is removed from the Solve Stage area and appears in the Unassigned Resource area.
Changing Solve Sequence Stages
To change solve sequence stages:
-
From the Model Workspace, right-click the scenario, and select Solve Sequence.
-
Select the solve stage that you want to move.
-
To move the solve stage, click the Move Solve Stage Up or Move Solve Stage Down button on the toolbar, or right-click the solve stage and select the Move Up or Move Down option.
-
To move resource to a different solve stage, drag and drop the resource to the appropriate stage.
-
To remove a resource from a solve stage, select the resource and click >>, or right-click the resource and select the Unassign option. The resource appears in the Unassigned Resources region.
-
To rename the stage, select a solve stage and enter the solve stage name in the Code field in the Solve Stage Details area.
-
Use the Build Strategy option to assign the solve stage as Pre-built or JIT.
-
To have the solve stopped upon completing the solve stage, select the Break Solve After Stage option. The solve is stopped at the solve stage, allowing you to review the schedule and make manual scheduling changes, if required.
-
If necessary, define the Campaign Run Optimization options for the solve stage. The Campaign Run Optimization options will be enabled if there is an applicable resource in the respective solve stage, otherwise the options are not applicable. This features allows you to define specific campaign run options to the solve stage, and these can differ from the Solver Option window settings defined for the scenario.
See "Setting Up Campaign Run Options," Configuring Solver Options, Production Scheduling.
-
If necessary, define the Risk Adjusted Cost Factors for the solve stage. This features allows you to define specific risk factors to the solve stage, and these can differ from the Solver Option window settings defined for the scenario.
See "Risk Adjusted Costs," Configuring Solver Options, Production Scheduling.
Removing Solve Sequence Stages
To remove a solve sequence stage:
-
From the Model Workspace, right-click the scenario, and select Solve Sequence.
-
Select the stage that you want to delete, and click the X (Remove Solve Stages) button in the toolbar.
When you delete a solve stage, all of the resources that were assigned to the stage appear in the Unassigned Resources resource.
Renaming Solve Sequence Stages
To rename a solve sequence stage:
-
From the Model Workspace, right-click the scenario, and select Solve Sequence.
-
Select a solve stage.
-
Enter the new name in the Code field.
Setting Up Campaign Run Optimization (CRO)
This section provides an overview of campaign run optimization (CRO) and model configuration options, and discusses how to set up CRO.
Campaign Run Optimization Overview
This section provides an overview of campaign run optimization (CRO) and provides an example of CRO.
CRO is an optional step to the solve that is run if you have licensed CRO in the application and have configured the data model appropriately. The primary purpose of the CRO solver algorithm in Production Scheduling is to create a production schedule that optimizes campaign run length while minimizing sequence dependent setups on a given machine. Simultaneously, the CRO solver balances the trade-off between the cost of manufacturing and carrying inventory, stocking out or violating safety stock during or across a user defined minimum manufacturing cycle time.
CRO requires separate licensing. This feature is available only if it has been enabled in the License Manager.
To use CRO, you must perform the following:
-
Configure your model to use CRO by enabling this feature in Solver Options window.
-
Indicate which resource is campaign run optimized.
If a resource is a member of a set within an operation, ensure that all resources are marked as campaign run optimized and that they share the same minimum cycle size.
-
Indicate the resource and operation minimum run length by time or quantity.
-
Ensure that you define item carrying costs, item stockout costs, and item safety stock violation costs.
As a general rule, item carrying costs should always be less than item stockout costs.
-
Define machine operating costs.
-
If defining changeovers, define changeover time and cost.
CRO Example
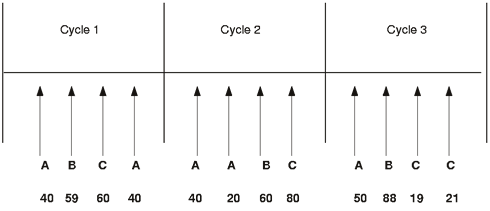
The following diagram provides an example of manufacturing times and demands. This example assumes that we have three weekly manufacturing cycles. Within each cycle, there are demands for Items A, B, and C, in various quantities, which are displayed in the following diagram:
Each item also has a manufacturing process associated with it, which is set up as follows:
-
The grinder, which is used in the production of each item, is marked as a campaign run optimized resource.
-
The minimum run length is 10 units of any item when run on the grinder
-
Operation lot multiple is 5 units.
-
The rate is 2 hours to make 5 units of any product on the grinder
This diagram illustrates the processes for each respective item:
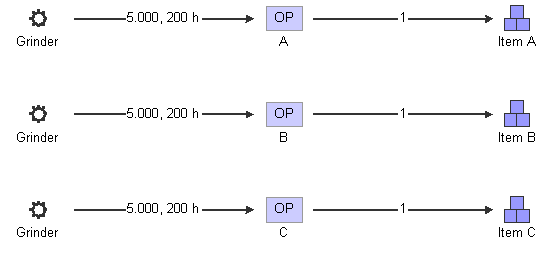
Manufacturing process for items A, B, and C
This table provides the changeover rules for this example:
| Machine | From operation | To Operation | Duration (hours) | Calendar | Cost (US$) |
|---|---|---|---|---|---|
| Grinder | A | B | 1.00 | Default | 75.00 |
| Grinder | B | A | 1.50 | Default | 50.00 |
| Grinder | B | C | 4.00 | Default | 250.00 |
| Grinder | A | C | 2.00 | Default | 80.00 |
| Grinder | C | A | 4.50 | Default | 250.00 |
| Grinder | C | B | 3.00 | Default | 150.00 |
| Grinder | * | * | 1.00 | Default | 50.00 |
The CRO first determines how much of each item is needed in a given bucket, for example supply and demand netting. This diagram illustrates the ideal run length, which is calculated by aggregating demands in the user specified cycle:

For example, if there are demands for 125 units for an item in cycle 1, and there is a minimum run length of 100 items, this step creates a series of operations for the same item to be 125 or more, depending on the operation lot multiple. If there is demand for only 25 units in cycle 1, the run length is calculated as 100 units.
Next, the ideal sequence within each cycle is calculated. The purpose of this step is to minimize changeovers within the user-defined manufacturing cycle times. This is based on changeover cost or time, which is user-specified.
Because the CRO algorithm works in buckets, the solver buckets demand for the CRO, based on the bucket boundaries. In this example the bucket boundaries are weeks. CRO then calculates a plan, based on the weekly bucketed demand, and Production Scheduling then sequences the runs according to the recommendations of the CRO.
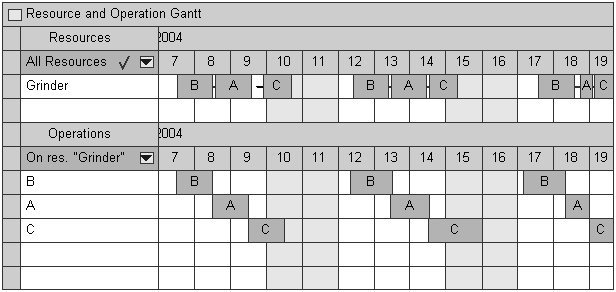
Scenario solve results using CRO
CRO Options Overview
For each schedule, you must first set up your Model Configuration options before you run the CRO. The options that need to be set up are:
-
Minimum cycle time.
-
Minimization of changeovers between cycles.
-
Ideal run sequence.
-
Risk adjusted costs.
-
User defined ideal run sequence.
Minimum Cycle Time
Before you can run the CRO algorithm, you need to specify the manufacturing cycle time that pertains to the run length calculation. Setting a manufacturing cycle time gives the solver insight into your product manufacturing cycle and enables it to determine the appropriate run size that is required to optimize product resources. Generally, the run pattern repeats across cycles.
Minimum Run Cycle is user defined, for example one day, two weeks, and so on. This can be a global option or it can be resource specific.
Minimization of Changeovers Between Cycles
Minimizing changeovers between cycles avoids changeovers between the last operations of the previous manufacturing cycle and the first operation of the of the following cycle. The solver always calculates the optimal sequence based on changeover durations or cost. The ideal sequence is consistent for each cycle, although Production Scheduling won't always run items in the sequence due to supply and demand variability or pull-forward production.
Minimizing changeovers between cycles enables the solver to weigh the changeover cost between cycles against the carrying cost of an item in the next cycle. Production of the item may be pulled forward into an earlier cycle to eliminate a subsequent changeover.
Ideal Sequence Run
Ideal run sequence is the order in which events happen within a cycle. If changeovers are specified by cost, it may result in changeovers which are slightly longer, but cost optimal. If changeovers are specified by time, the time spent on changeovers is minimized but the costs may be higher.
Note: The costs you specify in your scenario greatly impact the quality of your schedule. Make sure that you have accurately specified the costs of inventory carrying, changeovers, safety stock violation, and inventory stockout. Costs are normally calculated during model prototyping.
Risk Adjusted Costs
When the CRO algorithm is run, it looks at various costs in the model, including inventory carrying, inventory stockout, changeover, and safety stock violation costs when it attempts to create an optimal production schedule. These costs are typically imported from your ERP system.
The Risk Adjusted Costs functionality in Production Scheduling enables you to quickly scale the relative costs of inventory carrying, inventory stockout, changeover, and safety stock violation costs. The actual costs in the model do not change, but they are "scaled" in the Production Scheduling solver when it makes trade-off decisions in creating a schedule.
The cost factors default to a value of 1. You can quickly and easily change the relative importance of the specific cost by either moving the slider bar to the left or right of 1, or by manually typing in the value in the field beside the slider bar. The acceptable values for each of the respective scale factors range from 0.01 to 100.
User Defined Ideal Run Sequence
In many environments, you may simply wish to dictate the order of changeovers to run. You can specify the sequence operations should be scheduled in CRO according to attribute (available for CRO resources only). This is an alternate sequencing strategy compared to the current CRO sequencing strategies of Cost or Time.
To define ideal run sequence for the solve stages:
-
From the Model Workspace, right-click the scenario, and select Solve Sequence.
-
Select solve stage.
-
Select User Defined from the Calculate Ideal Run Sequence based on list.
At least one resource within the solve stage needs to be defined to Use Campaign Run Optimization (set from the Solver Options tab in the resource Properties window) for the Calculate Ideal Run Sequence based on list to be enabled.
The mechanism in which the "ideal" sequence is defined is by selecting and sorting the associated attributes and their attribute values on CRO resources in the model.
For example, take attributes "Size" and "Grade". Within "Size" there are 1/4 Inch, 1/3 Inch and 1/4 Inch as attribute values. Within the "Grade" attribute, there are Grades A and B.
Assume the user defined Ideal Sequence is to cycle by size and grade within the size, as outlined in the following example:
1/4 Inch-Grade A -> 1/4 Inch Grade B -> 1/3 Inch-Grade A -> 1/3 Inch Grade B -> 1/2 Inch-Grade A ->1/2 Inch Grade B
Assign attributes to a resource using the Attribute Processing tab in the resource Properties window, as shown in the example below.
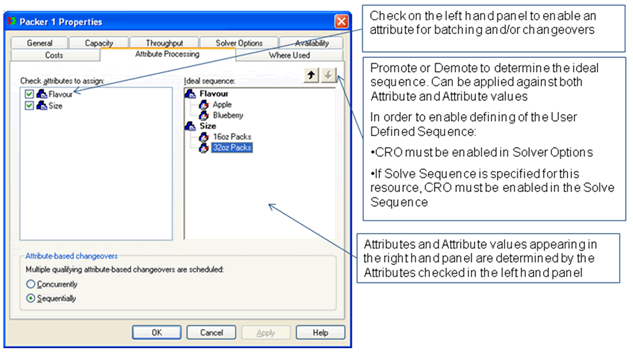
Essentially, the order in which the selected attributes and attribute values appear in the Ideal sequence column dictates the ideal sequence of operations (the operations must be associated to these attributes). For example, if Grade was more important than Size, you could move Grade above the Size attribute using the Move Up or Move Down button, located above the Ideal sequence column. The sequence would then cycle by Grade and then Size within the Grade.
Model Building Considerations
When building models, you should consider certain topics:
-
Optimizing single-capacity machines.
-
Late demand.
-
Campaign run optimized machines.
Only single-capacity duration machines can be optimized, and no more than one machine per routing can be optimized for repetitive manufacturing. If the machine is part of a resource set, then all machines within the set must be optimized for repetitive manufacturing.
Because the CRO algorithm is based on buckets, it is possible that the algorithm may not recognize demand if a given demand is late within a given bucket. For example, if demand is due at noon within a bucket, the CRO is solving on the basis of daily buckets, and the sequence of operations determines yields on available time of 4:00 p.m., the CRO phase of the solve does not see this demand as late.
Because the sequencing phase of the solver cannot change the operation sequence determined by the CRO, the demand may appear late within a given cycle. If inventory levels are below zero on a cycle boundary, then the CRO sees an item stockout. However, there is logic in the solver that internally sets the due date of the late demand to a previous bucket if there is sufficient idle time on the campaign run optimized machine. The CRO is then internally run again.
Within the manufacturing flow of an item, from raw materials to finished product, you can specify either one resource or resources in a resource set that can be campaign run optimized. This diagram below illustrates run optimization on a single resource, which is Machine 5.

The resource or resources in a resource set that you designate as campaign run optimized may be used in several different operations, if the operations are not producing the same final item. This diagram below illustrates this concept for Machine 5.
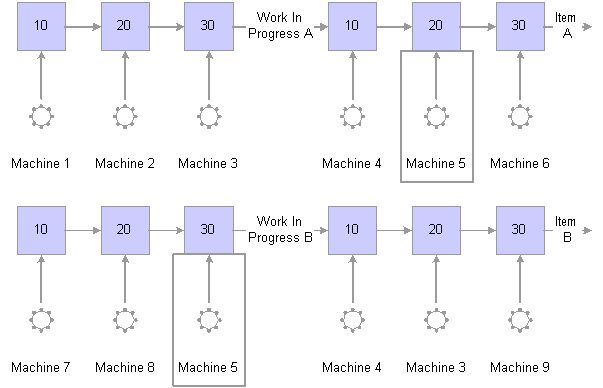
Note: Only single capacity and batchable machines can be designated as campaign run optimized.
A campaign run optimized resource cannot be set to relaxed.
Some scenarios, which are explained in the following paragraphs, are not conducive to run optimization:
-
You cannot specify a resource as campaign run optimized if the machine is used in a material flow that feeds into another material flow, which has a campaign run optimized machine.
-
A resource can be used only once in the entire material flow.
Multiple runs on the same resource in the same material flow presents conflicting objectives.
The following diagrams illustrate these restrictions on run optimization. The diagram below illustrates a scenario in which Machine 3 is campaign run optimized, but feeds into a material flow in which Machine 5 is also campaign run optimized.

The diagram below illustrates one resource being campaign run optimized more than once in the same material flow.

Minimum Run Length Specification
In Production Scheduling, you can specify a minimum run length. The minimum run length can be set in units or in time. If you set a minimum run quantity on the resource, the operation, which is producing the item, must run a minimum quantity of the item. Similarly, if you set a minimum run in terms of time, the operation must continue for the specified amount of time.
See "Creating an Operation Diagram," Creating Production Scheduling Models, Production Scheduling.
Multi-Stage Campaign Run Optimization Limitations
When using multi-stage campaign run optimization, it is important to note the following limitations:
-
If multi-stage is set up (per item material flow - it can still be single per flow without a solve stage as per existing functionality) but solve stages do not exist, then CRO will be disabled and a warning will appear in the solver log. This is a configuration error (for example, solve using the CSP). Validation should say "Multi-stage Campaign Run Optimization is configured without solve stages. CRO will not be utilized for this schedule".
-
Multi-stage CRO within the SAME routing is NOT supported. CRO resources called in a multi-stage fashion must be in different stages.
-
It is best to limit the number of CRO stages. Keep CRO stages to a minimum.
-
If alternate resources or alternate routings for the same item are present, they must exist in the same solve stage.
-
Resources cannot recur across solve stages. For example, you cannot solve the injection stage more than once.
Setting Up Campaign Run Options
To set up campaign run options:
-
Right-click a scenario, and select Solve Options.
-
Select the Campaign Run Options tab.
-
Complete these fields:
Campaign Run Options Tab Field Description Enable Campaign Run Optimization Select to indicate that you want to use this feature. When you select this option, the remaining fields on this page are available. Minimum Cycle Time Enter a value and select the time measurement required to cycle through demand for the items that are produced. The time measurement options are as follows: -
Seconds
-
Minutes
-
Hours
-
Days
-
Weeks
Resource Specific Select to indicate that minimum cycle time is different for each resource. When this option is selected, set the cycle time and select the Minimize Changeovers between cycles check box on the resource. Minimize Changeovers between cycles Select to indicate that you want Production Scheduling to consider what operations ran in the previous cycle. If possible, the application schedules an operation that can run on this resource without a changeover. Calculate Ideal Run Sequence based on Select one of the following options: -
Changeover Cost - Select if you want to minimize the changeover cost in each cycle.
-
Changeover Time- Select if you want to minimize the changeover time in each cycle.
Note: To accurately minimize changeover costs, you must enter a cost value for each changeover rule.
-
User Defined - Select if you want to define the sequence order used to solve the model.
Enforce CRO Cycle Boundaries Select this option to enforce the CRO cycle boundaries. Remove CRO Residual Production Select this option to remove CRO residual production. View Campaign Run Optimization solution results only Select to view the CRO solve results only. This helps to understand which decisions have been made by the CRO algorithm prior to them being fed into the base solver. This flag is generally only used in model prototyping and not set within a production environment. This flag is not persisted in the data model and is session specific. Risk Adjusted Costs Use the scale to select the appropriate scale factor.
See "Risk Adjusted Costs," Configuring Solver Options,Production Scheduling. -
-
Click OK.