| Skip Navigation Links | |
| Exit Print View | |

|
Font Administrator User's Guide |
To Add the Installation Directory to the Font Path
A. Font Administrator Messages
Note - To modify the font path, you must run Font Administrator as the root user.
Modifying the font path may include the following subtasks:
To list the font path
To reorder the font path
To delete font path Elements
To add font path Elements
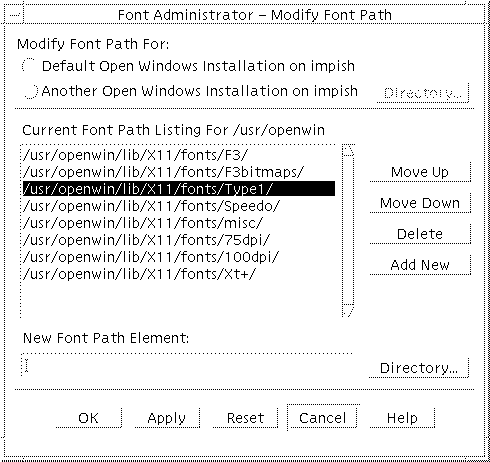
Figure 3-3 Modify Font Path Dialog

To list the font path you want to modify:
Choose Modify Font Path from the Options menu.
On the Modify Font Path dialog, click the appropriate radio button for the font path you want to modify.
If you are modifying the font path for another OpenWindows installation on the local host, click Directory and use the directory chooser to select the alternative OpenWindows installation. For more information about the directory chooser, see To Use the Directory Chooser.
If you are modifying the font path for a NeWSprint printer, select the printer on the printer option menu.
Font Administrator lists the font path you choose.
To reorder the font path:
Choose Modify Font Path from the Options menu.
On the Modify Font Path dialog, Figure 3-3, list the font path to modify.
Click the font path element you want to move.
Click Move Up or Move Down to place the font path element where you want it.
Repeat steps 3 and 4 until the font path elements are in the order you want.
Click OK or Apply to apply the changes.
To delete font path elements:
Choose Modify Font Path from the Options menu.
On the Modify Font Path dialog, Figure 3-3, list the font path to modify.
Click the font path element you want to delete.
Click Delete.
Repeat steps 3 and 4 until you have deleted the elements you want to delete.
Click OK or Apply to apply the changes.
To add font path elements:
Choose Modify Font Path from the Options menu.
On the Modify Font Path dialog, Figure 3-3, list the font path to modify.
Click in the New Font Path Element text box.
Either type the new font path element, or click Directory to use the directory chooser to browse for and select the directory that you want to add to the font path. When you find the directory you want, double-click the directory, and then click Choose to enter the directory in the New Font Path Element text box. For more information about the directory chooser, see To Use the Directory Chooser.
On the Modify Font Path dialog, Figure 3-3, click Add New.
Repeat steps 3 to 5 until you have added the font path elements you want to add.