| Skip Navigation Links | |
| Exit Print View | |

|
System Administration Guide: Naming and Directory Services (NIS+) |
| Skip Navigation Links | |
| Exit Print View | |

|
System Administration Guide: Naming and Directory Services (NIS+) |
Part I About Naming and Directory Services
Part II NIS+ Setup and Configuration
4. Configuring NIS+ With Scripts
5. Setting Up the NIS+ Root Domain
8. Configuring an NIS+ Non-Root Domain
10. NIS+ Tables and Information
12. Administering NIS+ Credentials
14. Administering Enhanced NIS+ Security Credentials
15. Administering NIS+ Access Rights
16. Administering NIS+ Passwords
18. Administering NIS+ Directories
Using the niscat Command With NIS+ Directories
Listing the Object Properties of an NIS+ Directory
Using the nisls Command With Directories
Listing the Contents of an NIS+ Directory - Terse
Listing the Contents of an NIS+ Directory - Verbose
Disassociating a Replica From an NIS+ Directory
Removing NIS+ Nondirectory Objects
Changing rpc.nisd Syntax Options
Three Methods to Initialize an NIS+ Client
Initializing the NIS+ Root Master Server
Starting and Stopping the NIS+ Cache Manager
Displaying the Contents of the NIS+ Cache
Pinging and Checkpointing in NIS+
Displaying When NIS+ Replicas Were Last Updated
Checkpointing an NIS+ Directory
Displaying the Contents of the NIS+ Transaction Log
Changing the Time-to-Live of an NIS+ Object
Changing the Time-to-Live of an NIS+ Table Entry
20. NIS+ Server Use Customization
23. Information in NIS+ Tables
Common NIS+ Namespace Error Messages
Note - This section describes how to add a non-root server to an existing domain using the nismkdir command. An easier way to do this is with the nisserver script as described in Chapter 4, Configuring NIS+ With Scripts
The nismkdir command creates a non-root NIS+ directory and associates it with a master server. (To create a root directory, use the nisinit -r command, described in nisinit Command. The nismkdir command can also be used to add a replica to an existing directory.
There are several prerequisites to creating an NIS+ directory, as well as several related tasks.
To create a directory, use:
nismkdir [-m master-server] \
 directory-name
To add a replica to an existing directory, use:
nismkdir -s replica-server \
 directory-name
nismkdir -s replica-server \
 org_dir.directory-name
nismkdir -s replica-server \
 groups_dir.directory-name
To create a directory, you must have create rights to its parent directory on the domain master server. First use the -m option to identify the master server and then the -s option to identify the replica, use:
nismkdir -m master directory
nismkdir -s replica directory
 | Caution - Always run nismkdir on the master server. Never run nismkdir on the replica machine. Running nismkdir on a replica creates communications problems between the master and the replica. |
This example creates the sales.doc.com. directory and specifies its master server, smaster.doc.com. and its replica, rep1.doc.com.. It is entered from the root master server.
rootmaster% nismkdir -m smaster.doc.com. sales.doc.com.
rootmaster% nismkdir -m smaster.doc.com. org_dir.sales.doc.com.
rootmaster% nismkdir -m smaster.doc.com. groups_dir.sales.doc.com.
rootmaster% nismkdir -s rep1.doc.com. sales.doc.com.
rootmaster% nismkdir -s rep1.doc.com. org_dir.sales.doc.com.
rootmaster% nismkdir -s rep1.doc.com. groups_dir.sales.doc.com.

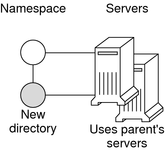
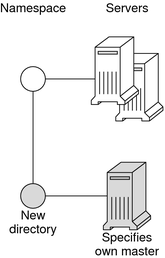
The nismkdir command allows you to use the parent directory's servers for the new directory instead of specifying its own. However, this should not be done except in the case of small networks. Here are two examples:
The first example creates the sales.doc.com. directory and associates it with its parent directory's master and replica servers.
rootmaster% nismkdir sales.doc.com

The second example creates the sales.doc.com. directory and specifies its own master server, smaster.doc.com.
rootmaster% nismkdir -m smaster.doc.com. sales.doc.com.
Since no replica server is specified, the new directory will have only a master server until you use nismkdir again to assign it a replica. If the sales.doc.com. domain already existed, the nismkdir command as shown above would have made salesmaster.doc.com. its new master server and would have relegated its old master server to a replica.
This section describes how to add a replica server to an existing system using the nismkdir command. An easier way to do this is with the nisserver script.
Keep in mind the following principles:
Root domain servers reside in (are part of) the root domain.
Subdomain servers reside in (are part of) the parent domain immediately above the subdomain in the hierarchy. For example, if a namespace has one root domain named prime and a subdomain named sub1:
The master and replica servers that serve the prime domain are themselves part of the prime domain because prime is the root domain.
The master and replica servers that serve the sub1 subdomain are also part of the prime domain because prime is the parent of sub1.
While it is possible for a master or replica server to serve more than one domain, doing so is not recommended.
To assign a new replica server to an existing directory, use nismkdir on the master server with the -s option and the name of the existing directory, org_dir, and groups_dir:
nismkdir -s replica-server existing-directory-name
nismkdir -s replica-server org_dir. existing-directory-name
nismkdir -s replica-server groups_dir. existing-directory-name
The nismkdir command realizes that the directory already exists, so it does not recreate it. It only assigns it the additional replica. Here is an example with rep1 being the name of the new replica machine:
rootmaster% nismkdir -s rep1.doc.com. doc.com.
rootmaster% nismkdir -s rep1.doc.com. org_dir.doc.com.
rootmaster% nismkdir -s rep1.doc.com. groups_dir.doc.com.
 | Caution - Always run nismkdir on the master server. Never run nismkdir on the replica machine. Running nismkdir on a replica creates communications problems between the master and the replica. |
After running the three iterations of nismkdir as shown above, you need to run nisping from the master server on the three directories:
rootmaster# nisping doc.com.
rootmaster# nisping org_dir.doc.com.
rootmaster# nisping group_dir.doc.com.
You should see results similar to these:
rootmaster# nisping doc.com.
Pinging replicas serving directory doc.com. :
Master server is rootmaster.doc.com.
 Last update occurred at Wed Nov 18 19:54:38 1995
Replica server is rep1.doc.com.
 Last update seen was Wed Nov 18 11:24:32 1995
 Pinging ... rep1.doc.com
It is good practice to include nisping commands for each of these three directories in the master server's cron file so that each directory is “pinged” at least once every 24 hours after being updated.