Oracle® Insurance Rules Palette 9.4.0.0 E18894_01
If a plan uses funds, then
the funds must be set-up and associated to the plan. This
must be done prior to setting-up allocation structures, transactions or
business rules that use the funds. Funds are created
at the plan level.
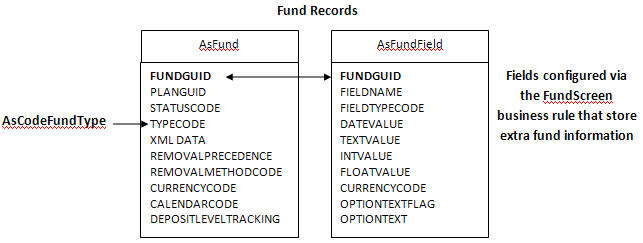
Currently OIPA supports the following types of funds. Fund types are listed in AsCode>AsCodeFundTypes.
TypeCode Fund Type
02 Variable Fund
01 Fixed
05 Non-Invest
10 Unit linked funds
The type of fund is important since the valuation calculation is based on the type of fund. For example, if the fund is variable, then the current unit position is multiplied by the current unit price to establish a fund’s value.
Note: Funds are now available for configuration in allocations for transaction and business rule processing.
Configure the FundScreen business rule.
Create new fund via Fund Wizard.
Enter fund information.
Before creating funds, configure the FundScreen business rule. This rule allows additional fields to be configured. The fields configured are used when entering fund information. They store custom information need by the business in the AsFundField table.
Steps to Review FundScreen Business Rule Configuration
Navigate to the Global Rules Explorer.
Expand the Business Rules folder.
Expand the Screen folder.
Open the FundScreen folder.
Either create an override or use the global rule.
Right-click on the FundScreen.xml file and select Check-out.
Select the XML Source pane.
Configure <Field> elements for each field required. Please see the XML Configuration Guide topic in this help system for a list of all elements, attributes and values needed for configuration. View Common Elements | Field Elements.
Right-click on the FundScreen.xml file and select Check-In.
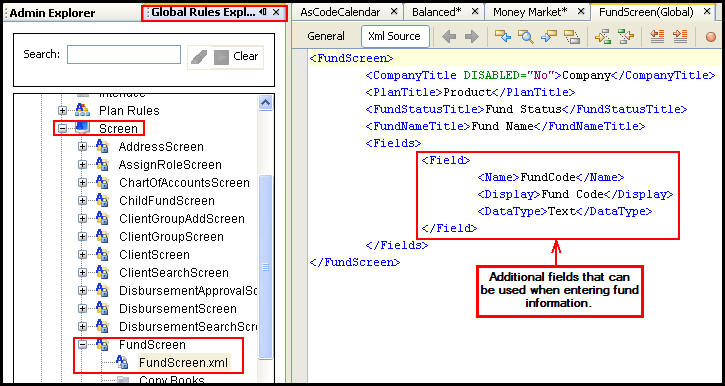
FundScreen Business Rule in Global Explorer
Navigate to the Main Explorer.
Expand the appropriate Company folder.
Expand the Plans folder that the funds are to be associated with.
Right-click on the Funds folder and select Add New Fund. The New Fund Wizard will appear.
Enter the fund information. Each field is described below.
Company: Cannot update this field. It is auto populated by the system.
Plan: Cannot update this field. It is auto populated by the system.
Fund Name: The name of the fund being entered.
Fund Type: Populated by AsCodeFundType. You can edit these options through the Code editor in the Admin Explorer.
Effective Date: The date when the fund is effective and available for investors.
Fund Status: Populated by AsCodeFundStatus. You can edit these options through the Code editor in the Admin Explorer.
Removal Precedence: Optional integer field. Tells the order in which funds should be removed. A value of zero (0) will not allow the fund to have its value removed.
Currency Code: Populated with options specified in AsCurrency table. You can edit these options from the Currency editor in the Admin Explorer.
Removal Method: Populated by AsCodeFundRemoval. You can edit these options from the Code editor in the Admin Explorer.
Currency Code: Populated by AsCurrency. You can edit these options from the Currency editor in the Admin Explorer.
Calendar Code: This field is only enabled if the Fund Type is Unit Linked. Populated by AsCodeCalendar. These codes are also stored in AsPriceOffset. You can edit these options from the Code editor in the Admin Explorer. Scroll down to AsCodeCalendar and check out the XML file to make updates. Changes are saved to both AsCodeCalendar and AsPriceOffset.
Fund Calendar Override: These radio buttons are only enabled if the Fund Type is Unit Linked. Select whether to override the fund offset days provided by the selected calendar associated with the fund. If Yes, then the Fund Offset Days field will be come enabled.
Fund Offset Days: This drop down box is only enabled if the Fund Type is Unit Linked and the Fund Calendar Override is set to Yes. Enter the number of days to use for the offset of the fund calendar.
Deposit Level Tracking: Set whether to track deposits or not. This setting is for plans using point-in-time valuation. A value of Y will track this fund at the deposit level.
Select Finish. If the Finish button is not enabled, required fund information may be missing. When complete, the Fund Detail pane opens for the new fund in the Configuration Area.
When the new fund displays in the Configuration Area, additional information can be captured in the fields that were created through the FundScreen business rule in step one. In the image below, the Fund Code field is displayed. When the information is entered, right-click on the fund name in the Main Explorer and select Check-in. This will save the changes to the database.
Note: A child fund node will appear below the new fund. You can only generate child funds if the fund type has been specified in the <Fund Type> tag of the ChildFundScreen business rule.
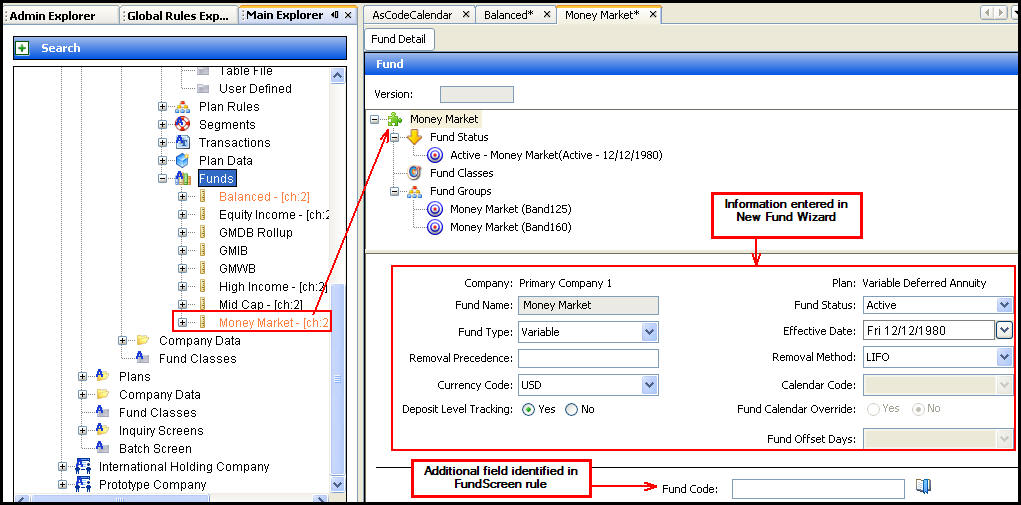
Fund with Fund Details Displayed in Configuration Area
Copyright © 2009, 2011, Oracle and/or its affiliates. All rights reserved. Legal Notices