| Skip Navigation Links | |
| Exit Print View | |

|
Oracle GlassFish Server 3.1 Security Guide |
1. Administering System Security
2. Administering User Security
3. Administering Message Security
4. Administering Security in Cluster Mode
5. Managing Administrative Security
6. Running in a Secure Environment
7. Integrating Oracle Access Manager
About OAM Security Provider for Glassfish
Obtaining Oracle Access Manager Group Information
Understanding OAM Security Provider Use Cases
Use Case: Authentication for Web Resources Via Access Gate
Use Case: Identity Assertion for Web Resources via WebGate
Use Case: Authorization Checks Based on Policy Manager
Configuring the OAM Security Provider
Determining Which Authentication Method is Used
Integrating OAM Security Provider with Oracle Access Manager 10g
Integrating OAM Security Provider with Oracle Access Manager 10g
Integrating OAM Security Provider with Oracle Access Manager 11g
Integrating OAM Security Provider with Oracle Access Manager 11g
Addtional Considerations for Certificate Authentication
Integrating OAM Security Provider with Oracle Access Manager 11g and WebGate
Integrating OAM Security Provider with Oracle Access Manager 11g and WebGate
Additional Considerations for Certificate Authentication With a WebGate
This section describes how to integrate the OAM Security Provider with Oracle Access Manager 10g.
This procedure explains how to integrate the OAM Security Provider with Oracle Access Manager 10g.
See the Oracle Access Manager Installation Guide for detailed instructions on Access Manager tasks.
The procedure was tested on Microsoft Windows and the file names are those of the Windows version.
To do this, install Oracle Identity Server, the Policy Manager, and the Oracle Access Server component. You need to obtain all of the required Oracle Access Manager components before you begin the installation procedures.
After the successful installation, access the Administration Console from http://host:port/access/oblix and log in.
The administrative interface for managing core access server components, policy manager, and identity console is displayed.
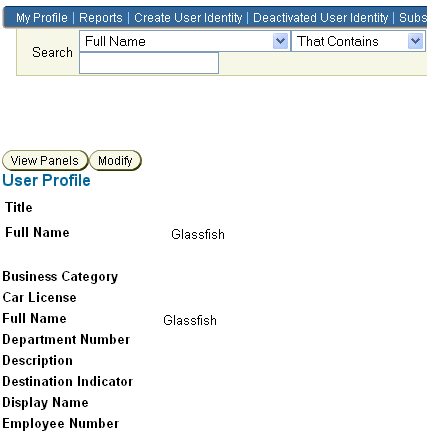
From the User Manager tab of the Identity System Console, create the users who will have access to the protected resource. For example, you might create the user Glassfish, as shown in Figure 7-4.
Figure 7-4 Glassfish User
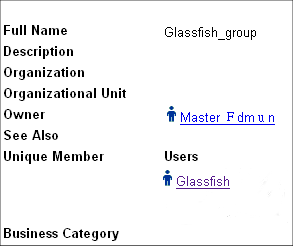
From the Group Manager tab of the Identity System Console, create the group to which you will grant access and add users to the group. For example, you might create the group Glassfish_group, and add the user Glassfish to this group, as shown in Figure 7-5.
Figure 7-5 Glassfish Group
From the Access System Configuration tab of the Access System Console, create an Access Server Configuration.
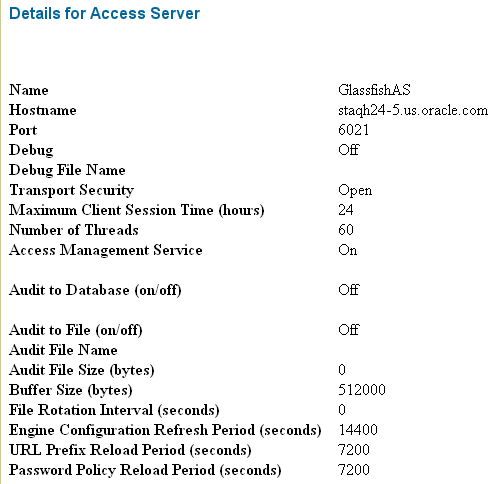
Provide the required parameters including Name and Hostname, and enable it.
When you configure an Access Server, you specify the transport security mode to use between an Access Gate/WebGate and this Access Server, from the following choices:
Open mode means no encryption.
Simple mode means encryption through SSL and a public key certificate provided by Oracle.
Cert mode means encryption through SSL and a public key certificate provided by an external CA.
For example, a sample Access Server configuration, GlassfishAS, is shown in Figure 7-6.
Figure 7-6 Sample Access Server Configuration (Partial Screen)
From the Access System Configuration tab of the Access System Console, create an Access Gate configuration.
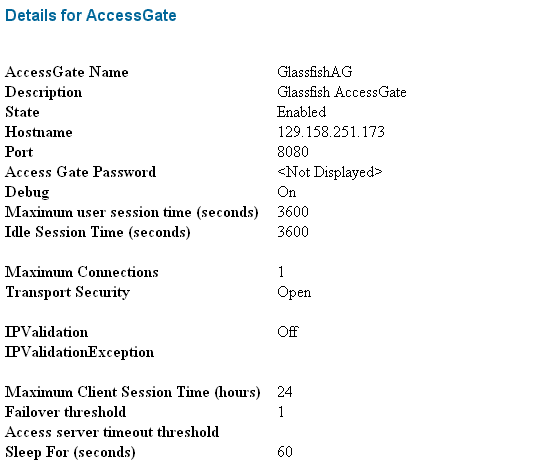
Provide the required parameters including Name, Hostname (name of the system that will host the AccessGate), and enable it. For example, a sample AccessGate configuration, GlassfishAG, is shown in Figure 7-7.
Figure 7-7 Sample AccessGate Configuration (Partial Screen)
From the Access System Configuration tab of the Access System Console, associate the Access Gate and the Access Server.
To do this, from the AccessGate configuration page, click List Access Servers and then add the Access Server you previously created.
Figure 7-8 Associating Access Server with Access Gate
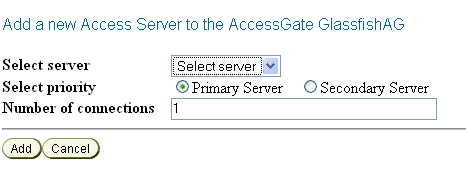
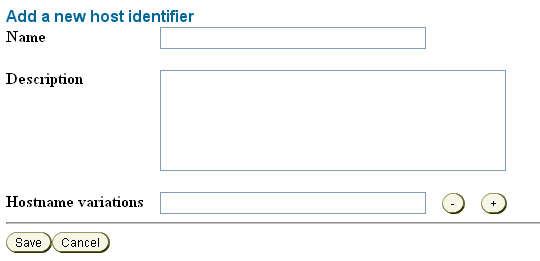
From the Access System Configuration tab of the Access System Console, add one or more host identifiers.
You use Host identifiers to simplify the identification of a Web server that hosts resources you want to protect with Access Manager.
For example, when you added the configuration for the AccessGate, assume that you used the hostname of the system hosting the AccessGate. You might want to add a host identifier for the IP address or the fully-qualified domain name of the system hosting the AccessGate.
Figure 7-9 Adding a Hostname Identifier for the AccessGate System
From the Access System Configuration tab of the Access System Console, create an authentication scheme for each login mechanism.
Create an authentication scheme for each login mechanism (BASIC, Form, client cert) that you want to use to protect the resource, save it, and then add a credential mapping plug-in (from the Plugins tab) for the authentication scheme.
For BASIC authentication, the credential mapping plug-in maps the LDAP attributes of the user (shown in the figure as genuserid=%userid% and obCredentialPassword) with the challenge parameters (shown in the figure as realm:LDAP User Name/Password) of the authentication scheme, and they must match.
Figure 7-10 and Figure 7-11 show a sample BASIC over LDAP authentication scheme, and the respective plug-ins.
Figure 7-10 BASIC Authentication Scheme
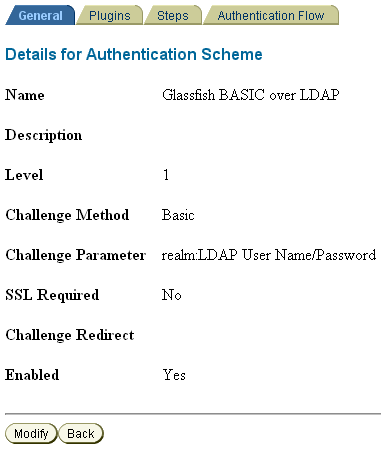
Figure 7-11 Plug-Ins for BASIC Authentication Scheme

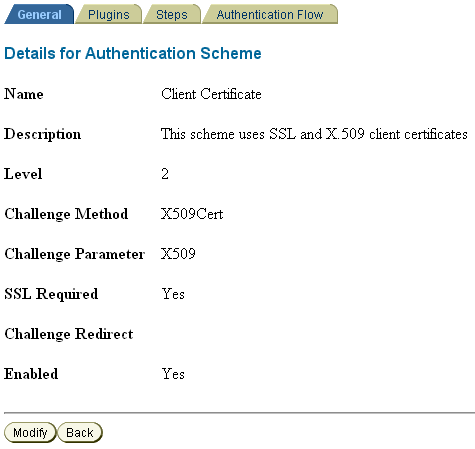
For client cert authentication, a sample authentication scheme is shown in Figure 7-12.
In this mapping, the LDAP attribute employeetype is mapped to the certificate subject certSubject.CN.
Figure 7-12 Client Cert Authentication Scheme
For client cert authentication, the associated plug-in configuration is shown in Figure 7-13.
Figure 7-13 Plug-Ins for Client Cert Authentication Scheme

From the Policy Manager, create a policy domain.
The Policy Manager application allows you to create, remove and manage policies and resources and test policy enforcement.
Before a policy domain can control access to your resources, you must:
From the Resources tab, click Add. Select the host identifier for the system that hosts the AccessGate and the resource to be protected.
The URL prefixes provide the pathway to your Web resources. A policy domain can contain one or more URL prefixes. The available URL prefixes depend on the resource type you selected. You can also specify a unique URL prefix in the associated text field; for example, glassfish-default.
If you want to use the Policy Manager authorization function to protect resources, you can configure the resources individually. If you want to use GlassFish Server for authorization, and use Oracle Access Manager only for authentication, you can use a proxy resource.
From the Default Rules tab, select the Authentication Rule tab and add enter an authentication rule. Choose the authentication scheme you configured in Step 10. For example, Basic Over LDAP.
From the Authorization Rules tab, click Add and enter an authorization rule. Save the change. Then, from the Allow Access tab, add the user or group you created in Step 4 and Step 5.
From the Default Rules tab, select the Authorization Expression tab. Click Add to add an authorization expression.
Provide a name, choose the operations for the policy, and choose the configured resource (Host Identifier and URL Prefix).
You can download the SDK from Oracle Identity Management 10g (10.1.4.x) Downloads.
Select Oracle Access Manager Core Components (10.1.4.3.0) (Disk1).
The Access Server SDK allows Java, C++, and C applications to use the services of the Oracle Access Manager , including user authentication and authorization of user requests to access resources protected by Oracle Access Manager.
The following components are installed from the zip file:
oamcfgtool_10_1_4_3_0.zip
Oracle_Access_Manager10_1_4_3_0_Win32-dotnet20_AccessServerSDK.exe
Oracle_Access_Manager10_1_4_3_0_Win32_AccessServerSDK.exe
Oracle_Access_Manager10_1_4_3_0_Win32_Access_Server.exe
Oracle_Access_Manager10_1_4_3_0_Win32_Identity_Server.exe
Oracle_Access_Manager10_1_4_3_0_Win32_OHS11g_Policy_Manager.exe
Oracle_Access_Manager10_1_4_3_0_Win32_OHS11g_WebPass.exe
Oracle_Access_Manager10_1_4_3_0_Win32_Snmp_Agent.exe
Run Oracle_Access_Manager10_1_4_3_0_Win32_AccessServerSDK.exe on the system from which you intend to run the GlassFish Server hosted application and follow the installation wizard.
Note - Depending on the platform, additional steps may be required to configure the AccessServerSDK, such as setting LD_LIBRARY_PATH and so forth. Please consult the ASDK_README.htm file under installdirectory\AccessServerSDK for more details.
Configure the AccessServer SDK to facilitate the handshake between the AccessGate you created and Oracle Access Manager.
To do this, run the utility configureAccessGate.exe, located in installdirectory\AccessServerSDK\oblix\tools\configureAccessGate, where installdirectory is the root folder for your Access Manager SDK installation.
configureAccessGate -i <AccessServerSDK-install-dir>
-t AccessGate -w GlassfishAG -m open -h access-server-host-name -p 6021 -a GlassfishAS

Please enter the Password for this AccessGate :

Preparing to connect to Access Server.  Please wait.

AccessGate installed Successfully.
The command line parameters shown are as follows:
|
You may also need to enter an Access Server password (-r AccessServerpassphrase) and an AccessGate password (-P AccessGatePwd) if you created them in Oracle Access Manager.
In the GlassFish Server JVM options, add the following entry:
<jvm-options>-DJOBACCESS_INSTALL_DIR=<AccessServerSDK-install-dir></jvm-options>
You can use the create-jvm-options command to do this. Consider the following example:
asadmin --port 4848 --host localhost create-jvm-options
 -DJOBACCESS_INSTALL_DIR=D\:\\\\"program files"\\NetPoint\\AccessServerSDK
Copy jobacces.jar from from installdirectory\AccessServerSDK\oblix\lib into <Glassfish>\lib.
Ensure that the OAM Security Provider, oam-integration.jar, is in <Glassfish>\lib.
You can use either the Administration Console or the create-message-security-provider command to do this. Consider the following example:
<message-security-config auth-layer="HttpServlet">
<provider-config provider-type="server" provider-id="MySAM"
class-name="com.sun.glassfish.oamsam.OAMAuthenticatorSAM">
<property name="oam.resource.hostid.variation" value="your-system.com" />
<!--property name="form.login.page" value="" /-->
</provider-config>
</message-security-config>
Bind the OAM Security Provider for use with your application. You do this by defining the httpservlet-security-provider attribute in the glassfish-web.xml file corresponding to your application.
Set the value of the attribute to the name you assigned to the OAM Security Provider in Step a. For example, MySAM.
The group name you specify must match the group name you specified in Oracle Access Manager.
<?xml version="1.0" encoding="UTF-8"?>
<!DOCTYPE sun-web-app PUBLIC "-//Sun Microsystems, Inc.//DTD Application
Server 9.0
Servlet 2.5//EN" "http://www.sun.com/software/appserver/dtds/
sun-web-app_2_5-0.dtd">
<sun-web-app error-url="" httpservlet-security-provider="MySAM">
<context-root>/BasicAuthen</context-root>
<security-role-mapping>
<role-name>glassfish</role-name>
<group-name>Glassfish_group</group-name>
<group-name>cn=Glassfish_group,ou=groups,ou=myrealm,dc=oam_domain</group-name>
</security-role-mapping>
<class-loader delegate="true"/>
<jsp-config>
<property name="keepgenerated" value="true">
<description>Keep a copy of the generated servlet class' java code.</description>
</property>
</jsp-config>
</sun-web-app>
Deploy the application you want to protect in GlassFish Server.
Configure the LDAPRealm in GlassFish Server to point to Oracle Access Manager backend, as described in Obtaining Oracle Access Manager Group Information. For example, you can use the Administration Console or the create-auth-realm command to add the following entry:
<auth-realm
classname="com.sun.enterprise.security.auth.realm.ldap.LDAPRealm" name="ldaprealm">
          <property name="jaas-context" value="ldapRealm" />
          <property name="base-dn" value="o=company,c=us" />
          <property name="directory" value="ldap://140.87.134.98:1389" />
          <property name="search-bind-dn" value="cn=Directory Manager" />
          <property name="search-bind-password" value="welcome1" />
</auth-realm><security-service default-realm="ldaprealm">
Restart GlassFish Server and access the protected resource from a browser, such as http://hostname.domainname:8080/BasicAuthen/SecureServlet.