| Skip Navigation Links | |
| Exit Print View | |

|
Oracle GlassFish Server 3.1 Security Guide |
1. Administering System Security
2. Administering User Security
3. Administering Message Security
4. Administering Security in Cluster Mode
5. Managing Administrative Security
6. Running in a Secure Environment
7. Integrating Oracle Access Manager
About OAM Security Provider for Glassfish
Obtaining Oracle Access Manager Group Information
Understanding OAM Security Provider Use Cases
Use Case: Authentication for Web Resources Via Access Gate
Use Case: Identity Assertion for Web Resources via WebGate
Use Case: Authorization Checks Based on Policy Manager
Configuring the OAM Security Provider
Determining Which Authentication Method is Used
Integrating OAM Security Provider with Oracle Access Manager 10g
Integrating OAM Security Provider with Oracle Access Manager 10g
Integrating OAM Security Provider with Oracle Access Manager 11g
Integrating OAM Security Provider with Oracle Access Manager 11g
Integrating OAM Security Provider with Oracle Access Manager 11g and WebGate
Integrating OAM Security Provider with Oracle Access Manager 11g and WebGate
Additional Considerations for Certificate Authentication With a WebGate
This section describes how to integrate the OAM Security Provider with Oracle Access Manager 11g.
This procedure explains how to integrate the OAM Security Provider with Oracle Access Manager 11g.
See the Oracle Fusion Middleware Administrator's Guide for Oracle Access Manager with Oracle Security Token Service for detailed instructions on Access Manager tasks.
The procedure was tested on Microsoft Windows and the file names are those of the Windows version.
This procedure focuses on LDAP authentication. See Addtional Considerations for Certificate Authentication for information on X509 authentication.
If you have not already done so, create an OAM Server instance.
Under System Configuration, from the left navigation pane select Server Instances and then click the Create command button in the tool bar. The Create: OAM Server page appears.
When you create an OAM Server instance, you specify the transport security mode to use between an OAM Agent and this OAM Server instance, from the following choices. See “Securing Communication Between OAM 11g Servers and WebGates” in the Access Manager online help for a description of these modes and how to use them.
Open
Simple
Cert
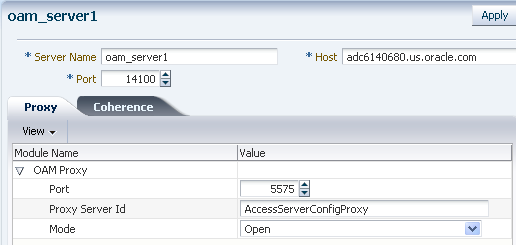
For example, consider the OAM Server instance shown in Figure 7-25.
Figure 7-14 OAM Server Instance
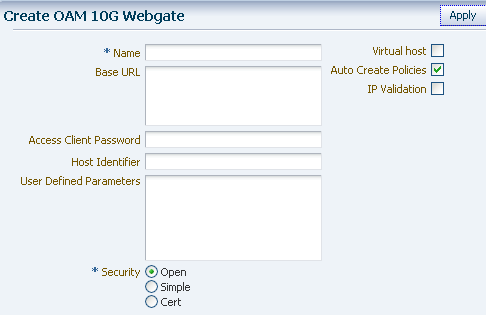
Under System Configuration, from the left navigation pane select SSO Agents and then OAM Agents. Click Create 10g Webgate. The Create OAM 10g Webgate screen appears.
The security mode you choose must match that of the OAM Server instance.
The Create OAM 10g Webgate screen is shown in Figure 7-15.
Figure 7-15 10g Webgate
You use Host identifiers to simplify the identification of a Web server that hosts resources you want to protect with Access Manager.
From the Policy Configuration tab, expand the Shared Components node, and then select Host Identifiers. Click the Create command button in the tool bar.
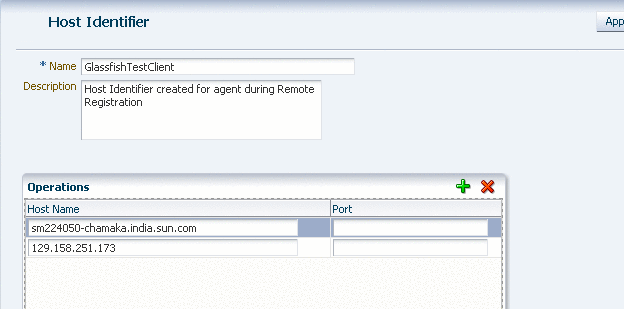
Figure 7-16 shows an example host identifier GlassfishTestClient to be used for systems that require BASIC and FORM authentication.
Figure 7-16 GlassfishTestClient Host Identifier
From the System Configuration tab, select Data Sources. Expand Data Sources and click User Identity Stores. Click the Create command button in the tool bar.
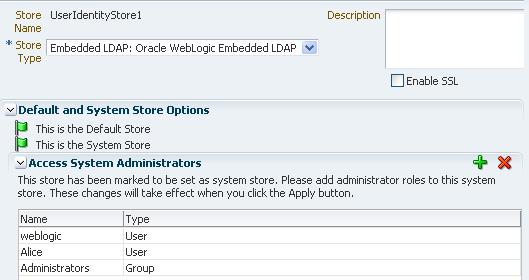
The User Identity Store specifies the LDAP provider it is associated with, as shown in Figure 7-17. This LDAP provider can be the Oracle WebLogic embedded LDAP provider, or another supported provider from the drop-down menu that you have previously configured.
Figure 7-17 LDAP Provider of Identity Store
For LDAP providers other than the embedded LDAP provider, when you create a User Identify Store based on one of these LDAP providers, you specify identifying properties, such as the User Search Base and the User Name Attribute that you will need later in this procedure to configure the GlassFish Server LDAPRealm. For example, Figure 7-18 shows the User Identity Store screen for the Oracle Internet Directory LDAP Provider.
Figure 7-18 OID LDAP Provider
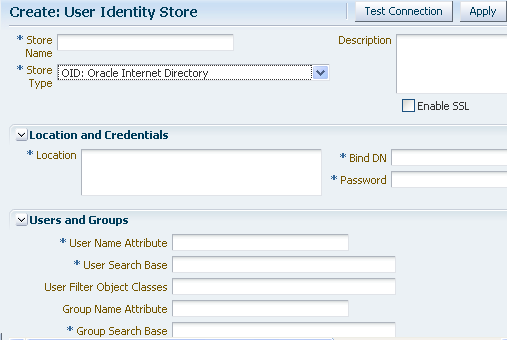
For the embedded LDAP provider, the identifying properties are not available from the Access Manager user interface. You therefore need to use some other LDAP tool to configure these properties when you create a user in the next step.
Create a group and user in the LDAP provider who will have access to the protected resource.
Later in this procedure you need to configure the GlassFish Server LDAPRealm, and to do this you will need identifying LDAP properties that are not available for the embedded LDAP provider from the Access Manager user interface.
If you want to use the embedded LDAP provider, you will therefore need to use some other LDAP tool to configure these properties. For example, you might use LDAP commands to add the user and group, and to search the LDAP database for them:
ldapadd -x -h cieqalnx01.us.oracle.com -p 7001 -D"cn=Admin"
-w welcome1 -f gadd.ldif
ldapadd -x -h cieqalnx01.us.oracle.com -p 7001 -D"cn=Admin" -w welcome1 -f uadd.ldif
ldapsearch -x -h   cieqalnx01.us.oracle.com -p 7001 -D"cn=Admin" -w welcome1 -s sub
-b "ou=people,ou=myrealm,dc=oam_domain"
ldapsearch -x -h   cieqalnx01.us.oracle.com -p 7001 -D"cn=Admin" -w welcome1 -s sub
-b "ou=groups,ou=myrealm,dc=oam_domain"
In this example, the contents of the “user add” file uadd.ldif that adds the user Glassfish might be as follows:
# GlassFish, people, myrealm, oam_domain
dn: uid=GlassFish,ou=people,ou=myrealm,dc=oam_domain
objectclass: top
objectclass: person
objectclass: organizationalPerson
    objectclass: inetOrgPerson
objectclass: wlsUser
cn: GlassFish
sn: GlassFish
uid: GlassFish
description: GlassFish User
wlsMemberOf: cn=GlassFish_Group,ou=groups,ou=myrealm,dc=oam_domain
userpassword: GlassFish
The contents of the “group add” file gadd.ldif that adds a GlassFish_Group might be as follows:
dn: cn=GlassFish_Group,ou=groups,ou=myrealm,dc=oam_domain
objectclass: top
objectclass: groupOfURLs
objectclass: groupOfUniqueNames
cn: GlassFish_Group
description: OAM GlassFish Group
memberURL: ldap:///ou=people,ou=myrealm,dc=oam_domain??
sub?(&(objectclass=person)(wlsMemberOf=cn=GlassFish_Group,ou=groups,ou=myrealm,
dc=oam_domain))
Make a note of sufficient properties to uniquely identity the user, such as wlsMemberOf, as you will need them later in this procedure when you configure the LDAPRealm.
From the System Configuration tab, select Authentication Modules. Expand Authentication Modules and select LDAP Authentication Modules. Click the Create command button in the tool bar.
Specify a name for this Authentication Module, and select the User Identity Store you previously created, as shown in Figure 7-19
Figure 7-19 LDAP Authentication Module

Create an authentication scheme for each challenge method (BASIC, Form, and X.509) that you want to use to protect the resource.
From the Policy Configuration tab, expand the Shared Components node, and then select Authentication Schemes. Click the Create command button in the tool bar.
The Authentication Module must already exist.
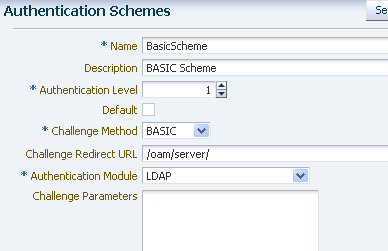
Figure 7-20 shows an example BASIC over LDAP authentication scheme.
Figure 7-20 BASIC Over LDAP Authentication Scheme
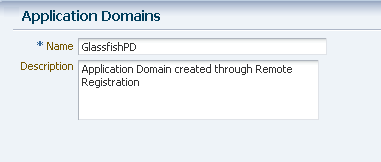
From the Policy Configuration tab, select Application Domains. Click the Create command button in the tool bar to create an Application Domain. An example Application Domain is shown in Figure 7-21.
Figure 7-21 Application Domain
Before an application domain can control access to your resources, you must now identify those resources and specify how you want to protect them:
From the Policy Configuration tab, expand Application Domains and select the domain you just created. Select Resources, and click the Create command button in the tool bar. On the Create resource page:
Select HTTP as the resource type.
Select the host identifier (described in Step 4) for the system that hosts the resource to be protected.
Specify the resource URL for the Web resource. The URL value of a resource must begin with a forward slash (/), for example /BasicAuthen/SecureServlet, and must match a resource value for the chosen host identifier. To protect all of the resource URLs, append "/.../*". For example, /BasicAuthen/SecureServlet/.../*.
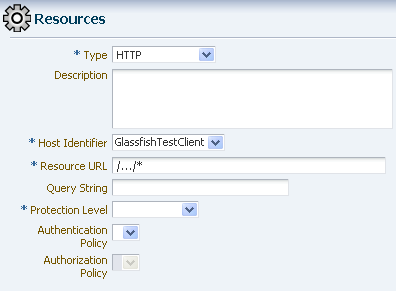
Figure 7-22 shows an example of creating a resource that uses a host identifier named GlassfishTestClient.
Figure 7-22 Creating a Resource
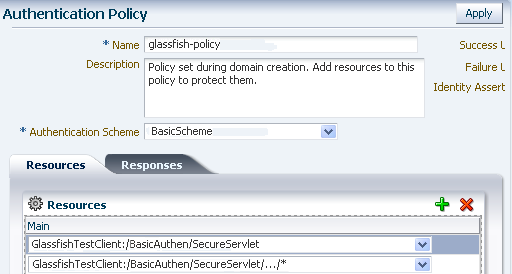
From the Policy Configuration tab, expand Application Domains and select the domain you just created. Select Authentication Policies, and click the Create command button in the tool bar. On the Create Authentication Policies page:
Name this Authentication Policy.
Select a named authentication scheme you previously configured.
Select the resources you want to protect with this Authentication Policy.
Figure 7-23 shows an example of creating an Authentication Policy that uses the BasicScheme authentication scheme.
Figure 7-23 Authentication Policy
Note - The OAM 11g default behavior is to deny access when a resource is not protected by a policy that explicitly allows access. In contrast, the OAM 10g default behavior allowed access when a resource was not protected by a rule or policy that explicitly denied access to limit the number of WebGate queries to the Access Server.
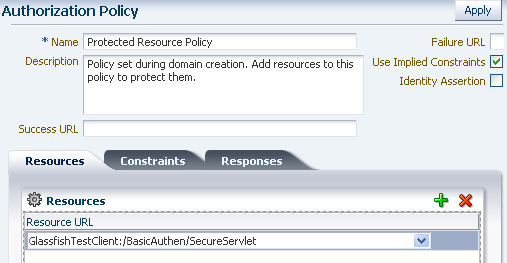
From the Policy Configuration tab, expand Application Domains and select the domain you just created. Select Authorization Policies, and click the Create command button in the tool bar. On the Create Authorization Policies page:
Name this Authorization Policy.
Select the resource to be protected by this Authorization Policy.
Set the Use Implied Restraints control, or explicitly set constraints on the Constraints tab.
Figure 7-24 shows an example Authorization Policy with two protected resources.
Figure 7-24 Authorization Policy
You can download the SDK from Oracle Identity Management 10g (10.1.4.x) Downloads.
Select Oracle Access Manager Core Components (10.1.4.3.0) (Disk1).
The Access Server SDK allows Java, C++, and C applications to use the services of the Oracle Access Manager , including user authentication and authorization of user requests to access resources protected by Oracle Access Manager.
The following components are available from the zip file:
oamcfgtool_10_1_4_3_0.zip
Oracle_Access_Manager10_1_4_3_0_Win32-dotnet20_AccessServerSDK.exe
Oracle_Access_Manager10_1_4_3_0_Win32_AccessServerSDK.exe
Oracle_Access_Manager10_1_4_3_0_Win32_Access_Server.exe
Oracle_Access_Manager10_1_4_3_0_Win32_Identity_Server.exe
Oracle_Access_Manager10_1_4_3_0_Win32_OHS11g_Policy_Manager.exe
Oracle_Access_Manager10_1_4_3_0_Win32_OHS11g_WebPass.exe
Oracle_Access_Manager10_1_4_3_0_Win32_Snmp_Agent.exe
Oracle_Access_Manager10_1_4_3_0_Win32_AccessServerSDK.exe on the system from which you intend to run the GlassFish Server hosted application and follow the installation wizard.
Note - Depending on the platform, additional steps may be required to configure the AccessServerSDK, such as setting LD_LIBRARY_PATH and so forth. Please consult the ASDK_README.htm file under installdirectory\AccessServerSDK for more details.
Configure the AccessServer SDK to facilitate the handshake between the WebGate you created and Oracle Access Manager.
To do this, run the utility configureAccessGate.exe, located in installdirectory\AccessServerSDK\oblix\tools\configureAccessGate, where installdirectory is the root folder for your Access Manager SDK installation.
configureAccessGate -i <AccessServerSDK-install-dir>
-t AccessGate -w GlassfishAG -m open -h access-server-host-name -p 5575 -a oam_server1

Please enter the Password for this AccessGate :

Preparing to connect to Access Server.  Please wait.

AccessGate installed Successfully.
The command line parameters shown are as follows:
|
You may also need to enter an OAM Server password (-r AccessServerpassphrase) and an AccessGate password (-P AccessGatePwd) if you created them in Oracle Access Manager.
In the GlassFish Server JVM options, add the following entry:
<jvm-options>-DJOBACCESS_INSTALL_DIR=<AccessServerSDK-install-dir></jvm-options>
You can use the create-jvm-options command to do this. Consider the following example:
asadmin --port 4848 --host localhost create-jvm-options
 -DJOBACCESS_INSTALL_DIR=D\:\\\\"program files"\\NetPoint\\AccessServerSDK
Copy jobaccess.jar from from installdirectory\AccessServerSDK\oblix\lib into <Glassfish>\lib.
Ensure that oam-integration.jar is in <Glassfish>\lib.
You can use either the Administration Console or the create-message-security-provider command to do this. Consider the following examples:
For BASIC authentication
<message-security-config auth-layer="HttpServlet">
          <provider-config provider-type="server" provider-id="MySAM"
class-name="com.sun.glassfish.oamsam.OAMAuthenticatorSAM">
            <property name="oam.resource.hostid.variation"
value="your-host-name" />
          </provider-config>
        </message-security-config>
For Form authentication, you might want to set the form.login.property.
message-security-config auth-layer="HttpServlet">
          <provider-config provider-type="server" provider-id="MySAM"
class-name="com.sun.glassfish.oamsam.OAMAuthenticatorSAM">
            <property name="oam.resource.hostid.variation"
value="your-host-name" />
            <property name="form.login.page" value="" />
          </provider-config>
</message-security-config>You do this by defining the httpservlet-security-provider attribute in the glassfish-web.xml file corresponding to your application.
Set the value of the attribute to the name you assigned to the OAM Security Provider in Step a. For example, MySAM.
The group name you specify must match the group name you specified in the LDAP provider. For example, GlassFish_Group.
<?xml version="1.0" encoding="UTF-8"?>
<!DOCTYPE sun-web-app PUBLIC "-//Sun Microsystems, Inc.//DTD Application
Server 9.0
Servlet 2.5//EN" "http://www.sun.com/software/appserver/dtds/
sun-web-app_2_5-0.dtd">
<sun-web-app error-url="" httpservlet-security-provider="MySAM">
<context-root>/BasicAuthen</context-root>
<security-role-mapping>
<role-name>glassfish</role-name>
<group-name>GlassFish_Group</group-name>
<group-name>cn=GlassFish_Group,ou=groups,ou=myrealm,dc=oam_domain</group-name>
</security-role-mapping>
<class-loader delegate="true"/>
<jsp-config>
<property name="keepgenerated" value="true">
<description>Keep a copy of the generated servlet class' java code.</description>
</property>
</jsp-config>
</sun-web-app>
Configure the LDAPRealm in GlassFish Server to point to the Access Manager LDAP provider and group you specified to authenticate the user.
The properties you enter here must match that of the LDAP provider.
For example, you can use the Administration Console or the create-auth-realm command to add the following entry:
<auth-realm classname="com.sun.enterprise.security.auth.realm.ldap.LDAPRealm"
name="ldaprealm">
          <property name="jaas-context" value="ldapRealm"></property>
          <property name="base-dn" value="ou=people,ou=myrealm,dc=oam_domain"></property>
          <property name="directory" value="ldap://cieqalnx01.us.oracle.com:7001"></property>
          <property name="group-search-filter" value="cn=%s"></property>
          <property name="group-target" value="wlsMemberOf"></property>
          <property name="search-bind-dn" value="cn=Admin"></property>
          <property name="search-bind-password" value="welcome1"></property>
</auth-realm><security-service default-realm="ldaprealm">
Restart GlassFish Server and access the protected resource, such as http://hostname.domainname:8080/BasicAuthen/SecureServlet.
In addition to the procedure described in Integrating OAM Security Provider with Oracle Access Manager 11g, there are additional steps required if you want to use certificate authentication to protect your resource.
The X.509 root certificate and the CA certificate you plan to use for Authentication to the OAM Server must be in the GlassFish Server trust store for the domain.
The X.509 root certificate and the CA certificate you plan to use for Authentication to the OAM Server must also be in the OAM Server keystore. See Importing CA-Signed Certificates Into the Keystore for instructions on how to do this.
The X.509 certificate you use for authentication must map to a valid user. To do this, create a user in the Access Manager LDAP provider whose CN attribute matches that of the subject.CN from the certificate.
Consider the following example, which adds the user Alice. The subject.CN from the certificate must therefore be Alice.
#ldapadd -x -h cieqalnx01.us.oracle.com -p 7001
-D"cn=Admin" -w welcome1 -f uadd.ldif
In this example, the contents of uadd.ldif are as follows:
#contents of uaddalice.ldif
# GlassFish, people, myrealm, oam_domain
dn: uid=Alice,ou=people,ou=myrealm,dc=oam_domain
objectclass: top
objectclass: person
objectclass: organizationalPerson
objectclass: inetOrgPerson
objectclass: wlsUser
cn: Alice
sn: Alice
uid: Alice
description: GlassFish End User
wlsMemberOf: cn=GlassFish_Group,ou=groups,ou=myrealm,dc=oam_domain
userpassword: Alice
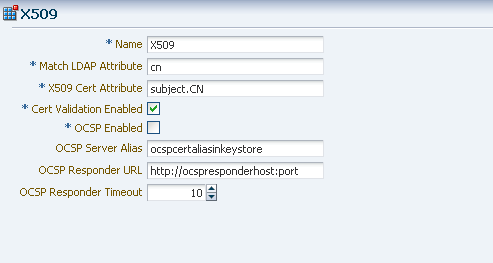
Create an X509 Authentication Module. Make sure that the Match LDAP Attribute is set to cn, and that the X509 Cert Attribute is Subject.CN. Set CertValidationEnabled to true. Consider the following example.
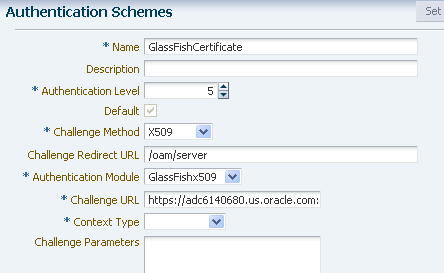
Create an Authentication Scheme that uses the X509 Challenge Method, and the X509 Authentication Module you just created.
Remember that the WebGate challenges the user for credentials based on the type of OAM Server authentication scheme configured for the resource, which is X509 in this case.
Set the Challenge URL to the SSL port of OAM server. For example, https://<oam_server>:<ssl_port>/oam/CredCollectServlet/X509.
Note - To work around a known problem, the name of the Authentication Scheme must contain either or both of the (case sensitive) words “X509” and “Certificate”.
Consider the following example.
Configure the OAM Security Provider. To do this, define your SAM as a message-security-provider. You can use either the Administration Console or the create-message-security-provider command to do this. Consider the following example:
For Ceritificate Auth :
      <message-security-config auth-layer="HttpServlet">
      <provider-config provider-type="server" provider-id="MySAM"
class-name="com.sun.glassfish.oamsam.OAMAuthenticatorSAM">
            <property description="" name="oam.resource.hostid.variation"
value="129.158.239.142"></property>
          </provider-config>
      </message-security-config>
Modify the http-listener-2 configuration in domain.xml as follows:
<ssl classname="com.sun.enterprise.security.ssl.GlassfishSSLImpl"
ssl3-enabled="false" cert-nickname="s1as" client-auth-enabled="true"></ssl>