| Oracle® Real-Time Decisions Base Application Decision Management Installation and Configuration Guide Release 3.1 Part Number E19023-01 |
|
|
View PDF |
| Oracle® Real-Time Decisions Base Application Decision Management Installation and Configuration Guide Release 3.1 Part Number E19023-01 |
|
|
View PDF |
Terminology:
The term "reference implementation" is used in this chapter to refer to the specific Oracle RTD Decision Management application RTD for Marketing Optimization, released with Oracle RTD Base Application.This chapter contains the following topics:
The following diagram shows the communications at runtime between the various components of Oracle RTD Decision Management after installation:
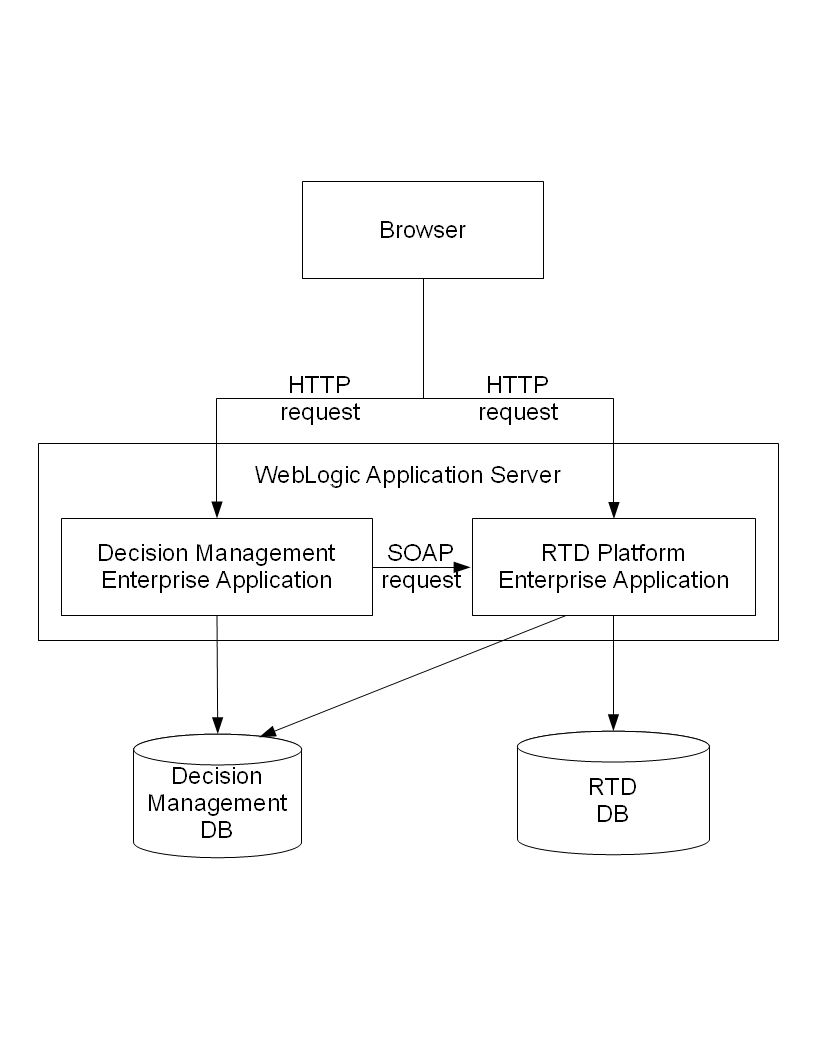
The Oracle RTD Decision Management application is an ADF based web application, which also leverages the Oracle RTD rule editor and reports as JSP pages embedded in an IFrame. As such, the Decision Manager browser displays JSP pages from both the Oracle RTD Decision Management and the Oracle RTD applications.
Users log in to the Oracle RTD Decision Management application and credentials are carried over to the Oracle RTD application because the Weblogic JSESSIONID cookie is shared between both applications (which must reside in the same application server).
Additionally, Oracle RTD makes web service (SOAP) calls from the Oracle RTD Decision Management application to the Oracle RTD workbench server to retrieve type restrictions. These requests use the username and password that you configured in Section 1.4.3.5, "Storing Credentials to Make Oracle RTD Web Service Calls from Oracle RTD Decision Management."
The Oracle RTD Decision Management application accesses the Decision Management database using the credentials defined in the CLMDS JNDI datasource.
The Oracle RTD Decision Management Inline Service loaded in the Oracle RTD application accesses the Decision Management database to retrieve dynamic choices.
The Oracle RTD application accesses the Oracle RTD (SDDS) database using the credentials defined in the SDDS JNDI datasource.
This section contains the following topics:
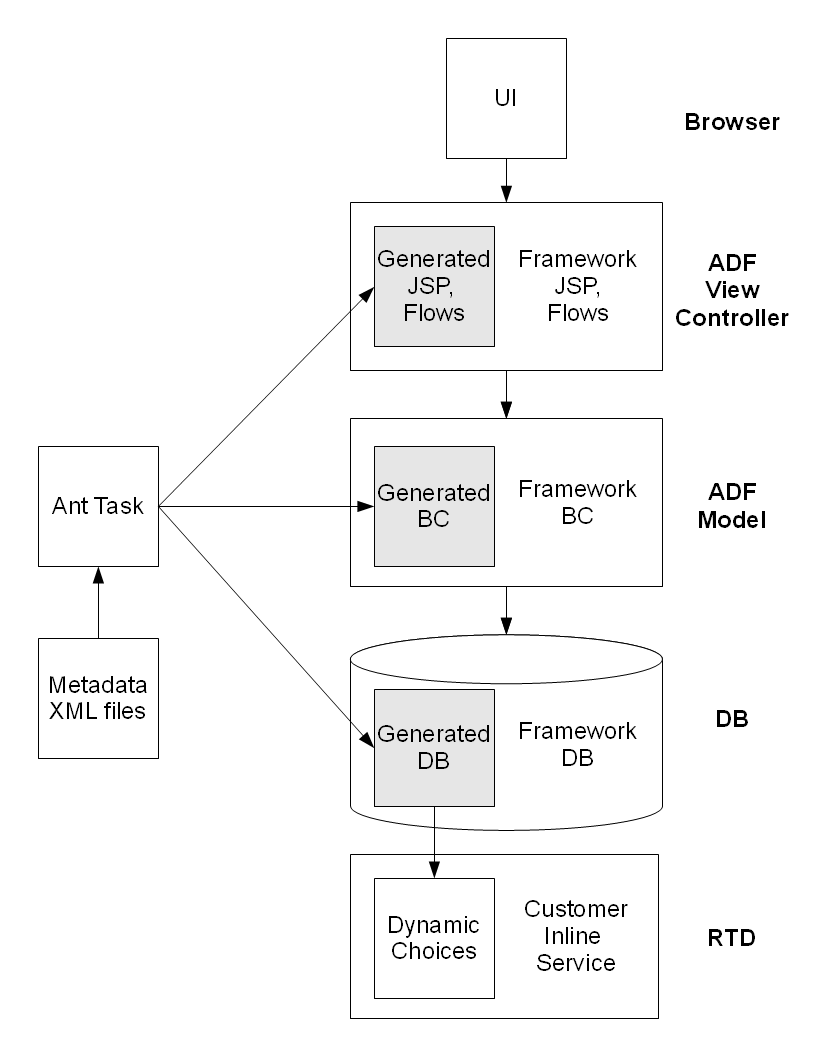
Oracle RTD Decision Management applications are built and deployed using Decision Designer.
Decision Designer is the combination of design tools that include JDeveloper, ant, and the metadata files that you set up and used to create the Oracle RTD Decision Management application, as described in Chapter 1, "Installing Oracle RTD Decision Management."
You can use Decision Designer to make changes to the reference implementation, or to build your own application from scratch.
The following diagram shows what components are generated by Decision Designer:
The following diagram shows the main Decision Management metadata and database setup files, as released with Oracle RTD Base Application.
The folder clm\Build\metadata, also referred to generically as <metadata_modules_home>, contains metadata modules for different applications.
The folder clm\Build\metadata\ref contains the metadata for the reference implementation.
Within a metadata module, two files, config.xml and perspectives.xml, must be in the config subdirectory. And you can add as many files as you want in the main directory to configure choice groups, relationship types, and security.
The folder clm\Build\metadata\core contains the metadata module for the core application. Use the core application when you want to create your own application from scratch, it contains the strict minimum for an empty application and Inline Service.
This section contains the following topics:
config.xml contains general configuration settings:
Under a <config> node, the following settings are available:
<workbenchService> specifies the url of the Oracle RTD server running in the same host WebLogic server as Oracle RTD Decision Management.
The host is therefore always localhost, but the port can change based on your configuration. If you followed the instructions in Chapter 1, "Installing Oracle RTD Decision Management," the port is 7001 in a development environment and 7003 in a production environment.
<inlineService> specifies the name of the Inline Service used to get type restrictions and decision center reports.
The deployment state must be the exact deployment state that you want to access.
<decisionCenter> specifies the base URL to access embedded decision center reports. Remove the <decisionCenter> node to hide the decision center reports in the user interface.
<ownership-mode> specifies the ownership mode for when a choice is edited in a project. The value can be:
off (the default)
The user does not become the owner of the choice when the user edits a choice, and the choice owner is not shown in the Decision Manager user interface
on
The user becomes the owner of the choice when the user edits a choice, and the choice owner is shown in the Decision Manager user interface
<display-name> specifies the name of the application as it appears on the login page and at the top of the main page
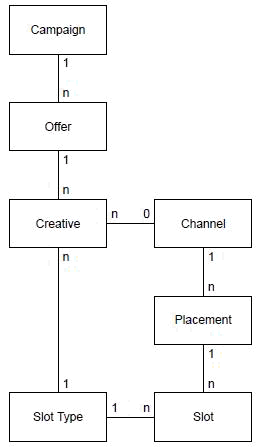
Perspectives allow business users to view a subset of the choice group graph in the tree in the Decision Manager user interface.
For instance, the reference implementation contains the choices shown in the following choice group graph:
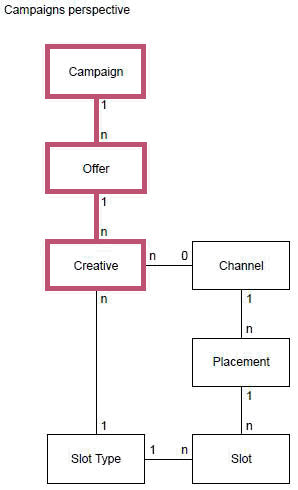
Four "general" - that is, unqualified - perspectives are defined on top of this graph:
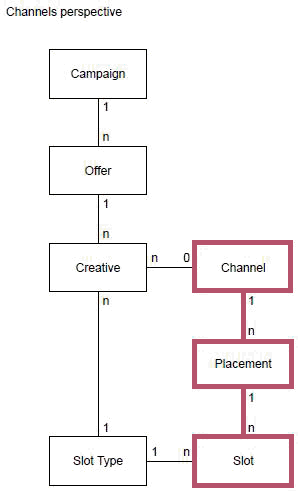
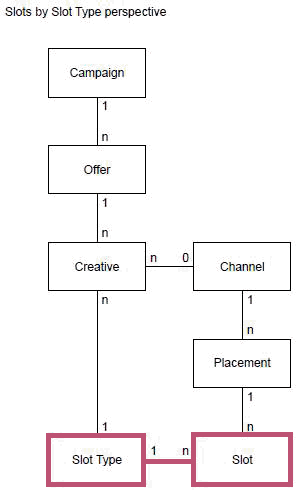
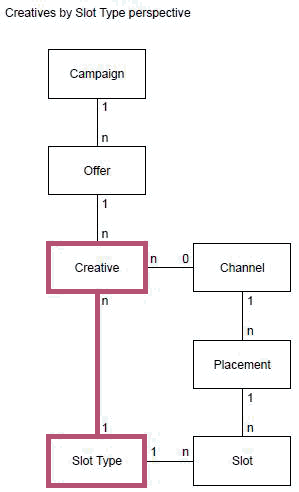
Perspectives are defined in the file clm\Build\metadata\ref\config\perspectives.xml (you can modify this if you use a metatada.module different from ref).
perspectives.xml is made of a <perspectives> root node which contains multiple perspectives.
Note:
In this section, property entries shown in bold are required entries.Properties of perspective:
name: the name of the perspective
one root node
multiple level nodes (ordered)
Properties of root:
choiceGroupId: the choice group that will be the root node of the tree
simpleViewCriteria (see later in this section)
viewCriteria (see later in this section)
Properties of level:
choiceGroupId: the choice group that will be the node of the tree at that level
relationshipTypeId: the relationship to follow between the previous level and this level
reversed: whether to follow the relationship from fromChoiceGroupId to toChoiceGroupId (reversed = false) or from toChoiceGroupId to fromChoiceGroupId (reversed = true, the default).
For the cardinalities currently supported, *:1 and *:0, use reversed=true to display many child nodes under each node
simpleViewCriteria (see later in this section)
viewCriteria (see later in this section)
simpleViewCriteria and viewCriteria allow the application of a filter on which choices are displayed.You can specify multiple choices and the resulting filter will be the OR combination of all of them (that is, a choice will appear if it matches any of the criteria).
Properties of simpleViewCriteria:
attribute: the choice attribute to filter on (of the choice group defined by choiceGroupId for this root or level)
operator: the operator to use for filtering (see searchCriteriaOperator later in this section for a list of operators)
value: the value of the choice attribute to filter on
Note:
To specify criteria for date attributes, the value must be in the format yyyy-mm-dd, such as in:<simpleViewCriteria attribute="startDate" operator="AFTER" value="2012-11-25"
Properties of viewCriteria:
name: the id of a criteria defined on the choice group of the same choiceGroupId as this root or level
You can put as many xml configuration files in the perspectives configuration folder as you wish.
These configuration files let you specify choice groups and relationship types between choice groups.
Relationship types are owned by one side. In other words, to add, edit or delete a relationship between two choices, the user must be able to lock the choice owning that relationship.
Note: In the following lists, properties shown in bold mean that they are required.
Properties of choice groups:
id: the id of the choice group. It must match the id in the Inline Service
name: the name of the choice group. It will appear as such in the Decision Manager user interface
description: the description of the choice group.
searchSortOrder: the order in which this choice group will appear in the search dropdowns (sorted ascending based on this number)
If you do not put this property, then this choice group will not appear in the dropdowns
createSortOrder: the order in which this choice group will appear in the create dropdown (sorted ascending based on this number)
If you do not put this property, then this choice group will not appear in the dropdown
attributes: an array of attribute (see later in this section)
criteria: zero to many criteria used for perspective filtering (see later in this section)
Properties of attributes:
id: the id of the choice attribute. It must match the id in the Inline Service.
name: the name of the choice attribute. It will appear as such in the Decision Manager user interface.
description: the description of the choice attribute.This description will appear in tool tips in the user interface, and is a useful way to give advice to business users on how to enter values for this attribute.
searchCriteriaOperator: the operator used for the advanced search.
If you do not put this property, then this attribute will not show up in the advanced search (unless you use the Add Field dropdown).
Valid values for strings:
"<>" (Not equal to)
"NOTBETWEEN" (Not between)
"CONTAINS" (Contains)
"ISNOTBLANK" (Is not blank)
"=" (Equal to)
"<" (Less than)
">" (Greater than),
"ISBLANK" (Is blank)
"<=" (Less than or equal to)
">=" (Greater than or equal to)
"DOESNOTCONTAIN" (Does not contain)
"STARTSWITH" (Starts with),
"ENDSWITH" (End with)
"BETWEEN" (Between)
Valid values for dates:
"<>" (Not equal to)
"ISBLANK" (Is blank)
"ONORAFTER" (On or after)
"BEFORE" (Before)
"NOTBETWEEN" (Not between)
"ISNOTBLANK" (Is not blank)
"ONORBEFORE" (On or before)
"AFTER" (After)
"BETWEEN" (Between)
"=" (Equal to)
Valid values for numbers:
"<>" (Not equal to)
"ISBLANK" (Is blank)
">" (Greater than)
"<=" (Less than or equal to)
">=" (Greater than or equal to)
"NOTBETWEEN" (Not between)
"ISNOTBLANK" (Is not blank)
"BETWEEN" (Between)
"<" (Less than)
"=" (Equal to)
The text within each set of parentheses shows what appears in the user interface.
genSysNote: controls whether changing the value of such an attribute should trigger a "Set Attribute" audit trail entry, true or false, true by default
type (see later in this section)
restriction (see later in this section)
Properties of type:
name: the type of the attribute, either "string", "date" or "number"
length: for string types, the maximum number of characters that can be entered into the text control. This includes the characters representing the new line. If set to 0 or less, the maximumLength is ignored. Note that in some browsers like Internet Explorer, new line is treated as two characters.
precision: for number types, the precision is the total number of digits. It must be between 1 to 38.
scale: for number types, the scale is the number of digits to the right of the decimal point. It can range from -84 to 127.
displayWidth: the size of the text control specified by the number of characters shown. The number of columns is estimated based on the default font size of the browser.
required: whether a non-null, non-empty value must be entered.
Properties of restriction:
kind: the kind of type restriction, either "lov" (only for string attributes), "regexp" (only for string attributes), or "range" (only for number attributes).
minDefined: for range type restrictions, whether the range has a min bound ("true" or "false")
maxDefined: for range type restrictions, whether the range has a max bound ("true" or "false")
minInclusive: for range type restrictions, whether the range min bound is included ("true" or "false")
maxInclusive: for range type restrictions, whether the range max bound is included ("true" or "false")
(all other type restriction information is retrieved at runtime from the Inline Service)
Properties of relationship types:
id: the id of the relationship type. You use this id in your Inline Service for methods such as CLMChoiceBag.getRelatedChoiceIds().
fromChoiceGroupId: the choice group that owns this relationship type.
toChoiceGroupId: the choice group destination.
fromName: the owner to destination relationship type name. You use this name in your Inline Service for methods such as CLMChoiceBag.getRelatedChoiceIds().
toName: the destination to owner relationship type name. You use this name in your Inline Service for methods such as CLMChoiceBag.getRelatedChoiceIds().
fromDescription: the owner to destination relationship type description.
toDescription: the destination to owner relationship description.
cardinality: From the owner to the destination, can be:
*:1
Each source has one destination
Each destination has 0 to n sources
*:0
Each source has 0 or 1 destination
Each destination has 0 to n sources
onDelete: 'C' to cascade delete destination choices, 'O' to make destination choices orphans (that is, only delete the relationship). Explicitly:
onDelete="C": Deleting a choice on the "zero or one" side of the relationship will attempt to also delete the choices on the "many" side
onDelete="O": Deleting a choice on the "zero or one" side of the relationship will not delete the choices on the "many" side
propagateRules: 'N' to not propagate rules (the default), 'D' to propagate rules from owner to destination, 'S' to propagate rules from destination to owner, 'B' to propagate rules in both directions. For more details, see the section "Propagation of Rules" in Oracle Real-Time Decisions Base Application Installation and Reference Guide.
propagateEvents: 'N' to not propagate rules (the default), 'D' to propagate rules from owner to destination, 'S' to propagate rules from destination to owner, 'B' to propagate rules in both directions. For more details, see the section "Propagation of Events" in Oracle Real-Time Decisions Base Application Installation and Reference Guide
Properties of criteria:
id: the id of the criteria
xml: the <ViewCriteria> xml of a view criteria defined on this choice group's VO (view object).
Projects are a special kind of choice group. You can specify additional attributes to projects by specifying a choice-group with id Project. Project attributes cannot be required and do not appear in the user interface. They only appear in the model layer, where they can be accessed by the Oracle RTD public Java APIs.
By default, all security metadata is in a file called security.xml but you may create as many files containing security information as you want.
There are different root nodes that apply to security:
<application-roles> contains the definition of application roles
<enterprise-roles> contains the definition of enterprise roles, which are uploaded as WebLogic groups in a development environment, but are not meant to be used in a production environment
<users> contains the definition of users, which are uploaded as WebLogic users in a development environment, but are not meant to be used in a production environment
<application-roles> contains multiple <application-role>.
Each application role has a <name> and <permissions>.
<permissions> has multiple <permission>, each having a <resource-name>, a <resource-type> and <actions>.
The resource type can be perspective, choice group and project.
For the perspective resource type, the resource name is the name of the perspective as defined in perspectives.xml, or _all_ to mean all perspectives.
For the perspective resource type, the only action is view, which means that the user having this application role will be able to see and select this perspective in the Decision Manager user interface.
For the choice group resource type, the resource name is the id of the choice group as defined in one of the other configuration files, or _all_ to apply to all choice groups.
For the choice group resource type, the actions are a comma separated list of one or multiples of:
create: to be able to create a choice of that choice group in a project
read: to be able to view choices of that choice group
update: to be able to edit a choice of that choice group in a project, and to be able to discard any changes (including addition and deletion) on a choice of that choice group
delete: to be able to delete a choice of that choice group in a project
own: to be able to edit (in the same project) and become owner of a choice that is owned by someone else
For the project resource type, the resource name must be _all_.
For the project resource type, the actions are a comma separated list of one or multiples of:
create: to be able to create a project
commit: to be able to commit a project
discard: to be able to discard a project and all changes within it
update: to be able to update a project
read: to be able to log in to the application and to use the Decision Manager user interface
<enterprise-roles> has multiple <enterprise-role>.
Each <enterprise-role> has a name and <application-roles>, which is a comma separated list of application roles that are granted to members of that enterprise role.
<users> has multiple <user>.
Each <user> has a name, a display name, a description and credentials which is the password in an encrypted form. See previous sections for how to get the correct credential string.
Each <user> has <application-roles>, which is a comma separated list of application roles that are granted to members of that enterprise role.
For each choice group you have defined, add a 16x16 png image in the images\group folder (under <metadata_modules_home>\<your_application>) named after the choice group id.
The file must be called <choiceGroupId>.png.
Both parts of the file name are case-sensitive:
<choiceGroupId> must exactly match the name of the choice group id, as set up in the choice group configuration xml file (see Section 2.2.2.3, "Choice Group and Relationship-Types XML Files"
png must be all lower-case
The RTD_Base_Marketing Inline Service released with the RTD for Marketing Optimization application is in the service folder under <metadata_modules_home>\ref, that is, in clm\Build\metadata\ref\service. This Inline Service is described in more detail in Oracle Real-Time Decisions Base Application Installation and Reference Guide.
After you have modified the metadata, you need to run the application generation tool ant to generate the application.
The clm\Build directory contains the ant tasks to perform the generation.
The ant targets are as follows:
ear - creates EAR file for deployment in production mode
clean - cleans projects
generate - generates the application.
overwrite - overwrites files with custom files.
clean-generated - removes generated code
The ant option "generate" takes one parameter: metadata.module. The default value is ref. This specifies which subfolder of clm\Build\metadata should be used to generate the application.
For instance, to generate an application in clm\Build\metadata\myapp, call:
ant -Dmetadata.module=myapp generate
Then
ant ear (for deploying to production, otherwise deploy from JDeveloper)
The ant option "overwrite" copies the files in the metadata.module overwrite subfolder and copies them over any existing file. Use this if you are making changes to files that are generated by the generate task but want to keep the changes that were made. To do so, copy the file in the overwrite subfolder after you have applied your changes, following the same directory structure from the root (the root being where the file clm.jws is). You should then call ant overwrite after calling ant generate, in order to retain your changes.
If you have made changes to metadata that affect one of the files you have already overwritten, you need to manually apply these changes by merging these changes in the files in the overwrite folder.
ant generate will warn you if it is about to overwrite files that have been modified and should therefore be kept in the overwrite folder. To overwrite this warning, add -Dchanges=overwrite to the ant generate command line.
Notes:
After generation, the database schema may have changed. You should then run "drop ils.sql" then "drop core.sql" (or drop and recreate the database user), then "load core.sql" then "load ils.sql". This will delete any choice you have in the database. To preserve choices, you can compare the previous and new sql and just make these changes. For instance, if you added a choice attribute, you can alter the table to add a column, and recreate the view associated with it.
The files modified by application generation are usually in sub-directories called ils. The following files are modified by application generation and are NOT in ils sub-directories:
clm\src\META-INF\jazn-data.xml (you must include your users and roles in security xml configuration files)
clm\ViewController\adfmsrc\config.xml (you must edit clm\Build\metadata\ref\config\config.xml instead, replacing ref with your metadata module directory if different)
clm\ViewController\adfmsrc\perspectives.xml (you must edit clm\Build\metadata\ref\config\perspectives.xml instead, replacing ref with your metadata module directory if different)
clm\ViewController\adfmsrc\oracle\rtd\clm\ui\DataBindings.cpx
The behavior of the Oracle RTD Decision Management business layer can be further extended by the use of the Java API that comes with it. The javadoc for this Java API can be found in clm\lib\clm-model-api-javadoc.jar.
This section contains the following topics:
In order to add an attribute to a choice group, follow these steps:
Modify the xml where this choice group is defined in folder clm\Build\metadata\ref.
Run application generation again: in folder clm\Build, run "ant generate".
Since adding an attribute to a choice group modifies the database, you have to recreate the database. In order to do this, call "drop ils.sql" then "drop core.sql" then "load core.sql" then "load ils.sql" (these files are in clm\Database\sql and clm\Database\sql\ils). If you do not want to lose your database data, you can compare the sql to the previous one and alter the table to add the column and recreate the associated view.
You can now deploy the new version of the Decision Management application using JDeveloper.
You have to add the choice attribute to the choice group in your Inline Service as well. Make sure the id is the same as the one you entered in the xml metadata in the first step. Redeploy the Inline Service.
In order to add a choice group, follow these steps:
Add an xml file for this new choice group in folder clm\Build\metadata\ref.
Add an image for this choice group in folder clm\Build\metadata\ref\images\group.
Run application generation again: in folder clm\Build, run "ant generate".
Since adding a choice group modifies the database, you have to recreate the database. In order to do this, call "drop ils.sql" then "drop core.sql" then "load core.sql" then "load ils.sql" (these files are in clm\Database\sql and clm\Database\sql\ils). If you do not want to lose your database data, you can compare the sql to the previous one and add the new table, the new view and one row in the CHOICE_GROUP table.
You can now deploy the new version of the Decision Management application using JDeveloper.
You have to add the choice group in your Inline Service as well. Make sure the ids are the same as the ones you entered in the xml metadata in the first step. Make sure the choice group you add is under CLM Base choice group. Add the choice group in the CLM ILS Choice Groups application parameter. Redeploy the Inline Service.
In order to create a relationship type between two choice groups, follow these steps:
Edit relationship-types.xml in folder clm\Build\metadata\ref and add the new relationship type.
Run application generation again: in folder clm\Build, run "ant generate".
Since adding a choice group modifies the database, you have to recreate the database. In order to do this, call "drop ils.sql" then "drop core.sql" then "load core.sql" then "load ils.sql" (these files are in clm\Database\sql and clm\Database\sql\ils). If you do not want to lose your database data, you can compare the sql to the previous one and add one row in the RELATIONSHIP_TYPE table.
You can now deploy the new version of the Decision Management application using JDeveloper.
You can (but do not have to) add choice attributes in both choice groups in the Inline Service to follow the relationship. For an example, see how Offer has a "campaign" choice attribute and a "creatives" choice attribute. Redeploy the Inline Service.
In order to modify perspectives, follow these steps:
Edit perspectives.xml in folder clm\Build\metadata\ref\config.
Run application generation again: in folder clm\Build, run "ant generate".
You can now deploy the new version of the Oracle RTD Decision Management application using JDeveloper.
This section contains the following topics:
Oracle RTD Decision Management uses Java Logging API. There are two ways to configure Java Logging API (http://java.sun.com/j2se/1.5.0/docs/guide/logging/overview.html):
Update global logging configuration of the JRE which is used to start WebLogic: JAVA_HOME/jre/lib/logging.properties
Create separate logging properties file (for example c:\src\clm\logging.properties) and pass it in the -Djava.util.logging.config.file argument to the Weblogic.Server startup command.
To pass this argument append the line:
set JAVA_OPTIONS=%JAVA_OPTIONS% -Djava.util.logging.config.file= c:\src\clm\logging.properties
to
C:\Oracle\Middleware\user_projects\domains\<RTDCLM_domain>\bin\setDomainEnv.cmd
Sample logging.properties file:
# Specify the handlers to create in the root logger
.level= INFO
handlers = weblogic.logging.ServerLoggingHandler
# Register handlers for the oracle.rtd.clm. and its child loggers
oracle.rtd.clm.handlers = java.util.logging.FileHandler, java.util.logging.ConsoleHandler, weblogic.logging.ServerLoggingHandler
oracle.rtd.clm..useParentHandlers = false
oracle.rtd.clm.level = ALL
#Console handler
java.util.logging.ConsoleHandler.level = INFO
java.util.logging.ConsoleHandler.formatter = java.util.logging.SimpleFormatter
# Set the default logging level for new FileHandler instances
weblogic.logging.ServerLoggingHandler.level = ALL
#File handler
java.util.logging.FileHandler.pattern = %h/java%u.log
java.util.logging.FileHandler.limit = 50000
java.util.logging.FileHandler.count = 1
java.util.logging.FileHandler.formatter = java.util.logging.SimpleFormatter
java.util.logging.FileHandler.level=ALL
This configuration logs message with level INFO to the Weblogic Server Startup Console and all messages to the java*.log file in the user home directory. To change log level for Oracle RTD Decision Management applications replace oracle.rtd.clm.level = ALL
with oracle.rtd.clm.level = SEVERE|WARNING|INFO|CONFIG|FINE|FINER|FINEST.
Additional info can be found at the following site:
http://download.oracle.com/docs/cd/E14571_01/web.1111/e13739/logging_services.htm