| C H A P T E R 14 |
|
Using Simple Network Management Protocol (SNMP) |
This chapter describes how to use SNMP. It includes the following sections:
The Sun server supports the Simple Network Management Protocol (SNMP) interface, versions 1, 2c, and 3. SNMP is an open technology that enables the management of networks and devices, or nodes, connected to the network. SNMP messages are sent over IP using the User Datagram Protocol (UDP). Any management application that supports SNMP can manage your server.
Utilizing SNMP requires two components: a network management station and a managed node (in this case, the ILOM). Network management stations host management applications, which monitor and control managed nodes.
Managed nodes are any number of devices, including servers, routers, and hubs that host SNMP management agents responsible for carrying out the requests from management stations. The management station monitors nodes by polling management agents for the appropriate information using queries. Managed nodes can also provide unsolicited status information to a management station in the form of a trap. SNMP is the protocol used to communicate management information between the management stations and agents.
The SNMP agent is preinstalled and runs on the ILOM, so all SNMP management of the server should occur through the ILOM. To utilize this feature, your operating system must have an SNMP client application. See your operating system vendor for more information.
The SNMP agent on your ILOM provides the following capabilities: inventory management and sensor and system state monitoring.
The base component of an SNMP solution is the management information base (MIB). A MIB is a text file that describes a managed node's available information and where it is stored. When a management station requests information from a managed node, the agent receives the request and retrieves the appropriate information from the MIBs. The Sun server supports the following SNMP classes of MIB files.
Download and install the product-specific MIB files from your Tools and Drivers CD for your platform.
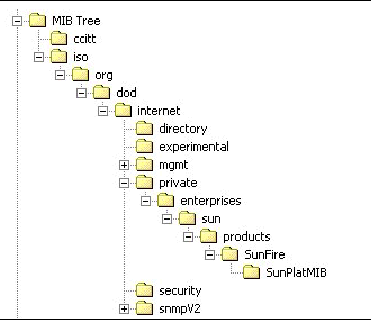
Use the MIBs to integrate the management and monitoring of the server into SNMP management consoles. The MIB branch is a private enterprise MIB, located at MIB object iso(1)/org (3)/dod (6)/internet (1)/private (4)/enterprises (1)/sun (42)/products (2). FIGURE 14-1 shows the arrangement. The standard SNMP port (port 161) is used by the SNMP agent on the ILOM.
FIGURE 14-1 Sun server MIB Tree
SNMP is a protocol, not an operating system, so you need some type of application to use SNMP messages. Your SNMP management software might provide this functionality, or you can use an open source tool like net-SNMP, which is available at:
http://net-snmp.sourceforge.net/
Both management stations and agents use SNMP messages to communicate. Management stations can send and receive information. Agents can respond to requests and send unsolicited messages in the form of a trap. There are five functions that management stations and agents use:
By default, port 161 is used for SNMP messages and port 162 is used to listen for SNMP traps.
The ILOM has a preinstalled SNMP agent that supports trap delivery to an SNMP management application.
To use this feature, you must (1) integrate the platform-specific MIBs into your SNMP environment, (2) tell your management station about your server, and (3) configure the specific traps.
The Sun server MIB tree appears in FIGURE 14-1.
Use a third-party SNMP management application to load the SUN-PLATFORM-MIB listed in Section 14.2, SNMP Management Information Base (MIB) Files.
Add your Sun server as a managed node, using your SNMP management application. See your SNMP management application documentation for more details.
To configure a trap in your ILOM, see Section 8.5, Managing ILOM Alerts for CLI instructions, and Section 9.5, Managing Alerts for WebGUI instructions.
You can add, delete, or configure SNMP user accounts from the CLI. By default, SNMP v3 is enabled, and SNMP v1 and v2c are disabled.
To do this on the WebGUI, see Section 14.7, Managing SNMP With the WebGUI.
To add an SNMP v3 read-only user account, type the following command:
create /SP/services/snmp/users/username authenticationpassword=password
To add an SNMP v1/v2c user account, type the following command:
create /SP/services/snmp/communities/communityname
To delete an SNMP v3 user account, type the following command:
delete /SP/services/snmp/users/username
To delete an SNMP v1/v2c user account, type the following command:
delete /SP/services/snmp/communities/communityname
To configure SNMP user accounts, use the set command.
set target [propertyname=value]
These targets, properties, and values are valid for SNMP user accounts.
|
* If the privacyprotocol property has a value other than none, then a privacypassword must be set. |
|||
When changing the parameters of SNMP users, you must set values for all the properties, even if you are not changing all the values. For example, to change user jeff's privacyprotocol to DES you must type:
-> set /SP/services/snmp/users/jeff privacyprotocol=DES privacypassword=password authenticationprotocol=SHA authenticationpassword=password
Your changes would be invalid if you typed:
-> set /SP/services/snmp/users/jeff privacyprotocol=DES
|
Note - You can change SNMP user permissions without resetting the privacy and authentication properties. |
This section describes how to use the WebGUI to manage SNMP users.
For more information about SNMP and the classes of MIB files that the Sun server supports, see Section 14.1, About SNMP.
1. Log in to the ILOM as administrator.
Only accounts with administrator privileges are enabled to modify SNMP settings.
2. Select Configuration =>System Management Access => SNMP.
The SNMP Settings page appears.
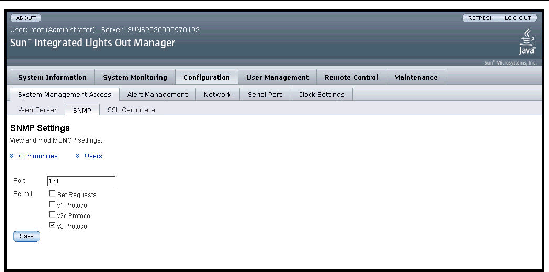
3. Type the port number in the Port field.
4. Enable or disable Set Requests by selecting or clearing the Set Requests check box.
If Set Requests is disabled, all SNMP objects are read-only.
5. Select a check box to enable SNMP v1, v2c, or v3.
SNMP v3 is enabled by default. You can independently enable or disable v1, v2c, and v3 protocol versions.
6. Click Save for your settings to take effect.
7. At the bottom of the page, you can also add, edit, or delete SNMP communities, as well as SNMP users. See FIGURE 14-3.
FIGURE 14-3 SNMP Communities and Users
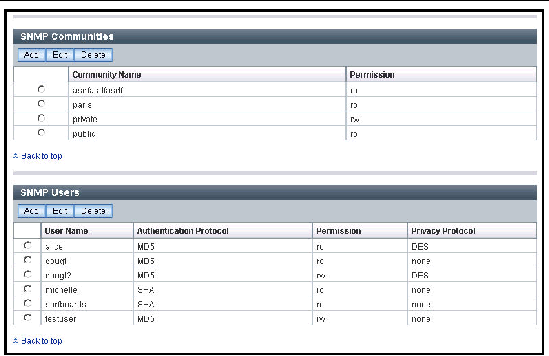
1. Click the Users link or scroll down to the SNMP Users list.
2. Click Add or Edit under the SNMP Users list.
The Add dialog box, or the Edit dialog box appears. See FIGURE 14-4.
FIGURE 14-4 Edit SNMP User Dialog Box
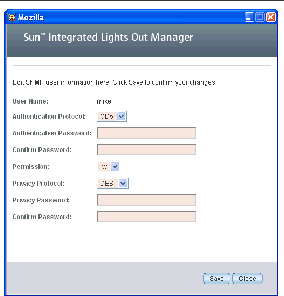
3. Add or change the information in the fields as follows:
a. Type a user name in the User Name field.
The name can include up to 35 characters. It must start with an alphabetic character and cannot contain a space.
b. Select either Message Digest 5 (MD5) or Secure Hash Algorithm (SHA).
c. Type an authentication password.
The authentication password must contain 8 to 16 characters, with no colons or space characters. It is case sensitive.
d. Type the authentication password again in the Confirm Password field.
e. Select read-only (ro) or read-write (rw) permissions.
f. Select DES or none for a privacy protocol.
The privacy password must contain 8 to 16 characters, with no colons or space characters. It is case sensitive.
h. Type the privacy password again in the Confirm Password field.
1. Click the Users link, or scroll down to the SNMP Users list.
2. Select the radio button of the SNMP user to be deleted.
3. Click Delete under the SNMP Users list.
A confirmation dialog box appears.
4. Click OK to delete the SNMP user.
1. Click the Communities link, or scroll down to the Communities list.
2. Click the Add button or the Edit under the SNMP Communities list.
The Add or Edit dialog box appears. See FIGURE 14-5.
FIGURE 14-5 Add Community Dialog Box
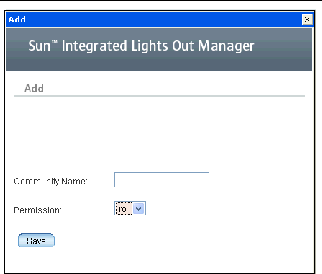
3. Type the community name in the Community Name field.
The name can contain up to 35 characters. It must start with an alphabetic character and cannot contain a space.
4. Select read-only (ro) or read-write (rw) permissions.
1. Click the Communities link, or scroll down to the Communities list.
2. Select the radio button of the SNMP community to be deleted.
3. Click Delete under the SNMP Communities list.
A confirmation dialog box appears.
4. Click OK to delete the SNMP community.
Copyright © 2007, Sun Microsystems, Inc. All Rights Reserved.