| C H A P T E R 9 |
|
Working with Display Groups |
This chapter describes how to work with and manage display groups in the Sun StorageTek RAID Manager software.
To create display groups, see Creating Display Groups.
The chapter contains the following sections:
As your storage space grows and changes, you can add new systems to your display groups.
|
1. Right-click on the system in the Enterprise View.
A navigational menu is displayed.
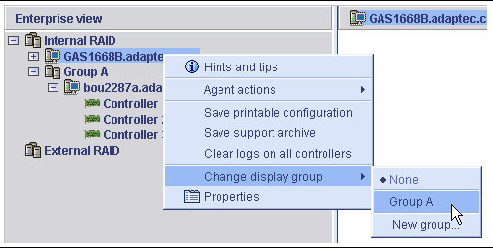
2. From the navigational menu, choose Change display group > display-group-name.
FIGURE 9-1 Changing a Display Group

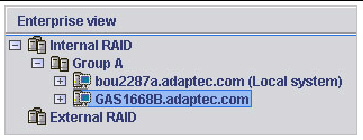
The system is added to the display group.
FIGURE 9-2 System Added to a Display Group

| Note - A system can belong to only one display group at a time; you can’t include the same system in multiple display groups. |
To quickly view the status of systems within a display group, you can open the display group Properties window.
|
 In the Enterprise View, right-click on the display group, and choose Properties.
The Properties window is displayed for that display group, summarizing the status of the systems that belong to that group.
|
1. In the Enterprise View, right-click the system you want to move.
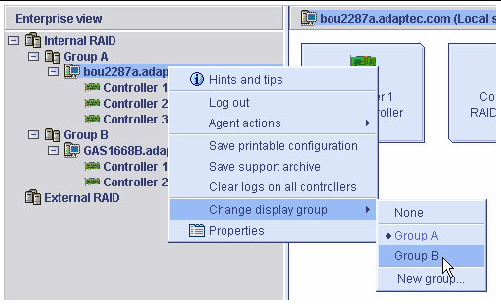
2. Choose Change display group > new-display-group-name.
FIGURE 9-3 Moving a System to a New Display Group

The system moves to its new display group.
You can make managing your storage space easier and more efficient by giving your display groups meaningful names.
|
1. In the Enterprise View, right-click on the display group.
A navigational menu is displayed.
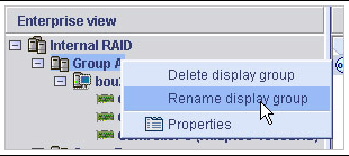
2. From the navigational menu, choose Rename display group.
FIGURE 9-4 Renaming a Display Group

3. Enter a new name for the display group, then click OK.
The Enterprise View shows the new name of the display group.
|
1. In the Enterprise View, right-click the system you want to remove.
A navigational menu is displayed.
2. From the navigational menu, choose Change display group > None.
The system is removed from the display group.
| Note - Systems that are not part of display groups are listed at the top of the Enterprise View, above any display groups. |
If required, you can delete a display group. When you delete the display group, the systems that belonged to it are listed at the top of the Enterprise View, above any remaining display groups.
|
1. In the Enterprise View, right-click on the display group.
A navigational menu is displayed.
2. From the navigational menu, choose Delete display group (as shown in FIGURE 9-4).
The display group is deleted and the systems that belonged to it are no longer grouped together in the Enterprise View.
Copyright © 2009 Sun Microsystems, Inc. All rights reserved.