| Sun StorageTek RAID Manager Software User’s Guide |
| C H A P T E R 5 |
|
Customizing the Software |
This chapter describes how you can customize the Sun StorageTek RAID Manager software to make managing your storage space easier and more effective. All tasks described in this chapter are optional. The chapter contains the following sections:
If multiple systems on the network are in your storage space, you can use the Sun StorageTek RAID Manager software to monitor and manage all of them from one system.
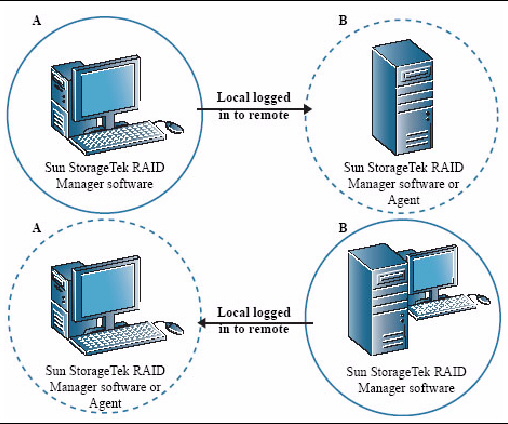
The system that you are working on is called the local system. All other systems in the storage space are remote systems. ‘Local’ and ‘remote’ are relative terms, as shown in the following figure--when you are working on system A (local system), system B is a remote system; when you are working on system B (local system), system A is a remote system.
FIGURE 5-1 Local and Remote System Configurations
To manage remote systems from the local system, you log into the remote systems. (The Sun StorageTek RAID Manager software encrypts the user name and password of a remote system during log-in.) The Sun StorageTek RAID Manager software or the Sun StorageTek RAID Manager Agent (see Starting the Agent Only) must be running on these remote systems before you can log into them.
When you log into a remote system, you add that system to the Enterprise View of the Sun StorageTek RAID Manager software, as shown in this example.
FIGURE 5-2 Identifying Local and Remote Systems in the Enterprise View

Once you have logged into a remote system, it is automatically included in the Enterprise View each time you start the Sun StorageTek RAID Manager software from the local system. You can work with the remote system’s HBAs, disk drives, and logical drives as if they were part of your local system. You must log in with the proper permission level to complete the tasks you wish to perform. (See Understanding Permission Levels for more information.)
|
1. From the menu bar, click Remote, then select Add.
The Add Managed System window is displayed.
2. Ensure that Managed System (Internal RAID) is selected in the Type drop-down menu, then enter the Host name or TCP/IP address of the remote system.
3. Enter the startup port number of the remote system.
The default port number is 34571.
4. If prompted, enter your user name and password.
(User names and passwords are case-sensitive.) To save this user name and password, select the Save user name/password box.
The Sun StorageTek RAID Manager software connects to the remote system and adds it to the list of managed systems in the Enterprise View.
6. To manage the remote system, select it in the Enterprise View and enter your user name and password if prompted.
To create logical drives on remote systems, see Building a Storage Space.
|
If you no longer want to monitor a remote system, you can remove it from the Enterprise View.
Removing a remote system does not cause it to fail.
1. In the menu bar of the main window, choose Remote > Remove managed system > remote-system-name.
The Remove Managed System window is displayed.
2. If you want to continue receiving events from the remote system after it has been removed from the local system, select Continue to receive events from the remote system from the drop-down menu.
The remote system is removed from the Enterprise View of the Sun StorageTek RAID Manager software.
You can organize related local and remote systems into display groups to make managing your storage space easier and more effective.
Systems in a display group are displayed together in the Enterprise View under the group name.
|
1. In the Enterprise View, right-click on a system that you want to add to a display group
A navigational menu is displayed.
2. Choose Change display group > New group.
FIGURE 5-3 Creating a New Display Group

3. Enter a name for the new display group, then click OK.
The display group is created and the system you selected in Step 1 is added to it.
FIGURE 5-4 Viewing The Display Groups

4. To add another system to the newly created display group, right-click on the system in the Enterprise View, choose Change display group > group-name.
FIGURE 5-5 Changing the Display Group

The system is added to the new display group.
FIGURE 5-6 Viewing Systems Within a Display Group

Display groups are sorted alphabetically and are displayed in the Enterprise View below any systems that are not part of a display group.
A system can belong to only one display group at a time; you can’t include the same system in multiple display groups.
For more information, see Working with Display Groups.
You can customize the Sun StorageTek RAID Manager software by doing the following:
|
You can set the Sun StorageTek RAID Manager software to sort systems in the Enterprise View alphabetically or chronologically. By default, systems are listed in alphabetical order. The local system always appears first when you sort objects alphabetically.
1. In the menu bar of the main window, choose File > Preferences.
2. Click the Display options tab.
3. In the System tree sorting drop-down menu, select the option you want.
FIGURE 5-7 Sorting Systems in the Enterprise View

|
You can set the Sun StorageTek RAID Manager software to show disk drive capacity in measures of megabytes (MB), gigabytes (GB), or terabytes (TB).
You can choose the Auto-select setting to allow the Sun StorageTek RAID Manager software to show the most appropriate unit of measure based on disk drive size. This option allows different disk drives to be shown in different units of measure.
By default, disk drives are shown in GB.
1. In the menu bar of the main window, choose File > Preferences.
2. Click the Display options tab.
3. In the Capacity display units drop-down menu, select the option you want.
FIGURE 5-8 Changing the Standard Unit of Measure

|
You can choose to remove the tool bar and status bar from the main Sun StorageTek RAID Manager software window to save space on-screen. You can also choose to turn off the Tool Tips that automatically appear when you place your cursor over on-screen items.
The options in the View menu are toggle switches, which means that they can be selected and deselected by clicking on them.
The default settings of the Sun StorageTek RAID Manager Agent are suitable for most storage spaces. (See About the Agent for more information.) However, you can customize the Agent on any system by doing the following:
Any changes you make to the Agent settings affect the selected system only and are not applied to all systems in your storage space.
You can set the Sun StorageTek RAID Manager Agent to send event alerts about a specific system to all users who are logged into your storage space network. You might want to do this if your storage space isn’t managed by a dedicated person, or if that particular system is off-site or isn’t connected to a monitor.
Event alerts signal to everyone working on the storage space that technical assistance is required for that system.
For more information, see Broadcasting Event Alerts to Users.
|
By default, all Warning- and Error-level events on a system are recorded in the operating system event log. You can customize the level of events that are recorded, or you can disable operating system event logging.
1. In the Enterprise View, select the system.
2. Click the Configure button, then choose General Settings.
FIGURE 5-9 Changing the Agent’s General Settings

The Agent General Settings window is displayed.
3. From the Save events to OS log drop-down menu, choose the type of event logging that you want, then click Save changes.
FIGURE 5-10 Agent General Settings Window

4. Restart the Sun StorageTek RAID Manager software to apply the new setting.
|
Warning- and Error-level events on a system (see About the Status Icons) trigger an audible alarm, a series of beeps which sound every five minutes until the event is resolved.
You can change the frequency and duration of the alarm, or choose to disable the alarm on any system. For information about using the audible alarm, see Silencing and Testing the Audible Alarm.
1. In the Enterprise View, select the system.
2. Click the Configure button, then click General Settings.
The Sun StorageTek RAID Manager Agent General Settings window is displayed for the system you selected.
FIGURE 5-11 Editing Alarm Settings on the Agent General Settings Window

3. Edit the alarm settings as required.
(Select or deselect Sound alarm; change the Alarm interval (Seconds) time.)

|
Caution - If you disable the alarm, no audible signal will sound on that system when a Warning- or Error-level event occurs. |
5. Restart the Sun StorageTek RAID Manager software to apply the new settings.
|
The Sun StorageTek RAID Manager software uses six consecutive ports to access remote systems: 34571, 34572, 34573, 34574, 34575, and 34576. The default port number for the Agent is 34571. If your system has a conflict with these ports, change the base port to a different port number.
1. In the Enterprise View, select the system.
2. Click the Configure button, then click General Settings.
The Sun StorageTek RAID Manager Agent General Settings window is displayed for the system you selected.
3. Enter a new Agent system base port number.
5. Restart the Sun StorageTek RAID Manager software and the Sun StorageTek RAID Manager Agent to apply the new setting.
| Sun StorageTek RAID Manager Software User’s Guide | 820-1177-13 |
Copyright © 2009 Sun Microsystems, Inc. All rights reserved.
 To Log Into a Remote