| C H A P T E R 6 |
|
Installing VMware ESX Server 3.5 Software |
This chapter explains the procedure for installing VMware ESX Server 3.5 Update 1 on the Sun Blade X6440 server module. It contains the following sections:
Review the following sections:
The following table maps out the installation task order and points to the relevant section where you can find more information.
|
Updating the VMware Server 3.5 Software With Updates and Patches |
Before you begin installing VMware ESX Server 3.5 software on a Sun Blade X6440 server module, collect the necessary information pertinent to your situation by consulting the following required documents at http://www.vmware.com/support/pubs/vi_pubs.html.
Refer to the Sun Blade X6440 Server Module Service Manual for detailed information concerning network interface cabling and the BIOS considerations of these interfaces.
The most common methods for installing VMware on your server are to use:
This chapter contains the procedures for the first three methods. For information about preparing for PXE installation, see the VMware Installation and Upgrade Guide for VESX Server 3 and Virtual Center 2.0, Chapter 6, “Remote and Scripted Installations.” This document can be accessed at http://www.vmware.com/pdf/vi3_301_201_installation_guide.pdf
Alternately, go to the following web site and search for the document:
http://www.vmware.com/support/pubs/vi_pubs.html
Perform the following steps to install the VMware server software:
1. Review the VMware ESX Server 3.5 documentation, available at http://www.vmware.com/support/pubs/vi_pubs.html.
For a list of the documents, see VMware Installation and Administration Documentation.
2. Download the VMware server ISO image.
For instructions, see Downloading the VMware ESX Server 3.5 ISO Image.
3. Depending on the installation method that you selected, use the appropriate procedure below to install the VMware server software:
4. Update the VMware ESX Server 3.5 software with the latest updates and patches, if necessary.
See Updating the VMware Server 3.5 Software With Updates and Patches.
No matter what method you choose to install VMware ESX Server, you must first download an ISO image of the software installation CD.
|
1. Download the ISO image using a network-connected system with CD-burning capabilities from:
http://www.vmware.com/download/vi/eval.html
2. Optionally, burn the image to a CD.
The following procedure describes how to use the Integrated Lights Out Manager (ILOM) Remote Console to install VMware ESX Server 3.5 from a remote CD/DVD drive or a remote ISO image.
|
1. Locate your VMware ESX Server installation CD/DVD or the equivalent ISO image.
2. Connect to the ILOM service processor web interface.
3. Select the Remote Control tab, then select the Mouse Mode Settings tab.
4. If necessary, change the mouse mode to Relative Mouse Mode.
See the “Remote Console Application” chapter of the Sun Integrated Lights Out Manager 2.0 User’s Guide for further instructions.
5. Select the Redirection tab.
6. Click the Launch Redirection button to start the JavaRConsole application.
7. Log in to the JavaRConsole.
8. Start keyboard and mouse redirection.
Select Keyboard and Mouse in the Devices menu.
From the JavaRConsole Devices menu, you can redirect the CD in two ways:
10. Refer to the Installation and Upgrade Guide for VMware Infrastructure to guide you through the installation process.
From your network-connected system go to http://www.vmware.com/support/pubs/vi_pubs.html.
11. Identify the specific network interface for the Sun Blade X6440 server module.
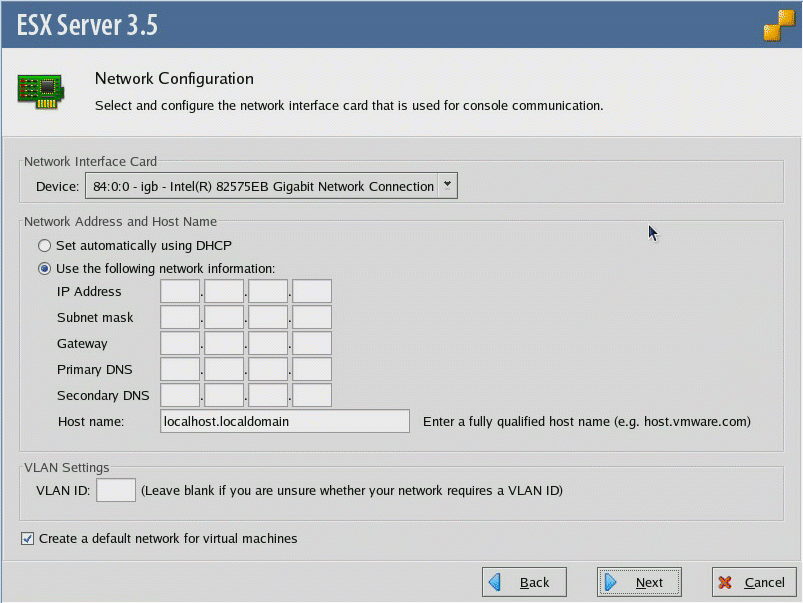
In the service console window on the Sun Blade X6440 server module, identify the available network configuration alternatives (see FIGURE 6-1).
FIGURE 6-1 ESX Server 3.5 Update 1 Network Configuration Dialog Box

12. Update the VMware ESX Server 3.5 software with the latest updates and patches, if necessary.
See Updating the VMware Server 3.5 Software With Updates and Patches.
| Note - Installing all critical and security patches is recommended for best performance. |
The following procedure describes how to install VMware ESX Server 3.5 from a CD-ROM installed in a locally connected USB CD/DVD drive.
Installation from local distribution media requires the following items:
|
1. Connect the multi-port dongle cable to the front of the Sun Blade X6440 server module.
2. Connect the following to the USB ports on the dongle:
| Note - You can also configure keyboard, video and mouse (KVM) access through a JavaRConsole. |
3. Connect a monitor to the server module (this is not required if you are using Java KVM).
4. Power on the server module.
5. Insert the CD-ROM with the ISO image into the CD/DVD drive.
The server boots from the CD-ROM and displays a boot prompt.
6. To access graphical mode, press Enter.
7. To work in text mode, type the following:
8. Refer to the Installation and Upgrade Guide for VMware Infrastructure to guide you through the installation process.
From your network-connected system go to http://www.vmware.com/ support/pubs/vi_pubs.html.
9. Identify the specific network interface for the Sun Blade X6440 server module.
In the service console window on the Sun Blade X6440 server module, identify the available network configuration alternatives (see FIGURE 6-1 for ESX Server 3.0.1 and 12. for ESX Server 3.0.2).
10. Complete the VMware installation.
This is detailed in the Installation and Upgrade Guide for VMware Infrastructure at http://www.vmware.com/support/pubs/vi_pubs.html.
11. Update the VMware ESX Server 3.5 software with the latest updates and patches, if necessary.
See Updating the VMware Server 3.5 Software With Updates and Patches.
| Note - We strongly recommend installing all critical and security patches. |
Because software is constantly being updated, your distribution media might not contain the latest updates and patches.
VMware ESX Server 3.5 update images are available for download at http://www.vmware.com/download/vi/vi3_patches.html.
Copyright © 2009 Sun Microsystems, Inc. All rights reserved.