Adding Authorized Systems
Any remote host with which you want to communicate must be configured using the Add pop-up window.
An authorized host may or may not be using encryption. The Add pop-up window provides three options:
-
Off (not using encryption)
-
Using SKIP encryption
-
Using SunScreen SKIP Version 1 encryption
You add hosts to the authorized systems list using the Add button. The valid types of remote hosts that you can add to your ACL are
-
Host
-
Network
-
Nomadic
 Caution -
 When setting up SunScreen SKIP, be sure to include any NFS servers and NIS or DNS name servers on the authorized systems list, otherwise your system may hang. To avoid problems such as this, a safe approach at the beginning is to add the clear "default" entry. Once you become more comfortable with SKIP configuration, you can remove it.
To determine the servers your system communicates with, use the following commands:
-
For NFS servers, type mount
-
For NIS servers, type ypwhich
-
For DNS servers, consult your system administrator
-
Verify the current routing entries used by the local system. To verify the current routing entries, type netstat -rn and add specific network ACL entries.
If you do not specify a system that you currently have in use when you enable access control, a menu will come up and ask if you want to add the system. It also checks for multicast routers that are being used for others and adds them to the proposed list of systems to add.
Regardless of the type of system that you are adding to the ACL, you must implement the same policy on both your machine and the entity with which you wish to communicate securely. If you do not configure both systems properly, the packets are silently dropped and it appears as if that particular host does not exist. skiplog is useful in diagnosing this situation.
When you click on the Add button, the Add pop-up window appears. From the menu in this window, you select the type of connection: Host, Network, or Nomadic. Next, use the pull-right menu to set the security level. After you have selected the level of security, the appropriate Properties window becomes available. The Add System Properties window is used to set up the options for the type of encryption used by the host, network, or nomadic system being authorized. The procedures in the sections following the table detail how to set up each encryption option.
Adding a Host or Network with No Encryption
This procedure is used to allow a host or network access to your system without using any encryption.
-
Click and hold the Add button at the bottom of the authorized systems list on the skiptool main window.
-
Select the type of connection being authorized: Host or Network. (Nomadic does not offer this option.)
-
Pull right on the type of connection and select Off.
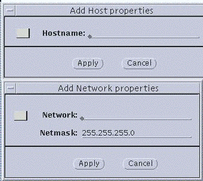
The Add Host properties or Add Network properties dialog box, shown in the following figure, in appears.
Figure 3-2 Add Host/Properties--No Encryption
-
In the Add Host or Network properties window, enter the name or IP address of the host system to be added to your ACL.
In the case of a network, you must define the network with the IP address and the netmask.
-
Click the Apply button.
Setting Up Security for a Host, Network, or Nomadic System
The procedures in this section enable a host, network, or nomadic system access to your system according to the encryption rules you set up. Remember, both your system and the other system need to use the same rules in order to communicate.
Dialog Box Parameters
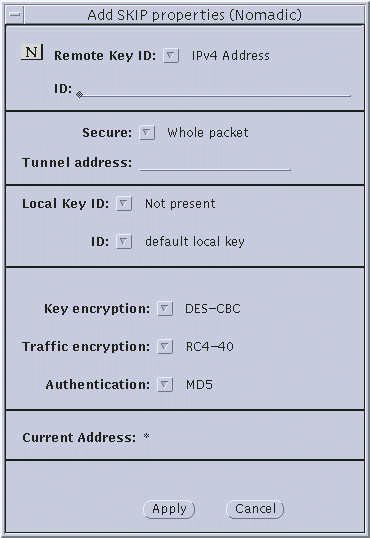
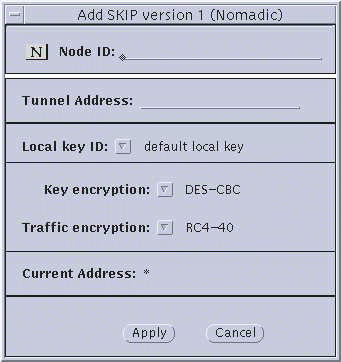
The following section provides some background on the choices available to you from the skiptool dialog boxes. This material will be useful to use the procedures that follow. The two encryption dialog boxes (SKIP and SKIP Version 1) use common set-up parameters, as you can see in Figure 3-3 through Figure 3-5. Explanations of the parameters follow the figures.
Figure 3-3 Host--Add SKIP Host Properties and SKIP Version 1 Properties
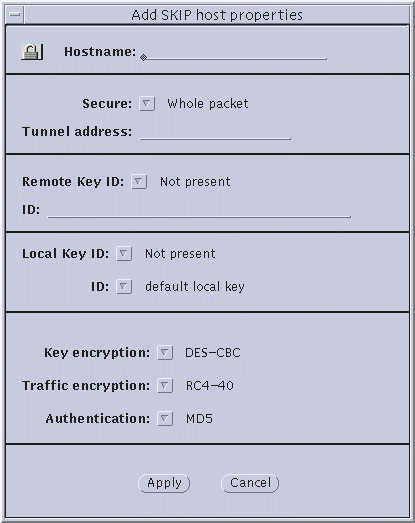
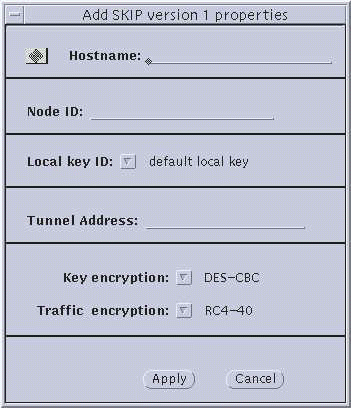
Figure 3-4 Network--Add SKIP Network Properties and SKIP Version 1 Properties
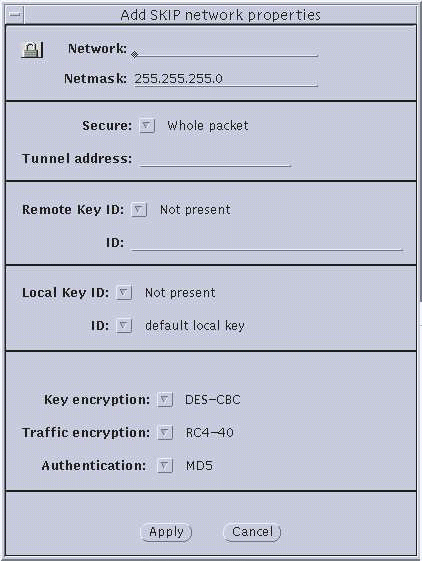
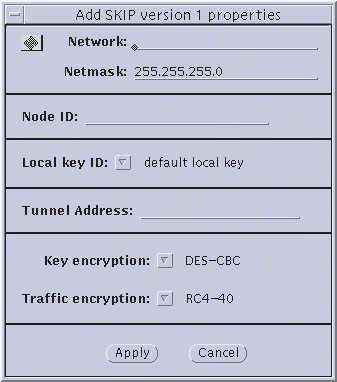
Figure 3-5 Nomadic--Add SKIP Properties and Add SKIP Version 1
Parameter Explanations
-
Hostname/Network/Node ID. Enter the name of the host or nomadic system, or the IP address of the host or network.
-
Netmask--(network only) Enter the netmask of the network. The default (255.255.255.0) is already entered.
-
Secure button--(SKIP only) Set to either Whole packet (tunnel mode) or Data only (transport mode). Whole packet is recommended because it offers a greater degree of security.
-
Node ID--(SKIP Version 1 only) This is the IPv4 key ID.
-
Tunnel Address--Use the tunnel address as the destination IP address. Tunnel address is generally used for clients of encrypted gateways where the IP address of the host entered here serves as the intermediary for any or all hosts on a network whose topography must remain unknown or hidden from the rest of the world. This is called topology hiding. This field is not available if you select Data only.
-
Remote Key ID button--(SKIP only) Select whether you want the remote system's key ID included in SKIP packets and, if so, the namespace that key ID occupies. Selecting Not Present means that the receiver key ID will not be sent.
The following name spaces are listed in this menu:
-
Not Present
-
IPv4 Address
-
MD5 (DH Public Value)
Not Present is the default. It uses the IP address of the remote system to identify its certificate. If a remote system has a key ID other than that identified by its IP address, set the namespace and indicate the remote system's key ID in the ID field.
Note -When you add a host by entering the hostname and you change the Remote key Id menu to IPV4 address from Not present the cursor does not appear in the ID field even if you click there. You must click on the Local key Id menu to move the cursor and regain focus.
-
Remote Key ID field--(SKIP only) The namespace indicated in the Remote Key ID field is determined by the type of certificate, shown in the following table, that you are using or have obtained for this system:
Table 3-1 Remote Key ID FieldCertificate Type
Remote Key ID Field
CA (Sun or other)
IPv4
Self-generated unsigned key
MD5 (DH Public Value)
If the Remote Key ID field has been set to other than Not Present, enter the key ID in hexadecimal format in the ID field (such as 0x0a000000). It must contain the appropriate key ID for the system being authorized based upon the selection made with the Remote Key ID button. Depending on the type of certificate, this information may be obtained from the master key ID on the diskette or from the local key ID field of the other host.
-
Local Key ID and ID buttons. Use the Local Key ID button to indicate whether you want your local system to send its key ID in the SKIP packet and, if so, the namespace that key occupies. If you select Not Present, the sender's key ID is not sent in the packet and the remote system uses the local system's IP address to decide what key to use.
Note -If you have installed new local keys after you have started skiptool, skiptool will not list them. You must restart the key manager with the skipd_restart command to list them and rerun skiptool.
All the local-key times installed for this host are listed. Select the namespace for the local key that is to be used for communication with the above host. Once you have selected the namespace, click on the ID field to select the key to be used, in hexadecimal, for communication with this host.
-
Key Encryption button--Selecting this button lists the available key encryption algorithms. The algorithms available are determined by the system type and the selected encryption method selected.
Table 3-2 Available Key and Traffic Encryption Algorithms512 bit
1024 bit
2048 and 4096 bit
Key Encryption DES-CBC
DES-CBC
DES-CBC
RC2-40 (32-bit mode only)
RC2-40 (32-bit mode only)
RC2-40 (32-bit mode only)
3DES
SAFER
Traffic Encryption RC2-40 (32-bit mode only)
RC2-40 (32-bit mode only)
RC2-40 (32-bit mode only)
RC4-40
RC4-40
RC4-40
3DES
3DES
SAFER
RC4-128
Note -The RC2 cryptor is supported in 32-bit mode only. If you inadvertently select this cryptor while in 64-bit mode, the console reports an error message and communication with the system using this cryptor stops (no information is transferred in the clear).
-
Traffic Encryption button--Select the algorithm for encrypting the traffic between your system and the remote system. The algorithms available are determined by the system type, the version of SunScreen SKIP, and the method of encryption selected. Please see the previous table for complete information.
-
Authentication button--Use the authentication button to select the type of authentication for the packets. Currently, SunScreen SKIP supports two types of authentication--MD5 and MD5-NAT. You can also select None for no authentication.
Adding Authorized Systems with Encryption
Note -
While using any of the Add functions of skiptool, if you generate an error msg, clicking the apply button will not close the window. You must close the Add window manually. The normal behavior is for the window to close automatically after you click the apply button.
-
Click and hold on the Add button at the bottom of the authorized systems list on skiptool's Main Window.
-
Select the type of connection being authorized: Host, Network, or Nomadic.
-
Pull right on the type of connection and select the type of encryption that you want to use.
-
If the remote host system also uses SKIP and the traffic between your systems is to be encrypted, select SKIP.
-
For systems using Sun Microsystems' SunScreen SPF-100, select SKIP Version 1.
-
-
On the Add properties window, enter the name or IP address of the host system to be added to your ACL.
-
Determine whether Whole packet (tunnel mode) or Data only (transport mode) is secure by clicking on the appropriate selection for the Secure button.
-
Each type of encryption requires that certain options be set.
The parameters selected are determined by the type of system being authorized and your security policies. The options to be considered are based on the method of encryption selected. They are
-
For systems using SKIP: Tunnel address, Remote Key ID, Local Key ID. If you leave the tunnel address blank, it will default to the peer's address.
-
For SKIP Version 1: Key ID, Tunnel address.
-
-
Select the appropriate algorithms buttons for Key encryption, Traffic encryption, and Authentication.
The options available for each system are based upon the method of encryption selected from the Security pop-up menu:
-
Key Encryption button: Selecting this button lists the available key encryption algorithms. The algorithm available is determined by the type of system and selected method of encryption. Please Table 3-2.
-
Traffic Encryption button: Selecting this button lists the algorithms available for encryption between your system and the remote system. The algorithms that are available for key and traffic encryption depend on the packages that were installed on the system, such as core product and key upgrades. The algorithms available determine the type of system and the method of encryption selected. Please see Table 3-2.
-
Authentication button: Use this button to select the type of authentication for the packets.
-
-
Click Apply to add the host to the authorized systems list.
Refer to the previous section for descriptions of the fields and buttons.
Repeat Steps 1 though 8 for all encrypted hosts. Remember that your policy options for each system entered on your ACL must be the same as those entered on the system entity with which you wish to communicate through encrypted channels. If the configuration on your system does not match that of the party with which you wish to communicate, the packets are silently dropped. It will simply appear as though that host no longer exists.
Using Default System Entry
The default system entry is used when no other more specific ACL entry matches a host. Often, this entry is set to clear to allow hosts that are not listed in the ACL to communicate in the clear. It may, however, be used to create a default encryption rule.
Communicating In the Clear (Off)
Typically, the NIS and DNS servers to which your systems have access are set up as communicating with your system in the clear or unencrypted. In addition, any host that does not use an encryption package must be set up to communicate with you in the clear.
Communicating Using SKIP Version 1
Complete the following steps to set these fields for encrypted traffic between your server and the system to be authorized.
-
After selecting the type of system and setting the security to SKIP, enter the Hostname.
-
Enter the Node ID.
This is the IPv4 key ID.
-
Local Key ID and ID buttons.
Use the Local Key ID button to indicate whether you want your local system to send its key ID in the SKIP packet.
-
Set the Tunnel Address, if you are using topology hiding.
Tunnel addressing is generally used for clients of encrypted gateways where the IP address of the host entered here serves as the intermediary for any or all hosts on a network whose topography is to remain unknown or hidden from the rest of the world.
-
Select the appropriate key and traffic algorithms for the Key and Traffic encryption buttons.
The available key and traffic encryption algorithms depend on the which version of SKIP you are using: 512 bit, 1024 bit, 2048 bit, 4096 bit. To see which options are available, please see Table 3-2.
Communicating Using SKIP
Complete the following steps to set these fields for encrypted traffic between your server and the system to be authorized.
-
After selecting the type of system and setting the security to SKIP, enter the Hostname.
-
Set the Secure button to either Whole packet (tunnel mode) or Data only (transport mode).
Whole packet is recommended because it offers a greater degree of security.
-
Set the Tunnel address, if you are using topology hiding.
Tunnel addressing is generally used for clients of encrypted gateways where the IP address of the host entered here serves as the intermediary for any or all hosts on a network whose topography is to remain unknown or hidden from the rest of the world.
-
Use the Remote Key ID button to select whether you would like the remote system's keyID included in SKIP packets.
If so, what namespace does that key occupy. By selecting Not Present, the receiver key ID is not sent.
Not Present is the default. It uses the IP address of the remote system to identify its certificate. If a remote system has a key ID other than identified by its IP address, set the name spaces and indicate the remote system's key ID in the ID Field. The namespace indicated in the Remote Key ID field is determined by the type of certificate that is used or obtained for this system. The type of certificate and the Remote Key ID field for that certificate is shown in the following table:
Table 3-3 Type of Certificate and Remote Key ID FieldCertificate Type
Remote Key ID Field
CA (Sun or other)
IPv4
Self-generated unsigned key
MD5 (DH Public Value)
-
The following name spaces are used in this menu:
Not present
IPv4 Address
MD5 (DH public Value)
-
If the Remote Key ID field has been set to something other than Not Present, enter the key ID in hexadecimal format in the ID field (0x0a000000).
It must contain the appropriate key ID for the system that is being authorized based upon the selection made in the Remote Key ID field. Depending on the type of certificate, this information may be obtained from the master keyID on the diskette or from the Local key ID field of the other host.
-
Select the appropriate key and traffic algorithms for the Key and Traffic encryption buttons.
The available options that appear depend on which version of SKIP you are using. versions Available options include: 512 bit, 1024 bit, 2048 bit, or 4096 bit. Please see Table 3-2.
-
Authentication button.
Use the authentication button to select the type of authentication for the packets. Currently, SunScreen SKIP supports MD5 and MD5-NAT. You can also select None for no authentication.
- © 2010, Oracle Corporation and/or its affiliates
