SNMP Alert Receivers
You set actions that generate SNMP alerts as part of a security policy.
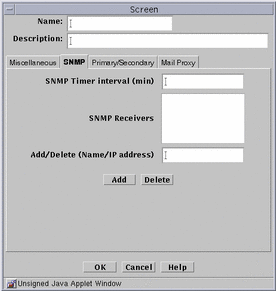
You use the SNMP tab in the Screen dialog window to:
-
Add a new SNMP trap receiver
-
Delete an SNMP trap receiver
-
Set the timer for the timed status indicator
A management information base (MIB) that describes the SNMP trap is included with the SunScreen CD-ROM, as part of the SUNWicgSA package. It is installed as: /opt/SUNWicg/SunScreenAdmin/etc/sunscreen.mib. Load this MIB into your SNMP manager to enable it to use the SNMP trap generated by the Screen.
Note -
The machine that you want to receive SNMP trap alerts must not be a remote Administration Station. SNMP alert packets are sent in the clear and the communication between the remote Administration Station and Screen is encrypted; any packets sent in the clear are dropped.
The recipients of SNMP messages are controlled on a Screen-by-Screen basis. The Screen object has a place for an optional list of IP addresses, which are the hosts to which it sends the SNMP packets.
Setting SNMP in a packet filtering rule's "Action," or in the default Reject Action of an interface causes the SNMP packets to be sent.
SNMP alerts are described in the SunScreen Reference Manual.
The following information describes using the administration GUI. For the command line interface, see Appendix A.
To Add a New SNMP Alert Receiver
-
Click the SNMP tab in the Screen dialog window.
The SNMP area is displayed.
Figure 3-11 Screen Dialog Window SNMP Area

-
Type the name or IP address of the recipient of the SNMP trap in the Name field.
-
Click the Add button.
A list of SNMP alert receivers appears. You can define up to five receivers. SunScreen sends each generated alert to all receivers.
-
Click the OK button when you are finished.
To Delete an SNMP Alert Receiver
-
Click the SNMP tab in the Screen dialog window for the Screen.
The SNMP area appears.
-
Choose an entry in the SNMP Receivers field.
If the name of the SNMP Receiver to delete is not listed (that is, only the IP address is listed), type the name in the Add/Delete field.
-
Click the Delete button.
Click the OK button when you are finished with this Screen object.
- © 2010, Oracle Corporation and/or its affiliates
