Screen
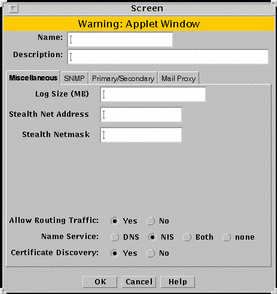
Use the screen common object to edit or add screen objects. You can edit miscellaneous Screen parameters, SNMP parameters, and mail Proxy parameters for screen objects that already exist. The algorithms used here are for centralized management only. FIGURE 5-23 shows the Screen dialog box.
Figure 5-23 Screen Dialog Box

In general, edit, rather than create, screen objects because they are automatically created during installation. Specifying a Screen enables you to define packet-filtering rules that encrypt traffic between any two machines, not just between an Administration Station and a Screen.
Note -
You must enter the name of the administrative interface of the Screen. The name must be the name of the administrative interface of the Screen as it is listed in the naming service or in the /etc/hosts file.
You must create a screen object if you are setting up:
-
A high availability (HA) cluster
-
A centralized management group (CMG)
You create or edit a screen object using the Miscellaneous, Primary/Secondary, SNMP, and Mail Proxy tabs in the Screen dialog box.
Miscellaneous Tab
Figure 5-23 shows the Miscellaneous tab of the Screen dialog box and the parameters.
TABLE 5-23 describes the controls for the Miscellaneous tab of the Screen dialog box.
Table 5-23 Controls for the Miscellaneous Tab of the Screen Dialog Box|
Control |
Description |
|---|---|
|
Name |
Specifies a name for the screen object. |
|
Description |
(Optional) Provides a brief description of the screen object. |
|
Log Size |
Sets the size of the log in megabytes. |
|
Stealth Network |
Specifies the network address for interfaces that are used as stealth interfaces. Set this parameter if you have used the interface object to designate any Screen interfaces as stealth interfaces. |
|
Stealth Netmask |
Specifies the netmask for interfaces that are used as stealth interfaces. Set this parameter if you have used the interface object to designate any Screen interfaces as stealth interfaces. |
|
Allow Routing Traffic |
Specifies whether the Screen sends or receives updates to the routing table using the RIP protocol. |
|
Name Service |
Specifies the name service (DNS, NIS, Both, or None) that the Screen will use. |
|
Certificate Discovery |
Specifies whether the Screen uses Certificate Discovery. |
|
OK Button |
Stores the new or changed information and makes the Save Changes command button active. |
|
Cancel Button |
Cancels any new or changed information. |
|
Help Button |
Calls up the page of online help for this common object. |
SNMP Tab
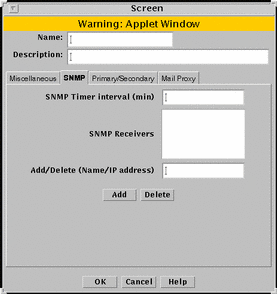
The SNMP tab specifies the interval for SNMP timed status indicator traps and you can add, edit, or delete SNMP trap receivers.
Note -
Use the Action field of the packet-filtering Rule Definition dialog box to specify actions that generate SNMP alerts. The machine that receives SNMP trap alerts must not be a remote Administration Station.
FIGURE 5-24 shows the SNMP tab of the Screen dialog box.
Figure 5-24 SNMP Tab of the Screen Dialog Box

TABLE 5-24 describes the controls for the SNMP tab on the Screen dialog box.
Table 5-24 Controls for the SNMP Tab of the Screen Dialog Box
The following SNMP traps are supported:
-
As an action on a packet that matches a particular rule
-
As a default drop action on an interface
-
Time status indicator traps
The first two types include the following data:
-
interface - The SunScreen network interface number on which the packet was received.
-
interfaceName - The SunScreen network interface name on which the packet was received.
-
errorReason - The reason the alert was generated. (See the sunscreen.mib file for a complete list of reasons.)
-
packetLength - The actual length of the packet in bytes.
-
lengthLogged - The length of the data logged in bytes.
-
packetData - The packet data.
The SNMP timed status indicator trap uses the same receivers database as other types of SNMP traps. There is only one database with a maximum of five receivers. These receivers are specified as variable to the screen object.
To activate the timed status indicator traps, set the SNMP timer interval.
The following data are in the SNMP timed status indicator. These data cannot be modified and new data cannot be added:
-
cpuUsage - Average percentile CPU usage
-
memoryAvail - Current swap space available, in kilobytes
-
swapIn - Current swap ins
-
swapOut - Current swap outs
-
scanRate - Current scan rate
-
tcpUsage - Current number TCP connections in the SunScreen state table
-
ipUsage - Current number IP connections in the SunScreen state table
-
udpUsage - Current number UDP connections in the SunScreen state table
-
rootUsage - Disk usage of the root partition, /
-
varUsage - Disk usage of the var partition, /var
-
etcUsage - Disk usage of the etc partition, /etc
-
tmpUsage - Disk usage at the tmp partition, /tmp
Only these SNMP traps are supported. No get or set operations are supported.
Primary/Secondary Tab
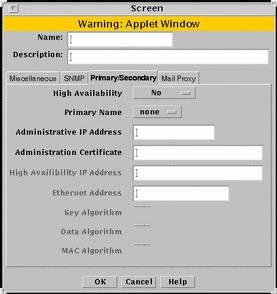
The Primary/Secondary tab associates a certificate object with a Screen that is part of an HA cluster or a CMG. The High Availability choice (No, Primary, or Secondary) and the Primary Name choice determine the role a Screen has within an HA cluster and centralized management group (CMG). The settings you choose determine which other controls on the Primary/Secondary tab are active. FIGURE 5-25 shows the Primary/Secondary tab of the Screen dialog box.
Figure 5-25 Primary/Secondary Tab on the Screen Dialog Box

TABLE 5-25 describes the controls for the Primary/Secondary tab.
Table 5-25 Controls for the Primary/Secondary Tab of the Screen Dialog Box
Mail Proxy
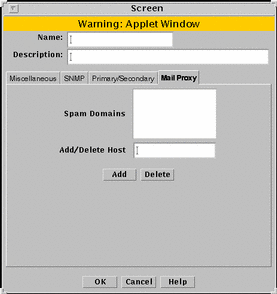
The Mail Proxy tab allows adding, editing, or deleting domains known to distribute unsolicited electronic mail (spam). You can define spam domains if you use an SMTP proxy.
FIGURE 5-26 shows the Mail Proxy tab of the Screen dialog box.
Figure 5-26 Screen Dialog Box Showing the Mail Proxy Tab

TABLE 5-26 describes the controls for the Mail Proxy tab of the Screen dialog box.
Table 5-26 Controls for the Mail Proxy Tab of the Screen Dialog Box
- © 2010, Oracle Corporation and/or its affiliates
