Policy Rules Page
FIGURE 5-11 shows the Policy Rules page.
Figure 5-11 Policy Rules Page
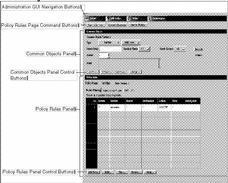
Administration GUI Navigation Buttons
The topmost area contains the administration GUI navigation buttons. Figure 5-2 shows the navigation buttons and TABLE 5-2 describes these buttons.
The Policy Rules Page Command Buttons
The area below the administration GUI navigation buttons contains the command buttons for the Policy Rules page. These buttons become active when you add or edit a common object or modify a policy.
FIGURE 5-12 shows the command buttons on the Policy Rules page.
Figure 5-12 Policy Rules Page Command Buttons
TABLE 5-13 describes the command buttons on the Policy Rules page.
Table 5-13 Policy Rules Page Command Buttons
The Policy Rules panel displays the rules in a policy and their order. In this panel, you can write new rules for a policy and edit the rules in a policy. You can establish rules for Packet Filtering, Administrative Access, NAT, or VPN, using the respective tab.
Common Objects Panel
Below the command buttons for the page is the Common Objects panel. You use the controls on this panel to edit or create new common objects for policies and objects specific to the Screen. FIGURE 5-13 shows the Common Objects panel of the Policy Rules page
Figure 5-13 Common-Objects Panel
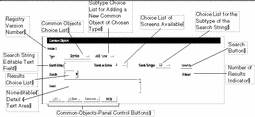
TABLE 5-14 describes the information, controls, and the buttons in the Common Objects Panel.
Table 5-14 Common Object Information, Controls, and Buttons|
Information |
Control |
Description |
|---|---|---|
|
Version |
|
The version of the registry of common objects that is being used in a policy. The latest version of the registry is used by all policies. If you edit the common objects (registry) the word "modified" appears after the number until you either cancel the changes or save the changes. |
|
Type |
Common Object Choice List |
Displays the list of common objects available. You choose the common object that you want from this list. |
|
|
Subtype Choice List for Adding a New Common Object of Chosen Type |
Displays the choice list of subtypes available for the common object that you selected. Each common object has it own set of subtypes and each subtype requires that you provide different information in a dialog box for that subtype for that common object. |
|
Search |
Search String |
Enter the string for a particular subtype for a common object in this editable text field. When you click the Search button, all matching subtypes appear in the Results choice list. Leaving this field blank returns all entries defined for the selected subtype or local to the selected Screen. Selecting All in Search on Screens and Search Subtype Choice with the Search String field empty returns all entries defined. |
|
|
Search on Screen |
Displays a choice list of the Screens that the Administration Station manages. Selecting a Screen from this list limits the search to common objects exclusive to that Screen. |
|
|
Search Subtypes |
Display a choice list of the subtypes available for the selected common object. |
|
|
Search Button |
Starts the search according to the criteria set. |
|
|
Results |
Displays a choice list of available entries that match the criteria. |
|
Found |
|
Show the number of entries in the search that match the criteria. |
|
Detail |
|
Displays the description for the item chosen from the Results choice list. |
|
|
Edit Button |
Displays the dialog box for the common object selected. Editing a common object is similar to adding a new one. The difference is that after you have chosen the common object that you want to edit and have clicked the Edit button, the dialog box for that common object contains all the information and you only need to modify the requisite information. |
|
|
Delete Button |
Displays the Delete dialog box. |
|
|
Rename Button |
Displays the Rename dialog box. |
|
|
Help Button |
Displays online help. |
Common Objects
Common objects are the components or data objects that you use to make up policy rules. Before you write these rules, you add the common objects that you plan to use in the rules.
After the common objects have been added, they are stored in a database and can be used over again to create rule sets for additional policies.
Save Is Not Required With Certain Common Objects
-
Authorized user
-
Admin user
-
Jar signature
-
Jar hash
-
Proxy user
that appear in the administration GUI are automatically saved when they are edited or new objects are added. You do not need to save these objects. Once these objects are added or edited, the change applies immediately and cannot be reversed. The Save button in the administration GUI is greyed out to show that it is inactive.
Note -
Although the changes made to these objects are saved immediately, they do not take effect until a policy is activated. The administration GUI edits authorized users, which are authuser objects; proxy users, which are proxyuser objects; and Jar signatures and Jar hashes.
Service
Use the service common object to identify network services that a Screen will use to filter packets. The service common object has two subtypes, single service and service group.
Note -
Adding a new service with new values makes troubleshooting easier than editing the default values of a service.
Single Service
You add new network services and edit the filtering activities applied when a service is used in a rule. You add a new single service using the Service dialog box that appears when you select New Single Service from the Add New combo box in the Common Objects panel, shown in FIGURE 5-14.
Figure 5-14 Service Dialog Box for a New Single Service
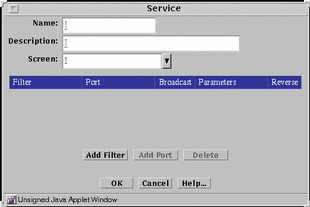
You control the filtering activities by specifying what packet-filtering engine you want to use and the various discriminators and parameters applicable to that filtering engine.
FIGURE 5-15 shows the filter table of the Service dialog box for a new single service.
Figure 5-15 Service Dialog Box for a New Single Service with Expanded Filter Table
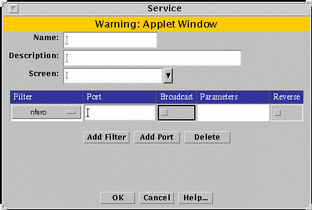
TABLE 5-15 describes the controls in the Service dialog box for a single service.
Table 5-15 Controls for Service Dialog Box for Single Service|
Control |
Description |
|---|---|
|
Configuration Information |
|
|
Name |
Specifies the name of the service object. |
|
Description |
(Optional) Provides a brief description about the service object. |
|
Screen |
(Optional) Restricts the service so that it applies to the selected Screen only. The default (All) means that all Screens recognize this object unless an object exists that has been specifically defined for a particular Screen and has the same name as the Screen for which it is defined. |
|
Filter Table Information |
|
|
Filter Table |
Display the parameters for the single services.
|
|
Filter |
Identifies the state engine. |
|
Port |
Identifies the port number, program number, or type used by the forward filter. |
|
Broadcast |
Determines whether the rules in which the service is used allows communication to broadcast or multicast addresses. If you want the service to work for nonbroadcast addresses, you must enter a separate table entries for broadcast and nonbroadcast entries |
|
Parameters |
Overrides the default values the selected packet-filter state engine. Each state engine has a set of parameters; refer to Appendix C, Services and State Engines for default parameters values and their meaning. |
|
Reverse |
Determines whether the filter applies to packets originating from the host in the To address of a rule and going to the From address of a rule. |
|
OK Button |
Stores the new or changed information and makes the Save Changes command button active. |
|
Cancel Button |
Cancels any new or changed information. |
|
Help Button |
Displays the page of online help for this common object. |
Service Group
Use the service group to group single services that you want to use together. FIGURE 5-16 shows the Service dialog box for service group.
Figure 5-16 Service Dialog Box for Service Group
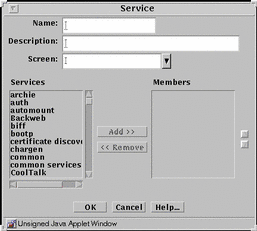
TABLE 5-16 describes the controls in the Service dialog box for service group.
Table 5-16 Controls for Service Group Service Dialog Box|
Control |
Description |
|---|---|
|
Name |
Specifies the name of the service object. |
|
Description |
(Optional) Provides a brief description about the service object. |
|
Screen |
(Optional) Restricts this service group applies to the selected Screen only. The default (All) means that all Screens recognize this object unless an object exists that has been specifically defined for a particular Screen and has the same name as the Screen for which it is defined. |
|
Services List |
Identifies the services that do not belong to the service group. Refer to "State Engines" for a description of services. |
|
Members List |
Identifies the services that belong to the service group. |
|
Add Button |
Moves the service selected in the Services list to the Members list, making the service a member of the specified service group. |
|
Remove Button |
Moves the service selected in the Members list to the Services list, removing the service from the specified service group. |
|
OK Button |
Stores the new or changed information and makes the Save Changes command button active. |
|
Cancel Button |
Cancels any new or changed information. |
|
Help Button |
Calls up the page of online help for this common object. |
Address
Use the address common object to create address objects that define the source and destination address for a policy rule. If you are adding addresses, the Address dialog box that appears for a particular subtype is empty. If you are modifying an existing address, the Address dialog box displays the existing information. Address objects has three subtypes: host, range and group.
Host
Host is a way to associate an individual host's IP address with a name for the address object. FIGURE 5-17 shows the Address dialog box for adding a new host to the host subtype.
Figure 5-17 Address Dialog Box for New Host
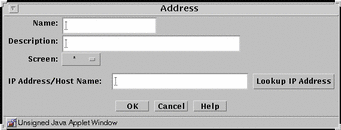
TABLE 5-17 describes the controls in the Address dialog box for a new host.
Table 5-17 Controls for New Host Address Dialog Box|
Control |
Description |
|---|---|
|
Name |
Specifies the name for the address object. |
|
Description Field |
(Optional) Provides a brief descriptive note about the address object. |
|
Screen |
(Optional) Restricts this address so that it applies to the selected Screen only. The default (All) means that all Screens recognize this object unless an object exists that has been specifically defined for a particular Screen and has the same name as the Screen for which it is defined. |
|
IP Address/Host Name |
Specifies the IP address you want to associate with the address object identified in the Name list. |
|
Lookup IP Address Button |
If SunScreen has access to DNS or NIS, lets you look up host addresses by host name. |
|
OK Button |
Stores the new or changed information and makes the Save Changes command button active. |
|
Cancel Button |
Cancels any new or changed information. |
|
Help Button |
Calls up the page of online help for this common object. |
Range
Range associates a range of IP addresses with an address object name. For example, you can associate a name with a specified range of network IP addresses and use that name to filter traffic to all hosts on that network. FIGURE 5-18 shows the Address dialog box for adding a new range of addresses to the range subtype.
Figure 5-18 Address Dialog Box for New Range

TABLE 5-18 describes the controls for the Address dialog box for new range.
Table 5-18 Controls for New Range Address Dialog Box|
Control |
Description |
|---|---|
|
Name |
Specifies the name for the address object. |
|
Description |
(Optional) Provides a brief description about the address object. |
|
Screen |
(Optional) Restricts this range of addresses so that it applies to the selected Screen only. The default (All) means that all Screens recognize this object unless an object exists that has been specifically defined for a particular Screen and has the same name as the Screen for which it is defined. |
|
Starting IP Address |
Specifies the starting IP address in the range. |
|
Ending IP Address |
Specifies the ending IP address in the range. |
|
OK Button |
Stores the new or changed information and makes the Save Changes command button active. |
|
Cancel Button |
Cancels any new or changed information. |
|
Help Button |
Calls up the page of online help for this common object. |
Group
Group is a way to group host addresses, address ranges and other address groups. By grouping addresses that use similar services and have similar actions, you can save time when creating rules. FIGURE 5-19 shows the Address dialog box for adding a new group to the group subtype.
Note -
Before you create an address group, you first define the address objects--single addresses, address ranges, or address groups--that you want to use in the address group.
Figure 5-19 Address Dialog Box for New Group
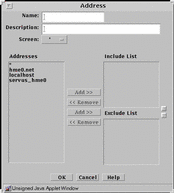
TABLE 5-19 describes the controls for the Address dialog box for new group.
Table 5-19 Controls for the New Group Address Dialog Box|
Control |
Description |
|---|---|
|
Name |
Specifies the name for the address object. |
|
Description |
(Optional) Provides a brief description about the address object. |
|
Screen |
(Optional) Restricts this address group so that it applies to the selected Screen only. The default (All) means that all Screens recognize this object unless an object exists that has been specifically defined for a particular Screen and has the same name as the Screen for which it is defined. |
|
Addresses |
Displays the addresses objects that can to be used to create the address group. |
|
Include List |
Specifies the address objects that are currently included in the address group. Use the Add or Remove buttons to modify the list. |
|
Exclude List |
Specifies the address objects that are excluded from the address group. For example, you can create an address group that includes all addresses except as specified in the Exclude List. Use the Add or Remove buttons to modify the list. |
|
OK Button |
Stores the new or changed information and makes the Save Changes command button active. |
|
Cancel Button |
Cancels any new or changed information. |
|
Help Button |
Calls up the page of online help for this common object. |
Certificate
Use the certificate common object to configure the certificates for the Screen and for remote hosts that will communicate securely through the Screen.
Note -
Changes to the certificate object that pertain to loading into SKIP take effect immediately without having to be saved. You cannot use the Cancel Changes button to undo the changes you made. Changes to the certificate object as stored in the common objects do not take effect immediately and must be save and only take effect when the policy in which they are used is activated. For example, in adding a new certificate, (the certificate is created and loaded immediately into SKIP, but the name has not been saved as part of the common objects and must be saved. Renaming a certificate only affects the common objects and must be saved.
Generate Screen Certificate
Generate screen certificate generates a certificate for the Screen. FIGURE 5-20 shows the Certificate dialog box.
Figure 5-20 Certificate Dialog Box for Generate Screen Certificate
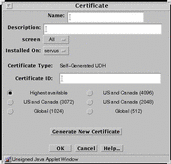
TABLE 5-20 describes the controls for the Certificate dialog box for generate Screen certificate.
Table 5-20 Controls for the Certificate Dialog Box for Generate Screen Certificate|
Control |
Description |
|---|---|
|
Name |
Specifies a name for the certificate. |
|
Description |
(Optional) Provides a brief description about the certificate object. |
|
Screen |
Specifies the Screen that recognizes the certificate object. The default is All. |
|
Installed On |
(Optional) Specifies the Screen on which the certificate is generated. |
|
Radio buttons |
Specifies the strength of encryption that the Screen uses. |
|
Generate New Certificate |
Generates the certificate. The Certificate ID field displays the certificate's certificate ID. |
|
OK Button |
Stores the new or changed information and makes the Save Changes command button active. |
|
Cancel Button |
Cancels any new or changed information. |
|
Help Button |
Calls up the page of online help for this common object. |
Associate MKID
Associate MKID, also called the certificate ID, assigns a name to a certificate that exists on another machine. Associate a certificate ID for encrypted communication between two screens or between a screen and an Administration Station. FIGURE 5-21 shows the Certificate dialog box for Associate MKID.
Figure 5-21 Certificate Dialog Box for Associate MKID

TABLE 5-21 describes the controls for the Certificate dialog box for associate MKID.
Table 5-21 Controls for Associate MKID Certificate Dialog Box|
Control |
Description |
|---|---|
|
Name |
Specifies the name for the certificate ID object. |
|
Description |
(Optional) Provides a brief description about the MKID or certificate ID object. |
|
Screen |
Specifies which Screen recognizes the certificate ID object. The default is All. Specifying a Screen allows you to define packet-filtering rules that encrypt traffic between any two machines, not just between an Administration Station and a Screen. Specify the Screen only if you are using Centralized Management. A common object or policy rule applies to all Screens unless you choose a specific Screen. |
|
Installed On |
(Optional) Used only if you later remove this certificate object from the common objects. At that time, the SKIP identity that is installed on the Screen will be removed from the parameter. |
|
Certificate ID |
Specifies the certificate ID (hash value) for the certificate that you generated on the other system. |
|
Radio Buttons |
Specifies the strength of encryption that the Screen uses. |
|
Generate New Certificate |
Generates the certificate. The Certificate ID field displays the certificate's certificate ID. |
|
OK Button |
Stores the new or changed information and makes the Save Changes command button active. |
|
Cancel Button |
Cancels any new or changed information. |
|
Help Button |
Calls up the page of online help for this common object. |
Certificate Group
Certificate group is a way to group single certificates that you want to use together. FIGURE 5-22 shows the Certificate dialog box for certificate group.
Figure 5-22 Certificate Dialog Box for Certificate Group
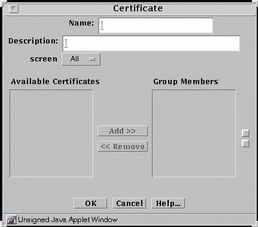
TABLE 5-22 describes the controls in the Certificate dialog box for certificate group.
Table 5-22 Controls for Certificate Group Dialog Box|
Control |
Description |
|---|---|
|
Name |
Specifies the name of the certificate object. |
|
Description |
(Optional) Provides a brief description about the certificate object. |
|
Screen |
Specifies which Screen recognizes the certificate object. |
|
Available Certificate List |
Identifies the certificates that do not belong to the certificate group. Refer toAppendix C, Services and State Engines for a description of services. |
|
Group Members List |
Identifies the certificates that belong to the certificate group. |
|
Add Button |
Moves the certificate selected in the Available Certificates List to the Group Members list, making the certificate a member of the specified service group. |
|
Remove Button |
Moves the certificate selected in the Group Members list to the Available Certificates list, removing the certificate from the specified certificate group. |
|
OK Button |
Stores the new or changed information and makes the Save Changes command button active. |
|
Cancel Button |
Cancels any new or changed information. |
|
Help Button |
Calls up the page of online help for this common object. |
Screen
Use the screen common object to edit or add screen objects. You can edit miscellaneous Screen parameters, SNMP parameters, and mail Proxy parameters for screen objects that already exist. The algorithms used here are for centralized management only. FIGURE 5-23 shows the Screen dialog box.
Figure 5-23 Screen Dialog Box
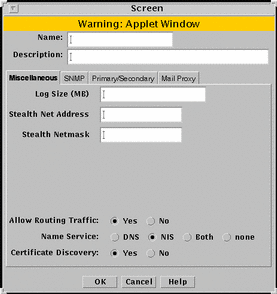
In general, edit, rather than create, screen objects because they are automatically created during installation. Specifying a Screen enables you to define packet-filtering rules that encrypt traffic between any two machines, not just between an Administration Station and a Screen.
Note -
You must enter the name of the administrative interface of the Screen. The name must be the name of the administrative interface of the Screen as it is listed in the naming service or in the /etc/hosts file.
You must create a screen object if you are setting up:
-
A high availability (HA) cluster
-
A centralized management group (CMG)
You create or edit a screen object using the Miscellaneous, Primary/Secondary, SNMP, and Mail Proxy tabs in the Screen dialog box.
Miscellaneous Tab
Figure 5-23 shows the Miscellaneous tab of the Screen dialog box and the parameters.
TABLE 5-23 describes the controls for the Miscellaneous tab of the Screen dialog box.
Table 5-23 Controls for the Miscellaneous Tab of the Screen Dialog Box|
Control |
Description |
|---|---|
|
Name |
Specifies a name for the screen object. |
|
Description |
(Optional) Provides a brief description of the screen object. |
|
Log Size |
Sets the size of the log in megabytes. |
|
Stealth Network |
Specifies the network address for interfaces that are used as stealth interfaces. Set this parameter if you have used the interface object to designate any Screen interfaces as stealth interfaces. |
|
Stealth Netmask |
Specifies the netmask for interfaces that are used as stealth interfaces. Set this parameter if you have used the interface object to designate any Screen interfaces as stealth interfaces. |
|
Allow Routing Traffic |
Specifies whether the Screen sends or receives updates to the routing table using the RIP protocol. |
|
Name Service |
Specifies the name service (DNS, NIS, Both, or None) that the Screen will use. |
|
Certificate Discovery |
Specifies whether the Screen uses Certificate Discovery. |
|
OK Button |
Stores the new or changed information and makes the Save Changes command button active. |
|
Cancel Button |
Cancels any new or changed information. |
|
Help Button |
Calls up the page of online help for this common object. |
SNMP Tab
The SNMP tab specifies the interval for SNMP timed status indicator traps and you can add, edit, or delete SNMP trap receivers.
Note -
Use the Action field of the packet-filtering Rule Definition dialog box to specify actions that generate SNMP alerts. The machine that receives SNMP trap alerts must not be a remote Administration Station.
FIGURE 5-24 shows the SNMP tab of the Screen dialog box.
Figure 5-24 SNMP Tab of the Screen Dialog Box
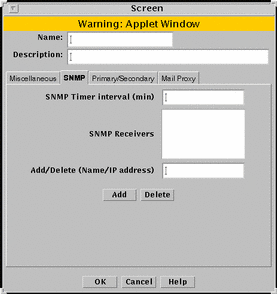
TABLE 5-24 describes the controls for the SNMP tab on the Screen dialog box.
Table 5-24 Controls for the SNMP Tab of the Screen Dialog Box
The following SNMP traps are supported:
-
As an action on a packet that matches a particular rule
-
As a default drop action on an interface
-
Time status indicator traps
The first two types include the following data:
-
interface - The SunScreen network interface number on which the packet was received.
-
interfaceName - The SunScreen network interface name on which the packet was received.
-
errorReason - The reason the alert was generated. (See the sunscreen.mib file for a complete list of reasons.)
-
packetLength - The actual length of the packet in bytes.
-
lengthLogged - The length of the data logged in bytes.
-
packetData - The packet data.
The SNMP timed status indicator trap uses the same receivers database as other types of SNMP traps. There is only one database with a maximum of five receivers. These receivers are specified as variable to the screen object.
To activate the timed status indicator traps, set the SNMP timer interval.
The following data are in the SNMP timed status indicator. These data cannot be modified and new data cannot be added:
-
cpuUsage - Average percentile CPU usage
-
memoryAvail - Current swap space available, in kilobytes
-
swapIn - Current swap ins
-
swapOut - Current swap outs
-
scanRate - Current scan rate
-
tcpUsage - Current number TCP connections in the SunScreen state table
-
ipUsage - Current number IP connections in the SunScreen state table
-
udpUsage - Current number UDP connections in the SunScreen state table
-
rootUsage - Disk usage of the root partition, /
-
varUsage - Disk usage of the var partition, /var
-
etcUsage - Disk usage of the etc partition, /etc
-
tmpUsage - Disk usage at the tmp partition, /tmp
Only these SNMP traps are supported. No get or set operations are supported.
Primary/Secondary Tab
The Primary/Secondary tab associates a certificate object with a Screen that is part of an HA cluster or a CMG. The High Availability choice (No, Primary, or Secondary) and the Primary Name choice determine the role a Screen has within an HA cluster and centralized management group (CMG). The settings you choose determine which other controls on the Primary/Secondary tab are active. FIGURE 5-25 shows the Primary/Secondary tab of the Screen dialog box.
Figure 5-25 Primary/Secondary Tab on the Screen Dialog Box
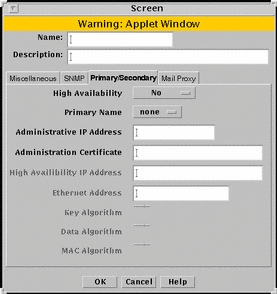
TABLE 5-25 describes the controls for the Primary/Secondary tab.
Table 5-25 Controls for the Primary/Secondary Tab of the Screen Dialog Box
Mail Proxy
The Mail Proxy tab allows adding, editing, or deleting domains known to distribute unsolicited electronic mail (spam). You can define spam domains if you use an SMTP proxy.
FIGURE 5-26 shows the Mail Proxy tab of the Screen dialog box.
Figure 5-26 Screen Dialog Box Showing the Mail Proxy Tab
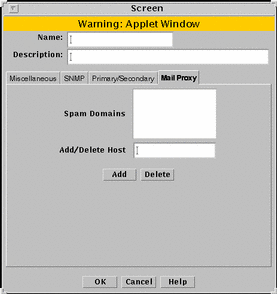
TABLE 5-26 describes the controls for the Mail Proxy tab of the Screen dialog box.
Table 5-26 Controls for the Mail Proxy Tab of the Screen Dialog Box
Interface
The interface common object defines interfaces and specifies the actions a Screen should take when a packet that is received on that interface is rejected.
FIGURE 5-27 shows the Interface Definition dialog box.
Figure 5-27 Interface Definition Dialog Box
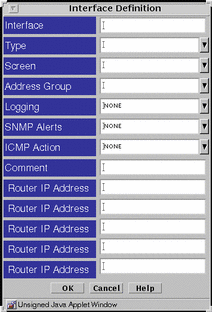
TABLE 5-27 describes the controls for the Interface Definition dialog box.
Table 5-27 Controls for the Interface Definition Dialog Box
Proxy User
The proxy user common object contains the mapping information for users of SunScreen proxies. The proxy user object has the subtypes single and group. FTP and Telnet rules reference the proxy user entries.
The proxy user object is automatically saved when it is edited or a new proxy user object is added. Any changes apply immediately and cannot be reversed. The Save Changes button is greyed out to show that it is inactive.
Single
The single dialog box defines a new single proxy user.
If you want to use the authentication feature of the FTP and Telnet proxies, you must define an authorized user before you add a proxy user.
FIGURE 5-28 shows the Proxy User dialog box for adding a new single proxy user.
Figure 5-28 Proxy User Dialog Box for a Single Proxy User
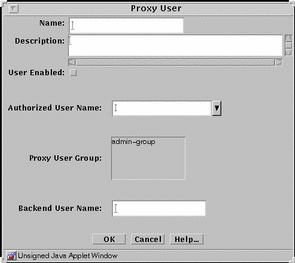
TABLE 5-28 describes the controls for the Proxy User dialog box for a single proxy user.
Table 5-28 Controls for the Proxy User Dialog Box for a Single Proxy User|
Control |
Description |
|---|---|
|
Name |
Specifies the name of the proxy user. |
|
Description |
Adds a brief description of the proxy user. |
|
User Enabled |
Controls whether the user can log into the Screen. This function permits the administrator to refuse login privileges to someone who previously could log in without having to remove that person from the list of proxy users. |
|
Authorized User Name |
Selects the name of the authorized user to be used to authenticate this proxy user. Names in this list are generated when you add an authorized user object. If this field is empty, authorization is not required for this user. |
|
Proxy User Group |
Identifies the user group or groups to which the user belongs. If no groups are highlighted, user does not belong to any group. |
|
Backend User Name |
Identifies the user on a specific server. It defaults to the user name. |
|
OK Button |
Stores the new or changed information. |
|
Cancel Button |
Cancels any new or changed information. |
|
Help Button |
Calls up the page of online help for this common object. |
Group
The group is a way to group proxy users that have the same privileges. Group proxy users to save time when creating rules. Before creating a proxy user group, define the proxy user objects for that proxy user group. Group proxy users to save time when creating rules.
FIGURE 5-29 shows the Proxy User dialog box for adding a new group.
Figure 5-29 Proxy User Dialog Box for Grouping Proxy Users
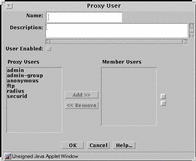
TABLE 5-29 describes the controls for the Proxy User dialog box for grouping proxy users.
Table 5-29 Controls for the Proxy User Dialog Box for Grouping Proxy Users|
Control |
Description |
|---|---|
|
Name |
Specifies the name of the proxy group. |
|
Description |
Adds a brief description of the proxy group. |
|
User Enabled |
Controls whether this group of proxy users can log into the Screen's proxy. This function permits the administrator to refuse login privileges to a group that previously could log in without having to remove that group from the list of member users. |
|
Proxy Users |
Displays the proxy user objects that can to be used to create the member user list for the proxy user group. |
|
Member Users |
Specifies the proxy user objects that are currently included in the member users list of the proxy user group. Use the Add or Remove buttons to modify the member users list. |
|
OK Button |
Stores the new or changed information. |
|
Cancel Button |
Cancels any new or changed information. |
|
Help Button |
Calls up the page of online help for this common object. |
Authorized User
The common object authorized user specifies the users that are allowed to use the Telnet and FTP proxies.
The common object authorized user is automatically saved when it is edited or a new authorized user object is added. Any changes apply immediately and cannot be reversed. The Save Changes button is greyed out to show that it is inactive.
FIGURE 5-30 shows the User dialog box for an authorized user object. This same dialog box also appears for the administrative user object.
Figure 5-30 User Dialog Box for an Authorized User
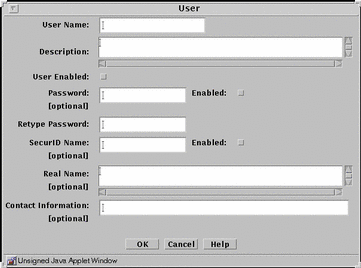
TABLE 5-30 describes the controls for the User dialog box for an authorized user object and for an administrative user object.
Table 5-30 Controls for the User Dialog Box for an Authorized User Object and an Administrative User Object|
Control |
Description |
|---|---|
|
User Name |
Specifies the login name of the authorized user. |
|
Description |
(Optional) Provides a brief description about the authorized user. |
|
User Enabled |
Controls whether the user can log into the Screen's proxy. This function permits the administrator to refuse login privileges to someone who previously could log in without having to remove that person from the list of proxy users. |
|
Password |
Specifies the login password for the authorized user. |
|
Retype Password |
Specifies the login password for the authorized user. The password typed in this field must exactly match the password you typed in the Password field. |
|
SecurID Name |
(Optional) Specifies the user's login name for SecurID authorization. |
|
Real Name |
(Optional) Identifies the real name of the authorized user. |
|
Contact Information |
(Optional) Displays information on how to contact the specified user. |
|
OK Button |
Stores the new or changed information. |
|
Cancel Button |
Cancels any new or changed information. |
|
Help Button |
Calls up the page of online help for this common object. |
Administrative User
The common object administrative user identifies the SunScreen administrators that have access to the Screen. This object refers to an authorized user; therefore, the administrative user object uses the same User dialog box that the authorized user object does.
FIGURE 4-32 shows the User dialog box for both an authorized user object and an administrative user object. TABLE 5-30 describes the controls for the User dialog box for both an authorized user object and an administrative user object.
The administrative user object is automatically saved when it is edited or a new administrative user object is added. Any changes apply immediately and cannot be reversed. The Save Changes button is greyed out to show that it is inactive.
After you create an administrative user object, you grant administrative access by creating a rule in the Administrative Access tab of the Policy Rules panel. The name that you create for the administrative user object is the same name that you use when you create administrative access rules.
Jar Signature
The Jar signature common object identifies the Java archives (JARs) that you want the Screen to pass. JAR signatures apply only to the HTTP proxy.
The Jar signature object is automatically saved when it is edited or a new Jar signature object is added. Any changes apply immediately and cannot be reversed. The Save Changes button is greyed out to show that it is inactive.
FIGURE 5-31 shows the Jar Signature dialog box.
Figure 5-31 Jar Signature Dialog Box
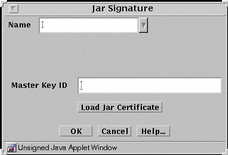
TABLE 5-31 describes the controls for the JAR signature dialog box.
Table 5-31 Controls for the Jar Signature Dialog Box|
Control |
Description |
|---|---|
|
Name |
Identifies the name of the certificate. |
|
Master Key ID |
Identifies the certificate ID. |
|
Load Jar Certificate Button |
Loads the certificate used to authenticate the Java archive. This procedure requires that your browser can allow local access to files. |
|
OK Button |
Stores the new or changed information. |
|
Cancel Button |
Cancels any new or changed information. |
|
Help Button |
Calls up the page of online help for this common object. |
Jar Hash
The HTTP proxy can be set up to filter the Java applets based on the hash value of the Jar file.
The Jar hash object is automatically saved when it is edited or a new Jar hash object is added. Any changes apply immediately and cannot be reversed. The Save Changes button is greyed out to show that it is inactive.
FIGURE 5-32 shows the Jar Hash dialog box.
Figure 5-32 Jar Hash Dialog Box
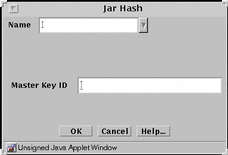
TABLE 5-32 describes the controls for the Jar hash dialog box.
Table 5-32 Controls for the Jar Hash Dialog Box|
Control |
Description |
|---|---|
|
Name |
Identifies the name of the certificate. |
|
Master Key ID |
Identifies the certificate ID. |
|
OK Button |
Stores the new or changed information. |
|
Cancel Button |
Cancels any new or changed information. |
|
Help Button |
Calls up the page of online help for this common object. |
Time
The time common object specifies the time of day and the day of the week that a rule applies.
FIGURE 5-33 shows the Time dialog box.
Figure 5-33 Time Dialog Box
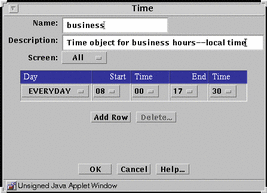
TABLE 5-33 describes the controls in the Time dialog box.
Table 5-33 Controls for the Time Dialog Box
Policy Rules Panel
Policy rules govern data communication between systems--either another host, a network, or a remote computer and your network. You write and edit the rules that govern this communication in the Policy Rules panel. SunScreen uses ordered sets of rules to implement the security policies. Ordered set of rules means that, when a Screen receives a packet, it matches the packet against each rule in its active policy until it finds one that applies, and then takes the actions associated with that rule. Once a Screen finds an applicable rule for a packet, it ignores subsequent rules in its active policies.
Rules do not take effect until you save and activate the policy to which they belong by clicking the Save Changes button located above the Common Objects area, and the Activate button in the bottom area of the Policies List page. SunScreen sets up the basic security policy for name service lookups, Routing Information Protocol (RIP) packets, and SunScreen SKIP certificate discovery during installation. You can change these setting for each Screen by changing them in the screen object. You can use the Rules area on the Policy Rules page to specify how your Screen should filter other types of packets.
Note -
If the specified filtering rule fails to detect any issued certificate (key) encryption algorithms, it may display the following error message: An error occurred in detecting the Encryption algorithms. Please check if skipd process is running. If this occurs, restart the skipd process using the command skipd_restart.
Use the Policy Rules panel to add or modify a rule in a SunScreen policy. Clicking the Add New button (or selecting a policy and clicking the Edit button) opens the Policy Rules panel of the Policy List page.
To display the controls on a tab, click the tab header. TABLE 5-34 describes the tabs that are available from the Policy Rules panel.
Table 5-34 Policy Rules Panel Tabs|
Tab |
Description |
|---|---|
|
Packet Filtering |
Shows the packet filtering rule or rules. |
|
Administration Access |
Defines access rules for local administration and remote Administration Stations through the administration GUI or the command line (seeAppendix B, Command-Line Reference ). |
|
NAT (Network Address Translation) |
Maps private network addresses to public network addresses. |
|
VPN (Virtual Private Network) |
Maps name, address, certificate, issued certificate (key) algorithm, data algorithm, MAC algorithm, tunnel address, and description. |
Packet Filtering Tab
The Packet Filtering tab displays a panel, shown in FIGURE 5-34, for configuring packet-filtering rules. Use packet filtering to control traffic using a particular service, traffic intended for a particular service, or traffic coming from a particular address.
Figure 5-34 Packet Filtering Tab
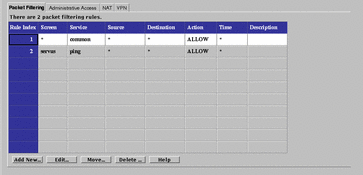
SunScreen uses ordered packet filtering. The Screen assumes that the first rule that matches a packet is the rule that governs the disposition of the packet.
If the packet does not match any rule, the Screen uses its default action to determine the disposition of the packet.
Note -
The default action is set when defining the interfaces. A default action can be set for each interface, but not for the entire Screen. Typically, the default action is to only drop the packet. Other options are available. See "Interface".
TABLE 5-35 describes the available fields in the Packet Filtering tab.
Table 5-35 fields on the Packet Filtering Tab|
Field |
Description |
|---|---|
|
Rule Index |
(Optional) Assigns a number to a rule. When editing or adding a new rule, by default, this field displays a number one greater than the last rule (indicating this rule will be placed at the bottom of the list). If you type a lower number, the new rule is inserted into the specified position in the list, and the rules currently in the configuration are renumbered. |
|
Screen |
(Optional) Specifies the Screen for which you want the rule to apply. Type a specific Screen name in this field if you use centralized management and want a rule to apply to a specific Screen. |
|
Service |
Identifies the network service or service group to which this rule applies. Network services and service groups are described in Appendix C, Services and State Engines. |
|
Source |
The value to which the source address of a packet is compared. If an asterisk (*) appears, any source address meets the criteria of the rule. |
|
Destination |
The value to which the destination address of a packet is compared to determine whether the rule should apply. If an asterisk (*) appears, any destination address meets the criteria of the rule. |
|
Action |
Displays the action for the rule and permits setting the logging behavior. The options are:
|
|
Time |
Specifies the time of day for the rule. |
|
Description |
(Optional) Provides a brief description of the Administrative Access rule. |
To edit every field, except the Rule Index field, on the Packet Filtering tab, click it to display the choice list. The changes in the fields for a rule are reflected in the Common Objects panel, except for the Action field, which displays a dialog box for that rule and policy. Set the logging options for the action in the dialog box for that action. The particular dialog box that appears depends on the action selected.
ALLOW Action
FIGURE 5-35 shows the Policy Rule Index dialog box for the ALLOW action.
Figure 5-35 Policy Rule Index Dialog Box for ALLOW action

TABLE 5-36 describes the controls in Policy Rule Index dialog box for ALLOW action.
Table 5-36 Controls for ALLOW Action
-
PROXY_HTTP - Presents the dialog box shown in FIGURE 5-36.
Figure 5-36 PROXY_HTTP Dialog Box for ALLOW action
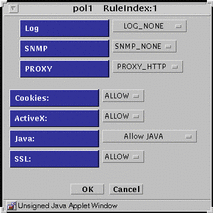
TABLE 5-37 lists the flags for the HTTP proxy.
Table 5-37 HTTP Proxy Flags
-
PROXY_FTP - Presents the dialog box shown in FIGURE 5-37.
Figure 5-37 PROXY_FTP Dialog Box for ALLOW action
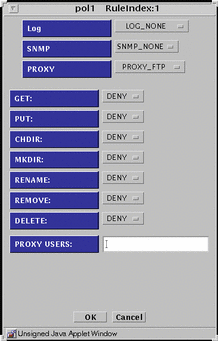
TABLE 5-38 lists the settings available for the flags for the FTP proxy.
Table 5-38 FTP Proxy Flags|
Flag |
Function |
|---|---|
|
GET |
Allow or disallow use of the FTP get command |
|
PUT |
Allow or disallow use of the FTP put command |
|
CHDIR |
Allow or disallow use of the FTP chdir command |
|
MKDIR |
Allow or disallow use of the FTP mkdir command |
|
RENAME |
Allow or disallow use of the FTP rename command |
|
REMOVE |
Allow or disallow use of the FTP remove_dir command |
|
DELETE |
Allow or disallow use of the FTP delete command |
|
PROXY USERS |
Choose the proxy user or the group of proxy users that you want for this rule. You can have only one proxy user or one group of proxy users in this field. You define these proxy users in the proxy user common object. |
-
PROXY_SMTP - Presents the dialog box shown in FIGURE 5-38.
Figure 5-38 PROXY_SMTP Dialog Box for ALLOW action
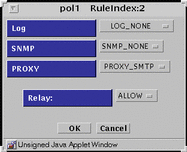
The only flag for the SMTP proxy is to allow or disallow relayed mail.
-
PROXY_Telnet - Presents the dialog box shown in FIGURE 5-39.
Figure 5-39 PROXY_Telnet Dialog Box for ALLOW action
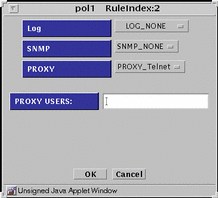
For the PROXY USER field, type the proxy user or the group of proxy users that you want for this rule from the choice list. Specify only one proxy user or one group of proxy users in this field. Define these proxy users in the proxy user common object.
DENY Action
FIGURE 5-40 shows the Policy Rule Index dialog box for DENY action
Figure 5-40 Policy Rule Index Dialog Box for DENY Action
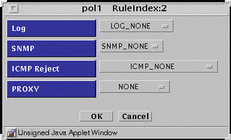
TABLE 5-39 describes the controls in Policy Rule Index dialog box for DENY action.
Table 5-39 Controls for DENY Action
-
PROXY_HTTP - Presents the same dialog box shown in Figure 5-40 save that PROXY_HTTP appears in the PROXY field. There are no flags to set.
-
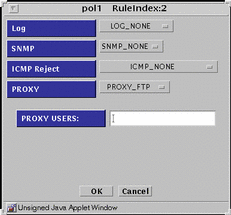
PROXY_FTP - Presents the dialog box shown in FIGURE 5-41.
Figure 5-41 PROXY_FTP Dialog Box for DENY action
-
PROXY_SMTP - Presents same dialog box shown in Figure 5-40 save that PROXY_SMTP appears in the PROXY field. There are no flags to set.
-
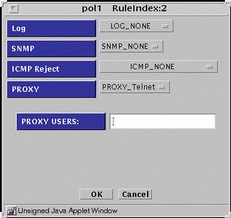
PROXY_Telnet - Presents the dialog box shown in FIGURE 5-42.
Figure 5-42 PROXY_Telnet Dialog Box for DENY action
ENCRYPT Action
FIGURE 5-43 shows the Policy Rule Index dialog box for ENCRYPT action.
Figure 5-43 Policy Rule Index Dialog Box for ENCRYPT Action
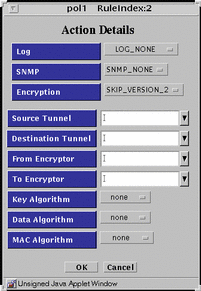
TABLE 5-40 describes the controls in Policy Rule Index dialog box for ENCRYPT action.
Table 5-40 Controls For ENCRYPT Action
SECURE Action
FIGURE 5-44 shows the Policy Rule Index dialog box for SECURE action
Figure 5-44 Policy Rule Index Dialog Box for SECURE Action
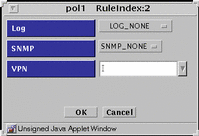
TABLE 5-41 describes the controls in Policy Rule Index dialog box for SECURE action.
Table 5-41 Controls for SECURE Action
Administrative Access Tab
The Administrative Access rules tab shows access and encryption settings for local and remote administration. FIGURE 5-45 shows the Administrative Access tab. You set the values reflected on the two panels of this tab through the dialog box for each panel.
Figure 5-45 Administrative Access Tab
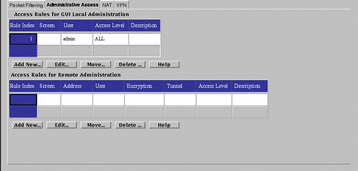
Access Rules for GUI Local Administration
Use the Access Rules for GUI Local Administration dialog box, shown in FIGURE 5-46, to add or modify administrative access rules for local Administration Stations.
Figure 5-46 Local Access Rules Dialog Box

TABLE 5-42 describes the controls for the Local Access Rules dialog box.
Table 5-42 Controls for the Local Access Rules Dialog Box
The Access Rules for Remote Administration
Use the Remote Access Rules dialog box, shown in FIGURE 5-47, to add or modify administrative access rules for remote administration stations. The certificates used here must be of the same strength and type as those defined in the screen object. The entries here determine what type of remote Administration Station the Screen will accept. The Screen only uses the administration certificate field of the Screen object here.
Figure 5-47 Remote Access Rules Dialog Box
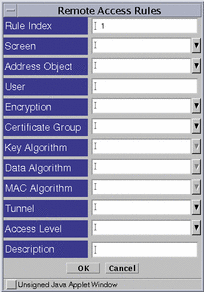
TABLE 5-43 describes the controls for the Remote Access Rules dialog box.
Table 5-43 Controls for the Remote Access Rules Dialog Box
NAT Tab
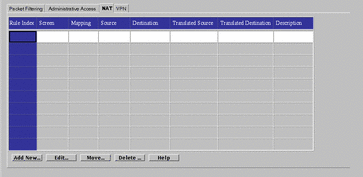
Use the Network Address Translation (NAT) tab, shown in FIGURE 5-48, to set up mapping rules to translate IP addresses according to specific rules. These rules interpret the source and destination of incoming IP packets, then translate either the apparent source or the intended destination, and send the packets on. You can map hosts, lists of addresses, ranges of addresses, or specific groups, depending on what you have configured in your SunScreen installation. See "Address" for information on defining addresses, ranges, or groups of addresses.
Figure 5-48 NAT Tab
In general, you map addresses to:
-
Ensure that internal addresses appear as registered addresses on the Internet, or
-
Send traffic for a specific destination to a different, predetermined destination.
Translating both source and destination addresses is not possible--that is, making packets appear to come from a different IP address and directing the packets to a different destination simultaneously is not possible.
When defining NAT rules, the first rule (lowest number) that matches a packet is the one that applies, and no other rules can apply; define specific rules first, then broader cases later.
FIGURE 5-49 shows the NAT Definition dialog box.
Figure 5-49 NAT Definition Dialog Box
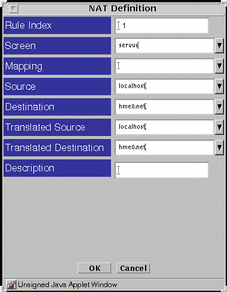
TABLE 5-44 describes the controls for the NAT Definition dialog box.
Table 5-44 Controls for the NAT Dialog Box
When defining rules, remember that translating both source and destination addresses is not possible. Either translate packets so they appear to come from a different source, or translate packets so they go to a specific destination, but not both.
All static NAT rules are unidirectional--that is, they work precisely as defined, and are not interpreted as also applying in the reverse direction. For rules to apply in both directions, specify two different rules. For example, if you map the source address internalname.com to the destination publicip.com, you will also have to map the source publicip.com to the destination internalname.com to translate traffic in both directions.
VPN Tab
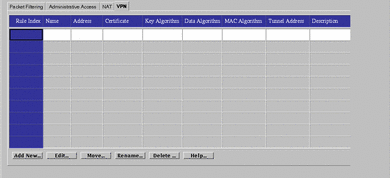
The VPN tab, shown in FIGURE 5-50, allows you to define VPN gateways. Defining VPN gateways using this mechanism simplifies the creation of VPNs that include more than two gateways and are managed in a centralized management group.
Note -
Each gateway in this type of configuration must be able to connect to the other ones directly--without going through another gateway.
Figure 5-50 VPN Tab
Setting up a VPN requires:
-
Choosing a name for the VPN.
-
Defining the VPN gateway.
-
Adding a rule for the VPN.
Defining VPN Gateways
Use the VPN Definition box, shown in FIGURE 5-51, to define and edit VPN gateways.
Figure 5-51 VPN Definition Dialog Box
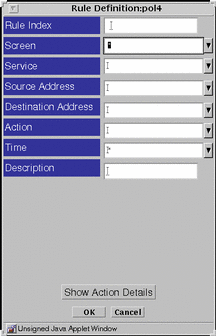
TABLE 5-45 describes the controls in the VPN Definition dialog box for defining VPN gateways.
Table 5-45 Controls in the VPN Definition Dialog Box|
Control |
Descriptions |
|---|---|
|
Rule Index |
(Optional) Assigns a number to a rule. By default, this field displays a number one greater than the last rule (indicating this rule will be placed the end of the list). Typing a lower number inserts the new rule into the specified position in the list and renumbers the rules currently in the configuration. Rules take effect in order. |
|
Name |
Specifies the Name of the VPN to which this gateway belongs. Type the same name in the Name field for each gateway that is in the VPN. |
|
Address |
Specifies the machine to be included in the VPN. |
|
Certificate |
Specifies the name of the certificate for this VPN gateway. |
|
Key Algorithm |
Specifies the secret (key) algorithm the VPN uses. All gateways in the same VPN must use the same (key) algorithm. |
|
Data Algorithm |
Specifies the data algorithm the VPN uses. All gateways in the same VPN must use the same data algorithm. |
|
MAC Algorithm |
Specifies the MAC algorithm the VPN uses. All gateways in the same VPN must use the same MAC algorithm. |
|
Tunnel Address |
Specifies the destination address on the outer (unencrypted) IP packet to which tunnel packets are sent. |
|
Description |
(Optional) Provides a short description of the VPN gateway. |
|
Add New |
Allows adding a new VPN rule. |
|
Edit |
Allows you to edit the VPN rule that you highlighted in the NAT tab. |
|
Move |
Allows assigning a new rule index number for the rule highlighted in the NAT tab. |
|
Delete |
Deletes the access rule highlighted in the VPN tab. |
|
Help |
Displays the online help. |
Adding a VPN Rule
After defining the gateways in a VPN, add a packet-filtering rule for this VPN. Add the packet-filtering rule using the Packet Filter tab.
When adding a packet-filtering rule for a VPN, leave the Screen field empty.
-
Specify SECURE for the packet-filtering action.
-
Type the name of the VPN in the VPN field.
Note -Use any address in the VPN rules. Only addresses that interact with a VPN Gateway and the address specified in the rule will apply. The simplest rule uses * for the source and destination address. This rule allows encrypted use of the specified service for all addresses in the VPN.
- © 2010, Oracle Corporation and/or its affiliates
