Screen Objects
If you are configuring high availability (HA) or centralized management groups (CMG), you need to add a Screen. For the standalone configuration, you may edit the Screen for adding SNMP or modifying miscellaneous properties.
If you are running in stealth mode or mixed mode (a mix of routing and stealth interfaces), you must modify the Screen object in order to define the stealth network and netmask for the network the Screen is subdividing.
Screen Object Tabs
Most of the work with Screen Objects is done using the 4 tabs on the
Screen dialog box.
Miscellaneous Tab

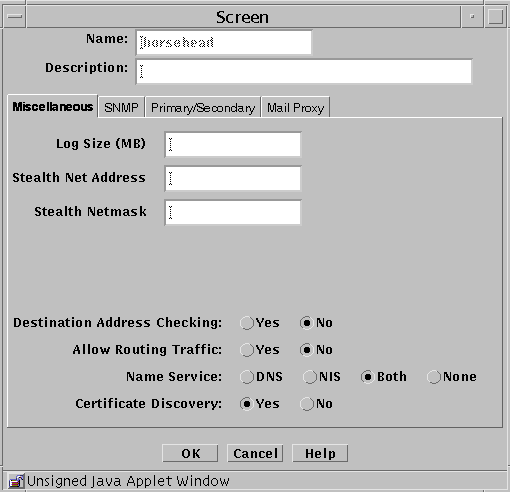
The following table describes the controls for the Miscellaneous tab of the Screen dialog box.
Table 2-14 Controls for the Miscellaneous Tab of the Screen Dialog Box|
Control |
Description |
|---|---|
|
Name |
Specifies a name for the screen object. |
|
Description |
(Optional) Provides a brief description of the screen object. |
|
Log Size |
Sets the size of the log in megabytes. |
|
Stealth Network Address |
Specifies the network address for interfaces that are used as stealth interfaces. Set this parameter if you have used the interface object to designate any Screen interfaces as stealth interfaces. |
|
Stealth Netmask |
Specifies the netmask for interfaces that are used as stealth interfaces. Set this parameter if you have used the interface object to designate any Screen interfaces as stealth interfaces. |
|
Allow Routing Traffic |
Specifies whether the Screen sends or receives updates to the routing table using the RIP protocol. |
|
Name Service |
Specifies the name service (DNS, NIS, Both, or None) that the Screen will use. |
|
Certificate Discovery |
Specifies whether the Screen uses Certificate Discovery. |
|
OK Button |
Stores the new or changed information and makes the Save Changes command button active. |
|
Cancel Button |
Cancels any new or changed information. |
|
Help Button |
Calls up the page of online help for this common object. |
SNMP Tab
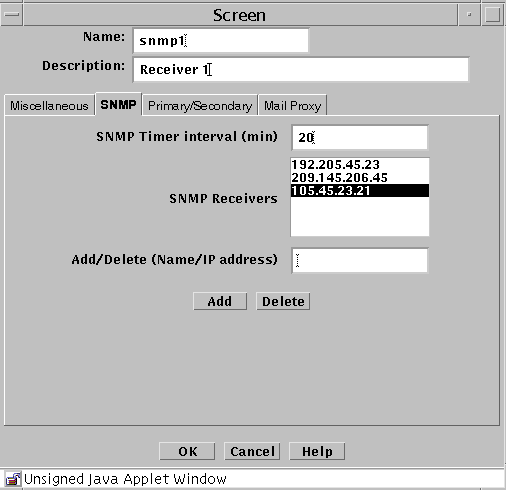
The SNMP tab specifies the interval for SNMP timed status indicator traps and you can add, edit, or delete SNMP trap receivers.
Note -
Use the Action field of the packet-filtering Rule Definition dialog box to specify actions that generate SNMP alerts. The machine that receives SNMP trap alerts must not be a remote Administration Station.
The following shows the SNMP tab of the Screen dialog box.

The following table describes the controls for the SNMP tab on the Screen dialog box.
Table 2-15 Controls for the SNMP Tab of the Screen Dialog Box
The following SNMP traps are supported:
-
As an action on a packet that matches a particular rule
-
As a default drop action on an interface
-
Time status indicator traps
The first two types include the following data:
-
interface - The SunScreen network interface number on which the packet was received.
-
interfaceName - The SunScreen network interface name on which the packet was received.
-
errorReason - The reason the alert was generated. (See the sunscreen.mib file for a complete list of reasons.)
-
packetLength - The actual length of the packet in bytes.
-
lengthLogged - The length of the data logged in bytes.
-
packetData - The packet data.
The SNMP timed status indicator trap uses the same receivers database as other types of SNMP traps. There is only one database with a maximum of five receivers. These receivers are specified as variable to the screen object.
To activate the timed status indicator traps, set the SNMP timer interval.
The following data are in the SNMP timed status indicator. These data cannot be modified and new data cannot be added:
-
cpuUsage - Average percentile CPU usage
-
memoryAvail - Current swap space available, in kilobytes
-
swapIn - Current swap ins
-
swapOut - Current swap outs
-
scanRate - Current scan rate
-
tcpUsage - Current number TCP connections in the SunScreen state table
-
ipUsage - Current number IP connections in the SunScreen state table
-
udpUsage - Current number UDP connections in the SunScreen state table
-
rootUsage - Disk usage of the root partition, /
-
varUsage - Disk usage of the var partition, /var
-
etcUsage - Disk usage of the etc partition, /etc
-
tmpUsage - Disk usage at the tmp partition, /tmp
Only these SNMP traps are supported. No get or set operations are supported.
Primary/Secondary Tab
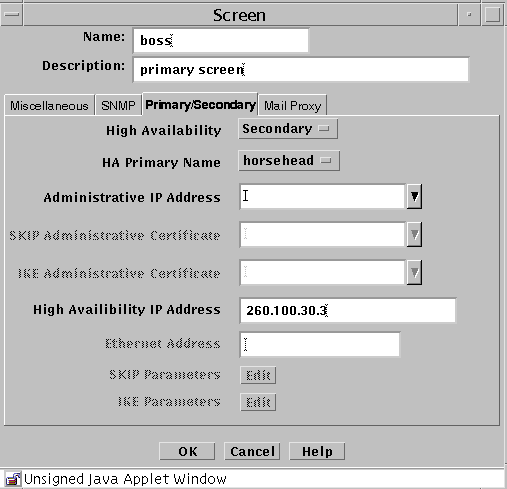
The Primary/Secondary tab associates a certificate object with a Screen that is part of an HA cluster or a CMG. The High Availability choice (No, Primary, or Secondary) and the Primary Name choice determine the role a Screen has within an HA cluster and centralized management group (CMG). The settings you choose determine which other controls on the Primary/Secondary tab are active.

The following table describes the controls for the Primary/Secondary tab.
Table 2-16 Controls for the Primary/Secondary Tab of the Screen Dialog Box
Mail Proxy Tab
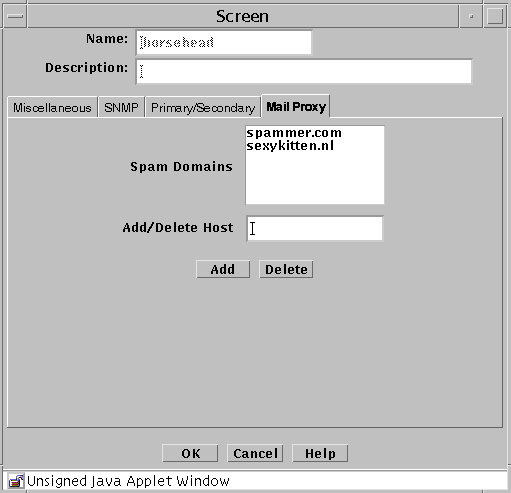
The Mail Proxy tab allows adding, editing, or deleting domains known to distribute unsolicited electronic mail (spam). You can define spam domains if you use an SMTP proxy.

The following table describes the controls for the Mail Proxy tab of the Screen dialog box.
Table 2-17 Controls for the Mail Proxy Tab of the Screen Dialog Box
Adding a Screen Object
To Add a Screen
-
Execute the steps in "To Modify the Policies Associated with a Common Object".
-
Select Screen in the Type list.

-
Select New from the Add New Object list.
The Miscellaneous area in the Screen dialog box appears.
-
In the Name field, type the name of the Screen as it appears in the naming service or the host file.
-
Type a number in the Log Size (MB) field, to set the total size for log files (the default is 100 Mbytes).
-
The Stealth Network Address and Stealth Netmask (of the network the Screen partitions) fields apply only if the Screen has stealth interfaces.
-
Click the Yes or No radio button to allow or deny Destination Address Checking. Destination Address Checking is used for anti-spoofing protection.
-
Click the Yes or No radio button to allow or deny routing traffic (RIP).
-
Click a Name Service radio button to choose the name service that the Screen will rely on to define the host address.
You can also use both DNS and NIS or no name service at all.
-
Click the Yes or No radio button for Certificate Discovery (SKIP only).
This determines whether the Screen itself is to participate in a certificate discovery exchange. Selecting Yes, however, does not allow CDP traffic to go through the Screen.
-
Click the OK button.
SNMP Alert Receivers
You set actions that generate SNMP alerts as part of a security policy. Use the SNMP tab in the Screen dialog box to:
A management information base (MIB) that describes the SNMP trap is included with the SunScreen CD-ROM, as part of the SUNWsfwau package. It is installed as: /usr/lib/sunscreen/Admin/etc/sunscreen.mib. Load this MIB into your SNMP manager to enable it to use the SNMP trap generated by the Screen.
The machine that you want to receive SNMP trap alerts must not be a remote Administration Station. SNMP alert packets are sent in the clear, and the communication between the remote Administration Station and Screen is encrypted; any packets sent in the clear are dropped.
The recipients of SNMP messages are controlled on a Screen-by-Screen basis. The Screen object has a place for an optional list of IP addresses, which are the hosts to which it sends the SNMP packets.
There are two ways to send SNMP packets:
-
Set SNMP in a Packet Filtering rule's Action
-
Specify it in the default Reject Action of an interface object
SNMP alerts are described in "Screen Object" in SunScreen 3.2 Administrator's Overview.
The following information describes using the administration GUI. For the command line interface, see Chapter 10, Using the Command Line Interface.
To Add an SNMP Alert Receiver
-
Execute the steps in "To Modify the Policies Associated with a Common Object".
-
Select Screen in the Type list.

-
Select New from the Add New Object list.
-
Click the SNMP tab in the Screen dialog box.
The SNMP area is displayed.

-
Type the name or IP address of the recipient of the SNMP trap in the Name field.
-
Click the Add button.
A list of SNMP alert receivers appears. You can define up to five receivers. SunScreen sends each generated alert to all receivers.
-
Click the OK button when you are finished.
Note -
You use the SNMP Timer Interval field in the SNMP tab to specify the time interval, in minutes, between the health-update packets that are emitted by the Screen. If you do not specify any Alert receivers, no health-update packets are issued.
If you set the SNMP Timer Interval field to zero (or leave it empty) and there are Alert receivers, no health-update packets are issued, although other SNMP alerts are sent to the Alert receivers.
To Delete an SNMP Alert Receiver
-
Execute the steps in "To Modify the Policies Associated with a Common Object".
-
Select Screen in the Type list.

-
Select New from the Add New Object list.
-
Click the SNMP tab in the Screen dialog box for the Screen.
The SNMP area appears.

-
Select an entry in the SNMP Receivers field.
If the name of the SNMP Receiver to delete is not listed (that is, only the IP address is listed), type the name in the Add/Delete field.
-
Click the Delete button.
-
Click the OK button when you are finished with this Screen object.
- © 2010, Oracle Corporation and/or its affiliates
