Interface Objects
An Interface Object represents a network interface that makes one or more IP addresses accessible to a Screen. Empty address groups for all available network interfaces are defined during installation in routing mode. After you complete the installation, you can add and remove interfaces, redefine the addressees for the network interfaces, and set up high availability. For an interface to be able to reach a desired set of addresses, you must define one or more address groups and specify which address group each interface will use.
Note -
If the user wants to use spoof detection, they will need to associate accurate address groups with each interface.
For Routing interfaces, there are two types of spoof detection : Complete and Incomplete. On the Interface Definition panel (see "To Add or Edit Interfaces"), you can set the spoof detection by clicking on the "Spoof Protection" pulldown and making the selection (see "Interface Object" in SunScreen 3.2 Administrator's Overview for information on Complete and Incomplete spoof detection).
For Stealth interfaces, the type of spoof detection is always set to Complete and is not modifiable.
The maximum number of stealth interfaces per Screen is 15; however, the number of routing interfaces is virtually limitless.
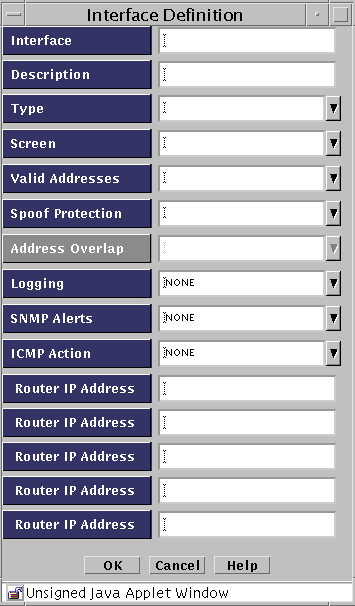
The following table describes the controls for the Interface Definition dialog box.
Table 2-18 Controls for the Interface Definition Dialog Box|
Control |
Description |
|---|---|
|
Interface |
Specifies the interface. |
|
Type |
Specifies the type of interface. The options are:
|
|
Screen |
Specifies the Screen on which this interface physically resides. If you are using centralized management, you must complete this field. |
|
Valid Address |
Specifies the source IP addresses for this interface. |
|
Spool Protection |
Specified the level of spoof protection. For Routing interfaces, there are two types of spoof detection : Complete and Incomplete (see "Interface Object" in SunScreen 3.2 Administrator's Overview for information on Complete and Incomplete spoof detection). |
|
Logging |
Identifies the disposition of a packet, when a packet received on the interface does not match any rule. The options are:
If a packet matches a rule, it is disposed of according to the action for the rule it matches. |
|
SNMP Alerts |
Specifies whether the Screen should issue an SNMP alert message when a packet received on an interface does not match a rule. The options are:
If a packet matches a rule, it is disposed of according to the action for the rule it matches. |
|
ICMP Action |
Identifies the ICMP rejection message that is issued if a packet received on the interface is rejected. In most cases, the Screen rejects packets by sending an ICMP Destination Unreachable packet with the reject code set as specified in the ICMP action on the interface. The one exception is the PORT_UNREACHABLE ICMP action. In this case, the Screen rejects TCP packets by sending a TCP RESET packet and other packets by sending an ICMP Destination Unreachable (Port Unreachable) message. The options for the actions are:
If a packet matches a rule, it is disposed of according to the action for the rule it matches. |
|
Comment |
(Optional) Provides a descriptive note about the Interface object. |
|
Router IP Address |
(Optional) Specifies the router's IP address when the type of interface is STEALTH. This allows packets that have had their destination address changed, for example NAT or tunnelling, to be sent to a router. You can specify as many as five router IP addresses. If you have stealth interfaces, define the router that does the routing for the subnet for at least one of them. |
|
OK Button |
Stores the new or changed information and makes the Save Changes command button active. |
|
Cancel Button |
Cancels any new or changed information. |
|
Help Button |
Calls up the page of online help for this common object. |
To Add or Edit Interfaces
Before adding a new interface, you must define the address group that the interface will use in the policy.
Note -
Any added interfaces, or edits to interfaces, take effect only when you activate the policy rule that includes those interfaces.
-
Execute the steps in "To Modify the Policies Associated with a Common Object".
-
Select Interface in the Type list.

-
Select New from the Add New Object list beside the Interfaces area.
The Interface Definition dialog box appears.
-
Type the name of the interface, such as hme0 or qfe1.
Note -Virtual interfaces are not configured in SunScreen. On the physical interface (qe1) needs to be defined, and all associated virtual (logical) interfaces will be protected.
-
Select the type of interface you want to add, such as ROUTING, ADMIN, DISABLED, HA, or STEALTH, from the Type list.
-
(Optional) Select the name of the Screen you want to add from the Screen list.
-
Select the name of the valid addresses you want to add from the Valid Addresses list.
-
(Optional) Select the type of logging you want to use from the Logging list.
-
(Optional) Select which SNMP alert to use, if any, from the SNMP Alert list.
-
(Optional) Select the name of the Reject Action you want to use from the ICMP Action list.
-
Click the OK button to save your interface definition.
-
(Optional) Repeat the steps above until you have added all the interfaces you require.
To Remove an Interface
-
Execute the steps in "To Modify the Policies Associated with a Common Object".
-
Select Interface in the Type list.

-
Select the name of the interface you want to delete from the Type list.
The Detail text area displays information about the interface.
-
Select the name of the Screen from which you want to remove the interface.
-
Click the Delete button.
Note -
Any interfaces that you remove with this procedure remain active until you activate the policy rule that formerly included them. Routing interfaces must be removed from the operating system, otherwise they will be unprotected on the network.
To Set up a Routing Interface
Note -
In Routing Mode only, before you can configure a new routing interface, you must first configure it on your system. (Use the documentation for your operating system.) Do not try to do this for stealth interfaces.
-
Execute the steps in "To Modify the Policies Associated with a Common Object".
-
Select Interface in the Type list.

-
Select New in the Add New Object list.
The Interface Definition dialog box appears.

-
Type the name for the interface in the Interface field.
-
(Optional) Type a brief description for the interface.
-
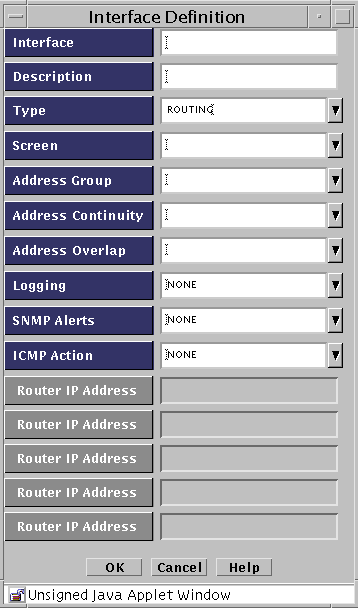
Select ROUTING in the Type field list.
The Interface Definition dialog box changes and the Routing IP Address fields are disabled and the Address Overlap field is enabled.
-
Type the remainder of the information in the fields.
-
(Optional) Select the name of the Screen you want to add from the Screen list.
-
Select the name of the valid addresses you want to add from the Valid Addresses list.
-
(Optional) Select the type of logging you want to use from the Logging list.
-
(Optional) Select which SNMP alert to use, if any, from the SNMP Alert list.
-
(Optional) Select the name of the reject action you want to use from the ICMP Action list.
-
Click the OK button when finished.
-
Click Save Changes.
To Set up a Stealth Interface
The stealth interfaces have optional router entries. Use these entries to define all accessible routers on your subnet that can be reached from this interface. These routers are required if your policy uses NAT or tunneling, and recommended otherwise.
You need to create address groups that accurately reflect all the hosts available from each stealth interface, and you must associate these address groups with stealth interfaces when you define them.
For additional information, see "Routing and Stealth Mode Interfaces" in SunScreen 3.2 Administrator's Overview.
Note -
Do not configure any interfaces at the operating system for use as stealth interfaces with the following exception. Configure one interface for use as an Admin Interface for Remote Administration.
-
Execute the steps in "To Modify the Policies Associated with a Common Object".
-
Select Interface in the Type list.

-
Select New in the Add New Object list.
The Interface Definition dialog box appears.

-
Type the name for the interface in the Interface field.
-
(Optional) Type a brief description for the interface.
-
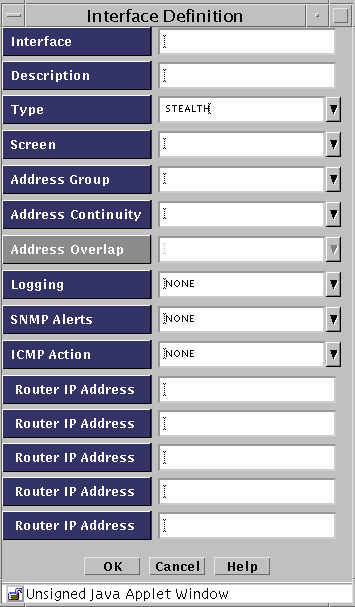
Select STEALTH in the Type field list.
The Interface Definition dialog box changes and the Address Overlap field is disabled.
-
Select the name of the Screen you want to add from the Screen list.
-
Select the name of the valid addresses you want to add from the Valid Addresses list.
-
Select the type of logging you want to use from the Logging list.
-
Select which SNMP alert to use, if any, from the SNMP Alert list.
-
Select the name of the reject action you want to use from the ICMP Action list.
-
Type the Router IP Addresses
-
Click the OK button when finished.
-
Click Save Changes.
To Change an Admin Interface From the Local Console
If you want to upgrade an existing admin interface or if an existing admin interface is defective, you can change the admin interface on the local console as follows:
-
Execute the steps in "To Modify the Policies Associated with a Common Object".
-
Select Interface in the Type list.

-
Select New from the Add New Object list
The Interface Definition dialog box appears.

-
Fill in the information making sure to select Admin in the Type field.
-
Click OK.
-
Select Screen from the Type List
-
Click Search to see the list of screens
-
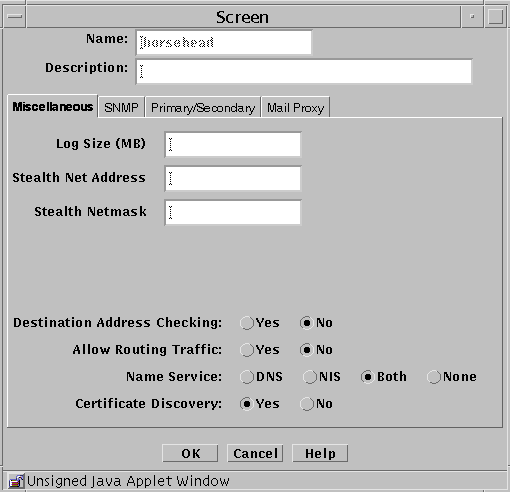
Select the screen and click Edit.
The screen dialog box appears.
-
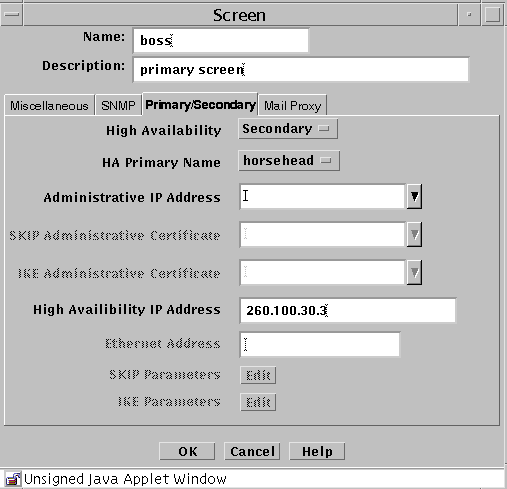
Select Primary/Secondary.
-
In the Administration IP Address field, either select "*" or the name of the address object. The address object is set by selecting Address in the Type list and then selecting New Host and filling in the IP address for the address object.
-
Save and activate the changes.
-
Thoroughly test the new admin interface.
-
Follow the steps in "To Remove an Interface" to remove the old admin interface once you are satisfied with the new admin interface.
-
Save and activate the changes.
To Change an Admin Interface From a Remote Console
-
Execute the steps in "To Modify the Policies Associated with a Common Object".
-
Select Interface in the Type list.

-
Select New from the Add New Object list
The Interface Definition dialog box appears.

-
Save and activate the changes.
-
Select Screen in the Type list.
The Screen panel appears.

-
Click Search and then select the screen for which you are changing the admin interface
-
Click Edit
-
Select Primary/Secondary in the Screen dialog box.
The Primary/secondary panel appears.

-
Select "*" for the Administration IP Address to allow for testing.
-
Save and activate the changes.
-
Thoroughly test the new admin interface.
-
Reselect Screen from the Type list
-
Select Primary/Secondary in the Screen dialog box.
-
Fill in the fields making sure to select the address object for the new admin interface. The address object is set by selecting Address in the Type list and then selecting New Host and filling in the IP address for the address object.
-
Save and activate the changes.
-
Thoroughly test the new admin interface.
-
After you are satisfied that the new admin interface is working correctly, follow the steps in "To Remove an Interface" to remove the old admin interface.
- © 2010, Oracle Corporation and/or its affiliates
