Chapter 2 Working With Common Objects
Common objects are the smallest building blocks you work with when managing your SunScreen. Common objects are used by ("common" to) all existing policies; any modification to these objects affects the operation of all policies.
This chapter describes:
-
Using the Policy Rules page
-
Adding, editing, deleting, renaming, and searching for common objects
-
Viewing and editing details of a common object
-
Adding services and service groups
-
Adding host addresses, ranges, and groups of addresses
-
Adding and deleting SNMP alert receivers
-
Adding, generating, and loading SKIP UDHs
-
Generating, importing, exporting and associating IKE certificates
-
Adding a Screen
-
Adding and editing interfaces
-
Adding a time object
This chapter describes how to use the administration GUI to manipulate common objects. To perform the same tasks from the command line interface, refer to Chapter 10, Using the Command Line Interface.
The following table provides a list of the procedures that are in this chapter.
Table 2-1 Common Object Procedures|
Object |
Procedure |
|---|---|
|
Common Objects | |
|
Service Objects | |
|
Address Objects | |
|
Certificate Objects | |
|
Certificate Group | |
|
IPsec Key Object | |
|
Screen Objects | |
|
Interface Objects | |
|
Jar Objects | |
|
Authentication | |
|
Time Objects |
Using the Policy Rules Page
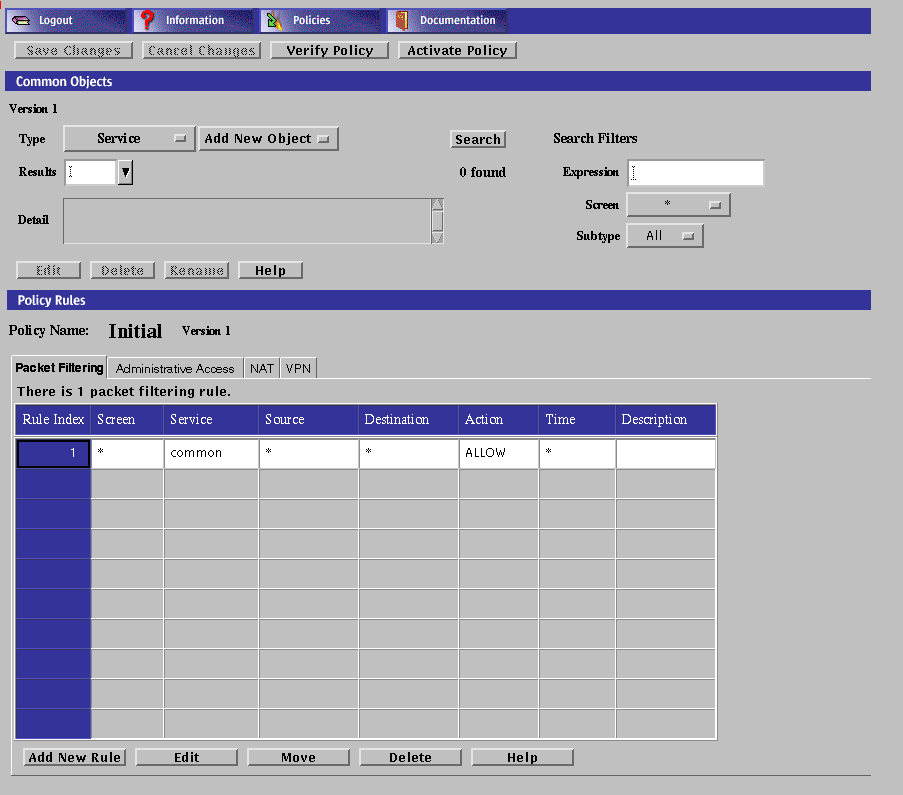
To add and modify the common objects, use the Policy Rules page of the administration GUI.
To Modify the Policies Associated with a Common Object
Policies List Page
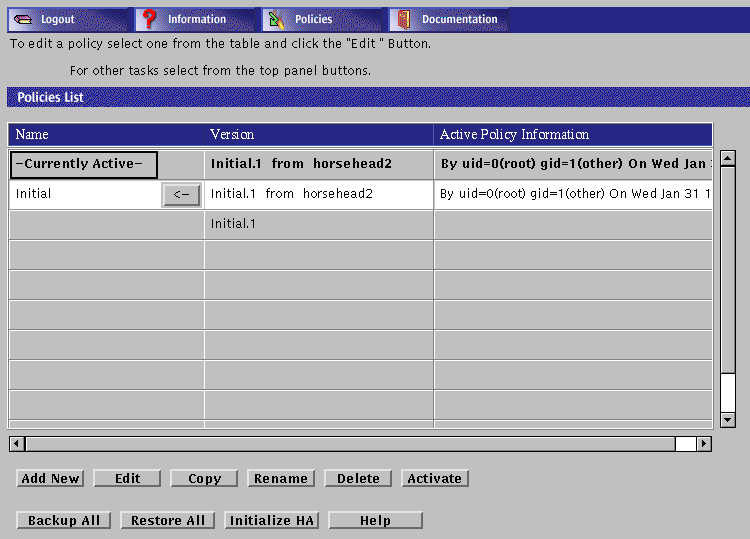
You reach the Policies List page by choosing Manage Policies for the Select Task field on the Login Page before you click the login button or by clicking the Policies button on the administration GUI's navigation bar.
You can move to the SunScreen Information page, display the online documentation, or log out by clicking the appropriate button on the administration navigation bar
The Policies List page allows you to add a new policy or to edit, copy, rename, delete, and backup a particular policy to a local file; to restore a policy from a local file; and to initialize HA.
The Policies List page identifies the policies that have been stored for a Screen. The List Policies page has two instructions under the top or navigation bar: "To edit a policy select one from the table and click the `Edit' button," and "For other tasks select from the top panel buttons."
Policies List Panel
Below the Policies List banner is a panel consisting of three columns that show:
-
The name - You must click a name of a policy that you want to edit in this column. The term "-Currently Active-" appears in this column for the active policy and the name and the version of the active policy appears in the version column.
-
The version (if present) - The version lists the versions of policies for your system.
-
The active policy information (if present).
The Policies List panel lists the policies that have been set up for a particular Screen. The active policy is the first policy in the list of policies and is automatically highlighted when you first come to this page. You can edit inactive Screen policies by clicking the name of an entry in the Policies List panel to highlight it, then click one of the controls at the bottom of the Policies List page.
Types of Policies
The types of policies are:
-
Regular Policies - Policies that share common objects with other regular policies.
-
Versioned Policies - A policy with a version number is displayed by clicking the button next to the regular policy name in the first column of Policies List Panel of the Policies List Page. Clicking the reverse arrow hides the versions of a policy. A policy with a version number contains a snapshot of the common objects that are embedded in the saved policy. The name of the policy contains a dot followed by an incremental number. The higher the number, the later the version. Versioned policies cannot be modified, but their rules can be extracted to a new policy.
-
Currently Active Policy - This policy is extracted from the active policy. The currently active policy cannot be modified. If you click the currently active policy and highlight it, the edit button retains the (RO) designation to show that it is read only. A Save As button appears on the Policy Name line on the Packet Filtering tab of the Policy Rules panel. You can save any modifications to the currently active policy as a new policy. A Save As button appears on the Common Objects panel. You can save the common objects of this policy to replace the current common objects associates with regular policies.
This allows you to make the common objects embedded in this version of the policy the current common objects, overwriting the existing set of common objects.
This approach allows you to save only the rules part of the versioned policy so that:
-
These rules become the current rules for this policy, for example the rules for policy Initial.10 can be made the rules for the current version of Initial.
-
You can copy the rule to a new name.
Note -The rules created in this way are used with the current set of common objects. On verifying this policy, you may have to fix any inconsistencies.
The difference in behavior between Save As and Edit(RO) is that Save As affects the current policy only and Edit(RO) affects a policy version. With Edit(RO), you have the additional choice of making the rules the current rules for the policy.
Policies List Page Action Buttons
The following table describes the action buttons for the Policies List page.
Table 2-2 Action Buttons on the Policies List Page
Using Common Objects
Use the Common Objects area of the Policy Rules page to add common objects and construct policy rules. The changes you make to the common objects do not affect the currently active policy until you activate them.

The following table describes the information, controls, and the buttons in the Common Objects Panel.
Table 2-3 Common Object Information, Controls, and Buttons|
Information |
Control |
Description |
|---|---|---|
|
Version |
|
The version of the registry of common objects that is being used in a policy. The latest version of the registry is used by all policies. If you edit the common objects (registry) the word "modified" appears after the number until you either cancel the changes or save the changes. |
|
Type |
Common Object Choice List |
Displays the list of common objects available. You choose the common object that you want from this list. |
|
|
Subtype Choice List for Adding a New Common Object of Chosen Type |
Displays the choice list of subtypes available for the common object that you selected. Each common object has it own set of subtypes and each subtype requires that you provide different information in a dialog box for that subtype for that common object. |
|
Search |
Search String |
Enter the string for a particular subtype for a common object in this editable text field. When you click the Search button, all matching subtypes appear in the Results choice list. Leaving this field blank returns all entries defined for the selected subtype or local to the selected Screen. Selecting All in Search on Screens and Search Subtype Choice with the Search String field empty returns all entries defined. |
|
|
Search on Screen |
Displays a choice list of the Screens that the Administration Station manages. Selecting a Screen from this list limits the search to common objects exclusive to that Screen. |
|
|
Search Subtypes |
Display a choice list of the subtypes available for the selected common object. |
|
|
Search Button |
Starts the search according to the criteria set. |
|
|
Results |
Displays a choice list of available entries that match the criteria. |
|
Found |
|
Show the number of entries in the search that match the criteria. |
|
Detail |
|
Displays the description for the item chosen from the Results choice list. |
|
|
Edit Button |
Displays the dialog box for the common object selected. Editing a common object is similar to adding a new one. The difference is that after you have chosen the common object that you want to edit and have clicked the Edit button, the dialog box for that common object contains all the information and you only need to modify the requisite information. |
|
|
Delete Button |
Displays the Delete dialog box. |
|
|
Rename Button |
Displays the Rename dialog box. |
|
|
Help Button |
Displays online help. |
The following table lists the common objects used in SunScreen.
Table 2-4 Common Object Descriptions|
Common Object |
Use |
|---|---|
|
Describes an administrator for your Screen administration |
|
|
IPsec Key |
For IPsec manual keys |
|
Proxy User | |
|
Defines values and objects to a specific Screen |
|
|
Time |
Some of these objects are saved automatically every time they are edited or new objects are added. Although the changes apply immediately and cannot be cancelled, they do not take effect until the policy is activated. The automatically saved objects are:
-
Authorized user
-
Jar hash
-
Jar signature
-
Proxy user
The Screen Field and Common Objects
The Screen field provides a way to define an object or rule for a specific screen in a scenario that utilizes multiple Screens, specifically when you use Centralized Management Groups. It has no effect on standalone Screen administration.
SunScreen allows you to use the same name for different common objects if you select different Screen objects for them. You may also define different parameters for these common objects; the Screens to which they refer then interpret them locally.
An object with "*" selected applies to all Screens. This is the default, and is recommended for all objects unless there is a need to use a single name more than once.
Rules whose Screen field is blank apply to all Screens. Rules with a specific Screen object selected apply only to that Screen.
To Add a Common Object
You use the same steps to add all common objects. The dialog boxes vary according to the common object selected.
-
Execute the steps in "To Modify the Policies Associated with a Common Object".
-
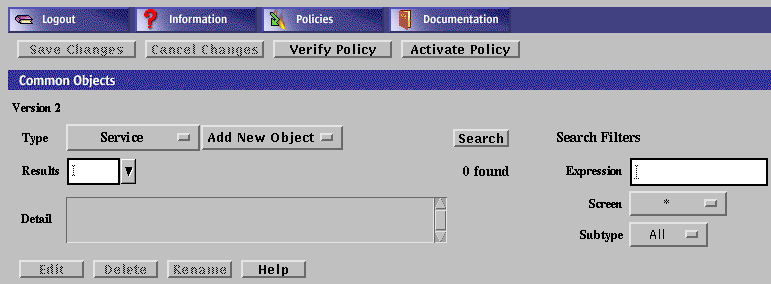
Select the Common Object in the Type list.
-
Click the Add New Object button to display the choices.
-
Type the necessary information in the dialog box.
-
Click the OK button.
To Search for a Common Object
-
Execute the steps in "To Modify the Policies Associated with a Common Object".
-
Select Common Object in the Type list.

-
(Optional) Type or select values in the search filters.
The results depend on whether the common object matches one of the three search criteria for the selected type. The search criteria are:
- Expression
-
This field restricts the search to names that match a specified character pattern. Leaving the field blank returns all names.
- Screen
-
This field restricts the search to match a specified screen. Leaving the field an asterisk (*) returns all names.
- Subtype
-
This field returns all objects when set to All. If you select a specific subtype, the search returns those objects that match the subtype.
-
Click the Search button or press Enter in the Expression field.
-
Select a result from the Results area to retrieve and display its properties in the Detail field.
After you retrieve the common object, you can edit, rename, or delete it.
To Edit a Common Object
-
Execute the steps in "To Modify the Policies Associated with a Common Object".
-
Select Common Object in the Type list.

-
(Optional) Select the search criteria.
-
Click the Search button.
-
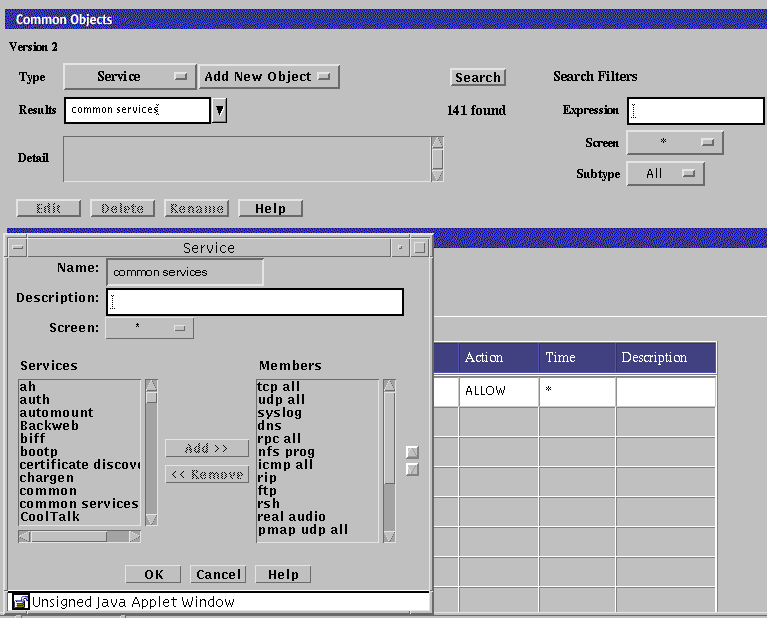
In the Results area, select the name of the common object to edit.
The details for the selected common object are displayed.

-
The dialog box for the object appears.
-
Make your changes in the dialog box.
-
Click the OK button.
To Edit a Common Object From the Policy Rules Table
-
Execute the steps in "To Modify the Policies Associated with a Common Object".
-
Click once on the cell in the Policy Rules Table that contains the object to be viewed or edited.
The dialog box for the chosen object appears.

Note -If more than one common object uses a particular name, you may not be able to display the details for the object by clicking on the table cell. In such cases, you must search for desired object and select it.
-
Edit the object if necessary.
-
Click the OK button.
To Delete a Common Object
If you delete a named common object (such as address, service, or certificate) that is being used in a policy object, SunScreen displays a warning message before it deletes the object.
-
Execute the steps in "To Modify the Policies Associated with a Common Object".
-
Select Common Object in the Type list.

-
Select the search criteria.
-
From the Results area, select the name of the common object to delete.

-
Click the Delete button.
-
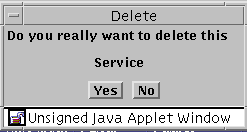
Click Yes in the Delete Rule dialog box.
Note -Be careful not to remove your Administration Station's address from its interface address group. If you do, you will be unable to administer your Screen after you activate the next policy.
To Rename a Common Object
When you rename a common object with no Screen object, you also rename all references to the object in the current policy.
-
Execute the steps in "To Modify the Policies Associated with a Common Object".
-
Select Common Object in the Type list.

-
Click the Search button.
-
From the Results area, select the name of the common object to be renamed.

-
The Rename dialog box appears.
-
Type the new name in the Please Enter the New Name field.

-
Click the OK button.
Service and Service Group Objects
When setting up your network security policy, you need to decide which network services to make available to hosts on your internal network and which services to make available to hosts on the external network. Most sites need to determine policy rules that govern basic services.
SunScreen provides many predefined network services and service groups, such as www, http, ftp, telnet, and dns. You can change the default values of a service or add a new service as needed. (See "Services and State Engines" in SunScreen 3.2 Administrator's Overview for a list of services and service groups.)
You can define both single services and service groups (clusters of single services that you want to use together.) The services that are available for use in the policies are installed as part of the SunScreen software.
In addition to the basic services, every TCP/IP implementation provides services such as echo, discard, daytime, chargen, and time. For services such as ftp, you may want to allow anyone in the internal corporate network to send outbound traffic, but only allow inbound traffic in this protocol to go to the FTP server. This requires two rules: one for the outbound traffic and one for the inbound traffic going to the public server.
Each service uses a state engine, a sort of protocol checker. For example, the FTP state engine checks port numbers when the ftp service is being used. For more information on state engines, see "Services and State Engines" in SunScreen 3.2 Administrator's Overview.
To Add a Service
Note -
Although you can change the default values for a service, the preferred method is to add a new service with the new values. This makes troubleshooting easier.
-
Execute the steps in "To Modify the Policies Associated with a Common Object".
-
Select Service in the Type list.

-
Click New Single from the Add New Object list.
The Service dialog box appears.
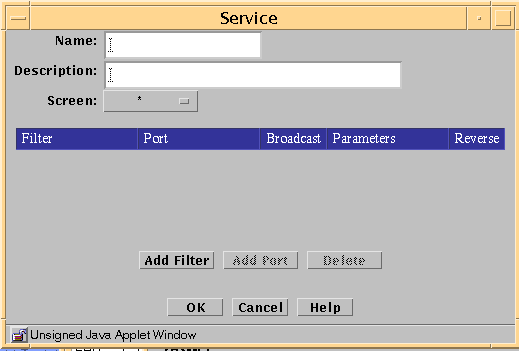
The following table describes the controls in the Service dialog box for a single service.
Table 2-5 Controls for Service Dialog Box for Single ServiceControl
Description
Name
Specifies the name of the service object.
Description
(Optional) Provides a brief description about the service object.
Screen
(Optional) Restricts the service so that it applies to the selected Screen only. The default (All) means that all Screens recognize this object unless an object exists that has been specifically defined for a particular Screen and has the same name as the Screen for which it is defined.
Filter Table Information
Filter Table
Display the parameters for the single services.
-
The Add Filter button Adds a row to the filter table so that you can define additional forward filters for the service.
-
The Add Port button adds ports for use by the forward filter. This field becomes active when you click the port field of the filter table.
-
The Delete button the highlighted row in the table. You click a row in the table to highlight it.
Filter
Identifies the state engine.
Port
Identifies the port number, program number, or type used by the forward filter.
Broadcast
Determines whether the rules in which the service is used allows communication to broadcast or multicast addresses. If you want the service to work for nonbroadcast addresses, you must enter a separate table entries for broadcast and nonbroadcast entries
Parameters
Overrides the default values the selected packet-filter state engine. Each state engine has a set of parameters; refer to "Services and State Engines" in SunScreen 3.2 Administrator's Overview for default parameters values and their meaning.
Reverse
Determines whether the filter applies to packets originating from the host in the To address of a rule and going to the From address of a rule.
OK Button
Stores the new or changed information and makes the Save Changes command button active.
Cancel Button
Cancels any new or changed information.
Help Button
Displays the page of online help for this common object.
-
-
Type the name for this new service in the Name field.
For example: ftp-34
-
(Optional) Type a description for this service in the Description field.
For example: Use ftp-34 instead of the supplied ftp service.
The description appears in the Service Details field that displays when you choose a service or service group for a rule.
-
(Optional) Select a Screen from the Screen list.
-
This adds an entry to the filter list.
-
Select a filter from the list.
You can use the Add Filter button as necessary to select the filters that you need for a particular service.
-
Click the select box in the Filter field to display the list of service filter engines.
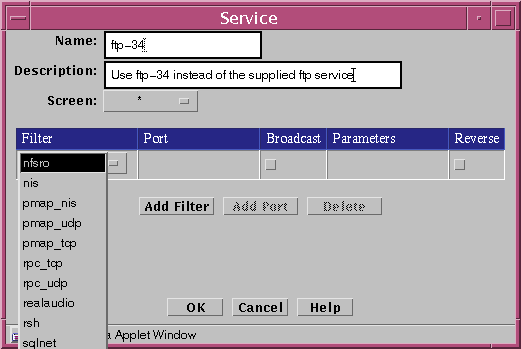
For each filter desired:
-
Type the port number for the new service in the Port field.
You can use the Add Port button as necessary to add an additional set or sets of ports that you need for a particular filter. As a rule, you need to use the Add Port button only when you must specify a discontinuous set of port numbers, such as "1024-1028" + "1030-1048". If you have too many ports, follow the steps below to delete them:
-
(Optional) To override the default values for the filter that you have selected, change the default values by typing the values that you want to use.
-
Click the Broadcast button if the service sends IP broadcast packets.
If the service sends both broadcast and non-broadcast packets (for example, the standard rip service), you will need two ports: one with the broadcast box checked and one with the broadcast box unchecked.
-
(Optional) If you want to override the default parameters for the filter that you have selected, type the required number of parameters, separated by spaces.
You need to type in parameters only if you do not want to use the default values. For information about the default values for these fields, see "Services and State Engines" in SunScreen 3.2 Administrator's Overview.
-
Click the OK button to place this service definition in the policy file.
The service ftp-34 now appears in the list of services.
-
Repeat the above steps until you have added all the services necessary for your policy.
To Add a Service Group
Note -
Although you can modify the default services in service groups, the preferred method is to add a new service group that contains the services that you want. This makes troubleshooting easier.
-
Execute the steps in "To Modify the Policies Associated with a Common Object".
-
Select Service in the Type list.

-
Select New Group from the Add New Object list.
The Service dialog box is displayed.
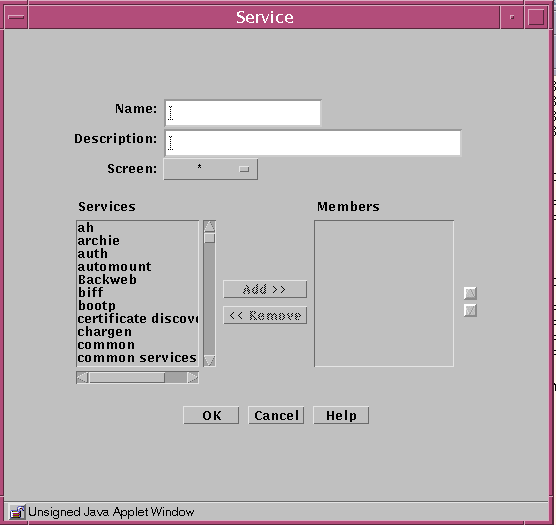
The following table describes the controls in the Service dialog box for service group.
Table 2-6 Controls for Service Group Service Dialog BoxControl
Description
Name
Specifies the name of the service object.
Description
(Optional) Provides a brief description about the service object.
Screen
(Optional) Restricts this service group applies to the selected Screen only. The default (All) means that all Screens recognize this object unless an object exists that has been specifically defined for a particular Screen and has the same name as the Screen for which it is defined.
Services List
Identifies the services that do not belong to the service group. Refer to "Services and State Engines" in SunScreen 3.2 Administrator's Overview for a description of services.
Members List
Identifies the services that belong to the service group.
Add Button
Moves the service selected in the Services list to the Members list, making the service a member of the specified service group.
Remove Button
Moves the service selected in the Members list to the Services list, removing the service from the specified service group.
OK Button
Stores the new or changed information and makes the Save Changes command button active.
Cancel Button
Cancels any new or changed information.
Help Button
Calls up the page of online help for this common object.
-
Type the name for the new service group in the Name field in the Service dialog box.
-
(Optional) Type a description for this new service group in the Description field.
The description appears in the Service Details field that displays when you choose a service or service group for a rule.
-
Select the service or service group that you want to include in this new service group.
-
Click the Add button to move the chosen service or service group to the Members list.
-
Click the OK button.
-
Repeat the above steps until you have added all the service groups required.
Address Objects
SunScreen identifies network elements--networks, subnetworks, and individual hosts--by mapping a named address object to one or more IP addresses. Address objects are used:
Each rule must have a source address and a destination address.
An address object can represent a single computer or a whole network. You can gather address objects that represent individual and network addresses to form address groups. You may define address objects that specifically include or exclude other address objects (single IP hosts, ranges of contiguous IP addresses, or groups of discontiguous IP addresses). Some addresses are already defined.
An individual host is identified by linking its unique IP address to an address object. The address object can use the name or IP address of the host.
If you change the Admin address, the admin certificate, the local certificate, or the admin-group certificate, you risk losing connectivity from the Administration Station to the Screen. Reestablishing connectivity is difficult and requires you to log into the Screen directly or to use an Administration Station that is still working. It also requires exchanging encryption information.
To Add a Host Address
-
Execute the steps in "To Modify the Policies Associated with a Common Object".
-
Select Address in the Type list.

-
Select New Host from the Add New Object list.
The Host Address dialog box appears.
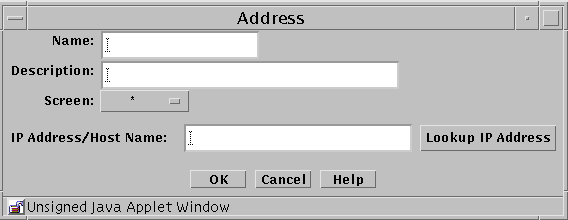
The following table describes the controls in the Address dialog box for a new host.
Table 2-7 Controls for New Host Address Dialog BoxControl
Description
Name
Specifies the name for the address object.
Description Field
(Optional) Provides a brief descriptive note about the address object.
Screen
(Optional) Restricts this address so that it applies to the selected Screen only. The default (All) means that all Screens recognize this object unless an object exists that has been specifically defined for a particular Screen and has the same name as the Screen for which it is defined.
IP Address/Host Name
Specifies the IP address you want to associate with the address object identified in the Name list.
Lookup IP Address Button
If SunScreen has access to DNS or NIS, lets you look up host addresses by host name.
OK Button
Stores the new or changed information and makes the Save Changes command button active.
Cancel Button
Cancels any new or changed information.
Help Button
Calls up the page of online help for this common object.
-
Type the name for this new address in the Name field.
For example: NewAddr
-
(Optional) Type a description in the Description field.
The description appears in the Address Details field that is displayed when you use the Rule Definition dialog box to choose an address or address group for a rule.
-
(Optional) Select a Screen from the Screen list.
-
Type the IP address in the IP Address/Host Name field.
For example: 100.100.20.10
-
Click the OK button.
To Add a Group of Addresses
-
Execute the steps in "To Modify the Policies Associated with a Common Object".
-
Select Address in the Type list.

-
Select New Group from the Add New Object list.
The Address dialog box appears.
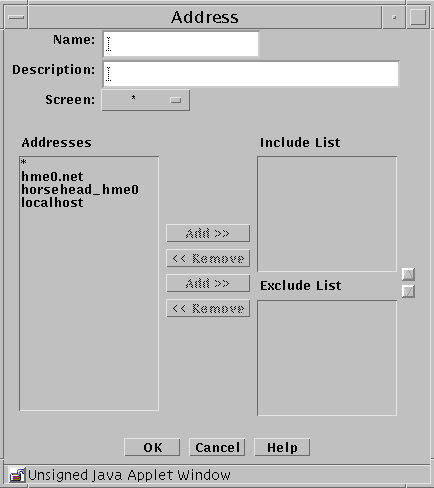
The following table describes the controls for the Address dialog box for new group.
Table 2-8 Controls for the New Group Address Dialog BoxControl
Description
Name
Specifies the name for the address object.
Description
(Optional) Provides a brief description about the address object.
Screen
(Optional) Restricts this address group so that it applies to the selected Screen only. The default (All) means that all Screens recognize this object unless an object exists that has been specifically defined for a particular Screen and has the same name as the Screen for which it is defined.
Addresses
Displays the addresses objects that can to be used to create the address group.
Include List
Specifies the address objects that are currently included in the address group. Use the Add or Remove buttons to modify the list.
Exclude List
Specifies the address objects that are excluded from the address group. For example, you can create an address group that includes all addresses except as specified in the Exclude List. Use the Add or Remove buttons to modify the list.
OK Button
Stores the new or changed information and makes the Save Changes command button active.
Cancel Button
Cancels any new or changed information.
Help Button
Calls up the page of online help for this common object.
-
Type the name for this new address group in the Name field.
For example: GroupName
-
(Optional) Type a description in the Description field.
The description appears in the Address Details field that is displayed when you choose an address or address group for a rule using the Rule Definition dialog box.
-
Select an address from the Addresses list.
-
Use the Add button to move the address to the Include list or to the Exclude list.
Use the corresponding Remove button to remove addresses from the lists.
-
Continue to build the intended address group by adding to the Include lists.
-
Click the OK button.
To Add a Range of Addresses
An address range is a set of numerically contiguous IP addresses, identified by the starting and ending addresses or using the CIDR notation. Networks and subnetworks are typically identified by an IP address range name. You can set up an address object to represent an address range.
-
Execute the steps in "To Modify the Policies Associated with a Common Object".
-
Select Address in the Type list.

-
Select New Range in the Add New Object list.
The Address dialog box appears.
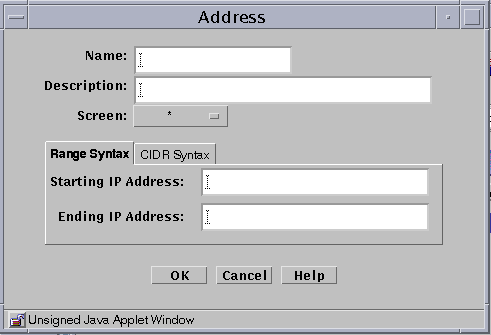
The following table describes the controls for the Address dialog box for new range.
Table 2-9 Controls for New Range Address Dialog BoxControl
Description
Name
Specifies the name for the address object.
Description
(Optional) Provides a brief description about the address object.
Screen
(Optional) Restricts this range of addresses so that it applies to the selected Screen only. The default (All) means that all Screens recognize this object unless an object exists that has been specifically defined for a particular Screen and has the same name as the Screen for which it is defined.
Starting IP Address
Specifies the starting IP address in the range.
Ending IP Address
Specifies the ending IP address in the range.
OK Button
Stores the new or changed information and makes the Save Changes command button active.
Cancel Button
Cancels any new or changed information.
Help Button
Calls up the page of online help for this common object.
-
Type the name for this new address range in the Name field.
For example: AddrRange
-
(Optional) Type a description in the Description field.
The description appears in the Address Details field that is displayed when you choose an address or address group for a rule using the Rule Definition dialog box.
-
(Optional) Select All from the Screen list.
-
If you are using the Range Syntax, type the Starting IP address in the Starting IP Address field.
For example: 100.100.20.10
-
If you are using the Range Syntax, type the Ending IP address in Ending IP Address field.
For example: 100.100.20.90
-
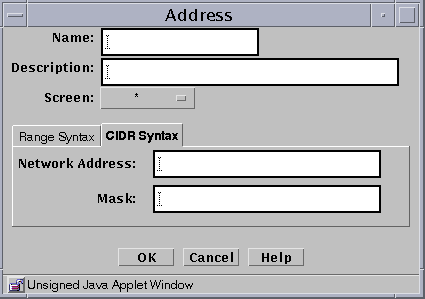
Clicking the CIDR Syntax tab to use the CIDR Syntax for defining a Range of Addresses.
The CIDR Address dialog box appears
-
If you are using the CIDR Syntax tab, type the network address (for example, 10.100.20.0)and the network mask (for example, 255.255.255.0, or 24).
-
Click the OK button.
Certificate Objects
If you are using remote administration, the certificate for the Screen and the certificate for the remote Administration Station were created, and the hashes exchanged, during the installation procedure.
You can combine certificates into groups for ease of use and convenience.
Note -
Store the diskette that contains the certificate safely and securely. It contains sensitive information that is not encrypted.
To Generate an IKE Certificate
Unlike SKIP, installing a remote administration station does not automatically create an IKE certificate. Perform the following steps on the primary Screen to generate a new certificate:
-
Execute the steps in "To Modify the Policies Associated with a Common Object".
-
Select Certificate from the Type list.

-
Select Generate IKE Certificate from the Add New list.
The certificate dialog box appears with options for the type of key to generate. The default value for the Encryption Type is rsa-sha1. The default Key Size is the lowest available.
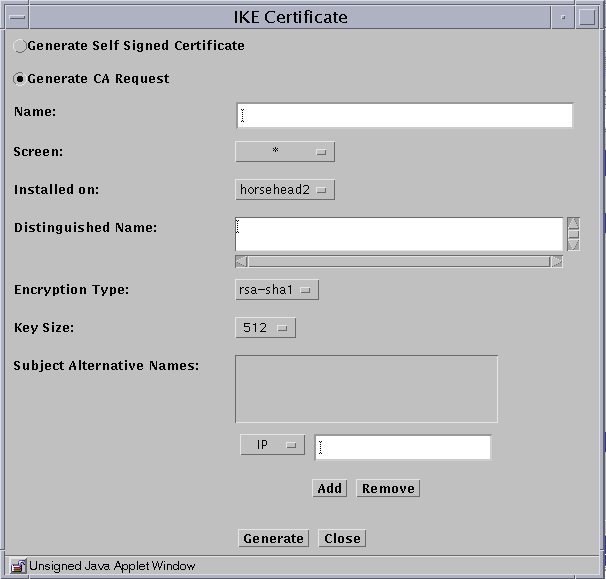
-
Select if you want to use a self-generated certificate or a certificate request for a certificate authority to sign.
-
Type a name in the Name field.
-
(Optional) Type a description in the Description field.
-
(Optional) Select the Screen from the Screen list.
-
Select the Screen the certificate is installed on from the Installed On list.
-
Type an X.509 distinguished name for the certificate subject in the Distinguished Name field. The distinguished name typically has the form of C=Country, O=Organization, OU=Organizational_Unit, and CN=Common_Name.
-
Select the Encryption Type. You can select rsa-sha1, rsa-md5, or dsa.
-
Select the Key Size. The default is the lowest available.
-
Click the Generate button.
-
Click the OK button.
To Export an IKE Certificate
-
Execute the steps in "To Modify the Policies Associated with a Common Object".
-
Select Certificate from the Type list.

-
Click Search.
-
Select the certificate you want to export from the list in the Results area.
-
Click the Edit button.
The export certificate panel appears
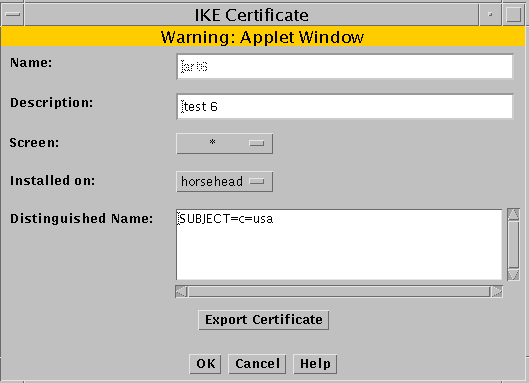
-
Click the Export Certificate button.
The Export Certificate panel appears
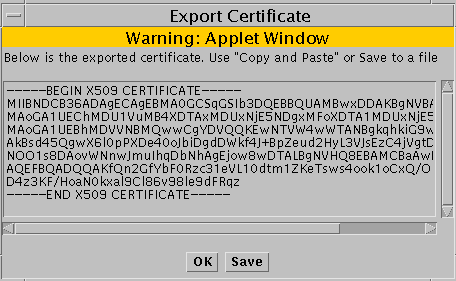
-
If you do not have the Java plugin loaded, you can Copy and Paste the information by selecting the certificate information in the Export Certificate panel and copying and pasting the information into another file.
-
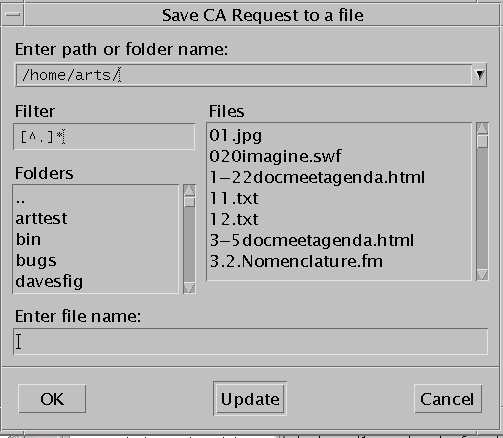
If you have the Java plugin loaded, you can click the Save button.
The Save CA request to a file panel appears. Type the file name for where to save the exported certificate.
To Import an IKE Certificate
When you import an IKE certificate, the process explicitly creates an object and associates that object with imported certificate. You do not need to manually do an associate for the imported IKE certificate. The procedure "To Associate an IKE Certificate" is typically used when you have added an IKE certificate from the command line.
-
Execute the steps in "To Modify the Policies Associated with a Common Object".
-
Select Certificate from the Type list.

-
Select Import IKE Certificate from the Add New Object selection list.
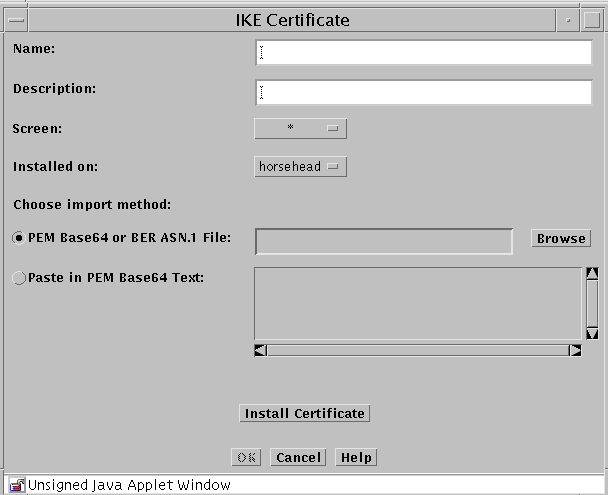
-
The IKE Certificate panel appears.
-
Type a name in the Name field.
-
(Optional) Type a description in the Description field.
-
Select the Screen from the Screen list.
-
Select the machine where the certificate will be installed from the Installed on list.
-
If you have the Java plugin loaded, click the Browse button beside the PEM Base64 or BER ASN.1 File field to bring up a panel that you can use to navigate to the file that contains the certificate.
-
If you do not have the Java plugin loaded, click the radio button beside the Paste in PEM Base64 Text: which enables the area where you can paste in the certificate information that you have copied from another file.
-
Click the Install Certificate button to import and install the certificate.
-
Go to "To Work with IKE Certificate Groups" to add the IKE certificate to either an IKE root CA certificate group or to an IKE manually verified certificate group.
To Associate an IKE Certificate
This procedure is typically used when you have added an IKE certificate using the command line interface.
-
Execute the steps in "To Modify the Policies Associated with a Common Object".
-
Select Certificate from the Type list.

-
Select Associate IKE Certificate from the Add New Object selection list.
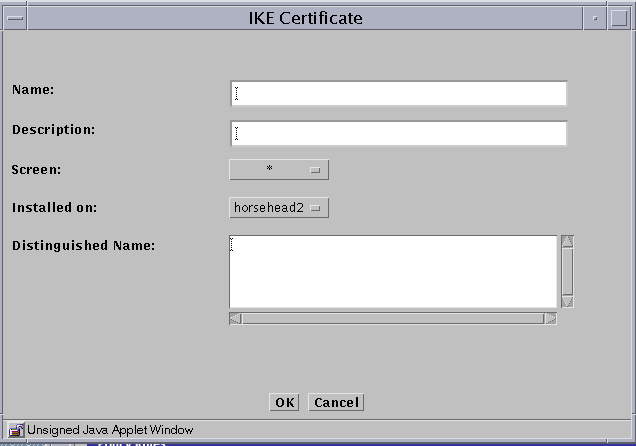
The associate IKE certificate panel opens.
-
Type a name in the Name field.
-
(Optional) Type a description in the Description field.
-
Select the Screen from the Screen list.
-
Select the machine where the IKE certificate will be installed from the Installed on list.
-
Type an X.509 distinguished name for the certificate subject in the Distinguished Name field. The distinguished name typically has the form of C=Country, O=Organization, OU=Organizational_Unit, and CN=Common_Name.
-
Go to "To Work with IKE Certificate Groups" to add the IKE certificate to either an IKE root CA certificate group or to an IKE manually verified certificate group.
To Generate SKIP UDHs Certificates
Note -
Use the Installed On field in the Certificate dialog box to choose the Screen where you want to add the certificate to the SKIP database. The default choice is the Screen to which users are connected. This is the choice you should use if you are using centralized management groups.
Self-generated private keys use the SKIP NSID 8, signifying that the public value for that key has not been signed. To validate the public value, the hash of the public value associated with that private key is used as the certificate ID. When the certificate is added either manually or through Certificate Discovery Protocol (CDP), you can certify the public value by comparing the hash of the public value in the certificate to the certificate ID. Unsigned Diffie-Hellman certificates are described in the SunScreen 3.2 Administrator's Overview.
-
Execute the steps in "To Modify the Policies Associated with a Common Object".
-
Select Certificate in the Type list.

-
Select Generate SKIP UDH in the Add New Object list.
The Certificate dialog box is displayed.
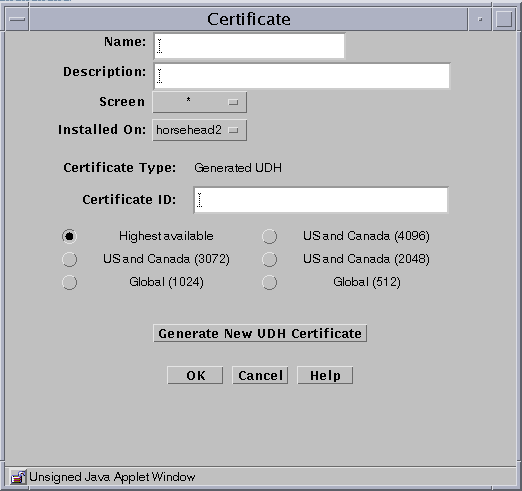
The following table describes the controls for the Certificate dialog box for generate Screen certificate.
Table 2-10 Controls for the Certificate Dialog Box for Generate Screen CertificateControl
Description
Name
Specifies a name for the certificate.
Description
(Optional) Provides a brief description about the certificate object.
Screen
Specifies the Screen that recognizes the certificate object. The default is All.
Installed On
(Optional) Specifies the Screen on which the certificate is generated.
Radio buttons
Specifies the strength of encryption that the Screen uses.
Generate New Certificate
Generates the certificate. The Certificate ID field displays the certificate's certificate ID.
OK Button
Stores the new or changed information and makes the Save Changes command button active.
Cancel Button
Cancels any new or changed information.
Help Button
Calls up the page of online help for this common object.
-
Type a name in the Name field.
-
(Optional) Type a description in the Description field.
-
(Optional) Select the Screen from the Screen list.
-
(Optional) Select the name of the Screen on which the Certificate is installed in the Installed On field.
-
Specify the level of encryption the Screen uses.
Available levels are:
-
Highest available
-
U.S. and Canada (4096)
-
U.S. and Canada (3072)
-
U.S. and Canada (2048)
-
Global (1024)
-
Global (512)
-
-
Click the Generate New Certificate button.
The Certificate ID field displays the Certificate ID.
-
Click the OK button.
To Load a SKIP Issued Public or Private Certificate
Note -
Because Netscape Navigator and Internet Explorer do not support the Java mechanism for applet signing, the administration GUI cannot access your system's local resources. (Browser security mechanisms prevent this type of access to local system resources.) See "Accessing Local System Resources".
You can add new key pairs and local identities by using a SunScreen Key and Certificate diskette. This type of key and certificate is known as an issued certificate. Certificates are described in "Certificate Object" in SunScreen 3.2 Administrator's Overview. You also can add new private keys from a directory that contains only one set of private key and certificate files.
-
Execute the steps in "To Modify the Policies Associated with a Common Object".
-
Select Certificate in the Type list.

-
Select Load SKIP Issued Private key or Load SKIP Issued Public key from the Add New Object list.
The Certificate dialog box appears.
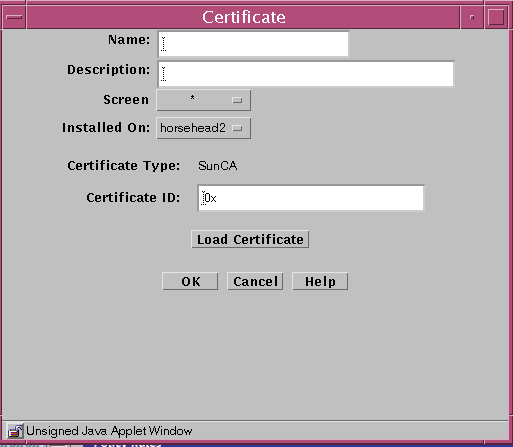
The following table describes the controls for the Certificate dialog box for generate Screen certificate.
Table 2-11 Controls for the Certificate Dialog Box for Generate Screen CertificateControl
Description
Name
Specifies a name for the certificate.
Description
(Optional) Provides a brief description about the certificate object.
Screen
Specifies the Screen that recognizes the certificate object. The default is All.
Installed On
(Optional) Specifies the Screen on which the certificate is generated.
Load Certificate
Brings up a selection panel where you can identify the location of the file that contains the certificate.
OK Button
Stores the new or changed information and makes the Save Changes command button active.
Cancel Button
Cancels any new or changed information.
Help Button
Calls up the page of online help for this common object.
-
Type a name in the Name field.
-
(Optional) Type a description in the Description field.
-
(Optional) Select the Screen from the Screen list.
-
(Optional) Select the Screen the certificate is installed on from the Installed On list.
-
Click the Load Certificate button.
-
In the File dialog box:
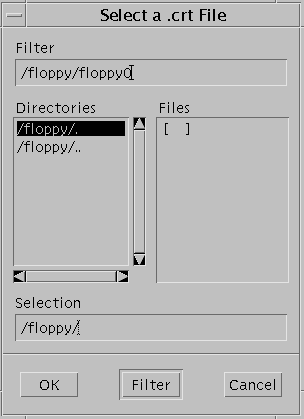
-
Click the OK button.
To Associate SKIP Certificate
By associating a certificate, you can assign a name to a certificate that exists on another Screen. Associate a certificate ID when you want to encrypt communication between two Screens or between a Screen and an Administration Station.
Note -
Self-generated certificates are validated by a telephone call between two people who know each other and recognize each other's voice.
-
Execute the steps in "To Modify the Policies Associated with a Common Object".
-
Select Certificate in the Type list.

-
Select Associate SKIP Certificate from the Add New Object list.
The Certificate dialog box appears.
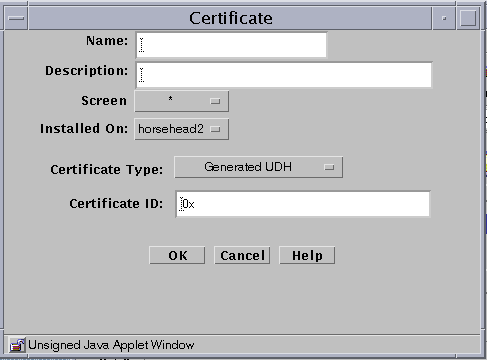
The following table describes the controls for the Certificate dialog box for associate SKIP certificate.
Table 2-12 Controls for Associate SKIP Certificate Dialog BoxControl
Description
Name
Specifies the name for the certificate ID object.
Description
(Optional) Provides a brief description about the MKID or certificate ID object.
Screen
Specifies which Screen recognizes the certificate ID object. The default is All. Specifying a Screen allows you to define packet-filtering rules that encrypt traffic between any two machines, not just between an Administration Station and a Screen. Specify the Screen only if you are using Centralized Management. A common object or policy rule applies to all Screens unless you choose a specific Screen.
Installed On
(Optional) Used only if you later remove this certificate object from the common objects. At that time, the SKIP identity that is installed on the Screen will be removed from the parameter.
Certificate ID
Specifies the certificate ID (hash value) for the certificate that you generated on the other system.
OK Button
Stores the new or changed information and makes the Save Changes command button active.
Cancel Button
Cancels any new or changed information.
Help Button
Calls up the page of online help for this common object.
-
Type a name in the Name field.
-
(Optional) Type a description in the Description field.
-
(Optional) Select the Screen from the Screen list.
-
Select the Screen the certificate is installed on from the Installed On list.
-
Select the type of certificate from the Certificate Type list.
-
Type the Certificate ID (MKID) for the certificate.
-
Click the OK button.
Certificate Groups
To Add a Certificate Group
After you have named certificate, you can group them into logical groups, so that you can use a group instead of single names in a policy rule..
There are two special predefined IKE certificate groups. See "To Work with IKE Certificate Groups" for the steps you need to follow to set up IKE certificate groups.
-
Execute the steps in "To Modify the Policies Associated with a Common Object".
-
Select Certificate in the Type list.

-
Select New Group from the Add New Object list.
The Certificate dialog box appears.
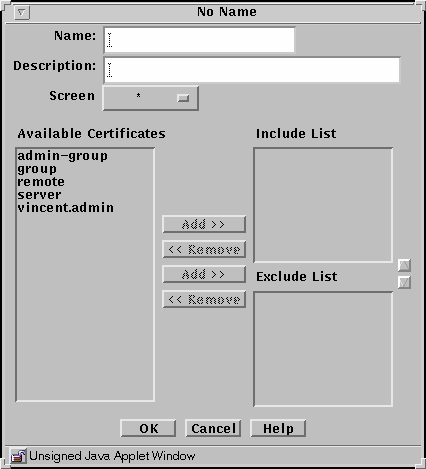
The following table describes the controls in the Certificate dialog box for certificate group.
Table 2-13 Controls for Certificate Group Dialog BoxControl
Description
Name
Specifies the name of the certificate object.
Description
(Optional) Provides a brief description about the certificate object.
Screen
Specifies which Screen recognizes the certificate object.
Available Certificate List
Identifies the certificates that do not belong to the certificate group. Refer to "Services and State Engines" in SunScreen 3.2 Administrator's Overview for a description of services.
Include List
Identifies the certificates that are to be included in the certificate group.
Exclude List
Identifies certificates that are to be excluded from the certificate group.
Add Button
Moves the certificate selected in the Available Certificates List to the Include or Exclude list, making the certificate a member of the specified service group.
Remove Button
Moves the certificate selected in the Group Members list to the Include or Exclude list, removing the certificate from the specified certificate group.
OK Button
Stores the new or changed information and makes the Save Changes command button active.
Cancel Button
Cancels any new or changed information.
Help Button
Calls up the page of online help for this common object.
-
Type a name in the Name field.
-
(Optional) Type a description in the Description field.
-
(Optional) Select a Screen from the Screen list.
-
Select an certificate from the Available Certificates list.
-
Use the Add button to move the certificate to the Include list or the Exclude list.
Use the corresponding Remove button to remove certificates from the lists.
-
(Optional) Continue to build the intended certificate group by adding to the Include lists.
-
Click the OK button.
To Work with IKE Certificate Groups
There are two special predefined IKE certificate groups:
- IKE manually verified certificates that hold trusted certificates used by IKE
- IKE root CA certificates that hold root CA certificates used by IKE
-
Execute the steps in "To Modify the Policies Associated with a Common Object".
-
Select Certificate in the Type list.

-
Click the Search button.
-
Select either the IKE root CA certificate or the IKE manually verified certificate from the results field.
-
Click the Edit button.
-
(For IKE root CA certificate) The IKE root CA certificate panel appears.
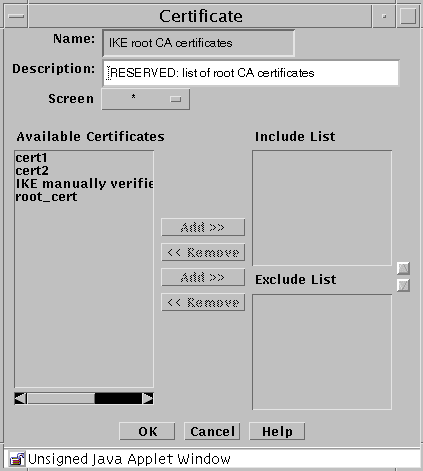
-
(For IKE root CA certificate) Select the IKE root CA certificate from the Available Certificates and click the ADD button to add it to the Include List
-
(For IKE manually verified certificate) The IKE manually verified certificate panel appears.
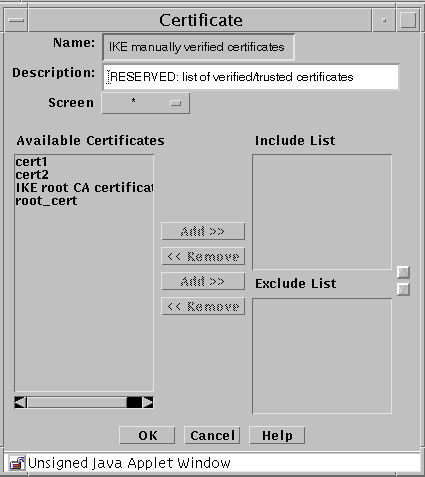
-
(For IKE manually verified certificate) Individually select the certificates that have been manually verified and click the Add button for each to add them to the Include List
IPsec Key
The IPsec Key (also referenced as manual keying) dialog allows you to generate an IPsec key by either manually typing the key value or to use a random number generator to generate the key. The key that is generated by the random number generator is determined by the algorithm used.
Note -
IPsec Key cannot be used for remote administration or VPN.
To Add an IPsec Key
-
Execute the steps in "To Modify the Policies Associated with a Common Object".
-
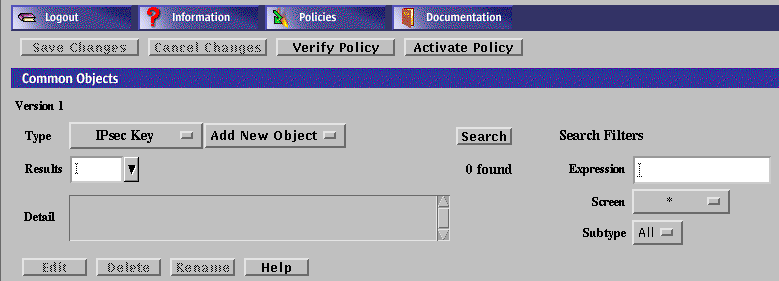
Select IPsec Key from the Type list.
-
Select NEW from the Add New Object list.
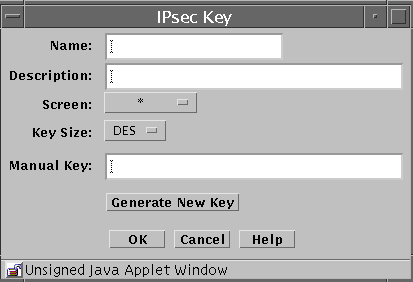
The IPsec Key dialog appears.
-
Type the name for the IPsec key in the Name field.
-
(Optional) Type a brief description for the IPsec key.
-
Select which Screen recognizes the IPsec key. The default is all.
Note -Typing a Screen name allows you to define packet filter rules that encrypt traffic between any two machines, not just between an Administration Station and a Screen.
-
Select the Key size. The Hex string values you can select are:
- DES-CBC
-
16
- 3DES-CBC
-
48
- MD5
-
32
- SHA1
-
40
-
Manually type a key value to be used for the IPsec key. You should use the above hex values for proper security. If you type additional hex characters, they are discarded and the maximum value listed above is used.
-
Alternatively, click the Generate New Key to use the random generator to create the IPsec key.
-
Click the OK button
Screen Objects
If you are configuring high availability (HA) or centralized management groups (CMG), you need to add a Screen. For the standalone configuration, you may edit the Screen for adding SNMP or modifying miscellaneous properties.
If you are running in stealth mode or mixed mode (a mix of routing and stealth interfaces), you must modify the Screen object in order to define the stealth network and netmask for the network the Screen is subdividing.
Screen Object Tabs
Most of the work with Screen Objects is done using the 4 tabs on the
Screen dialog box.
Miscellaneous Tab
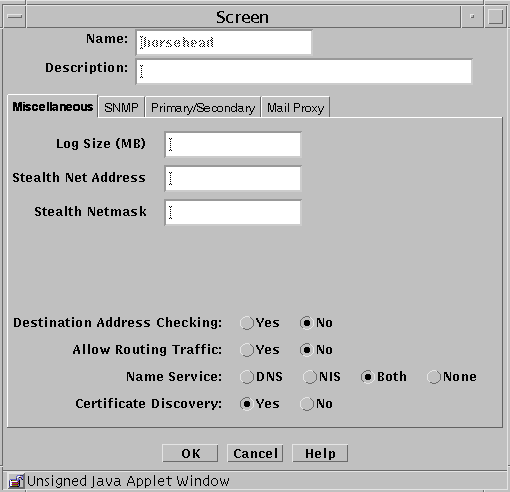
The following table describes the controls for the Miscellaneous tab of the Screen dialog box.
Table 2-14 Controls for the Miscellaneous Tab of the Screen Dialog Box|
Control |
Description |
|---|---|
|
Name |
Specifies a name for the screen object. |
|
Description |
(Optional) Provides a brief description of the screen object. |
|
Log Size |
Sets the size of the log in megabytes. |
|
Stealth Network Address |
Specifies the network address for interfaces that are used as stealth interfaces. Set this parameter if you have used the interface object to designate any Screen interfaces as stealth interfaces. |
|
Stealth Netmask |
Specifies the netmask for interfaces that are used as stealth interfaces. Set this parameter if you have used the interface object to designate any Screen interfaces as stealth interfaces. |
|
Allow Routing Traffic |
Specifies whether the Screen sends or receives updates to the routing table using the RIP protocol. |
|
Name Service |
Specifies the name service (DNS, NIS, Both, or None) that the Screen will use. |
|
Certificate Discovery |
Specifies whether the Screen uses Certificate Discovery. |
|
OK Button |
Stores the new or changed information and makes the Save Changes command button active. |
|
Cancel Button |
Cancels any new or changed information. |
|
Help Button |
Calls up the page of online help for this common object. |
SNMP Tab
The SNMP tab specifies the interval for SNMP timed status indicator traps and you can add, edit, or delete SNMP trap receivers.
Note -
Use the Action field of the packet-filtering Rule Definition dialog box to specify actions that generate SNMP alerts. The machine that receives SNMP trap alerts must not be a remote Administration Station.
The following shows the SNMP tab of the Screen dialog box.
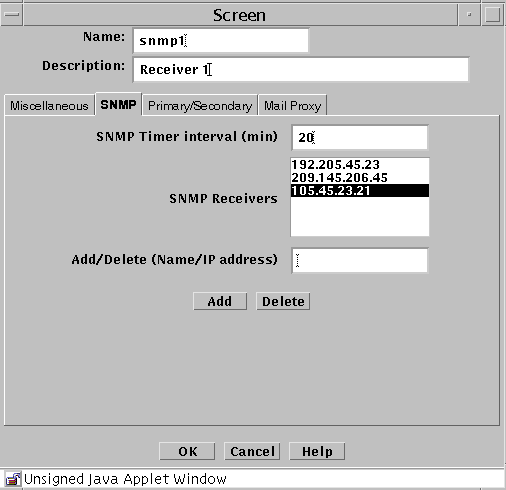
The following table describes the controls for the SNMP tab on the Screen dialog box.
Table 2-15 Controls for the SNMP Tab of the Screen Dialog Box
The following SNMP traps are supported:
-
As an action on a packet that matches a particular rule
-
As a default drop action on an interface
-
Time status indicator traps
The first two types include the following data:
-
interface - The SunScreen network interface number on which the packet was received.
-
interfaceName - The SunScreen network interface name on which the packet was received.
-
errorReason - The reason the alert was generated. (See the sunscreen.mib file for a complete list of reasons.)
-
packetLength - The actual length of the packet in bytes.
-
lengthLogged - The length of the data logged in bytes.
-
packetData - The packet data.
The SNMP timed status indicator trap uses the same receivers database as other types of SNMP traps. There is only one database with a maximum of five receivers. These receivers are specified as variable to the screen object.
To activate the timed status indicator traps, set the SNMP timer interval.
The following data are in the SNMP timed status indicator. These data cannot be modified and new data cannot be added:
-
cpuUsage - Average percentile CPU usage
-
memoryAvail - Current swap space available, in kilobytes
-
swapIn - Current swap ins
-
swapOut - Current swap outs
-
scanRate - Current scan rate
-
tcpUsage - Current number TCP connections in the SunScreen state table
-
ipUsage - Current number IP connections in the SunScreen state table
-
udpUsage - Current number UDP connections in the SunScreen state table
-
rootUsage - Disk usage of the root partition, /
-
varUsage - Disk usage of the var partition, /var
-
etcUsage - Disk usage of the etc partition, /etc
-
tmpUsage - Disk usage at the tmp partition, /tmp
Only these SNMP traps are supported. No get or set operations are supported.
Primary/Secondary Tab
The Primary/Secondary tab associates a certificate object with a Screen that is part of an HA cluster or a CMG. The High Availability choice (No, Primary, or Secondary) and the Primary Name choice determine the role a Screen has within an HA cluster and centralized management group (CMG). The settings you choose determine which other controls on the Primary/Secondary tab are active.
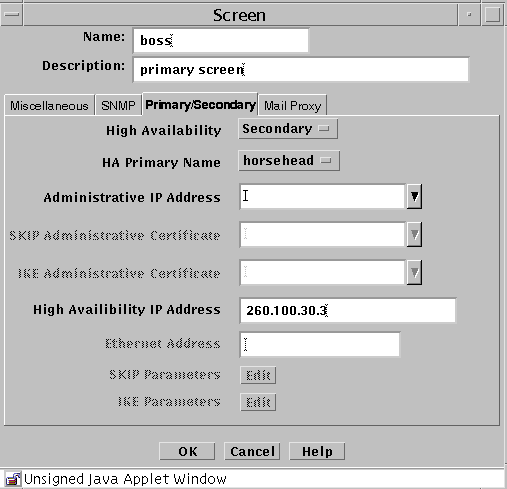
The following table describes the controls for the Primary/Secondary tab.
Table 2-16 Controls for the Primary/Secondary Tab of the Screen Dialog Box
Mail Proxy Tab
The Mail Proxy tab allows adding, editing, or deleting domains known to distribute unsolicited electronic mail (spam). You can define spam domains if you use an SMTP proxy.
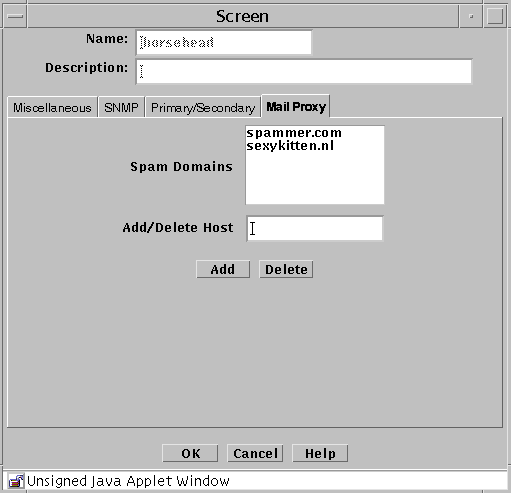
The following table describes the controls for the Mail Proxy tab of the Screen dialog box.
Table 2-17 Controls for the Mail Proxy Tab of the Screen Dialog Box
Adding a Screen Object
To Add a Screen
-
Execute the steps in "To Modify the Policies Associated with a Common Object".
-
Select Screen in the Type list.

-
Select New from the Add New Object list.
The Miscellaneous area in the Screen dialog box appears.
-
In the Name field, type the name of the Screen as it appears in the naming service or the host file.
-
Type a number in the Log Size (MB) field, to set the total size for log files (the default is 100 Mbytes).
-
The Stealth Network Address and Stealth Netmask (of the network the Screen partitions) fields apply only if the Screen has stealth interfaces.
-
Click the Yes or No radio button to allow or deny Destination Address Checking. Destination Address Checking is used for anti-spoofing protection.
-
Click the Yes or No radio button to allow or deny routing traffic (RIP).
-
Click a Name Service radio button to choose the name service that the Screen will rely on to define the host address.
You can also use both DNS and NIS or no name service at all.
-
Click the Yes or No radio button for Certificate Discovery (SKIP only).
This determines whether the Screen itself is to participate in a certificate discovery exchange. Selecting Yes, however, does not allow CDP traffic to go through the Screen.
-
Click the OK button.
SNMP Alert Receivers
You set actions that generate SNMP alerts as part of a security policy. Use the SNMP tab in the Screen dialog box to:
A management information base (MIB) that describes the SNMP trap is included with the SunScreen CD-ROM, as part of the SUNWsfwau package. It is installed as: /usr/lib/sunscreen/Admin/etc/sunscreen.mib. Load this MIB into your SNMP manager to enable it to use the SNMP trap generated by the Screen.
The machine that you want to receive SNMP trap alerts must not be a remote Administration Station. SNMP alert packets are sent in the clear, and the communication between the remote Administration Station and Screen is encrypted; any packets sent in the clear are dropped.
The recipients of SNMP messages are controlled on a Screen-by-Screen basis. The Screen object has a place for an optional list of IP addresses, which are the hosts to which it sends the SNMP packets.
There are two ways to send SNMP packets:
-
Set SNMP in a Packet Filtering rule's Action
-
Specify it in the default Reject Action of an interface object
SNMP alerts are described in "Screen Object" in SunScreen 3.2 Administrator's Overview.
The following information describes using the administration GUI. For the command line interface, see Chapter 10, Using the Command Line Interface.
To Add an SNMP Alert Receiver
-
Execute the steps in "To Modify the Policies Associated with a Common Object".
-
Select Screen in the Type list.

-
Select New from the Add New Object list.
-
Click the SNMP tab in the Screen dialog box.
The SNMP area is displayed.

-
Type the name or IP address of the recipient of the SNMP trap in the Name field.
-
Click the Add button.
A list of SNMP alert receivers appears. You can define up to five receivers. SunScreen sends each generated alert to all receivers.
-
Click the OK button when you are finished.
Note -
You use the SNMP Timer Interval field in the SNMP tab to specify the time interval, in minutes, between the health-update packets that are emitted by the Screen. If you do not specify any Alert receivers, no health-update packets are issued.
If you set the SNMP Timer Interval field to zero (or leave it empty) and there are Alert receivers, no health-update packets are issued, although other SNMP alerts are sent to the Alert receivers.
To Delete an SNMP Alert Receiver
-
Execute the steps in "To Modify the Policies Associated with a Common Object".
-
Select Screen in the Type list.

-
Select New from the Add New Object list.
-
Click the SNMP tab in the Screen dialog box for the Screen.
The SNMP area appears.

-
Select an entry in the SNMP Receivers field.
If the name of the SNMP Receiver to delete is not listed (that is, only the IP address is listed), type the name in the Add/Delete field.
-
Click the Delete button.
-
Click the OK button when you are finished with this Screen object.
Interface Objects
An Interface Object represents a network interface that makes one or more IP addresses accessible to a Screen. Empty address groups for all available network interfaces are defined during installation in routing mode. After you complete the installation, you can add and remove interfaces, redefine the addressees for the network interfaces, and set up high availability. For an interface to be able to reach a desired set of addresses, you must define one or more address groups and specify which address group each interface will use.
Note -
If the user wants to use spoof detection, they will need to associate accurate address groups with each interface.
For Routing interfaces, there are two types of spoof detection : Complete and Incomplete. On the Interface Definition panel (see "To Add or Edit Interfaces"), you can set the spoof detection by clicking on the "Spoof Protection" pulldown and making the selection (see "Interface Object" in SunScreen 3.2 Administrator's Overview for information on Complete and Incomplete spoof detection).
For Stealth interfaces, the type of spoof detection is always set to Complete and is not modifiable.
The maximum number of stealth interfaces per Screen is 15; however, the number of routing interfaces is virtually limitless.
The following table describes the controls for the Interface Definition dialog box.
Table 2-18 Controls for the Interface Definition Dialog Box|
Control |
Description |
|---|---|
|
Interface |
Specifies the interface. |
|
Type |
Specifies the type of interface. The options are:
|
|
Screen |
Specifies the Screen on which this interface physically resides. If you are using centralized management, you must complete this field. |
|
Valid Address |
Specifies the source IP addresses for this interface. |
|
Spool Protection |
Specified the level of spoof protection. For Routing interfaces, there are two types of spoof detection : Complete and Incomplete (see "Interface Object" in SunScreen 3.2 Administrator's Overview for information on Complete and Incomplete spoof detection). |
|
Logging |
Identifies the disposition of a packet, when a packet received on the interface does not match any rule. The options are:
If a packet matches a rule, it is disposed of according to the action for the rule it matches. |
|
SNMP Alerts |
Specifies whether the Screen should issue an SNMP alert message when a packet received on an interface does not match a rule. The options are:
If a packet matches a rule, it is disposed of according to the action for the rule it matches. |
|
ICMP Action |
Identifies the ICMP rejection message that is issued if a packet received on the interface is rejected. In most cases, the Screen rejects packets by sending an ICMP Destination Unreachable packet with the reject code set as specified in the ICMP action on the interface. The one exception is the PORT_UNREACHABLE ICMP action. In this case, the Screen rejects TCP packets by sending a TCP RESET packet and other packets by sending an ICMP Destination Unreachable (Port Unreachable) message. The options for the actions are:
If a packet matches a rule, it is disposed of according to the action for the rule it matches. |
|
Comment |
(Optional) Provides a descriptive note about the Interface object. |
|
Router IP Address |
(Optional) Specifies the router's IP address when the type of interface is STEALTH. This allows packets that have had their destination address changed, for example NAT or tunnelling, to be sent to a router. You can specify as many as five router IP addresses. If you have stealth interfaces, define the router that does the routing for the subnet for at least one of them. |
|
OK Button |
Stores the new or changed information and makes the Save Changes command button active. |
|
Cancel Button |
Cancels any new or changed information. |
|
Help Button |
Calls up the page of online help for this common object. |
To Add or Edit Interfaces
Before adding a new interface, you must define the address group that the interface will use in the policy.
Note -
Any added interfaces, or edits to interfaces, take effect only when you activate the policy rule that includes those interfaces.
-
Execute the steps in "To Modify the Policies Associated with a Common Object".
-
Select Interface in the Type list.

-
Select New from the Add New Object list beside the Interfaces area.
The Interface Definition dialog box appears.
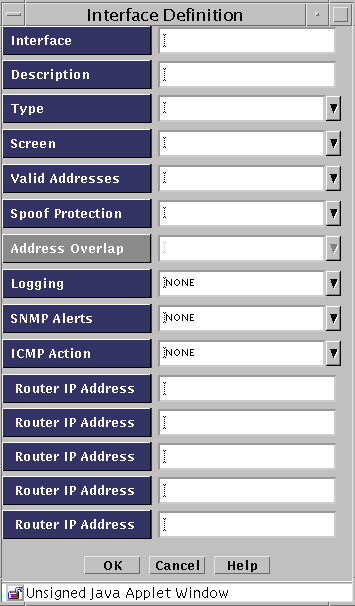
-
Type the name of the interface, such as hme0 or qfe1.
Note -Virtual interfaces are not configured in SunScreen. On the physical interface (qe1) needs to be defined, and all associated virtual (logical) interfaces will be protected.
-
Select the type of interface you want to add, such as ROUTING, ADMIN, DISABLED, HA, or STEALTH, from the Type list.
-
(Optional) Select the name of the Screen you want to add from the Screen list.
-
Select the name of the valid addresses you want to add from the Valid Addresses list.
-
(Optional) Select the type of logging you want to use from the Logging list.
-
(Optional) Select which SNMP alert to use, if any, from the SNMP Alert list.
-
(Optional) Select the name of the Reject Action you want to use from the ICMP Action list.
-
Click the OK button to save your interface definition.
-
(Optional) Repeat the steps above until you have added all the interfaces you require.
To Remove an Interface
-
Execute the steps in "To Modify the Policies Associated with a Common Object".
-
Select Interface in the Type list.

-
Select the name of the interface you want to delete from the Type list.
The Detail text area displays information about the interface.
-
Select the name of the Screen from which you want to remove the interface.
-
Click the Delete button.
Note -
Any interfaces that you remove with this procedure remain active until you activate the policy rule that formerly included them. Routing interfaces must be removed from the operating system, otherwise they will be unprotected on the network.
To Set up a Routing Interface
Note -
In Routing Mode only, before you can configure a new routing interface, you must first configure it on your system. (Use the documentation for your operating system.) Do not try to do this for stealth interfaces.
-
Execute the steps in "To Modify the Policies Associated with a Common Object".
-
Select Interface in the Type list.

-
Select New in the Add New Object list.
The Interface Definition dialog box appears.

-
Type the name for the interface in the Interface field.
-
(Optional) Type a brief description for the interface.
-
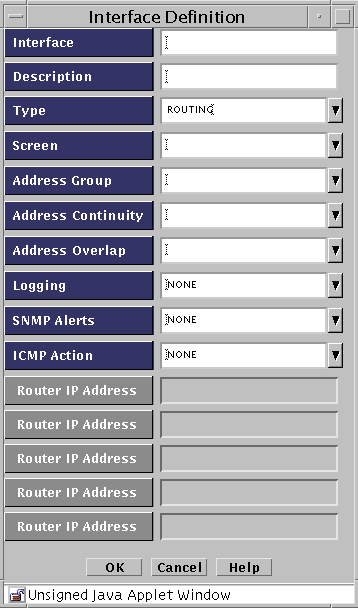
Select ROUTING in the Type field list.
The Interface Definition dialog box changes and the Routing IP Address fields are disabled and the Address Overlap field is enabled.
-
Type the remainder of the information in the fields.
-
(Optional) Select the name of the Screen you want to add from the Screen list.
-
Select the name of the valid addresses you want to add from the Valid Addresses list.
-
(Optional) Select the type of logging you want to use from the Logging list.
-
(Optional) Select which SNMP alert to use, if any, from the SNMP Alert list.
-
(Optional) Select the name of the reject action you want to use from the ICMP Action list.
-
Click the OK button when finished.
-
Click Save Changes.
To Set up a Stealth Interface
The stealth interfaces have optional router entries. Use these entries to define all accessible routers on your subnet that can be reached from this interface. These routers are required if your policy uses NAT or tunneling, and recommended otherwise.
You need to create address groups that accurately reflect all the hosts available from each stealth interface, and you must associate these address groups with stealth interfaces when you define them.
For additional information, see "Routing and Stealth Mode Interfaces" in SunScreen 3.2 Administrator's Overview.
Note -
Do not configure any interfaces at the operating system for use as stealth interfaces with the following exception. Configure one interface for use as an Admin Interface for Remote Administration.
-
Execute the steps in "To Modify the Policies Associated with a Common Object".
-
Select Interface in the Type list.

-
Select New in the Add New Object list.
The Interface Definition dialog box appears.

-
Type the name for the interface in the Interface field.
-
(Optional) Type a brief description for the interface.
-
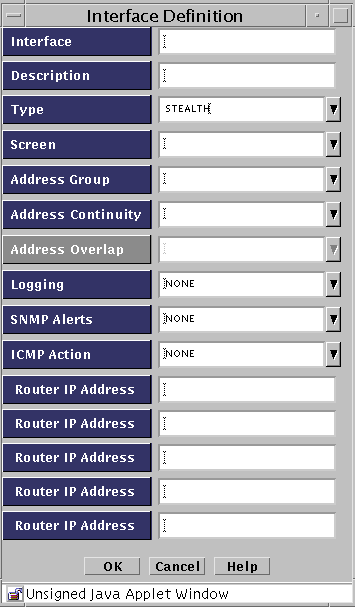
Select STEALTH in the Type field list.
The Interface Definition dialog box changes and the Address Overlap field is disabled.
-
Select the name of the Screen you want to add from the Screen list.
-
Select the name of the valid addresses you want to add from the Valid Addresses list.
-
Select the type of logging you want to use from the Logging list.
-
Select which SNMP alert to use, if any, from the SNMP Alert list.
-
Select the name of the reject action you want to use from the ICMP Action list.
-
Type the Router IP Addresses
-
Click the OK button when finished.
-
Click Save Changes.
To Change an Admin Interface From the Local Console
If you want to upgrade an existing admin interface or if an existing admin interface is defective, you can change the admin interface on the local console as follows:
-
Execute the steps in "To Modify the Policies Associated with a Common Object".
-
Select Interface in the Type list.

-
Select New from the Add New Object list
The Interface Definition dialog box appears.

-
Fill in the information making sure to select Admin in the Type field.
-
Click OK.
-
Select Screen from the Type List
-
Click Search to see the list of screens
-
Select the screen and click Edit.
The screen dialog box appears.

-
Select Primary/Secondary.

-
In the Administration IP Address field, either select "*" or the name of the address object. The address object is set by selecting Address in the Type list and then selecting New Host and filling in the IP address for the address object.
-
Save and activate the changes.
-
Thoroughly test the new admin interface.
-
Follow the steps in "To Remove an Interface" to remove the old admin interface once you are satisfied with the new admin interface.
-
Save and activate the changes.
To Change an Admin Interface From a Remote Console
-
Execute the steps in "To Modify the Policies Associated with a Common Object".
-
Select Interface in the Type list.

-
Select New from the Add New Object list
The Interface Definition dialog box appears.

-
Save and activate the changes.
-
Select Screen in the Type list.
The Screen panel appears.

-
Click Search and then select the screen for which you are changing the admin interface
-
Click Edit
-
Select Primary/Secondary in the Screen dialog box.
The Primary/secondary panel appears.

-
Select "*" for the Administration IP Address to allow for testing.
-
Save and activate the changes.
-
Thoroughly test the new admin interface.
-
Reselect Screen from the Type list
-
Select Primary/Secondary in the Screen dialog box.
-
Fill in the fields making sure to select the address object for the new admin interface. The address object is set by selecting Address in the Type list and then selecting New Host and filling in the IP address for the address object.
-
Save and activate the changes.
-
Thoroughly test the new admin interface.
-
After you are satisfied that the new admin interface is working correctly, follow the steps in "To Remove an Interface" to remove the old admin interface.
Adding Jar Signatures and Jar Hashes
You administer the Screen through any browser that supports the Java platform and is compliant with Java Developers Kit (JDK) 1.1. Because Netscape Navigator and Internet Explorer do not support the Java mechanism for applet signing, the administration GUI cannot access your system's local resources. (Browser security mechanisms prevent this type of access to local system resources.) See "Administration GUI Browser Requirements" for more information.
Jar Signatures and Jar hashes are described in the SunScreen 3.2 Administrator's Overview.
To Add a Jar Signature
-
Execute the steps in "To Modify the Policies Associated with a Common Object".
-
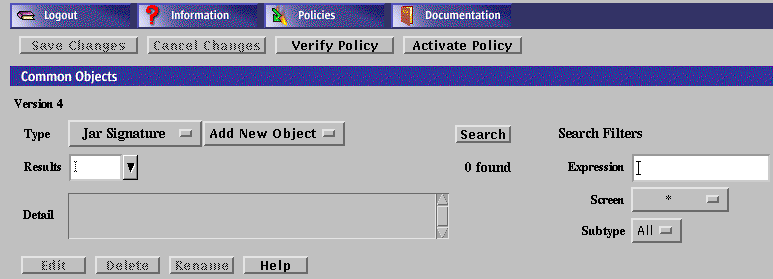
Select Jar Signature from the Type list.
-
Select New from the Add New list.
The Jar Signature dialog box appears.
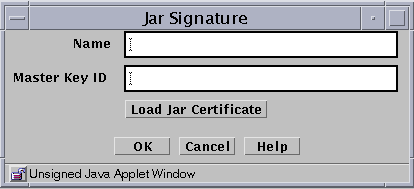
The following table describes the controls for the JAR signature dialog box.
Table 2-19 Controls for the Jar Signature Dialog BoxControl
Description
Name
Identifies the name of the certificate.
Master Key ID
Identifies the certificate ID.
Load Jar Certificate Button
Loads the certificate used to authenticate the Java archive. This procedure requires that your browser can allow local access to files.
OK Button
Stores the new or changed information.
Cancel Button
Cancels any new or changed information.
Help Button
Calls up the page of online help for this common object.
-
Type a name in the Name field.
-
Click the Load Jar Certificate button.
A dialog box appears. Navigate through the paths to find the certificate used to sign the Java archive.
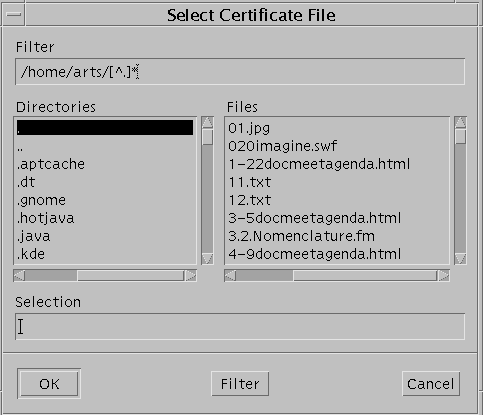
-
Select on the Certificate file.
-
Click the OK button.
To Add a Jar Hash
You can set up the HTTP proxy to filter Java applets based on the hash value of the Jar file. The Jar hash object is automatically saved when it is edited or when a new Jar hash object is added. Changes apply immediately and cannot be cancelled.
-
Execute the steps in "To Modify the Policies Associated with a Common Object".
-
Select Jar Hash from the Type list.
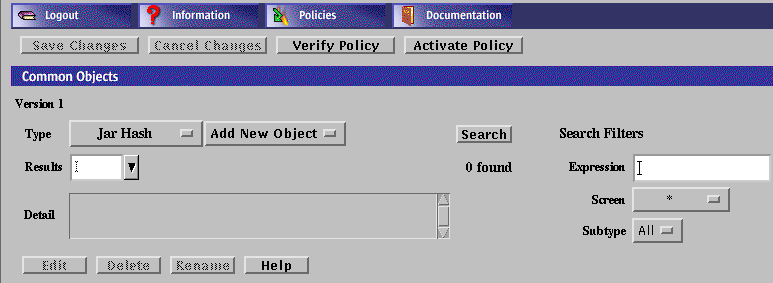
-
Select New from the Add New button.
The Jar Hash dialog box appears.
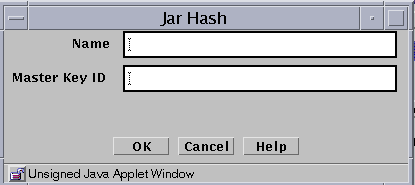
The following table describes the controls for the Jar hash dialog box.
Table 2-20 Controls for the Jar Hash Dialog BoxControl
Description
Name
Identifies the name of the certificate.
Master Key ID
Identifies the certificate ID.
OK Button
Stores the new or changed information.
Cancel Button
Cancels any new or changed information.
Help Button
Calls up the page of online help for this common object.
-
Type the name for this certificate in the Name field.
-
Type the MD5 hash of the Jar archive in the Master Key ID field.
-
Click the OK button.
Proxy Users
Proxy users are discussed in Chapter 6, Setting Up and Using Proxies.
Authentication
Authorized User is a Common Object that provides a way for you to specify which users are allowed to use the Telnet, HTTP, and FTP proxy.
The proxy users database depends on information in the authorized users database. To take full advantage of the user authentication feature of the FTP, HTTP, and Telnet proxies, you must create entries for both authorized users and proxy users. Define a user in the Authorized User area in the Policy Rules page before defining that user as a proxy user. See "Authentication" in SunScreen 3.2 Administrator's Overview for information on the proxy database and the authorized user database.
Also see SunScreen 3.2 Configuration Examples for an example that uses Authorized User and Proxy User.
Note -
You can define authorized and proxy user objects with identical names. Choose a naming strategy for each set that reflects naming systems already in use. For example, you might choose to name authorized users by employee identities, such as surname or employee number, and proxy users by their login names.
The proxy user database contains the mapping information for users of SunScreen proxies. FTP, HTTP, and Telnet rules reference the proxy user entries. Additionally, a user connecting through either of these proxies will often be configured to require authentication by using an authorized user identity. Users logging in with a Telnet proxy are authenticated through the authorized user identity.
You can also use external authentication mechanisms, such as RADIUS or SecurID, to enable user authentication by using special proxy user entries, which create a translation.
By referencing these special mechanisms directly in rules, or by adding references to other proxy user groups, you can allow users authenticated by those mechanisms to behave as authenticated users in the referenced contexts.
Names of proxy users must not contain the following characters: !, @, #, $, %, ^, &, *, {, }, [, ], <, >, ", `, \, or ?, nor may they contain a NULL character.
The following table describes the controls for the Authorized User dialog box for an authorized user object.
Table 2-21 Controls for the User Dialog Box for an Authorized User Object and an Administrative User Object|
Control |
Description |
|---|---|
|
User Name |
Specifies the login name of the authorized user. |
|
Description |
(Optional) Provides a brief description about the authorized user. |
|
User Enabled |
Controls whether the user can log into the Screen's proxy. This function permits the administrator to refuse login privileges to someone who previously could log in without having to remove that person from the list of proxy users. |
|
Password |
Specifies the login password for the authorized user. |
|
Retype Password |
Specifies the login password for the authorized user. The password typed in this field must exactly match the password you typed in the Password field. |
|
SecurID Name |
(Optional) Specifies the user's login name for SecurID authorization. |
|
Real Name |
(Optional) Identifies the real name of the authorized user. |
|
Contact Information |
(Optional) Displays information on how to contact the specified user. |
|
OK Button |
Stores the new or changed information. |
|
Cancel Button |
Cancels any new or changed information. |
|
Help Button |
Calls up the page of online help for this common object. |
To Add an Authorized User
-
Execute the steps in "To Modify the Policies Associated with a Common Object".
-
Select Authorized User from the Type list.
-
Select New from the Add New button.
The User dialog box appears.
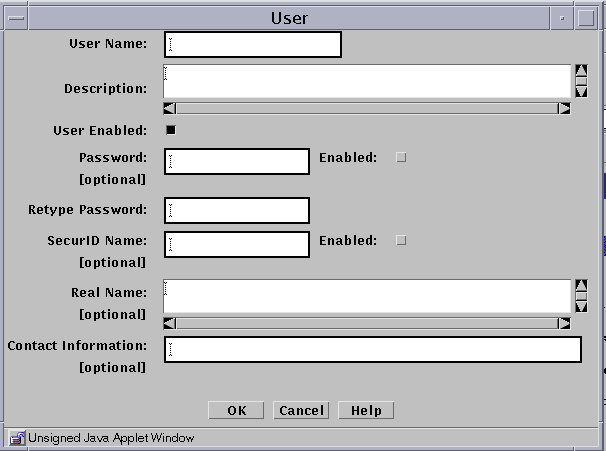
-
Type the user name in the User Name field.
-
(Optional) Type a description in the Description field.
-
Click the User Enabled button.
-
Define the authorization method by either assigning a password or choosing a SecureID name.
-
Select the Enabled check box.
-
(Optional) Type a name in the Real Name field.
-
(Optional) Type an email address in the Contact Information field.
-
Repeat these steps until you have added all the authorized users.
-
Click the OK button.
All changes apply immediately.
Time Objects
You can control the time of day when rules are in effect by defining time objects for them.
For instance,the following graphic shows use of the time object in a rule that allows all "www" service traffic during the "day" time (where "day" has been defined in the Time dialog box in"To Create Time Objects"). This rule is applicable only for the time defined, in this case the time specified in a predefined time object.
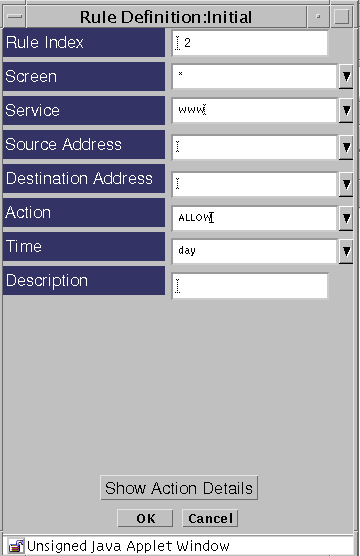
To Create Time Objects
-
Execute the steps in "To Modify the Policies Associated with a Common Object".
-
Select Time in the Type list.

-
Select New from the Add New Object list.
The Time dialog box appears.
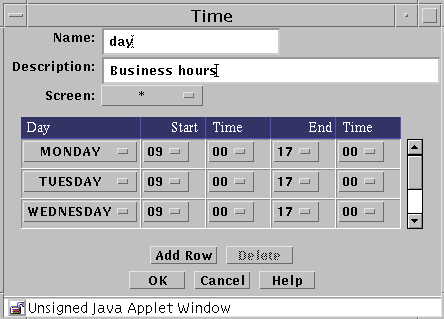
The following table describes the controls in the Time dialog box.
Table 2-22 Controls for the Time Dialog Box -
Type a name in the Name field.
For example: day
-
(Optional) Type a description in the Description field.
For example: Business hours
-
(Optional) Select a Screen from the Screen list.
-
Click Add Row.
-
Set the following:
-
Click the OK button.
- © 2010, Oracle Corporation and/or its affiliates

