Address Objects
SunScreen identifies network elements--networks, subnetworks, and individual hosts--by mapping a named address object to one or more IP addresses. Address objects are used:
Each rule must have a source address and a destination address.
An address object can represent a single computer or a whole network. You can gather address objects that represent individual and network addresses to form address groups. You may define address objects that specifically include or exclude other address objects (single IP hosts, ranges of contiguous IP addresses, or groups of discontiguous IP addresses). Some addresses are already defined.
An individual host is identified by linking its unique IP address to an address object. The address object can use the name or IP address of the host.
If you change the Admin address, the admin certificate, the local certificate, or the admin-group certificate, you risk losing connectivity from the Administration Station to the Screen. Reestablishing connectivity is difficult and requires you to log into the Screen directly or to use an Administration Station that is still working. It also requires exchanging encryption information.
To Add a Host Address
-
Execute the steps in "To Modify the Policies Associated with a Common Object".
-
Select Address in the Type list.

-
Select New Host from the Add New Object list.
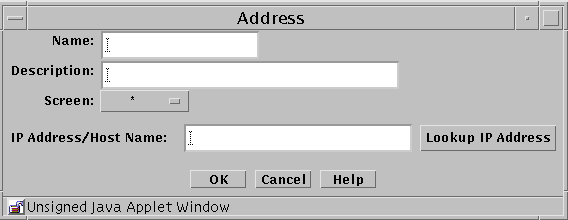
The Host Address dialog box appears.

The following table describes the controls in the Address dialog box for a new host.
Table 2-7 Controls for New Host Address Dialog BoxControl
Description
Name
Specifies the name for the address object.
Description Field
(Optional) Provides a brief descriptive note about the address object.
Screen
(Optional) Restricts this address so that it applies to the selected Screen only. The default (All) means that all Screens recognize this object unless an object exists that has been specifically defined for a particular Screen and has the same name as the Screen for which it is defined.
IP Address/Host Name
Specifies the IP address you want to associate with the address object identified in the Name list.
Lookup IP Address Button
If SunScreen has access to DNS or NIS, lets you look up host addresses by host name.
OK Button
Stores the new or changed information and makes the Save Changes command button active.
Cancel Button
Cancels any new or changed information.
Help Button
Calls up the page of online help for this common object.
-
Type the name for this new address in the Name field.
For example: NewAddr
-
(Optional) Type a description in the Description field.
The description appears in the Address Details field that is displayed when you use the Rule Definition dialog box to choose an address or address group for a rule.
-
(Optional) Select a Screen from the Screen list.
-
Type the IP address in the IP Address/Host Name field.
For example: 100.100.20.10
-
Click the OK button.
To Add a Group of Addresses
-
Execute the steps in "To Modify the Policies Associated with a Common Object".
-
Select Address in the Type list.

-
Select New Group from the Add New Object list.
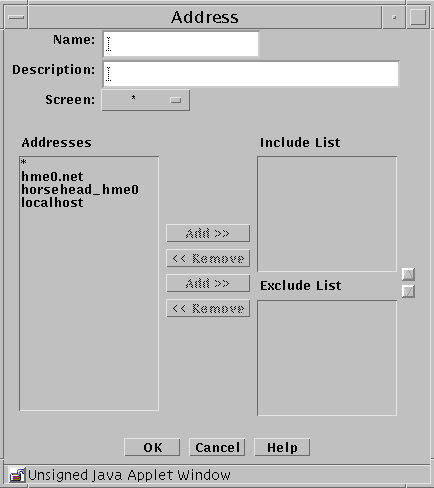
The Address dialog box appears.

The following table describes the controls for the Address dialog box for new group.
Table 2-8 Controls for the New Group Address Dialog BoxControl
Description
Name
Specifies the name for the address object.
Description
(Optional) Provides a brief description about the address object.
Screen
(Optional) Restricts this address group so that it applies to the selected Screen only. The default (All) means that all Screens recognize this object unless an object exists that has been specifically defined for a particular Screen and has the same name as the Screen for which it is defined.
Addresses
Displays the addresses objects that can to be used to create the address group.
Include List
Specifies the address objects that are currently included in the address group. Use the Add or Remove buttons to modify the list.
Exclude List
Specifies the address objects that are excluded from the address group. For example, you can create an address group that includes all addresses except as specified in the Exclude List. Use the Add or Remove buttons to modify the list.
OK Button
Stores the new or changed information and makes the Save Changes command button active.
Cancel Button
Cancels any new or changed information.
Help Button
Calls up the page of online help for this common object.
-
Type the name for this new address group in the Name field.
For example: GroupName
-
(Optional) Type a description in the Description field.
The description appears in the Address Details field that is displayed when you choose an address or address group for a rule using the Rule Definition dialog box.
-
Select an address from the Addresses list.
-
Use the Add button to move the address to the Include list or to the Exclude list.
Use the corresponding Remove button to remove addresses from the lists.
-
Continue to build the intended address group by adding to the Include lists.
-
Click the OK button.
To Add a Range of Addresses
An address range is a set of numerically contiguous IP addresses, identified by the starting and ending addresses or using the CIDR notation. Networks and subnetworks are typically identified by an IP address range name. You can set up an address object to represent an address range.
-
Execute the steps in "To Modify the Policies Associated with a Common Object".
-
Select Address in the Type list.

-
Select New Range in the Add New Object list.
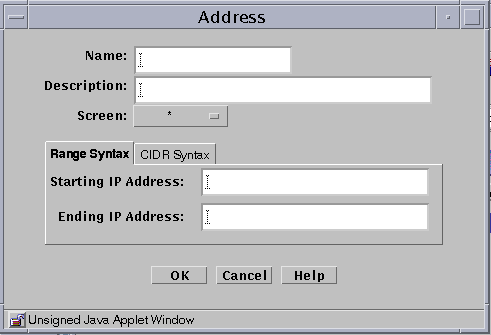
The Address dialog box appears.

The following table describes the controls for the Address dialog box for new range.
Table 2-9 Controls for New Range Address Dialog BoxControl
Description
Name
Specifies the name for the address object.
Description
(Optional) Provides a brief description about the address object.
Screen
(Optional) Restricts this range of addresses so that it applies to the selected Screen only. The default (All) means that all Screens recognize this object unless an object exists that has been specifically defined for a particular Screen and has the same name as the Screen for which it is defined.
Starting IP Address
Specifies the starting IP address in the range.
Ending IP Address
Specifies the ending IP address in the range.
OK Button
Stores the new or changed information and makes the Save Changes command button active.
Cancel Button
Cancels any new or changed information.
Help Button
Calls up the page of online help for this common object.
-
Type the name for this new address range in the Name field.
For example: AddrRange
-
(Optional) Type a description in the Description field.
The description appears in the Address Details field that is displayed when you choose an address or address group for a rule using the Rule Definition dialog box.
-
(Optional) Select All from the Screen list.
-
If you are using the Range Syntax, type the Starting IP address in the Starting IP Address field.
For example: 100.100.20.10
-
If you are using the Range Syntax, type the Ending IP address in Ending IP Address field.
For example: 100.100.20.90
-
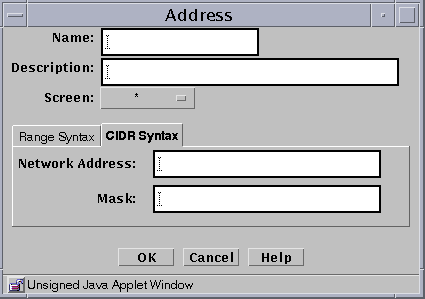
Clicking the CIDR Syntax tab to use the CIDR Syntax for defining a Range of Addresses.
The CIDR Address dialog box appears

-
If you are using the CIDR Syntax tab, type the network address (for example, 10.100.20.0)and the network mask (for example, 255.255.255.0, or 24).
-
Click the OK button.
- © 2010, Oracle Corporation and/or its affiliates
