Service and Service Group Objects
When setting up your network security policy, you need to decide which network services to make available to hosts on your internal network and which services to make available to hosts on the external network. Most sites need to determine policy rules that govern basic services.
SunScreen provides many predefined network services and service groups, such as www, http, ftp, telnet, and dns. You can change the default values of a service or add a new service as needed. (See "Services and State Engines" in SunScreen 3.2 Administrator's Overview for a list of services and service groups.)
You can define both single services and service groups (clusters of single services that you want to use together.) The services that are available for use in the policies are installed as part of the SunScreen software.
In addition to the basic services, every TCP/IP implementation provides services such as echo, discard, daytime, chargen, and time. For services such as ftp, you may want to allow anyone in the internal corporate network to send outbound traffic, but only allow inbound traffic in this protocol to go to the FTP server. This requires two rules: one for the outbound traffic and one for the inbound traffic going to the public server.
Each service uses a state engine, a sort of protocol checker. For example, the FTP state engine checks port numbers when the ftp service is being used. For more information on state engines, see "Services and State Engines" in SunScreen 3.2 Administrator's Overview.
To Add a Service
Note -
Although you can change the default values for a service, the preferred method is to add a new service with the new values. This makes troubleshooting easier.
-
Execute the steps in "To Modify the Policies Associated with a Common Object".
-
Select Service in the Type list.

-
Click New Single from the Add New Object list.
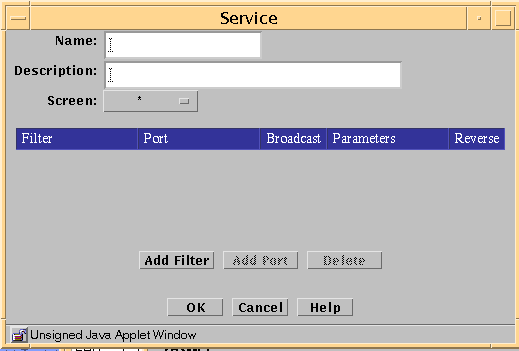
The Service dialog box appears.

The following table describes the controls in the Service dialog box for a single service.
Table 2-5 Controls for Service Dialog Box for Single ServiceControl
Description
Name
Specifies the name of the service object.
Description
(Optional) Provides a brief description about the service object.
Screen
(Optional) Restricts the service so that it applies to the selected Screen only. The default (All) means that all Screens recognize this object unless an object exists that has been specifically defined for a particular Screen and has the same name as the Screen for which it is defined.
Filter Table Information
Filter Table
Display the parameters for the single services.
-
The Add Filter button Adds a row to the filter table so that you can define additional forward filters for the service.
-
The Add Port button adds ports for use by the forward filter. This field becomes active when you click the port field of the filter table.
-
The Delete button the highlighted row in the table. You click a row in the table to highlight it.
Filter
Identifies the state engine.
Port
Identifies the port number, program number, or type used by the forward filter.
Broadcast
Determines whether the rules in which the service is used allows communication to broadcast or multicast addresses. If you want the service to work for nonbroadcast addresses, you must enter a separate table entries for broadcast and nonbroadcast entries
Parameters
Overrides the default values the selected packet-filter state engine. Each state engine has a set of parameters; refer to "Services and State Engines" in SunScreen 3.2 Administrator's Overview for default parameters values and their meaning.
Reverse
Determines whether the filter applies to packets originating from the host in the To address of a rule and going to the From address of a rule.
OK Button
Stores the new or changed information and makes the Save Changes command button active.
Cancel Button
Cancels any new or changed information.
Help Button
Displays the page of online help for this common object.
-
-
Type the name for this new service in the Name field.
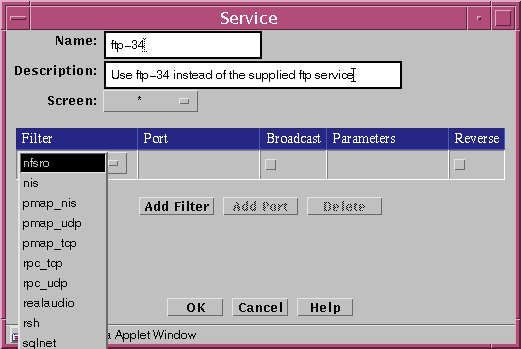
For example: ftp-34
-
(Optional) Type a description for this service in the Description field.
For example: Use ftp-34 instead of the supplied ftp service.
The description appears in the Service Details field that displays when you choose a service or service group for a rule.
-
(Optional) Select a Screen from the Screen list.
-
This adds an entry to the filter list.
-
Select a filter from the list.
You can use the Add Filter button as necessary to select the filters that you need for a particular service.
-
Click the select box in the Filter field to display the list of service filter engines.

For each filter desired:
-
Type the port number for the new service in the Port field.
You can use the Add Port button as necessary to add an additional set or sets of ports that you need for a particular filter. As a rule, you need to use the Add Port button only when you must specify a discontinuous set of port numbers, such as "1024-1028" + "1030-1048". If you have too many ports, follow the steps below to delete them:
-
(Optional) To override the default values for the filter that you have selected, change the default values by typing the values that you want to use.
-
Click the Broadcast button if the service sends IP broadcast packets.
If the service sends both broadcast and non-broadcast packets (for example, the standard rip service), you will need two ports: one with the broadcast box checked and one with the broadcast box unchecked.
-
(Optional) If you want to override the default parameters for the filter that you have selected, type the required number of parameters, separated by spaces.
You need to type in parameters only if you do not want to use the default values. For information about the default values for these fields, see "Services and State Engines" in SunScreen 3.2 Administrator's Overview.
-
Click the OK button to place this service definition in the policy file.
The service ftp-34 now appears in the list of services.
-
Repeat the above steps until you have added all the services necessary for your policy.
To Add a Service Group
Note -
Although you can modify the default services in service groups, the preferred method is to add a new service group that contains the services that you want. This makes troubleshooting easier.
-
Execute the steps in "To Modify the Policies Associated with a Common Object".
-
Select Service in the Type list.

-
Select New Group from the Add New Object list.
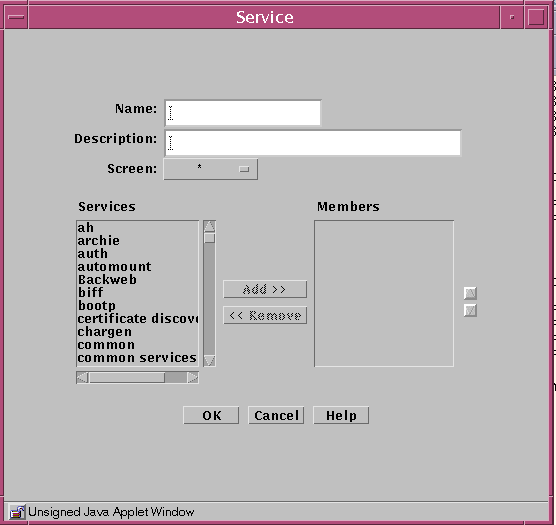
The Service dialog box is displayed.

The following table describes the controls in the Service dialog box for service group.
Table 2-6 Controls for Service Group Service Dialog BoxControl
Description
Name
Specifies the name of the service object.
Description
(Optional) Provides a brief description about the service object.
Screen
(Optional) Restricts this service group applies to the selected Screen only. The default (All) means that all Screens recognize this object unless an object exists that has been specifically defined for a particular Screen and has the same name as the Screen for which it is defined.
Services List
Identifies the services that do not belong to the service group. Refer to "Services and State Engines" in SunScreen 3.2 Administrator's Overview for a description of services.
Members List
Identifies the services that belong to the service group.
Add Button
Moves the service selected in the Services list to the Members list, making the service a member of the specified service group.
Remove Button
Moves the service selected in the Members list to the Services list, removing the service from the specified service group.
OK Button
Stores the new or changed information and makes the Save Changes command button active.
Cancel Button
Cancels any new or changed information.
Help Button
Calls up the page of online help for this common object.
-
Type the name for the new service group in the Name field in the Service dialog box.
-
(Optional) Type a description for this new service group in the Description field.
The description appears in the Service Details field that displays when you choose a service or service group for a rule.
-
Select the service or service group that you want to include in this new service group.
-
Click the Add button to move the chosen service or service group to the Members list.
-
Click the OK button.
-
Repeat the above steps until you have added all the service groups required.
- © 2010, Oracle Corporation and/or its affiliates
