Certificate Objects
If you are using remote administration, the certificate for the Screen and the certificate for the remote Administration Station were created, and the hashes exchanged, during the installation procedure.
You can combine certificates into groups for ease of use and convenience.
Note -
Store the diskette that contains the certificate safely and securely. It contains sensitive information that is not encrypted.
To Generate an IKE Certificate
Unlike SKIP, installing a remote administration station does not automatically create an IKE certificate. Perform the following steps on the primary Screen to generate a new certificate:
-
Execute the steps in "To Modify the Policies Associated with a Common Object".
-
Select Certificate from the Type list.

-
Select Generate IKE Certificate from the Add New list.
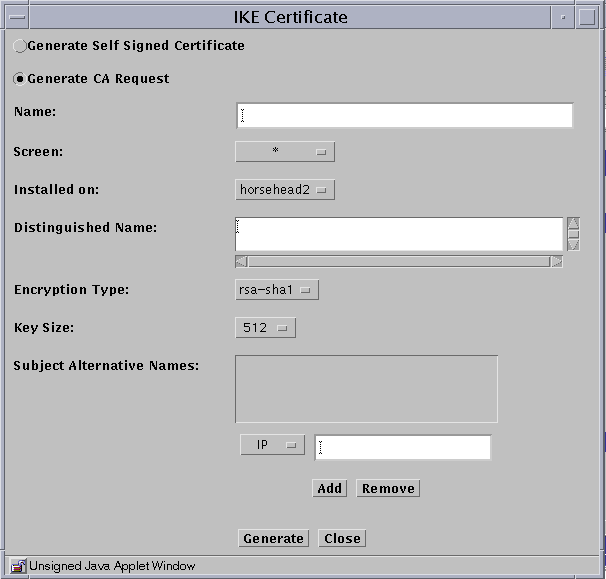
The certificate dialog box appears with options for the type of key to generate. The default value for the Encryption Type is rsa-sha1. The default Key Size is the lowest available.
-
Select if you want to use a self-generated certificate or a certificate request for a certificate authority to sign.
-
Type a name in the Name field.
-
(Optional) Type a description in the Description field.
-
(Optional) Select the Screen from the Screen list.
-
Select the Screen the certificate is installed on from the Installed On list.
-
Type an X.509 distinguished name for the certificate subject in the Distinguished Name field. The distinguished name typically has the form of C=Country, O=Organization, OU=Organizational_Unit, and CN=Common_Name.
-
Select the Encryption Type. You can select rsa-sha1, rsa-md5, or dsa.
-
Select the Key Size. The default is the lowest available.
-
Click the Generate button.
-
Click the OK button.
To Export an IKE Certificate
-
Execute the steps in "To Modify the Policies Associated with a Common Object".
-
Select Certificate from the Type list.

-
Click Search.
-
Select the certificate you want to export from the list in the Results area.
-
Click the Edit button.
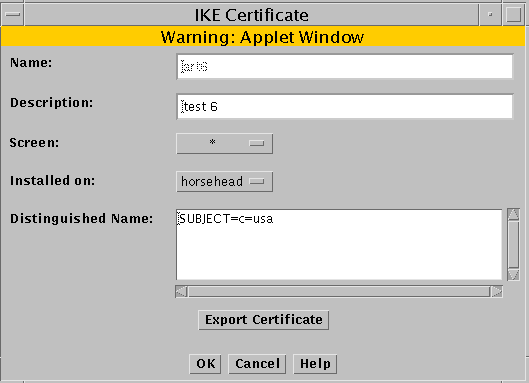
The export certificate panel appears
-
Click the Export Certificate button.
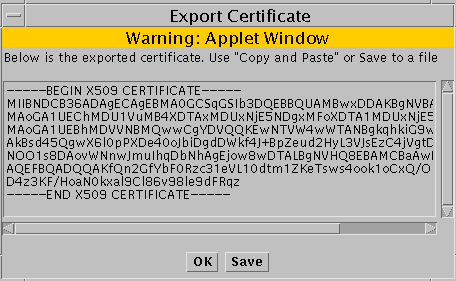
The Export Certificate panel appears
-
If you do not have the Java plugin loaded, you can Copy and Paste the information by selecting the certificate information in the Export Certificate panel and copying and pasting the information into another file.
-
If you have the Java plugin loaded, you can click the Save button.
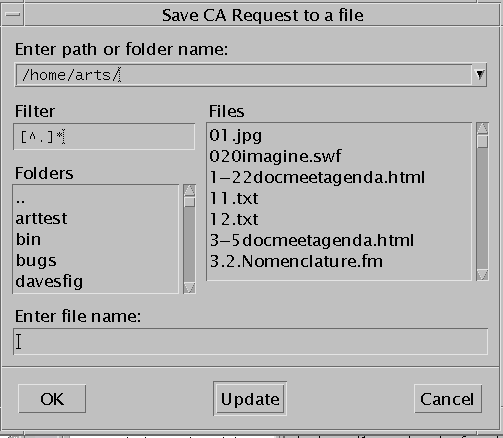
The Save CA request to a file panel appears. Type the file name for where to save the exported certificate.
To Import an IKE Certificate
When you import an IKE certificate, the process explicitly creates an object and associates that object with imported certificate. You do not need to manually do an associate for the imported IKE certificate. The procedure "To Associate an IKE Certificate" is typically used when you have added an IKE certificate from the command line.
-
Execute the steps in "To Modify the Policies Associated with a Common Object".
-
Select Certificate from the Type list.

-
Select Import IKE Certificate from the Add New Object selection list.
-
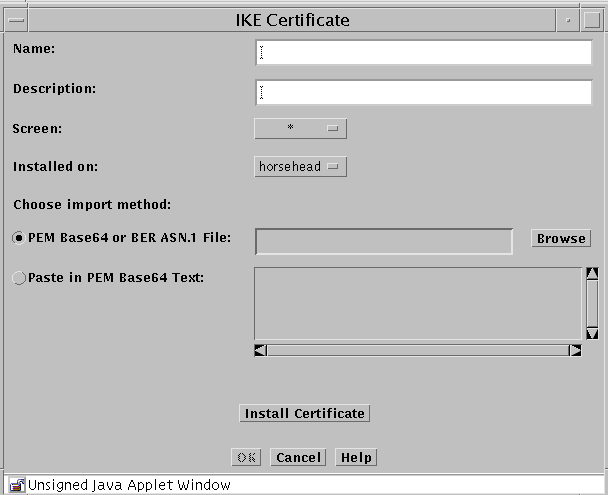
The IKE Certificate panel appears.
-
Type a name in the Name field.
-
(Optional) Type a description in the Description field.
-
Select the Screen from the Screen list.
-
Select the machine where the certificate will be installed from the Installed on list.
-
If you have the Java plugin loaded, click the Browse button beside the PEM Base64 or BER ASN.1 File field to bring up a panel that you can use to navigate to the file that contains the certificate.
-
If you do not have the Java plugin loaded, click the radio button beside the Paste in PEM Base64 Text: which enables the area where you can paste in the certificate information that you have copied from another file.
-
Click the Install Certificate button to import and install the certificate.
-
Go to "To Work with IKE Certificate Groups" to add the IKE certificate to either an IKE root CA certificate group or to an IKE manually verified certificate group.
To Associate an IKE Certificate
This procedure is typically used when you have added an IKE certificate using the command line interface.
-
Execute the steps in "To Modify the Policies Associated with a Common Object".
-
Select Certificate from the Type list.

-
Select Associate IKE Certificate from the Add New Object selection list.
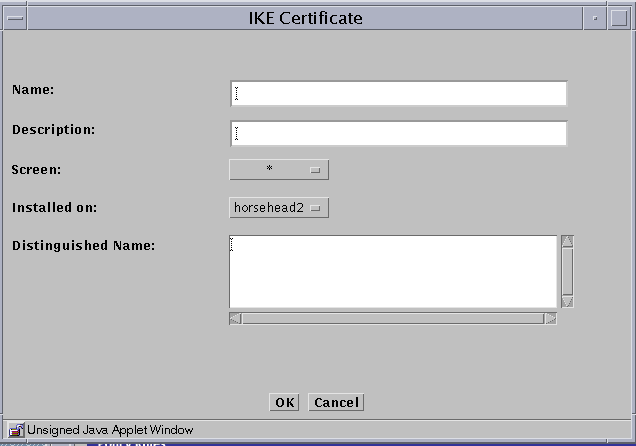
The associate IKE certificate panel opens.
-
Type a name in the Name field.
-
(Optional) Type a description in the Description field.
-
Select the Screen from the Screen list.
-
Select the machine where the IKE certificate will be installed from the Installed on list.
-
Type an X.509 distinguished name for the certificate subject in the Distinguished Name field. The distinguished name typically has the form of C=Country, O=Organization, OU=Organizational_Unit, and CN=Common_Name.
-
Go to "To Work with IKE Certificate Groups" to add the IKE certificate to either an IKE root CA certificate group or to an IKE manually verified certificate group.
To Generate SKIP UDHs Certificates
Note -
Use the Installed On field in the Certificate dialog box to choose the Screen where you want to add the certificate to the SKIP database. The default choice is the Screen to which users are connected. This is the choice you should use if you are using centralized management groups.
Self-generated private keys use the SKIP NSID 8, signifying that the public value for that key has not been signed. To validate the public value, the hash of the public value associated with that private key is used as the certificate ID. When the certificate is added either manually or through Certificate Discovery Protocol (CDP), you can certify the public value by comparing the hash of the public value in the certificate to the certificate ID. Unsigned Diffie-Hellman certificates are described in the SunScreen 3.2 Administrator's Overview.
-
Execute the steps in "To Modify the Policies Associated with a Common Object".
-
Select Certificate in the Type list.

-
Select Generate SKIP UDH in the Add New Object list.
The Certificate dialog box is displayed.
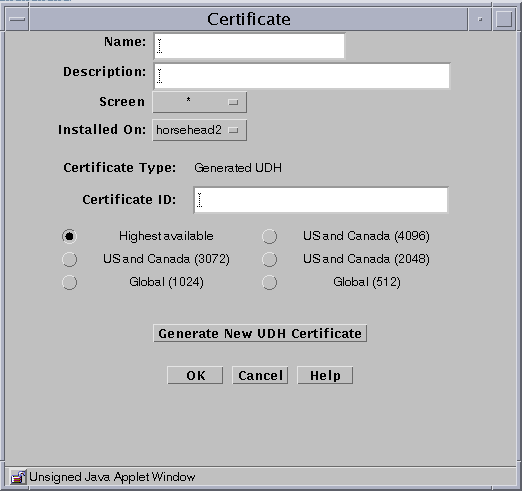
The following table describes the controls for the Certificate dialog box for generate Screen certificate.
Table 2-10 Controls for the Certificate Dialog Box for Generate Screen CertificateControl
Description
Name
Specifies a name for the certificate.
Description
(Optional) Provides a brief description about the certificate object.
Screen
Specifies the Screen that recognizes the certificate object. The default is All.
Installed On
(Optional) Specifies the Screen on which the certificate is generated.
Radio buttons
Specifies the strength of encryption that the Screen uses.
Generate New Certificate
Generates the certificate. The Certificate ID field displays the certificate's certificate ID.
OK Button
Stores the new or changed information and makes the Save Changes command button active.
Cancel Button
Cancels any new or changed information.
Help Button
Calls up the page of online help for this common object.
-
Type a name in the Name field.
-
(Optional) Type a description in the Description field.
-
(Optional) Select the Screen from the Screen list.
-
(Optional) Select the name of the Screen on which the Certificate is installed in the Installed On field.
-
Specify the level of encryption the Screen uses.
Available levels are:
-
Highest available
-
U.S. and Canada (4096)
-
U.S. and Canada (3072)
-
U.S. and Canada (2048)
-
Global (1024)
-
Global (512)
-
-
Click the Generate New Certificate button.
The Certificate ID field displays the Certificate ID.
-
Click the OK button.
To Load a SKIP Issued Public or Private Certificate
Note -
Because Netscape Navigator and Internet Explorer do not support the Java mechanism for applet signing, the administration GUI cannot access your system's local resources. (Browser security mechanisms prevent this type of access to local system resources.) See "Accessing Local System Resources".
You can add new key pairs and local identities by using a SunScreen Key and Certificate diskette. This type of key and certificate is known as an issued certificate. Certificates are described in "Certificate Object" in SunScreen 3.2 Administrator's Overview. You also can add new private keys from a directory that contains only one set of private key and certificate files.
-
Execute the steps in "To Modify the Policies Associated with a Common Object".
-
Select Certificate in the Type list.

-
Select Load SKIP Issued Private key or Load SKIP Issued Public key from the Add New Object list.
The Certificate dialog box appears.
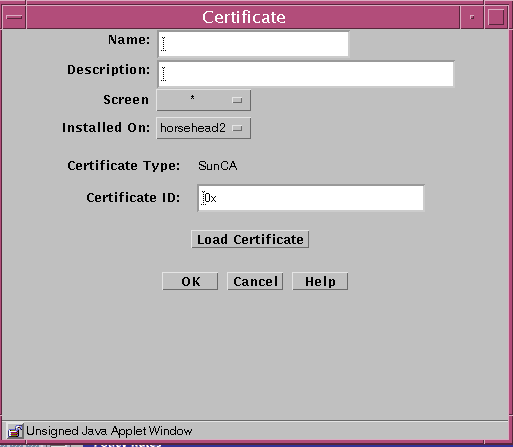
The following table describes the controls for the Certificate dialog box for generate Screen certificate.
Table 2-11 Controls for the Certificate Dialog Box for Generate Screen CertificateControl
Description
Name
Specifies a name for the certificate.
Description
(Optional) Provides a brief description about the certificate object.
Screen
Specifies the Screen that recognizes the certificate object. The default is All.
Installed On
(Optional) Specifies the Screen on which the certificate is generated.
Load Certificate
Brings up a selection panel where you can identify the location of the file that contains the certificate.
OK Button
Stores the new or changed information and makes the Save Changes command button active.
Cancel Button
Cancels any new or changed information.
Help Button
Calls up the page of online help for this common object.
-
Type a name in the Name field.
-
(Optional) Type a description in the Description field.
-
(Optional) Select the Screen from the Screen list.
-
(Optional) Select the Screen the certificate is installed on from the Installed On list.
-
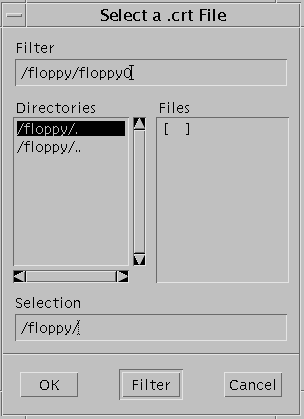
Click the Load Certificate button.
-
In the File dialog box:
-
Click the OK button.
To Associate SKIP Certificate
By associating a certificate, you can assign a name to a certificate that exists on another Screen. Associate a certificate ID when you want to encrypt communication between two Screens or between a Screen and an Administration Station.
Note -
Self-generated certificates are validated by a telephone call between two people who know each other and recognize each other's voice.
-
Execute the steps in "To Modify the Policies Associated with a Common Object".
-
Select Certificate in the Type list.

-
Select Associate SKIP Certificate from the Add New Object list.
The Certificate dialog box appears.
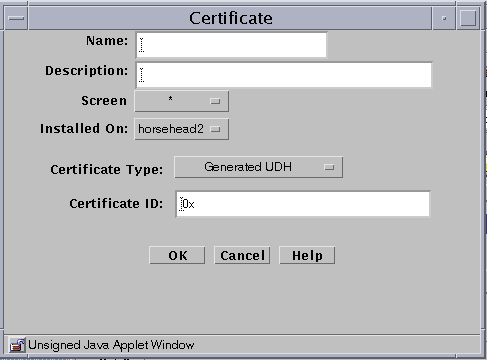
The following table describes the controls for the Certificate dialog box for associate SKIP certificate.
Table 2-12 Controls for Associate SKIP Certificate Dialog BoxControl
Description
Name
Specifies the name for the certificate ID object.
Description
(Optional) Provides a brief description about the MKID or certificate ID object.
Screen
Specifies which Screen recognizes the certificate ID object. The default is All. Specifying a Screen allows you to define packet-filtering rules that encrypt traffic between any two machines, not just between an Administration Station and a Screen. Specify the Screen only if you are using Centralized Management. A common object or policy rule applies to all Screens unless you choose a specific Screen.
Installed On
(Optional) Used only if you later remove this certificate object from the common objects. At that time, the SKIP identity that is installed on the Screen will be removed from the parameter.
Certificate ID
Specifies the certificate ID (hash value) for the certificate that you generated on the other system.
OK Button
Stores the new or changed information and makes the Save Changes command button active.
Cancel Button
Cancels any new or changed information.
Help Button
Calls up the page of online help for this common object.
-
Type a name in the Name field.
-
(Optional) Type a description in the Description field.
-
(Optional) Select the Screen from the Screen list.
-
Select the Screen the certificate is installed on from the Installed On list.
-
Select the type of certificate from the Certificate Type list.
-
Type the Certificate ID (MKID) for the certificate.
-
Click the OK button.
- © 2010, Oracle Corporation and/or its affiliates
