Chapter 6 Setting Up and Using Proxies
A proxy is a user-level application that runs on the Screen. The main purpose of proxies is to provide content filtering, as opposed to packet filtering. For example, you can use proxies to allow or deny access to Java applets through the firewall. Proxies can also provide user authentication, as in the case of telnet traffic. See SunScreen 3.2 Configuration Examples manual for an example using Proxies.
Note -
There is no way for SunScreen High Availability systems to share the proxy state. Proxies do not work with SunScreen High Availability.
The following table shows the procedures in this chapter.
Table 6-1 Proxy Procedures|
Proxy Users | |
|
Policy Rules | |
|
FTP Proxy | |
|
Telnet Proxy | |
|
SMTP Proxy | |
|
HTTP proxy |
Matching Proxy Rules
Each proxy is an independent program that reads its own policy file. The file for each proxy consists of policy rules selected by the compiler. Rules may in turn reference data in the user database.
Each proxy follows a sequence of tests to determine whether a rule matches:
-
Does the source address of the packet fall within the source-address range in the policy rule?
-
Is the destination address of the final connection (the host that the user specifies) in the destination address in the policy rule?
-
If the policy rule requires user authentication, did the user authenticate correctly? Is that user enabled?
-
Is this (possibly anonymous) authenticated user included in the policy rule, either directly or by group membership?
Preparing to Use Proxies
SunScreen includes four proxies: FTP, HTTP, SMTP, and TELNET.
Each one is a completely separate user-level application, although they use some shared data and policy files for authentication. Certain proxies provide some content filtering or user authentication or both. They allow or deny sessions based on the source and destination addresses.
The rc proxy script is used to start up the proxies as needed. It is located in /etc/init.d and the symbolic link to /etc/rc2.d/S79proxy. The script verifies that:
-
The proxy executable is in /usr/lib/sunscreen/proxies.
-
The corresponding policy file is in /etc/sunscreen/proxies.
-
The policy file has a size larger than zero.
If these requirements are not met, the proxy will not start.
The policy rule compiler uses this script to cause each proxy to reread its policy file as needed.
Note -
You must disable the corresponding standard network service (if any) for HTTP proxies to function. If you have installed an HTTP daemon, you must disable it before the HTTP proxy will work. Conflicting standard Solaris servers for telnet, FTP, and SMTP are handled automatically during policy activation. See the SunScreen 3.2 Administrator's Overview for further details.
Defining Proxy Data
You define proxy data on the Policy Rules page. The databases for proxies are the Java archive (Jar) Signatures, Jar hashes, the Proxy Users, and SMTP Proxy data.
Setting Up Proxy Users
Proxy users are used in FTP, HTTP (if desired), and Telnet proxy rules. The proxy users database depends on information in the authorized users database. To take full advantage of the user authentication feature of the FTP, HTTP, and Telnet proxies, you must create entries for both authorized users and proxy users. Define a user as an Authorized User before defining that user as a Proxy user. See "Authentication" for the procedure for setting up an Authorized user and "Authentication" in SunScreen 3.2 Administrator's Overview for information on the proxy database and the authorized user database.
Note -
Define all necessary authorized users before attempting to define proxy users.
Note -
You can define authorized and proxy user objects with identical names. Choose a naming strategy for each set that reflects naming systems already in use. For example, you might choose to name authorized users by employee identities, such as surname or employee number, and proxy users by their login names.
The proxy user database contains the mapping information for users of SunScreen proxies. FTP, HTTP, and Telnet rules reference the proxy user entries. Additionally, a user connecting through either of these proxies will often be configured to require authentication by using an authorized user identity. Users logging in with a Telnet proxy are authenticated through the authorized user identity.
You can also use external authentication mechanisms, such as RADIUS or SecurID, to enable user authentication by using special proxy user entries, which create a translation.
By referencing these special mechanisms directly in rules, or by adding references to other proxy user groups, you can allow users authenticated by those mechanisms to behave as authenticated users in the referenced contexts.
Names of proxy users must not contain the following characters: !, @, #, $, %, ^, &, *, {, }, [, ], <, >, ", `, \, or ?, nor may they contain a NULL character.
To Set up Basic Proxy Users
To Add a Single Proxy User
-
Execute the steps in "To Set up Basic Proxy Users".
-
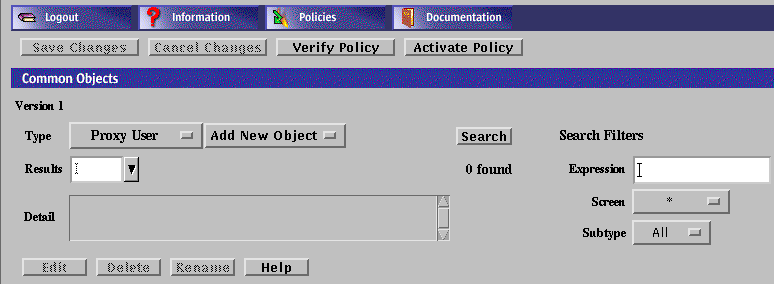
Select Proxy User from the Type list.
-
Select New Single from the Add New button.
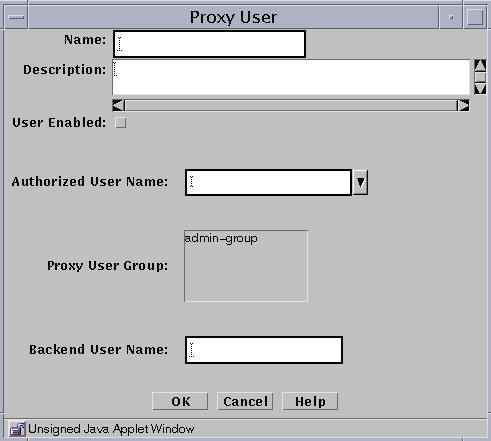
The Proxy User dialog box is displayed.
-
Type a name for this Proxy User in the Name field.
-
(Optional) Type a description in the Description field.
-
Select the User Enabled check box. The default is disabled,
If this box is not selected, the proxy user remains inactive and cannot use the proxies.
-
Select the name of the authorized user that you want to place in the Authorized User Name field.
-
(Optional) Select the name or names of the user group or groups with which you want to associate this proxy user.
-
Type the name that the proxy user should use when connecting to the target server (which is also known as the "backend" server) in the Backend User Name field.
This name will be the identity that the proxy user assumes on any target server connected through this proxy user.
Note -Only the FTP proxy sends the backend user name to the destination host. Telnet and HTTP do not send the backend user information.
-
Click the OK button.
-
Repeat the above steps until you have added all the proxy users.
All changes are saved immediately. Changes are only put into effect upon policy activation.
To Add a Proxy User Group
You can place proxy users in logical groups for convenience; then you can use a group name instead of single names in a policy rule.
-
Execute the steps in "To Set up Basic Proxy Users".
-
Select Proxy User from the Type list.

-
Select New Group from the Add New list.
The Proxy User dialog box appears.

-
Type the name for this group of proxy users in the Name field.
-
(Optional) Type a short description of this definition in the Description field.
-
Select the User Enabled check box to enable the user group.
-
Use the Add or Remove buttons to move selected proxy users or groups of proxy users into or out of the list of Member Users.
-
Add all the proxy users and groups of proxy users that you wish to include in your definition.
-
Click the OK button.
-
Repeat the above steps until you have defined all the groups of users required.
To Add Spam Domains
You can define the domains from which you think that you receive spam mail.
Note -
For more information on spam control, see "SMTP Proxy" in SunScreen 3.2 Administrator's Overview.
-
Execute the steps in "To Set up Basic Proxy Users".
-
Select Screen from the Type list.

-
Select New from the Add New list.
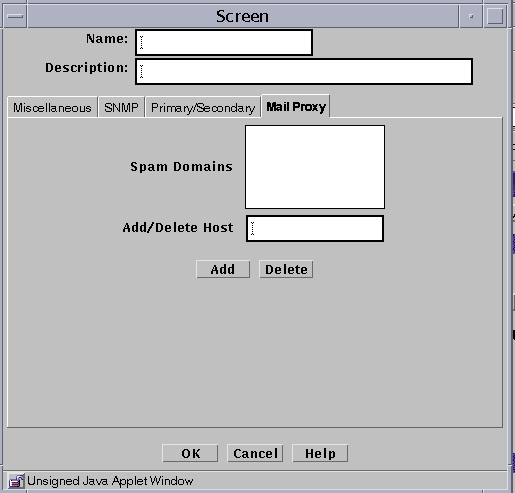
The Screen dialog box appears.

-
Type a name in the Name field.
-
(Optional) Type a brief description in the Description field.
-
The Spam Domain list appears.
-
Type the name you want to add to the Spam Domain list into the Add/Delete Host field.
-
Click the Add button.
-
Click the OK button.
-
Repeat these steps until you have added all the domains from which you receive Spam mail.
-
Click the Save Changes button
To Delete Spam Domains
Note -
For more information on spam control, see "SMTP Proxy" in SunScreen 3.2 Administrator's Overview.
-
Execute the steps in "To Set up Basic Proxy Users".
-
Select Screen from the Type list.

-
Click the Search button.
-
Select the Spam domain from the Results field.
-
Click the Edit button.
The Screen dialog box appears.

-
The Mail Proxy Screen appears

-
Select the Spam domain to be deleted in the Spam Domains field.
-
Click the Delete button.
-
Click the OK button.
-
Click the Save Changes button.
Writing and Editing Policy Rules for Proxies
Policy Rules are strictly ordered; they take effect in the order in which they are listed. You may either define policy rules in the order in which you want them to take effect or rearrange them after they are defined.
Basic Steps for Writing Policy Rules for Proxies
-
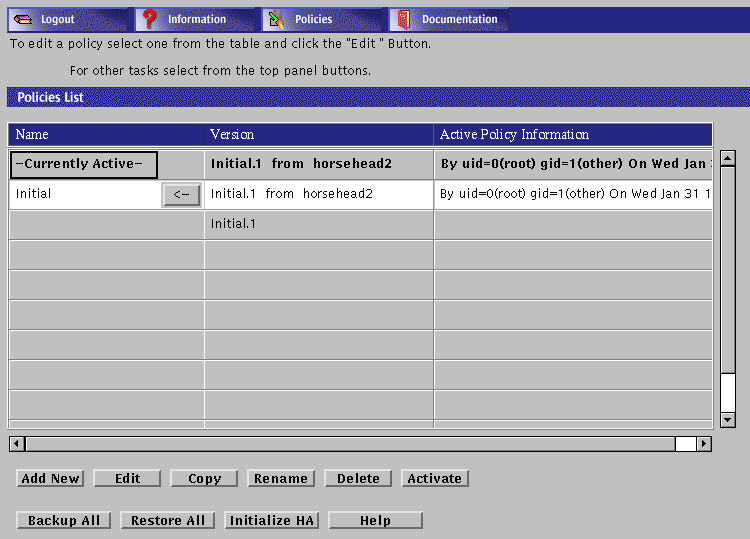
Choose the policy Initial in the Policies List page.
-
Click the Edit button.
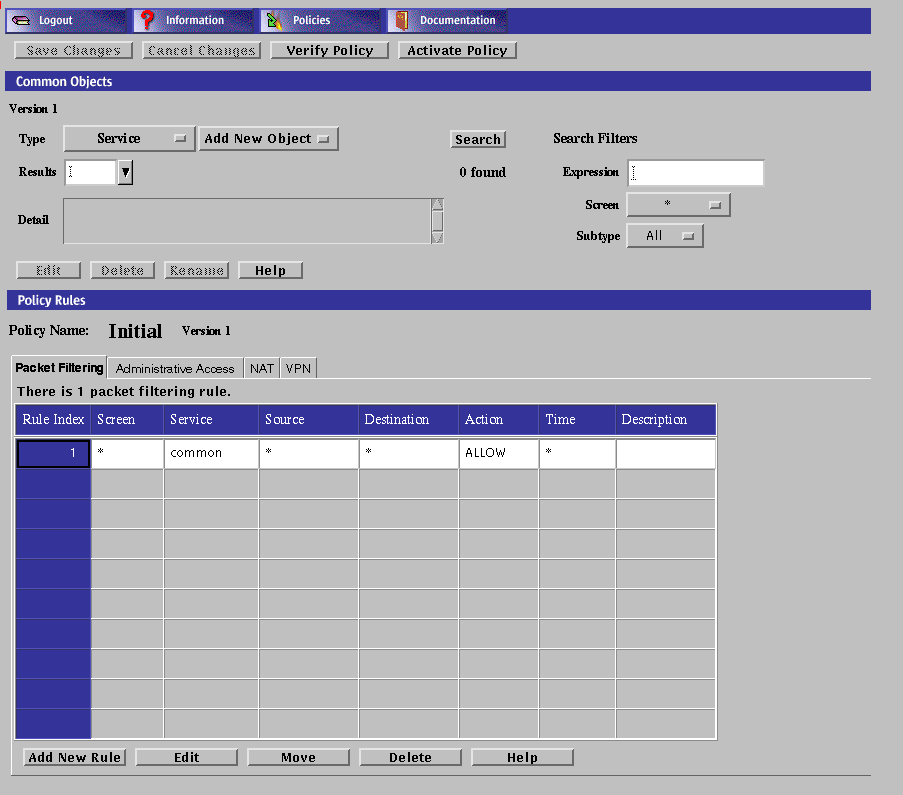
The Policy Rules page appears.
-
Select the Packet Filtering tab in the Policy Rules area.
Proxies are defined in the Packet Filtering page.
-
Click the Add New Rule button in the Packet Filtering area.
The Rule Definition dialog box for that policy is displayed.

In the Rule Definition dialog box, the Rule Index field is filled with the next available rule index.
-
(Optional) If a rule is valid only for a particular Screen, select that Screen only in the Common Objects area.
The default is for the rule to be valid for all Screens.
-
In the Services box in the panel, select one of the services that is valid for proxies, for example:
-
ftp
-
www
-
smtp
-
telnet
-
-
Select the source and destination address that you want for the Source and Destination Address fields.
Be sure you have defined these addresses on the Policy Rules page.
-
For a proxy rule, select ALLOW or DENY in the Action field.
These are the only valid actions for proxies. The Encrypt or VPN action to not apply to proxies.
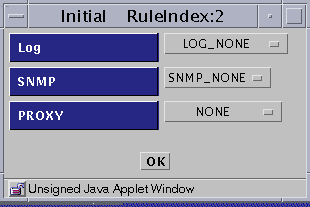
-
LOG
-
SNMP
-
PROXY
When you select ALLOW, a new dialog box appears:
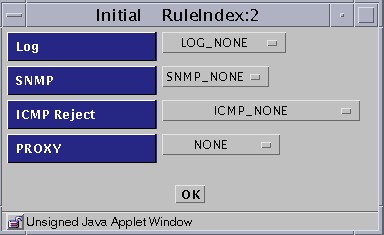
When you select DENY, a new dialog box appears:
-
LOG
-
SNMP
-
ICMP Reject
-
PROXY
-
To Write Policy Rules for the Proxies
-
Execute the steps in "Basic Steps for Writing Policy Rules for Proxies".
-
From the Proxy list, select the information that you want to put into the LOG and SNMP fields.
There are five items in the Proxy list:
-
NONE
-
PROXY_HTTP
-
PROXY_FTP
-
PROXY_SMTP
-
PROXY_Telnet
-
-
Select the name of the proxy service for which you are writing this policy rule for the Service field.
If you plan to use proxies, you must select the appropriate proxy service:
Table 6-2 Proxies and ServicesChoose This Service For This Proxy ftp PROXY_FTP www PROXY_HTTP smtp PROXY_SMTP telnet PROXY_TELNET Each choice requires slightly different steps, which are listed below under the four proxy types.
To Define PROXY_FTP
-
Execute the steps in "Basic Steps for Writing Policy Rules for Proxies".
-
Select PROXY_FTP as the proxy
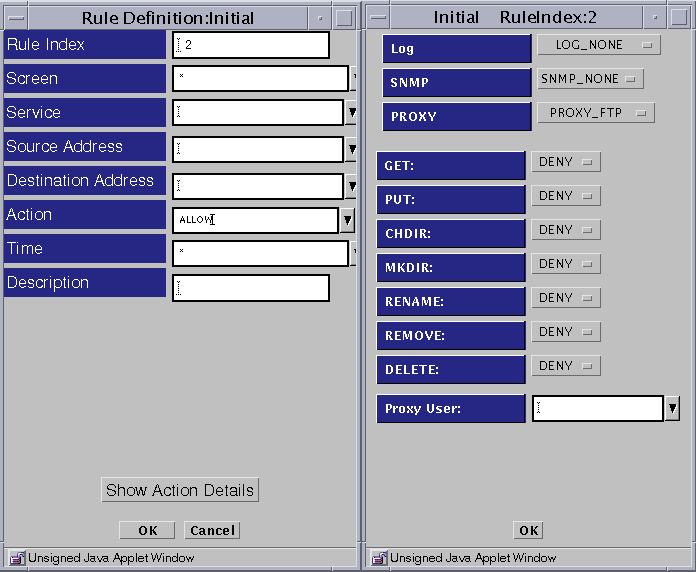
The Rule Definition Dialog Box for PROXY_FTP appears
-
Select PROXY_FTP from the Proxy list and eight fields appear below the Proxy field in the dialog box:
-
GET
-
PUT
-
CHDIR
-
MKDIR
-
RENAME
-
REMOVE
-
DELETE
-
Proxy User
-
-
Select an action for each field (GET, PUT, CHDIR, MKDIR, RENAME, REMOVE, and DELETE) or accept the default values. You can either allow (Allow) or disallow (Deny) use of these FTP commands based on the settings you choose.
-
Select the name of a defined proxy user in the PROXY USERS field.
-
Click the OK button in the dialog box.
-
Click the Save Changes button.
To Define PROXY_HTTP
-
Execute the steps in "Basic Steps for Writing Policy Rules for Proxies".
-
Select PROXY_HTTP as the proxy, click that name to put it into the Proxy field.
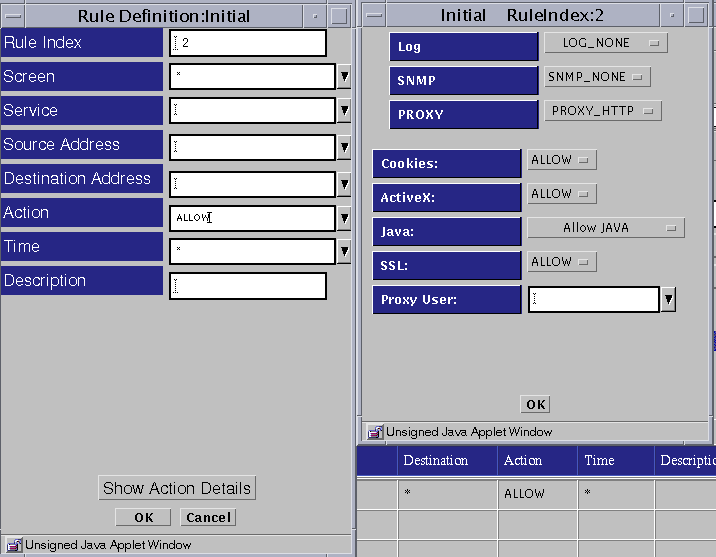
Five fields then appear below the Proxy field:
-
Cookies
-
ActiveX
-
Java
-
SSL
-
Proxy User
-
-
Set the action for each item.
-
For Cookies, ActiveX, and SSL, choose an action or accept the default under Proxy Details. You can either allow (Allow) or disallow (Deny) the use of cookies, ActiveX, or SSL based on the settings you choose for each field.
-
For the Java field, choose among the following under Proxy Details:
-
-
(Optionally) Select a proxy user or group to be allowed through the proxy.
-
Click the OK button in the dialog box.
-
Click the Save Changes button.
To Define PROXY_SMTP
-
Execute the steps in "Basic Steps for Writing Policy Rules for Proxies".
-
Select PROXY_SMTP as the proxy.
the Relay field appears below the Proxy field in the dialog box.
Note -For more information on relay control, see "SMTP Proxy" in SunScreen 3.2 Administrator's Overview.
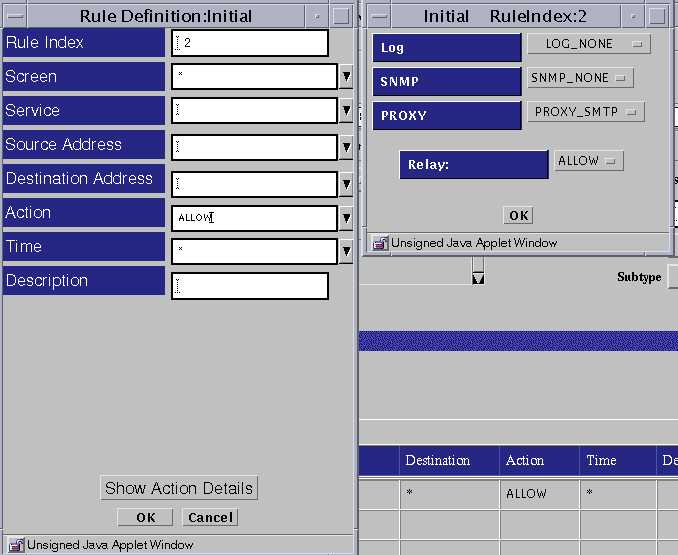
-
Determine whether you want to allow relaying of mail messages through the proxy in the Proxy Details area.
-
If you want to allow all relaying, select the RELAY: ALLOW setting.
-
If you want to restrict the relaying, define the local domain name for the Screen or create a list of valid relay (domain) targets as described in the following 2 substeps and select the RELAY: RESTRICT setting.
-
Define the Local Domain Name
Create or edit the /etc/defaultdomain file to contain the domain suffix for the Screen.
Note -For this default domain to become active, you must either shut down and reboot the Screen or run the following command:
# domainname 'cat /etc/defaultdomain'
-
Create a List of Valid Relay Targets
Use the mail_relay feature of the ssadm command to create a list of valid relay (domain) targets (see "SMTP Proxy" in SunScreen 3.2 Administrator's Overview).
Note -The destination address in this rule should be the address of the SMTP server or servers that will spool and/or deliver email after it is restricted and filtered by the screen.
-
-
Click the OK button in the dialog box.
-
Click the Save Changes button.
To Define PROXY_Telnet
-
Execute the steps in "Basic Steps for Writing Policy Rules for Proxies".
-
Select PROXY_Telnet as the proxy.
The Proxy Users field appears below the Proxy field on the right side of the Rule Definition dialog box.
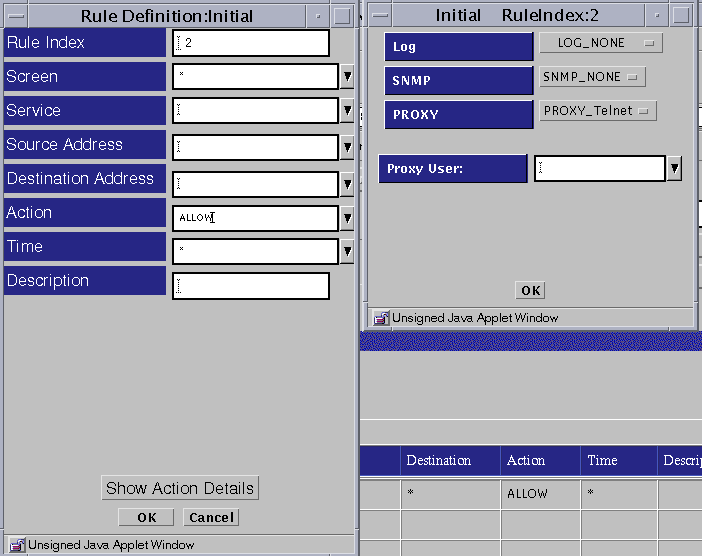
-
Select the proxy user or group that is allowed through the proxy.
-
Click the OK button in the dialog box.
-
Click the Save Changes button.
Using the FTP Proxy
To use the proxy and successfully make FTP connections through the Screen, you must FTP to the proxy on the Screen rather than directly to the end system. The Screen's policy rules will only allow FTP connections to and from the proxy.
For information on setting up the ftp proxy, see "To Define PROXY_FTP".
To Use the FTP Proxy
The following example steps show what happens when users wants to connect to the system named ftp.sun.com, which has an anonymous FTP account. To get there, they must first ftp to the SunScreen proxy named Screen.
Note -
The anonymous proxy user is prefigured during the installation of the software. It is an unauthenticated proxy user, so any string provided before the first @ ("at" sign) in the password is ignored. The password after the first@ (here: zzz@thereisnohelp.com) is the backend user password--in this case, the user name, as is the custom for anonymous FTP.
-
Type the command:
% ftp screen
The following text appears:
Connected to screen
220-Proxy: SunScreen FTP Proxy Version 3.2
	: Username to be given as <proxy-user@<FTP-server-host>
	: Password to be given as <proxy-password@<FTP-server-password>
220 Ready
Name (screen:zzz):anonymous@ftp.sun.com
The format for the user name is the proxy user name and the destination server separated by an "at" sign.
-
Type your authorized user password at the prompt to authenticate you to this proxy:
331- Proxy: Authenticate & connect:
331 Password needed to authenticate  ´anonymous'.
Password:
Note -The password is not echoed. Its format is two passwords separated by an "at" sign. The first password is the authorized user password for the proxy, and the second is the password for the destination ftp server. In the example, anonymous@zzz@thereisnohelp.com, anonymous is the password for the proxy and zzz@thereisnohelp.com is the email address that ftp.sun.com requires for anonymous ftp.
The following text appears:
230- Proxy:
	: Authentication mapped ´anonymous' to backend user ´anonymous'.
	: Connecting to ftp.sun.com (192.9.9.73) - done
Server:
	: 220 ftp.sun.com FTP server (Version 2.0.9) ready
	: 220-Welcome to Sun Microsystems Corporate FTP Server.
	: 220-
	: 220 ftp FTP server (ftpd Wed Oct 30 23:31:06 PST 1996) ready.
Proxy: Login on server as ´anonymou.
Server:331 Guest login ok, send your e-mail address as password.
Proxy supplying password to server
230 Guest login ok, access restrictions apply.
ftp>...
ftp>...
ftp>...
ftp> bye
221- Proxy: Quitting service.
221  Server: Goodbye.
%
Using the TELNET Proxy
The SunScreen telnet proxy logon process takes place in two stages:
-
First, you must telnet to the Screen and be authenticated by the proxy, which then forwards you to the destination host, which prompts you to log in.
-
You can then log in to the target system and be authenticated in the usual manner.
For information on setting up the telnet proxy, see "To Define PROXY_Telnet".
To Use the Telnet Proxy
The following steps illustrate what a user logging into a system through the telnet proxy experiences. In this example, the proxy is running on a Screen named Screen, and the user wants to connect to a system named foo.com:
-
Type the following:
% telnet Screen
The following text appears:
SunScreen Telnet Proxy Version: 3.2
-
Type the user name at the prompt:
Username@Hostname: username@foo.com
-
Type your authorized user password to authenticate you to this proxy:
password:
The password is not echoed. If you are successful, you will see the normal telnet connection information for the system foo.com, for example:
% Trying 172.16.6.74
Connected to foo.com
Escape character is `^]'.
UNIX(r) System V Release 4.0 (foo.com)
login:
-
Log in to the system as you normally would, and if required, type a password.
Using the SMTP Proxy
The SMTP proxy provides a relay for email. It can restrict access based on source address, as well as the domain name of the originating address, and the source and destination mailbox addresses presented within the SMTP protocol (envelope). The source (the sender's address) is compared to the list of spam domains; if the address matches any specific spam domain, the packet gets dropped. The destination (the recipients's address) is compared with the local domain to see if relaying is being attempted. If relaying is allowed, the email message gets passed through, if not, the email message gets dropped.
Be sure you have defined any necessary spam and relay restrictors (see "To Add Spam Domains" and "To Delete Spam Domains").
To Use the SMTP Proxy
-
Point the MX record for the domain to the proxy for mail to be processed properly.
SMTP connection is then made to the proxy rather than to the actual SMTP server.
-
Point the destination in the rule to the actual SMTP server.
Using the HTTP Proxy
The HTTP proxy provides a relay capability for the World Wide Web supporting the HTTP protocol. As with other proxies, it allows or denies sessions based on the source or destination address. It also provides selective filtering of content based on the source and destination of sessions. The selective filtering options include Java filtering, ActiveX, and cookies.
The HTTP proxy filters Java by reading the signatures encapsulated in Java Archives (Jars) or on a precomputed hash of Java Archive content.
For user-based authentication, select a proxy user. For more information on configuring the HTTP proxy, see "To Define PROXY_HTTP".
To Configure the Browser to Use the HTTP Proxy
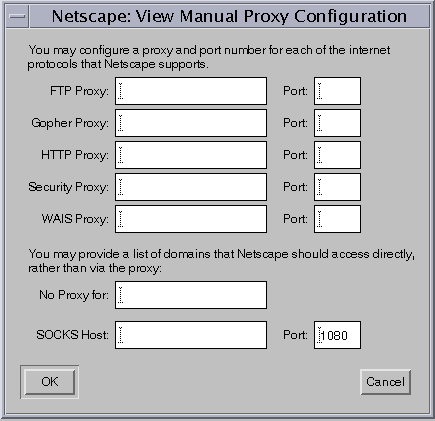
Basically, you point your browser at the Screen instead of allowing the browser to target HTTP servers directly. This example procedure is designed for configuring the Netscape browser. Consult the documentation for your browser to determine how to set the HTTP proxy server address and port number.
The server address should be the Screen's address and the port number must be 80.
-
Select Preferences in the Edit pulldown.
The Preference page is displayed.
-
Select Advanced on the Preferences page.
-
Select Proxies under the Advanced selection.
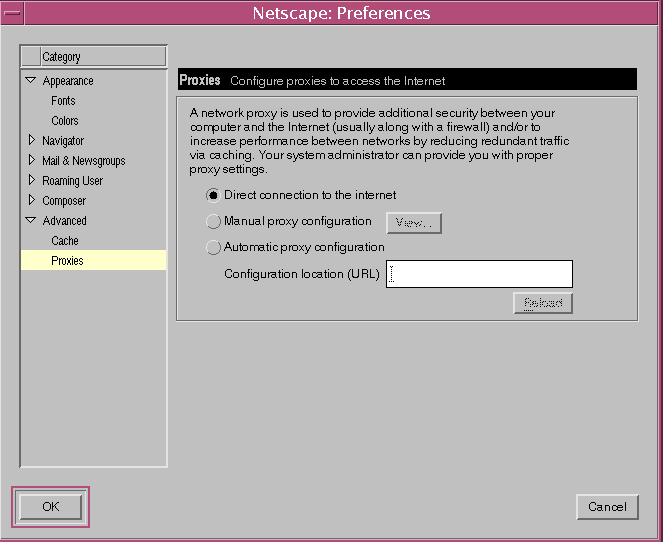
-
Select Manual proxy configuration.
-
Click the View button beside the Manual proxy configuration.
-
Enter the IP address in the HTTP Proxy field.
-
Type the number 80 as the number of the Port in the Port field for HTTP.
The HTTP proxy is fixed at port 80 in the current version of SunScreen.
You may, as desired, set the values for the FTP Proxy and/or Security Proxy to the same values just used for the HTTP Proxy. This will cause browser-initiated requests for ftp:// and/or SSL references to be handled by the HTTP proxy on the Screen. See "Proxies" in SunScreen 3.2 Administrator's Overview for details on HTTP Proxy Port Restrictions and HTTP Proxy Access for ftp://.
-
Click the OK button in the View Manual Proxy Configuration dialog box.
-
Click the OK button in the Preferences dialog box.
Proxy Logging
You control proxy logging by selecting Logging as part of a rule's action and by configuring the log limiter variables.
When logging is specified in a proxy rule, all (non-debug) events relating to a session enabled by that rule are logged for the proxy. Events based on the limiters for a given proxy are also logged, regardless of rule action.
See SunScreen 3.2 Administrator's Overview for the specifications of log limiter variables.
- © 2010, Oracle Corporation and/or its affiliates
