| Sun Blade 6000 Multi-Fabric Network Express Module User’s Guide |
| C H A P T E R 2 |
|
Installing, Removing, or Replacing the Sun Blade 6000 Multi-Fabric Network Express Module |
This chapter describes how to install, remove, or replace a Sun Blade 6000 Multi-Fabric Network Express Module. This chapter also includes instructions for verifying that the Multi-Fabric NEM has been installed correctly.
This chapter contains the following sections:
You can insert either one or two Multi-Fabric NEM modules in the Sun Blade 6000 chassis.

|
Caution - If you insert only one Multi-Fabric NEM, it must go in the lower slot (NEM 0). |
The Sun Blade 6000 Disk Module requires, at minimum, a SAS-NEM in NEM slot 0 for communication with server blades. For redundant dual paths to SAS disk drives, a SAS-NEM is also required in NEM slot 1.
Both the Multi-Fabric NEM) and the 10GbE Multi-Fabric NEM are supported.
You can mix SAS-NEMs. You can use two Multi-Fabric NEMs, or two 10GbE Multi-Fabric NEMs, or one of each. It does not matter which type is in NEM slot 0.
| Note - You can also use a plain NEM (one without SAS connectivity) in slot NEM 1, but not in slot NEM 0. If you use one SAS-NEM and one plain NEM, you do not have redundant paths to SAS disks. |
Before installing your Multi-Fabric NEM, remove the NEM filler panel in the slot you plan to use.
|
1. Unpack the NEM from the box.
2. Align the NEM with the chassis slot and ensure the following:
3. Slide the NEM into the vacant NEM chassis slot until you feel it stop.
4. Close the ejector levers to secure the NEM in the chassis.
FIGURE 2-1 shows how to install the Multi-Fabric NEM.
FIGURE 2-1 Installing a Multi-Fabric NEM

The NEM is automatically detected when it is inserted into the chassis.
You can connect to the Integrated Lights Out Manager (ILOM) command-line interface (CLI) by either of two methods:
Instructions for setting up and using ILOM are documented in the Sun Integrated Lights Out Manager 2.0 User’s Guide, and the Integrated Lights Out Manager Administration Guide for the Sun Blade 6000 Modular System, at: http://docs.sun.com/app/docs/prod/blade.6000mod#hic
|
You need to start a ILOM command-line session in a terminal window.
1. At the terminal window prompt, enter
-> SSH <IP address of the CMM> -l <login>
You are asked for the password.
3. Depending on which slot you used when installing the Multi-Fabric NEM, enter
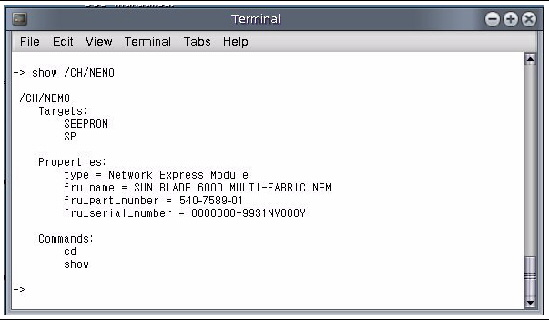
-> show /CH/NEM0
or
-> show /CH/NEM1
Information about the NEM and the NEM Field Replaceable Unit (FRU) information appears in the CLI, as shown here:
You can also enter show /CH/NEM0/SEEPROM or show /CH/NEM1/SEEPROM. The NEM SEEPROM information appears in the CLI, as shown here.

4. If the NEM does not appear in ILOM, verify that the NEM is properly seated in the chassis and verify that you have installed the latest CMM ILOM firmware.
For more information about using CMM ILOM, see the Integrated Lights Out Manager Administration Guide for the Sun Blade 6000 Modular System (820-0052) at: http://docs.sun.com/app/docs/prod/blade.6000mod#hic
|
1. In a web browser, type the IP address of the CMM in the location bar.
3. From the CMM ILOM left navigation bar, select CMM.
4. Select Components from the second row of tabs.
The window shows a list of all the components installed in the chassis (see FIGURE 2-2). The /CH/NEM0 and /CH/NEM1 Network Express Modules appear near the bottom of the window.
5. If the NEM you just installed does not appear in ILOM, verify that the NEM is properly seated in the chassis.
FIGURE 2-2 CMM ILOM Screen for Viewing NEM Information

If you click /CH/NEM0, you open a window that shows the FRU information for the Multi-Fabric NEM (see FIGURE 2-3).
Similarly, if you click /CH/NEM0/SEEPROM, you open a window that shows the SEEPROM information for the Multi-Fabric NEM (see FIGURE 2-3).
FIGURE 2-3 FRU and SEEPROM Information for NEM0 in the Web Browser

1. If you plan to replace the NEM, label all the cables so you can reconnect them to the same ports.
2. Disconnect all cables from the NEM.
3. Press together and hold the ejector buttons on both the right and left ejector levers.
4. Open the ejector levers by extending them outward until they stop.
5. Holding the opened ejector levers, pull the NEM out.
FIGURE 2-4 shows the removal of a Multi-Fabric NEM.
FIGURE 2-4 Removing a Multi-Fabric NEM

If an Multi-Fabric NEM fails, you need to replace it.
|
|
Caution - The NEM should be replaced immediatelyafter it fails. |
The Multi-Fabric NEM is a Customer Replaceable Unit (CRU). You replace the entire module. There are no subcomponents that you can replace.
You can remove and replace a Multi-Fabric NEM from a powered-on chassis using a hot-swap operation.
|
|
Caution - Before you remove the NEM from the chassis, you should pause or shut down any active I/O that passes through the NEM. |
| Note - The blue Ready to Remove LED on the NEM does not function. To help identify a NEM that you plan to remove, you can illuminate the white Locate LED using the proxy CLI. For more information, see ILOM 2.0 Proxy CLI Program For SAS-NEMs and Disk Modules. |

|
Caution - If the chassis is powered on and you are not replacing the Multi-Fabric NEM within 60 seconds, install a NEM filler panel to ensure proper system cooling. |
|
1. Label all the cables so you can reconnect them in same location.
2. Disconnect all cables from the NEM.
3. Press together and hold the ejector buttons on both the right and left ejector levers.
4. Open the ejector levers by extending them outward until they stop.
5. Holding the opened ejector levers, pull the NEM out.
6. (IMPORTANT) Execute the “Clear All Non-Present Persistent Mappings” operation described in Appendix A on all server blades in the chassis that meet both of these requirements:
a. The server blade is running CAM or a CAM agent.
b. The server blade uses an LSI host bus adapter.
7. Insert the new Multi-Fabric NEM into the chassis.
8. Reconnect all the cables in their original location.
9. (IMPORTANT) Execute the “Saving a Snapshot of Your Host Bus Adapter Configuration” operation described in Appendix A on all server blades in the chassis that meet all three of these requirements:
a. The server blade is running CAM or a CAM agent.
b. The server blade uses an LSI host bus adapter.
c. The server blade is running the Solaris OS.
| Sun Blade 6000 Multi-Fabric Network Express Module User’s Guide | 820-1705-14 |
Copyright © 2010, Oracle and/or its affiliates. All rights reserved.
 To Install a NEM