Sun Fire Link Software Installation Guide Link Software Installation Guide
|
| Sun Fire Link Software Installation Guide
|
| C H A P T E R 2 |
|
Update System Controllers and Install Solaris Operating Environment |
This chapter provides instructions for:
|
|
Load the Sun Fire Link CD-ROM provided with the Sun Fire Link hardware on the machine chosen to be the installation host. The machine is used as a Network File Services (NFS) server for the software installation. In the following example, <install_host> is the host name of this system.
1. Log in to the installation host machine and become superuser.
2. If the Sun Fire Link 1.1 CD-ROM is not already inserted into this system, insert it now.
3. Check that the Sun Fire Link 1.1 CD-ROM contents are visible.
<install_host># cd /cdrom/sun-fire-link_1.1/ <install_host># ls Docs Patches Product |
4. Add the following line to /etc/dfs/dfstab to support remote sharing of files.
If this file does not already exist, create it and add the following line to it.
share -o ro /cdrom/sun-fire-link_1.1/ |
5. Stop and restart the NFS daemons so the new share command takes effect.
<install_host># /etc/init.d/nfs.server stop <install_host># /etc/init.d/nfs.server start |
6. Verify that the Sun Fire Link software directory is available for mounting by remote systems.
<install_host># share - /cdrom/sun-fire-link_1.1/ ro "" |
|
Note - Later in the installation process you will need to install the Solaris CD-ROM in place of the Sun Fire Link 1.1 CD-ROM. Before using the Solaris CD-ROM, you must edit the dfstab file again, removing the line you added in Step 4. Then you must stop and start the NFS daemons (as in Step 5) to unshare the previous Sun Fire Link 1.1 CD-ROM. |
|
|
The Sun Fire Link firmware is copied from the Sun Fire Link 1.1 CD-ROM onto a File Transfer Protocol (FTP) server or web server, from which it is flashed onto the boards and switches of the Sun Fire cluster.
The server can be any preconfigured FTP or web server, or you can configure the administration server to serve this purpose. Use your preferred method to configure an FTP server or web server. One simple method is to run the script documented in the Solaris man page for the File Transfer Protocol server command, ftpd(1M), which creates an anonymous FTP server.
1. Find the ftp-script description on the ftpd man page, and copy it to your chosen FTP server.
% man ftpd ... |
2. Add the anonymous ftp user name and password entry to the /etc/passwd file.
ftp:x:30000:30000:Anonymous FTP:/export/anonymous-ftp:/nosuchshell |
3. Add the following line to the /etc/shadow file.
ftp:NP:6445:::::: |
4. As superuser, run ftp-script on the FTP server (named <ftp-host> in this example).
<ftp-host># ftp-script /export/anonymous-ftp |
5. Create a directory on the FTP server to hold the Sun Fire Link firmware.
<ftp-host># mkdir /export/anonymous-ftp/firmware |
6. Copy the Sun Fire Link node firmware from the Sun Fire Link 1.1 CD-ROM into the firmware directory.
In the following example, the Sun Fire Link 1.1 CD-ROM is inserted into the FTP server.
<ftp-host># cp /cdrom/sun-fire-link_1.1/tftpboot/* \ /export/anonymous-ftp/firmware |
However, do the following if the administration server and FTP server are different systems and the Sun Fire Link 1.1 CD-ROM is inserted into the administration server (named <admin_host> in this example).
<admin_host># cp /net/admin_host/cdrom/sun-fire-link_1.1/tftpboot/* \ /export/anonymous-ftp/firmware |
7. On the FTP server, install the package that loads the switch firmware. The package name is SUNWwcsfi.
Assuming that the Sun Fire Link CD-ROM is inserted in the administration server and the FTP server is a different system, change directory to either the Solaris_8 or Solaris_9 directory and add the SUNWwcsfi package, as shown below.
<ftp-host># cd /net/admin_host/cdrom/sun-fire-link_1.1/Product/Solaris_8 <ftp-host># pkgadd -d . SUNWwcsfi |
<ftp-host># cd /net/admin_host/cdrom/sun-fire-link_1.1/Product/Solaris_9 <ftp-host># pkgadd -d . SUNWwcsfi |
8. Copy the Sun Fire Link switch firmware from its destination on the FTP server into the server's firmware directory.
Step 7 loaded the switch firmware into the /opt directory on the FTP server. This step makes it available for anonymous FTP access.
<ftp-host># cp /opt/SUNWwcsfi/flash/SscApp.jflash /export/anonymous-ftp/firmware |
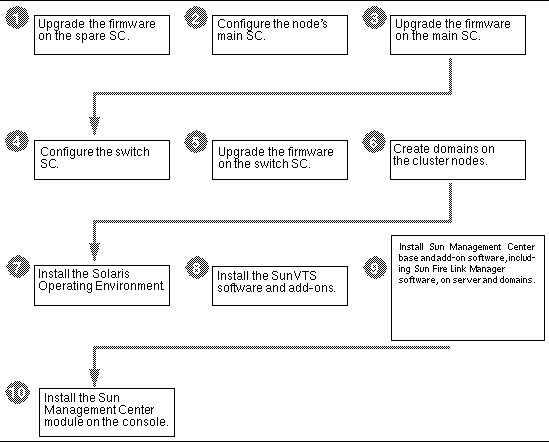
FIGURE 2-1 illustrates the sequence of procedures you perform to install the software components provided in the Solaris, Sun Fire Link 1.1, and Sun Management Center 3.5 CD-ROMs or downloaded software. Detailed instructions for these procedures follow.
This section describes the following procedures that you would perform on your Sun Fire 6800 systems:
The Sun Fire Link firmware (for nodes and switches) consists of the following images, which you copied to an FTP or web server in the preparation phase.
|
Sun Fire 6800 system controller |
Update the Sun Fire 6800 firmware, ScApp, and real-time operating system (RTOS) on the spare SC as follows.
1. Connect to the console of the spare SC on one of the cluster nodes (node1-sc1 in this example) and enter the platform shell.
Use your site-specific method to connect to the SC through the serial port, not through a Telnet session.
# <site-specific-command> node1-sc1 System Controller 'node1-sc1': Type 0 for Platform Shell Input: 0 Platform Shell node1-sc1:SC> |
2. Execute the poweron all command to ensure that all system boards have power.
3. From the platform shell, update the spare SC.
node1-sc1:SC> flashupdate -f ftp://<ftp-server-ip>/firmware ScApp RTOS |
where <ftp-server-ip> is the IP address of the FTP server.
4. Verify that the spare SC firmware has been updated correctly.
Execute the command showsc from the platform shell.
1. Connect to the console of the main SC on one of the cluster nodes (node1-sc0 in this example) and enter the platform shell.
# <site-specific-command> node1-sc0 System Controller 'node1-sc0': Type 0 for Platform Shell Input: 0 Platform Shell node1-sc0:SC> |
Use setupplatform to configure the main SC as you like. You need to supply (or accept defaults for) the following items:
For example, an SC might be configured as shown in CODE EXAMPLE 2-1.
3. Set date, time, and time zone from the platform shell.
node1-sc0:SC> setdate -t EST mmddHHMMyyyy |
node1-sc0:SC> setdate -t EST 052218162002 Wed May 22 18:16:00 EDT 2002 |
node1-sc0:SC> password Enter new password: Enter new password again: |
5. Verify that the SC is configured correctly.
node1-sc0:SC> showplatform . . . |
You can obtain the Sun Fire 6800 5.15 firmware from SunSolve or it will already be installed on your Sun Fire 6800 system if it new.
1. Now update the ScApp and RTOS on the main SC, system boards, and I/O assemblies.
All steps are performed from the SC's platform shell.
node1-sc0:SC> flashupdate -f ftp://<ftp-server-ip>/firmware all |
2. Verify that the main SC firmware has been updated correctly.
Execute the commands showsc and showboard -v -p prom from the platform shell.
|
|
If your cluster configuration includes Sun Fire Link switches, you need to configure each switch system controller (SSC). If you did not perform this procedure at the time of installing the switch hardware, do so now.
Connect to the SSC (switch1 in this example) via the serial port. For the requested password, enter the password that was specified as part of the switch installation procedure.
# <site-specific-command> switch1 Enter Password: switch1:SSC> |
Use setupplatform to configure the SSC as you like. You need to supply (or accept defaults for) the following items:
For example, an SSC might be configured as follows.
3. Set date, time, and time zone.
switch1:SSC> setdate -t EST <mmddHHMMyyyy> |
switch1:SSC> setdate -t EST 030613362002 System date is 06-Mar-02 1:36:00 PM |
switch1:SSC> rmi_password Enter new password: Enter new password again: |
5. Verify that the SSC is configured correctly.
switch1:SSC> showplatform . . . |
1. Now update the firmware on the SSC.
switch1:SSC> flashupdate -f ftp://<ftp-server-ip>/firmware/SscApp.jflash |
switch1:SSC> reboot |
|
|
Connect to a node SC via the serial port or a Telnet session and enter the platform shell.
2. Create one or more domains on the node by assigning boards to them.
From the platform shell, add the boards to a domain.
node1-sc0:SC> addboard -d <domain> <board> [<board> ...] |
For example, to create domain A with four boards, type:
node1-sc0:SC> addboard -d A sb0 ib7 ib8 ib9 |
3. Enter the domain you created. In this example, domain A.
node1-sc0:SC> console A Connected to Domain A Domain Shell for Domain A node1-sc0:A |
4. Within domain A, run setupdomain.
You need to supply (or accept defaults for) the following items:
PROM--use-nvramrc and auto-boot
node1-sc0:A> setupdomain |
5. Show the boards to verify that they are assigned correctly.
6. Repeat this procedure for each node in the Sun Fire cluster.
Perform an "Entire Distribution" installation of the Solaris Operating Environment into the domains you have created. The procedure is described in the Solaris documentation.
If the /etc/dfs/dfstab change you made in To Load the Sun Fire Link 1.1 CD-ROM on Sun Fire 15K/12K and 6800 Systems is still in effect, perform the following steps to unshare the Sun Fire Link 1.1 CD-ROM.
1. Edit /etc/dfs/dfstab, and remove the following line.
share -o ro /cdrom/sun-fire-link_1.1 |
2. Stop and restart the NFS daemons to unshare the Sun Fire Link 1.1 CD-ROM.
admin_host# /etc/init.d/nfs.server stop admin_host# /etc/init.d/nfs.server start |
3. Install the Solaris Operating Environment software as described in the applicable Solaris documentation.
The RSM software that is supplied with the Solaris 8 Operating Environment must be updated with patch 109664-14 on every domain of the Sun Fire cluster. The RSM software supplied with the Solaris 9 Operating Environment must be updated with patch 109726-09.
Perform the following procedure on each domain.
1. Connect to the domain and become superuser.
Connect to a domain using your preferred method.
2. Go to the <SFL_sw_directory>.
3. Add the following line to /etc/dfs/dfstab.
share -o ro /cdrom/sun-fire-link_1.1 |
4. Stop and restart the NFS daemons so the new share command takes effect.
<admin_host># /etc/init.d/nfs.server stop <admin_host># /etc/init.d/nfs.server start |
5. Change directory to either the Solaris_8 or Solaris_9 directory and install the required patches, as shown below.
<admin_host># cd /net/admin_host/cdrom/sun-fire-link_1.1/Patches/Solaris_8 <admin_host># patchadd 109664-14 |
<admin_host># cd /net/admin_host/cdrom/sun-fire-link_1.1/Patches/Solaris_9 <admin_host># patchadd 109726-09 |
6. Verify that the patch has installed.
# showrev -p | grep 109664-14 |
# showrev -p | grep 109726-09 |
7. Perform a reconfigure reboot, using whichever of the following methods applies.
# reboot -- -r |
# init 0 {c} ok boot <bootpath> -r |
{c} ok set boot-device <bootpath> {c} ok set diag-device <bootpath> |
8. Repeat the RSM patch installation on each domain in the cluster.
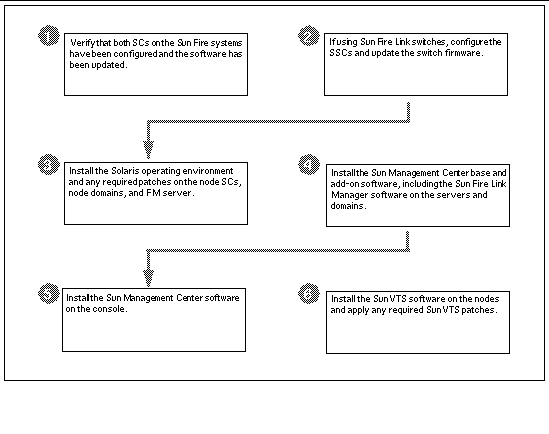
FIGURE 2-2 illustrates the sequence of procedures you perform on Sun Fire 15K/12K Systems to install the software components provided in the Solaris, Sun Fire Link 1.1, and Sun Management Center 3.5 CD-ROMs or downloaded software. Detailed instructions for these procedures follow.
This section describes the following additional procedures that you would perform on your Sun Fire 15K/12K systems:
Before configuring the switch SC and updating its firmware, ensure that the System Controllers in the node chassis have been configured and the software has been updated.
If your cluster configuration includes Sun Fire Link switches, you need to configure each switch system controller (SSC). If you did not perform this procedure at the time of installing the switch hardware, do so now.
1. Connect to the SSC (switch1 in this example) via the serial port.
For the requested password, enter the password that was specified as part of the switch installation procedure.
2. Use setupplatform to configure the SSC.
3. Assign the SSC's RMI password.
switch1:SSC> rmi_password Enter new password: Enter new password again: |
1. Update the firmware on the SSC from the flashupdate server you set up previously--either an FTP server or HTTP server.
The following example shows the update being done from an FTP server:
switch1:SSC> flashupdate -f ftp://ftp-server-ip/firmware/SscApp.jflash |
switch1:SSC> reboot |
Repeat these SSC configuration and firmware update procedures on the remaining Sun Fire Link switches.
When setting up domains in the Sun 15K/12K systems, configure some to include the I/O slots that contain Sun Fire Link link assemblies. These domains can then be included as nodes in the Sun Fire Link network
Perform an "Entire Distribution" installation of the Solaris operating environment onto the FM server, on each cluster node SC, and on each cluster domain. Also, apply any patches identified in the Sun Fire Link Release Notes.
| Sun Fire Link Software Installation Guide
| 817-0401-11 |
Copyright © 2003, Sun Microsystems, Inc. All rights reserved.
