Creating Containers
You can create custom containers in addition to the default containers that are available after the software has been installed and set up. The combined use of both types of containers aids you in the implementation of your server consolidation plan.
Use the New Container wizard to create custom containers. You have the option to create just the container definition and save that to the Containers view. Or, you can complete all wizard steps in order to create an active container. The same wizard is used for both situations.
If you choose to create just the container definition, the name will be saved in the Containers view. You can use the container definition to create one or more active containers at a later time. For more information about how to activate a container definition, see Activating or Deactivating Containers.
If you choose to create an active container, you also make a container definition as part of the process. After you finish creating the active container, the container definition is saved to the navigation window of the Containers view. You can use this same definition to create additional containers that are associated with multiple hosts. The definition for all these containers, including the name and project type, will be the same for each of the hosts. You can vary the resource reservations of the container per host, or you can make them all the same. This flexibility is provided so you can meet resource needs as conditions vary. For more information, see About Container Definitions.
The New Container wizard guides you through the container creation process. You should have the following information available when creating an active container in order to move readily through the wizard:
-
The name and description for the container.
-
The project type the container will be assigned. For more information, see Table 3–2.
-
The name of the host to which the container will be associated.
-
The name of the resource pool to which the container will be bound.
-
The resource boundaries that the container will be assigned, namely the minimum CPU reservation and memory cap amounts.
To Launch the New Container Wizard
The New Container wizard can be accessed from three places in the GUI. Depending upon the access point to the wizard, you might not be required to complete all its panels because certain information will be completed automatically.
-
If the Container Manager GUI is not already open, access it as described in To Launch the Container Manager GUI.
-
In the navigation window, determine the relationship of the container definition you want to create.
-
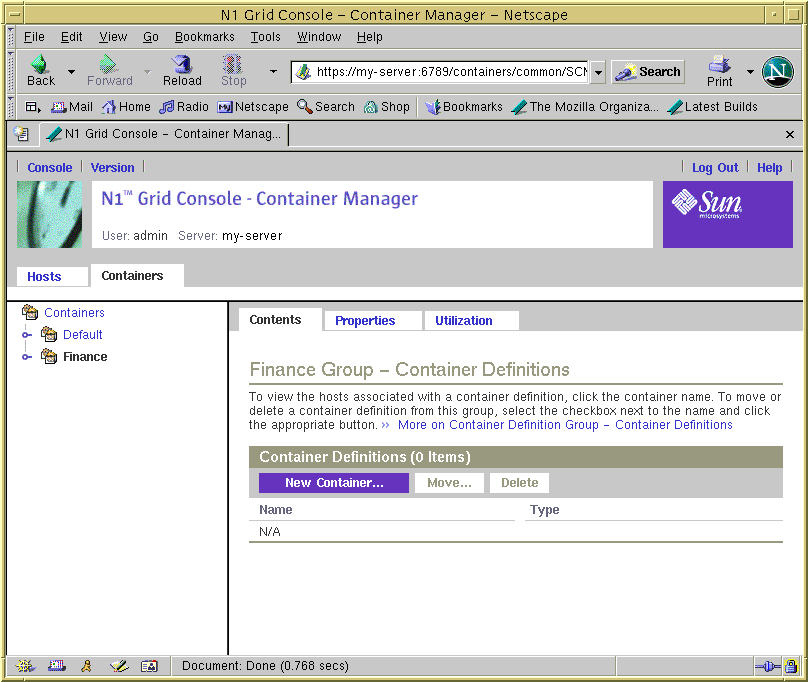
To place the container definition in the navigation tree under a specific group name, select the group name from the Containers view. The Container Definitions table appears in the right pane.
Figure 3–6 Sample: Accessing the New Container Button From a Group Name
-
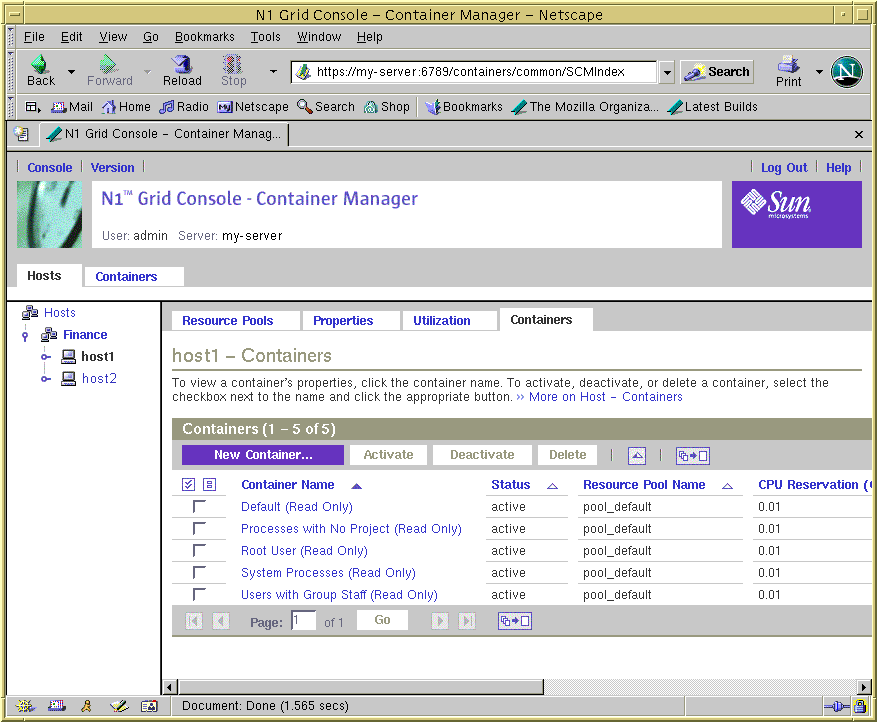
To automatically associate a specific host with the container:
-
Select the host name in the navigation window from the Hosts view.
If needed, click the host group name in order to expand the list.
-
Select the Containers tab located in the right pane.
The Containers table appears
You will not be required to select a host during the container creation process using this method.
Figure 3–7 Sample: Accessing New Container Button From a Host Name
-
-
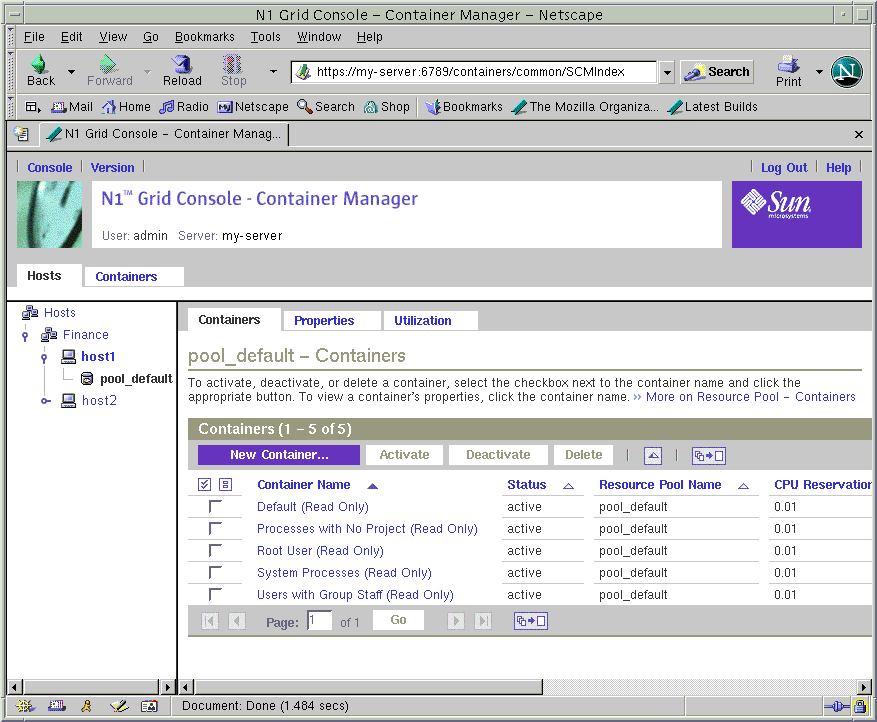
To automatically bind a container to specific resource pool:
-
Select the resource pool name from the navigation window in the Hosts view.
If needed, click the key symbol next to the host name in order to expand the list and the resource pools assigned to the host are displayed.
-
Select the Containers tab located in the right pane.
The Containers table appears.
You will not be required to assign a resource pool as part of the container creation process.
-
Figure 3–8 Sample: Accessing New Container Button From a Resource Pool
-
-
Click the New Container button.
Note –The New Container button is always available from a table appearing in the right pane, regardless of which of the three methods you selected.
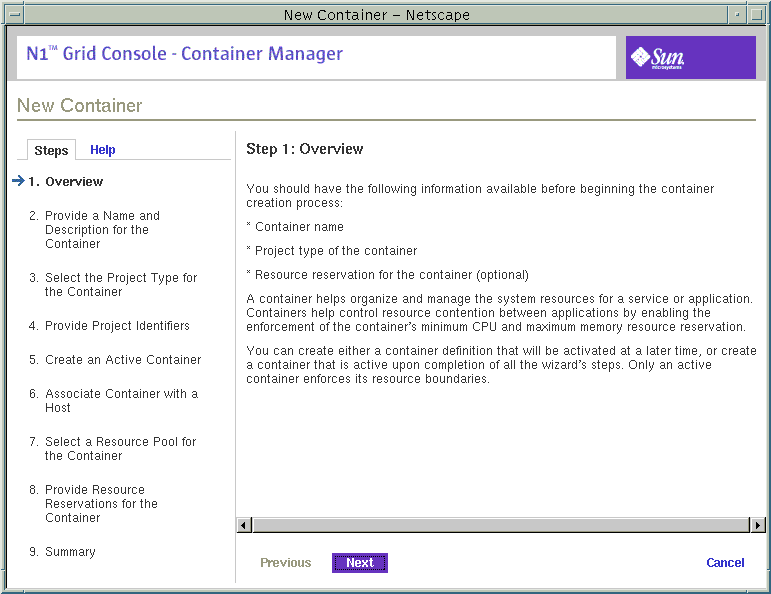
The New Container wizard is displayed. The Overview panel is the first to appear.
Figure 3–9 Sample: New Container Wizard Overview Panel
For more samples of the New Container wizard, see Creating an Application-Based Container.
Creating a User-Based or Group-Based Container
Note –
Only the user-based container type is available if you are running the Solaris 8 release.
If you want the container to manage processes that are identified by either a UNIX user or UNIX group name, you should create a user-based or group-based container. The project-type selected during the creation process will determine whether the finished container definition or container is user-based or group-based.
To Create a User-Based or Group-Based Container Definition
-
Launch the New Container wizard, as described in To Launch the New Container Wizard.
The Overview panel appears. Use the Next button to move through the wizard. Use the Previous button to return to any panel in the wizard to make any changes.
-
Provide a name for the container.
The name must be unique and not exceed 32 characters. This name will identify the container in the navigation window, status tables, and resource utilization reports. If a duplicate name is entered, the creation of the container definition will fail.
A container name cannot be changed after the creation procedure is finished.
-
(Optional) Provide a description for the container.
-
Select User or Group as the project type for the container.
A container with a user-based project type tracks processes with the same UNIX user name.
A container with a group-based project type tracks processes with the same UNIX group name.
Note –In the Solaris 8 OS, only the user-based container type is supported.
-
Provide project type identifiers according to the following:
-
User-Based Project - You must provide a valid UNIX user name in the first field. UNIX user names of those users that can join the project can be added in the second field. UNIX group names of those groups that can join the project can be added in the third field. Separate multiple entries with a comma.
Do not provide a user name that is being used in another user-based container or in a Default Container in the first field.
-
Group-Based Project - You must provide a valid UNIX group name in the first field. UNIX group names of those groups that can join the project can be added in the second field. UNIX user names of those users that can join the project can be added in the third field. Separate multiple entries with a comma.
Do not provide a group name that is being used in another group-based container or in a Default Container in the first field.
-
-
Select Later in the Create an Active Container panel.
All the required information to create the container definition has been supplied.
-
Review the information in the Summary panel.
Use the Previous button to move backward through the wizard to make any changes.
-
Click Finish.
The container definition is saved in the navigation window in the Containers view. The wizard is dismissed.
To Create a User-Based or Group-Based Active Container
-
Launch the New Container wizard, as described in To Launch the New Container Wizard.
The Overview panel appears. Use the Next button to move through the wizard. Use the Previous button to return to any panel in the wizard to make any changes.
-
Provide a name for the container.
The name must be unique and not exceed 32 characters. This name will identify the container in the navigation window, status tables, and resource utilization reports. If a duplicate name is entered, the creation of the container definition will fail.
A container name cannot be changed after the creation procedure is finished.
-
(Optional) Provide a description for the container.
-
Select User or Group as the project type for the container.
A container with a user-based project type tracks processes with the same UNIX user name.
A container with a group-based project type tracks processes with the same UNIX group name.
Note –In the Solaris 8 OS, only the user-based container type is supported.
-
Provide project type identifiers according to the following:
-
User-Based Project - You must provide a valid UNIX user name in the first field. UNIX user names of those users that can join the project can be added in the second field. UNIX group names of those groups that can join the project can be added in the third field. Separate multiple entries with a comma.
Do not provide a user name that is being used in another user-based container or in a Default Container in the first field.
-
Group-Based Project - You must provide a valid UNIX group name in the first field. UNIX group names of those groups that can join the project can be added in the second field. UNIX user names of those users that can join the project can be added in the third field. Separate multiple entries with a comma.
Do not provide a group name that is being used in another group-based container or Default Container in the first field.
-
-
Select Now in the Create an Active Container panel.
-
Depending upon the entry point from which you launched the wizard, choose from the following actions:
-
If you accessed the wizard from a host name in the navigation window of the Hosts view, the container is automatically associated with that host. Continue with Step 11.
-
If you accessed the wizard from a location other than the host name, you must associate this container with a host. Continue with Step 8.
-
-
The container must be associated with a host that supports its resource reservation. Select from the following options:
-
To begin the search for available hosts, provide the following information.
- Name
-
Default is '*' for searching all hosts. If you want to specify a particular host, you can provide the name here.
- Operating System
-
Select an operating system from this drop-down menu. Default is ALL.
- Platform
-
Select a platform from this drop-down menu. Default is ALL.
- Total Processors
-
Provide an integer that specifies the minimum number of processors required. The results returned will be hosts that have an equivalent, or more, number of CPUs.
- Total Physical Memory (MB)
-
Provide an integer that specifies the minimum amount of required memory in Mbytes. The results returned will be hosts that have an equivalent, or more, amount of total physical memory.
- Clock Speed
-
Provide an integer that specifies the minimum required processor clock speed in MHz. The results returned will be hosts that have at least that clock speed.
A list is returned of all hosts that meet the search criteria.
-
Make your selection from the list of the matching hosts.
The container is now associated with this host.
-
Assign a resource pool that supports the resource requirements of the container.
New processes started in a project are bound to the corresponding resource pool. Once the container is activated, the new processes the container is holding are bound to its resource pool.
-
To assign a new resource pool:
-
Select Create a New Resource Pool.
-
Provide a name for the resource pool.
The name must be alphanumeric and contain no spaces. The characters dash (-), underscore (_), and dot (.) are allowed.
-
Assign the number of CPUs.
The number of CPUs must be an integer not less than one and cannot exceed the number of CPUs available on the host. The total number of CPUs on the host and the number that are currently available are shown.
-
-
-
Select Use an Existing Resource Pool.
A list of available resource pools is displayed.
-
Select the radio button next to the pool's name in the list.
The total number of CPUs assigned to each resource pool is given, as well as the amount of unreserved CPU still available in each pool. The container is bound to the selected resource pool.
-
-
-
Provide the resource reservations for the container.
The amount of unreserved CPU and memory resources available on the host is provided.
The minimum CPU reservation is required, and must be provided in integer or decimal units. Decimal units up to 100th decimal place are accepted. If you provide a value at 1000th decimal place, the value will be treated as zero. For example, a CPU reservation of 0.002 is treated as zero. A container with a CPU reservation of zero receives CPU resources only when no processes are running in any other container that is associated with the same host.
The memory cap is optional, and must be provided in Mbytes.
-
Review the information in the Summary panel.
Use the Previous button to move backward through the wizard to make any changes.
-
Click Finish.
The selections are saved, and the container is now active. The Solaris kernel begins enforcing the container's resource reservations.
Creating an Application-Based Container
Note –
In the Solaris 8 OS, only the user-based container type is supported.
Use an application-based container to manage the processes that run in a particular software application. You can create an application-based container definition that moves the processes automatically, or one that allows you to move the processes manually.
If you can provide a match expression that is truly unique to the application, you can add this expression to the container definition. You must also provide the UNIX user or UNIX group ID under which the processes will run. Additional users or groups that have the right to join the container at a later time can be added as well. To automatically move processes into the container, you must provide all required project identifiers when the corresponding wizard panel appears. The software will then move all matching processes automatically for all the containers that are based upon this definition.
If the application does not create truly unique identifiers, then you will want to move the processes manually or start the application inside the container. If you want to move the processes manually, create the container definition with only the UNIX user or UNIX group ID under which the processes will run. Additional users or groups that have the right to join the container at a later time can be added as well. Then move the processes with the newtask -p command. For more information, see Moving or Starting Processes in a Container.
To Determine the Match Expression for an Application
Use this procedure to determine the correct match expression to identify the processes corresponding to the application you want to manage. This expression is required in the New Container wizard to move processes automatically into a container.
-
From a terminal window, launch the application that the application-based container will manage.
-
To see a list of all processes running, in a terminal window type:
% ps -cafe
-
In the CMD column, locate the corresponding executable name.
Choose the expression that will uniquely identify the application's processes.
Example 3–1 Determining a Match Expression For Mozilla
The following is an example of output from the ps - cafe command when searching for Mozilla:
% ps -cafe
     UID   PID  PPID  CLS PRI    STIME TTY      TIME CMD
    ...
username  8044  7435   IA  50 19:47:09 pts/11   0:00 /bin/ksh -p /usr/sfw/lib/mozilla/mozilla
|
In this example, the unique executable name is mozilla. Likewise, a correct match expression is mozilla.
Example 3–2 Determining a Match Expression for Tomcat Server
When you know the name of the application, you can use the grep command in conjunction with ps -cafe to locate the correct match expression. The following is an example of output from the ps - cafe | grep tomcat command when searching for Tomcat server. This example has been trimmed for space, leaving the relevant information.
% ps -cafe | grep tomcat nobody 27307 /usr/j2se/bin/java -classpath //usr/apache/tomcat/bin/bootstrap.jar:/usr/j2se/l |
In this example, the executable name is java. However, the correct match expression is tomcat. In this case the match expression is the argument instead of the executable name as java does not uniquely identify the Tomcat processes.
Example 3–3 Verifying a Match Expression for Tomcat Server
The following is an example of how to use the pgrep command to find the PID, in order to verify that you have identified the unique match expression for finding the desired process:
% pgrep -f tomcat 27307 |
The PID for Tomcat server is 27307. This matches the PID from Example 3–2. This confirms that the match expression tomcat corresponds to the Tomcat server process.
To Create an Application-Based Container Definition
-
Launch the New Container wizard, as described in To Launch the New Container Wizard.
The Overview panel appears. Use the Next button to move through the wizard. Use the Previous button to return to any panel in the wizard to make any changes.
-
Provide a name for the container.
The name must be unique and not exceed 32 characters. This name will identify the container in the navigation window, status tables, and resource utilization reports. If a duplicate name is entered, the creation of the container definition will fail.
A container name cannot be changed after the creation procedure is finished.
-
(Optional) Provide a description for the container.
-
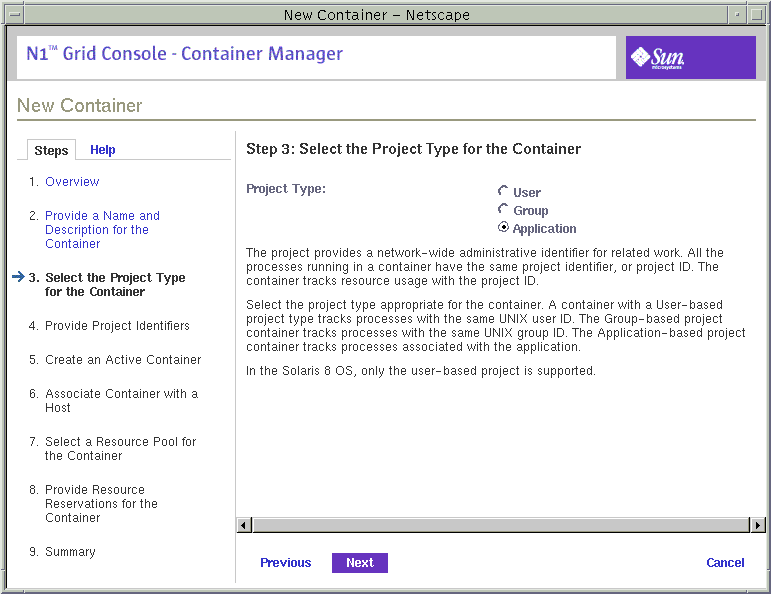
Select Application as the project type for the container.
The application-based project container tracks processes associated with the application. For more information about this project type, see Table 3–2.
Figure 3–10 Sample: Project Type Panel Showing Selected Type as Application
-
Provide the project name in the Project Name filed.
A project name is required. You can choose the name of the application itself, or any other name that is suitable for your needs. A corresponding project name is added to the /etc/project file on the host when the container is activated.
If you want to provide a project name that is already being used by another application-based container, both containers cannot be activated on the same host. For more information, see Container Types.
-
Determine whether you want to move the application processes under the container automatically when the container is activated or to move them yourself from the command line.
-
To indicate that you want to move the application processes yourself from the command line, select the checkbox Do Not Use Match Expression.
-
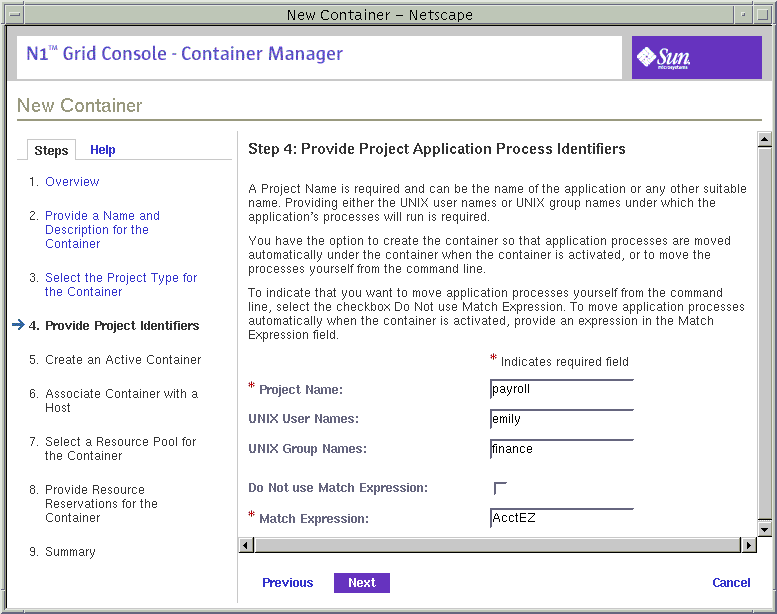
To move application processes under the container automatically when the container is activated, provide an expression in the Match Expression field.
The match expression must be supplied in order to automatically move the application's processes to the container. This expression is case sensitive. To determine the correct match expression, see To Determine the Match Expression for an Application.
If a match expression is not provided at this time, the application's processes will not be moved automatically to this container until this expression is supplied.
-
-
Provide the UNIX user names or UNIX group names under which the application's processes will run.
The UNIX user names or UNIX group names under which the application's processes will run must be supplied. If these are not provided, the corresponding processes will not be moved under the container upon activation until they are supplied. Separate multiple entries with a comma.
Figure 3–11 Sample: Completed Project Identifiers Panel Without a Match Expression
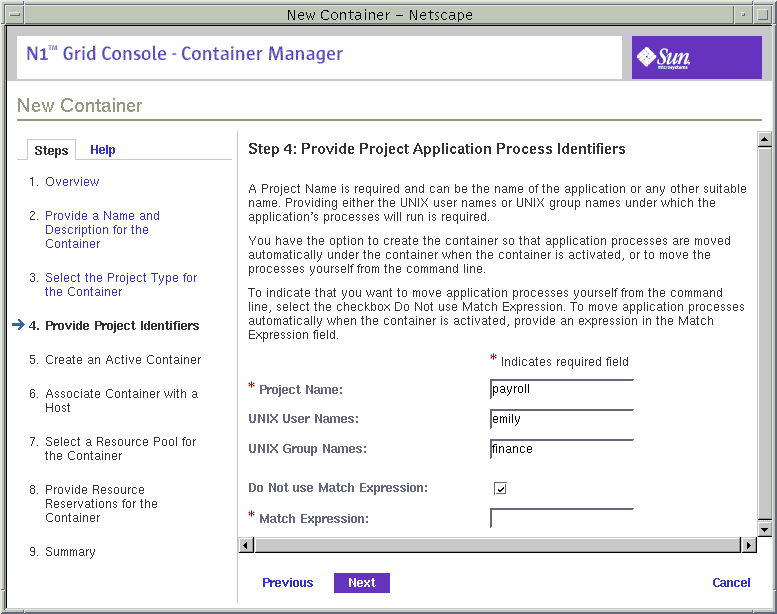
Figure 3–12 Sample: Completed Project Identifiers Panel With a Match Expression
-
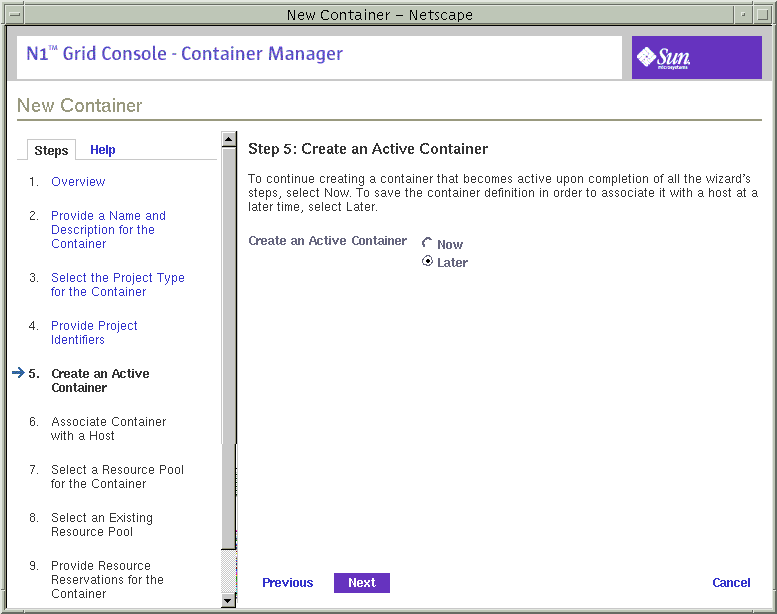
Select Later in the Create an Active Container panel.
All the required information to create the container definition has been supplied.
Figure 3–13 Sample: Creating Active Container Later Panel
-
Review the information in the Summary panel.
Use the Previous button to move backward through the wizard to make any changes.
-
Click Finish.
The container definition is saved in the navigation window in the Containers view. The wizard is dismissed.
To Create an Active Application-Based Container
-
Launch the New Container wizard, as described in To Launch the New Container Wizard.
The Overview panel appears. Use the Next button to move through the wizard. Use the Previous button to return to any panel in the wizard to make any changes.
-
Provide a name for the container.
The name must be unique and not exceed 32 characters. This name will identify the container in the navigation window, status tables, and resource utilization reports. If a duplicate name is entered, the creation of the container definition will fail.
A container name cannot be changed after the creation procedure is finished.
-
(Optional) Provide a description for the container.
-
Select Application as the project type for the container.
The application-based project container tracks processes associated with the application. For more information about this project type, see Table 3–2.
-
Provide the project name.
A project name is required. You can choose the name of the application itself, or any other name that is suitable for your needs. A corresponding project name is added to the /etc/project file on the host when the container is activated.
If you want to provide a project name that is already being used by another application-based container, both containers cannot be activated on the same host. For more information, see Container Types.
-
Determine whether you want to move application processes under the container automatically when the container is activated or to move them yourself from the command line.
-
To indicate that you want to move application processes yourself from the command line, select the checkbox Do Not Use Match Expression.
-
To move application processes under the container automatically when the container is activated, provide an expression in the Match Expression field.
The match expression must be supplied in order to automatically move the application's processes to the container. This expression is case sensitive. To determine the correct match expression, see To Determine the Match Expression for an Application.
If a match expression is not provided at this time, the application's processes will not be moved under this container until this expression is supplied.
-
-
Provide either the UNIX user names or UNIX group names under which the application's processes will run.
The UNIX user names or UNIX group names under which the application's processes will run must be supplied. If these are not provided, the corresponding processes will not be moved under the container until they are supplied. Separate multiple entries with a comma.
-
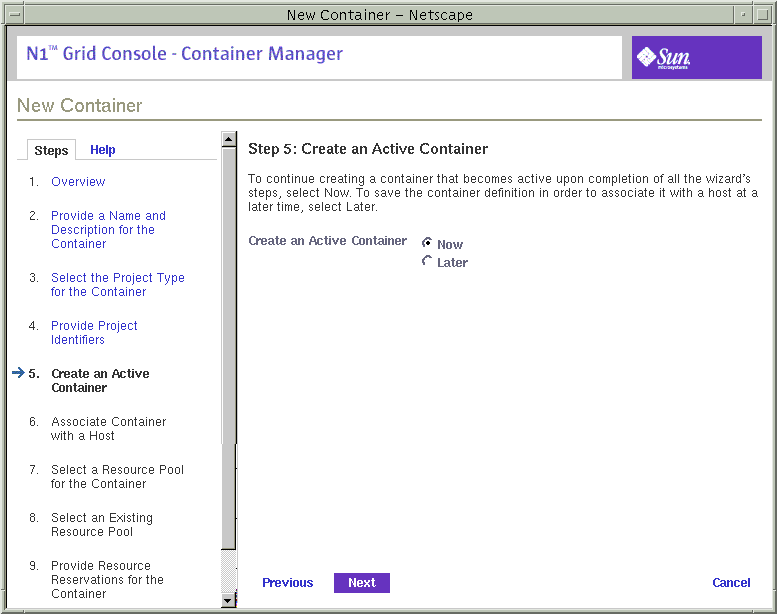
Select Now in the Create an Active Container panel.
Figure 3–14 Sample: Creating an Active Container Now
-
Depending upon the entry point from which you launched the wizard, choose from the following actions:
-
If you accessed the wizard from a host name in the navigation window of the Hosts view, the container is automatically associated with that host. Continue with Step 13.
-
If you accessed the wizard from a location other than the host name, you must associate this container with a host. Continue with Step 10.
-
-
The container must be associated with a host that supports its resource reservation. Select from the following options:
-
To begin the search for available hosts, provide the following information.
- Name
-
Default is '*' for searching all hosts. If you want to specify a particular host, you can provide the name here.
- Operating System
-
Select an operating system from this drop-down menu. Default is ALL.
- Platform
-
Select a platform from this drop-down menu. Default is ALL.
- Total Processors
-
Provide an integer that specifies the minimum number of processors required. The results returned will be hosts that have an equivalent, or more, number of CPUs.
- Total Physical Memory (MB)
-
Provide an integer that specifies the minimum amount of required memory in Mbytes. The results returned will be hosts that have an equivalent, or more, amount of physical memory.
- Clock Speed
-
Provide an integer that specifies the minimum required processor clock speed in MHz. The results returned will be hosts that have at least that clock speed.
Figure 3–15 Sample: Completed Search For a Host Panel
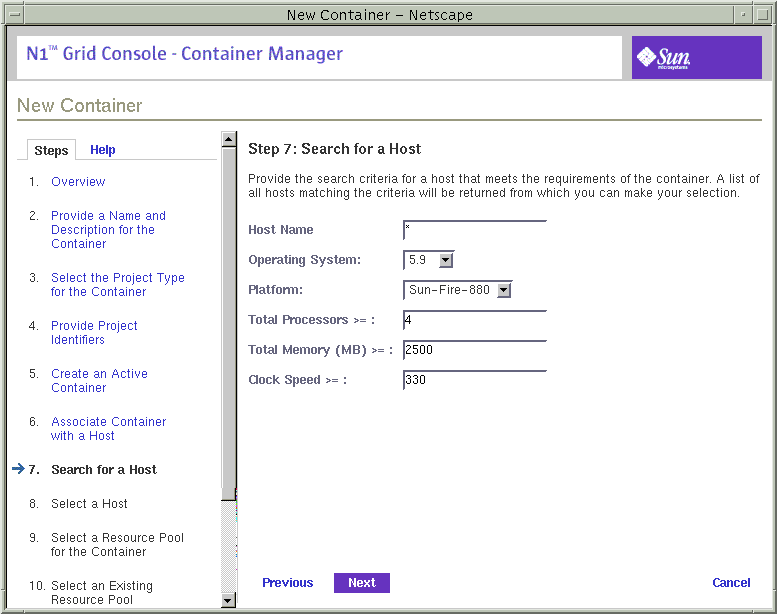
A list is returned of all hosts that meet the search criteria.
-
Make your selection from the list of the matching hosts.
The container is now associated with this host.
-
Assign a resource pool that supports the resource requirements of the container.
New processes started in a project are bound to the corresponding resource pool. Once the container is activated, the new processes being held in the container are bound to its resource pool.
-
To assign a new resource pool:
-
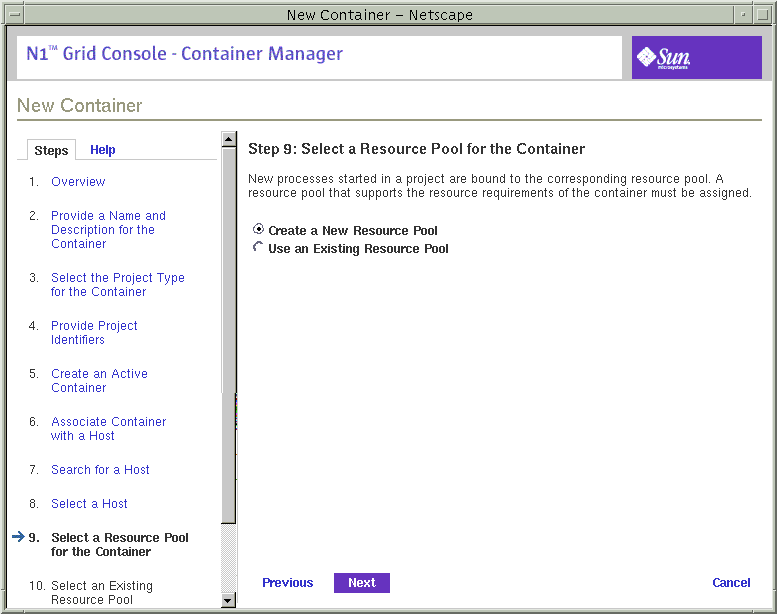
Select Create a New Resource Pool.
Figure 3–16 Sample: Selecting Create a New Resource Pool
-
Provide a name for the resource pool.
The name must be alphanumeric and contain no spaces. The characters dash (-), underscore (_), and dot (.) are allowed.
-
Assign the number of CPUs.
The number of CPUs must be an integer not less than one and cannot exceed the number of CPUs available on the host. The total number of CPUs on the host and the number that are currently available are shown.
-
-
-
Select Use an Existing Resource Pool.
A list of available resource pools is displayed.
-
Select the radio button next to the pool's name in the list.
To total number of CPUs assigned to each resource pool is given, as well as the amount of unreserved CPU still available in each pool. The container is bound to the selected resource pool.
-
-
-
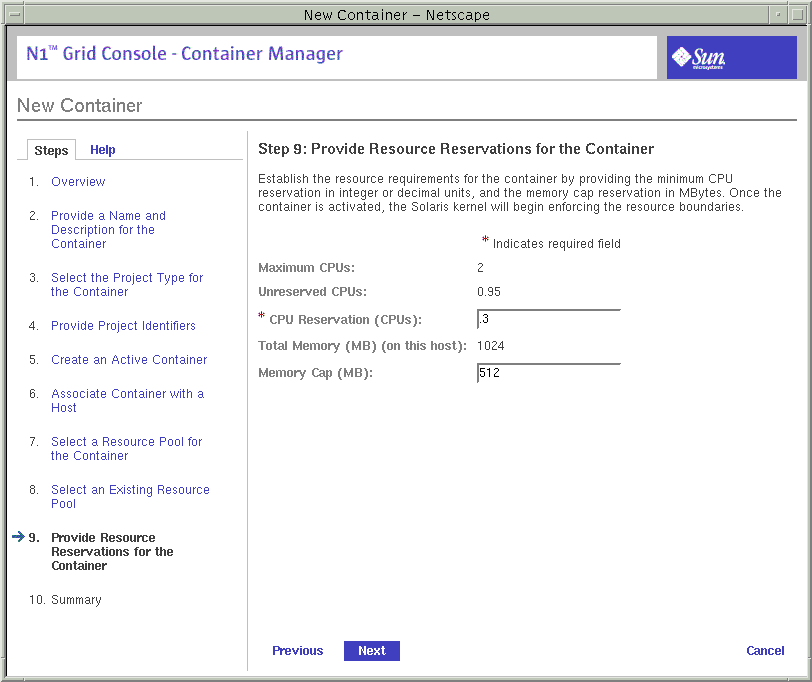
Provide the resource reservations for the container.
The amount of unreserved CPU and memory resources available on the host is provided.
The minimum CPU reservation is required, and must be provided in integer or decimal units. Decimal units up to 100th decimal place are accepted. If you provide a value at 1000th decimal place, the value will be treated as zero. For example, a CPU reservation of 0.002 is treated as zero. A container with a CPU reservation of zero receives CPU resources only when no processes are running in any other container that is associated with the same host.
The memory cap is optional, and must be provided in Mbytes.
Figure 3–17 Sample: Completed Resource Reservations Panel
-
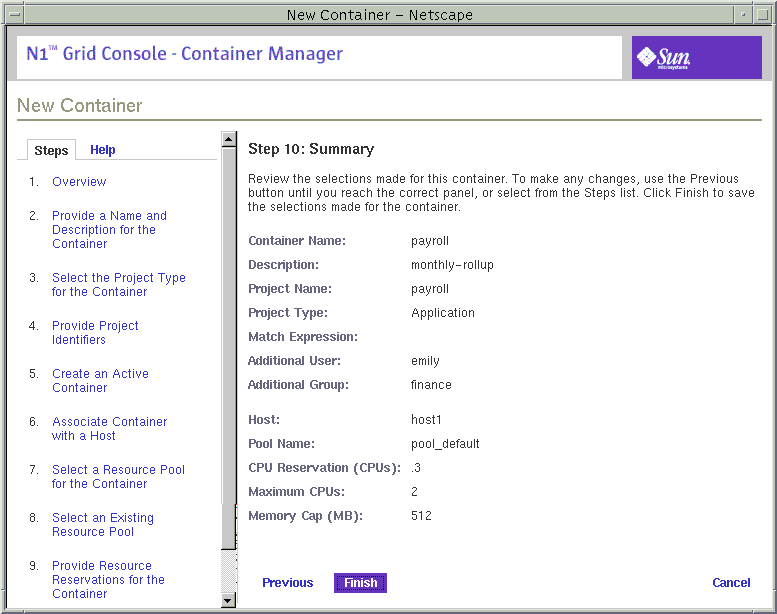
Review the information in the Summary panel.
Use the Previous button to move backward through the wizard in order to make any changes.
Figure 3–18 Sample: Summary Panel
-
Click Finish.
The selections are saved, and the container is now active. The Solaris kernel begins enforcing the container's resource reservations.
- © 2010, Oracle Corporation and/or its affiliates
