Chapter 3 Managing Containers
This chapter contains procedures for creating, using, and managing containers using N1 Grid Console - Container Manager 1.0 (Container Manager).
For the latest information about the software, see N1 Grid Console - Container Manager 1.0 Release Notes.
The following topics are discussed:
Container Management Overview
A container helps organize and manage the collection of physical system resources, and is useful when implementing your overall server consolidation plan. Containers offer the following features:
-
Setting minimum CPU reservations and memory caps for applications to help balance system resources
Each application is guaranteed the minimum CPU reservation and the memory cap set for its container. For example, an application-based container enables you to establish both a minimum CPU reservation and a memory cap for any application running on your network. When several containers are active on the same host, with each application in its own container, contention for system resources is reduced. In this situation, the resource boundaries set for each container are enforced by the Solaris kernel operating on that host.
-
Tracking of resource utilization across a datacenter
The total amount of resources that are being used by the container is tracked, in part, with project membership. Each UNIX user must be assigned to a default project, although users and groups can belong to one or more projects. The processes that a UNIX user launches can be bound to any of the projects of which the user is a member. Containers use both project membership and resource pools in order to help track and control application resource consumption.
For more information about how containers work and the resource management tools they use, see Chapter 1, Introduction to N1 Grid Console - Container Manager 1.0.
After the software is installed and set up, several default containers are available for your immediate use. You also create your own custom containers by using a wizard that guides you through the process. Every container has its own container definition. This definition can be used over again for creating new containers. Container definitions provide the following advantages:
-
Ability to create multiple container instances with the identical set of CPU and memory resource boundaries.
-
Spreading multiple container instances across several hosts. Whereas a single active container cannot span multiple hosts, additional container instances with the same definition can be spread across multiple hosts.
-
Shortens the time necessary to create a new container instance, enabling you to quickly apportion resources as needs fluctuate.
The GUI is browser-based and provides two management views: one from the host perspective, and one from the container perspective. You can further organize each view by creating groups and selecting which elements the groups should contain.
Additionally, the processes running inside the container and the resources being used can be readily checked with the software. Several graphing options are also available to help assess the level of resource utilization per container or host, including the ability to export the data to a file. These features enable you to monitor and reassess resource consumption in order to make adjustments as needed.
With the software's alarm feature you can be notified via email when a container's resource utilization reaches a threshold of your setting. Alarm icons are also visible in the GUI for both hosts and containers.
The resource change job feature gives you the ability to schedule changes to current resource boundaries on one or more containers with one request. A wizard guides you through the steps required for creating or modifying a resource change job.
About Container Definitions
The first step when creating a custom container is to make a container definition. The container definition consists of the following information:
-
Name of the container
-
Description of the container (optional)
-
Project type of the container
-
Project name associated with the container
-
The UNIX users and groups associated with the container
-
The match expression, if there is one
The container definition is saved by the software and is available for repeated use until the definition is deleted. The container definition is used when activating a container on a host. A container is active when it has been associated with a host, and its resource reservations have been set.
Because multiple containers, with the same definition and resource reservations, can be active simultaneously on several different hosts, the container definition is a convenience for managing containers across the data center. Once the container definition has been saved, it can be used at any time to activate a container on any suitable host. In this manner the container definition can be used as a template for creating a new container instance.
You can use a container definition to create multiple container instances. For example, if you use a single container definition to create three active containers on three different hosts, you have one container definition and three container instances of that definition. Changing the underlying information in the definition changes all the container instances based on that definition.
The wizard gives you the option to create a container that is activated upon completion of all the steps. A container definition is created at the same time and its name is saved in the GUI. You also have the option to create just the container definition and activate the container at a later time with a wizard that guides you through the process.
For a container definition, you can perform the following tasks using the GUI:
-
Create a new container definition
-
Create a new group
-
Move the container definition into and out of groups
-
Modify the properties
-
Create a new container instance (active container) on a host
-
Delete the container definition
For a container instance, you can perform the following tasks using the GUI:
-
Create a new group
-
Move the container
-
Modify the properties
-
Change the resource reservations
-
Create a resource change job
-
Check the status of the processes running inside
-
Request a utilization report and export the data to a file
-
Deactivate or activate the container
-
Set an alarm
-
Delete the container
Container States
A container does not actually enforce the resource consumption boundaries that you set for an application. Rather, once the minimum CPU reservation and memory cap are provided and the container is activated, the Solaris kernel begins enforcing these boundaries. Before using containers, you should know more about container states. A container can be in one of the following three states: defined, active, and inactive.
Figure 3–1 Container States
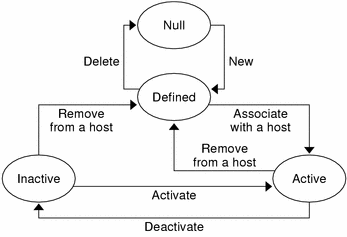
A container can move between these states throughout its lifetime.
Defined Container
The container definition is created during the initial stage but the container itself is still not fully formed. Each container definition must have a unique name and can be saved indefinitely in the database.
As seen in Figure 3–1, the defined container moves into the active state after the container is associated with a host. An inactive container can move back into the defined state after it has been deactivated and is no longer associated with a host.
Active Container
The first step in making a container active is to associate its definition with a host. The second step is to set the resource boundaries, namely, to assign the minimum CPU reservation and the memory cap for the container. The container must be associated with a host that can support these resource boundaries. An active container can also be referred to as being deployed, in the sense that the container definition has been pushed out and resides on a host.
When creating an application-based container with the New Container wizard, a match expression can be provided which identifies the processes associated with the application. All processes corresponding to the match expression are then automatically moved under this container. Upon container activation, an entry in the /etc/project database is created on the host that the container is associated with. Correspondingly, the matching processes are then moved under the project name for the container. Once the processes are moved, all resource utilization data is collected and saved for the container.
Inactive Container
When a container is deactivated, the resource boundaries are no longer enforced. A deactivated container enters into an inactive state and is deleted from the host's /etc/project file. While inactive, the container still exists in the software's database, pending future activation. Once the inactive container is reactivated, the container's resource boundaries are again enforced.
All data collected about the container's use of resources while it was active is preserved in the database. You can still request utilization reports for an inactive container for up to 30 days after the container was deactivated.
Container Manager GUI
Standard Solaris software resource management command-line commands are not supported by the Container Manager software. You should manage the containers from the Container Manager graphical user interface (GUI). The GUI is launched from the Sun Web Console using a browser. The following browsers are supported:
-
Netscape NavigatorTM 4.7x, 6.2x, and 7.x on Solaris versions 8 and 9
-
Netscape Navigator 4.7x, 6.2x, and 7.x on Microsoft Windows (98/2000/XP)
-
MozillaTM
-
Internet Explorer 5.0 and higher (including 6.x) on Microsoft Windows (98/2000/XP)
To Launch the Container Manager GUI
-
If your UNIX user ID is not contained in the Sun Management Center esusers file, create this entry.
For instructions on how to create an entry, see “Setting Up Users” in Sun Management Center 3.5 Installation and Configuration Guide.
-
Launch a browser.
For a list of supported browsers, see Container Manager GUI.
-
Choose from the following URLs to go to the Sun Web Console:
-
To reach the Container Manager GUI directly after you log into Sun Web Console type:
https://host_machine_name:6789/containers
-
To reach the Console page after you log into Sun Web Console type:
https://host_machine_name:6789
The host machine name must be a Sun Management Center server.
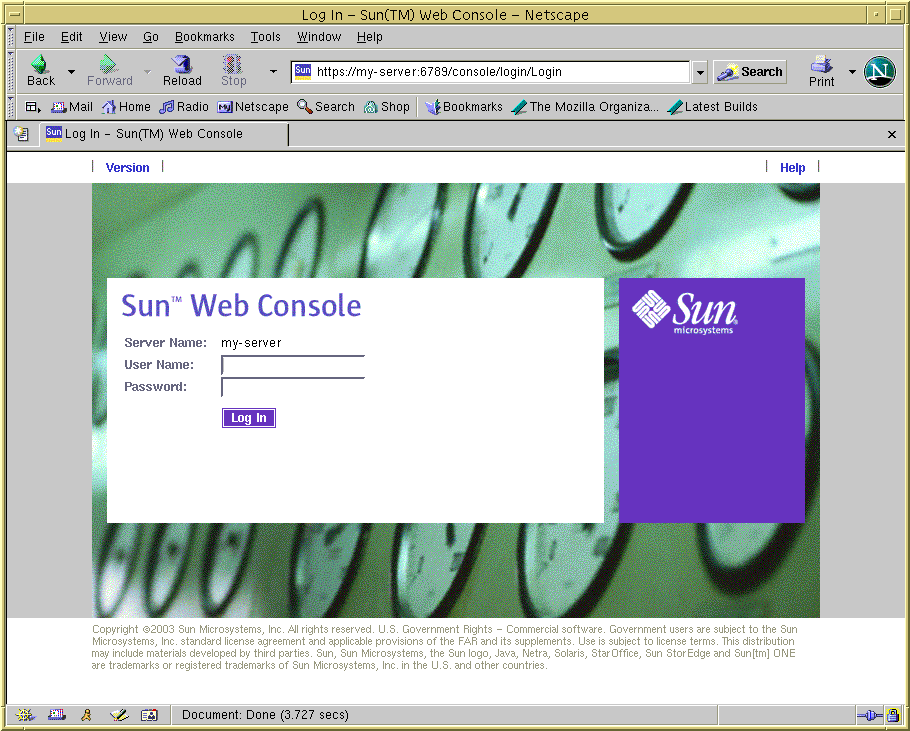
The Sun Web Console login page appears. If the login page does not appear, you may need to restart Sun Web Console. For instructions, see To Restart Sun Web Console.
Figure 3–2 Sample: Sun Web Console Login Page
-
-
Log into the Sun Web Console using your UNIX user ID and password.
The Container Manager GUI appears. Two views are available from the Hosts and Containers tabs in the navigation window.
-
If you reach the Console page, select the N1 Grid Console - Container Manager 1.0 link to access the GUI.
To Restart Sun Web Console
If you are unable to access the Sun Web Console, use this command to restart it.
Container Manager GUI Tabs
The following table provides information about the tabs that appear in the right pane of Container Manager GUI. This table is presented alphabetically but the choice and order of tabs varies according to location in the GUI.
Table 3–1 Container Manager GUI Tabs|
Tab Name |
Contents |
Available From |
|---|---|---|
|
Alarm Thresholds |
Provides information about alarm threshold settings. |
Hosts view, Containers view |
|
Containers |
Provides information about the containers that are associated with a host. |
Hosts view, Containers view |
|
Hosts |
Provides information about the hosts associated with the selected container. |
Containers view |
|
Processes |
Provides information about the processes that are currently running in the container. |
Hosts view, Containers view |
|
Properties |
Provides information about the properties of the selected host, container definition, container, or resource pool. |
Hosts view, Containers view |
|
Resource Change Job |
Provides information about scheduled resource change jobs. You can also create new a new resource change job from this tab. |
Containers view |
|
Resource Pools |
Provides information about the resource pools on the selected host. |
Hosts view |
|
Utilization |
Provides information about a container's daily, weekly, or monthly resource utilization. Real-time utilization data is available for active containers. This tab is visible only if Performance Reporting Manager software is installed. |
Hosts view, Containers view |
Hosts View
The Hosts view organizes information from the host perspective. All agent machines that you are managing with the software appear in the navigation window. The resource pools available for each host are shown as well. You can also manage the containers associated to the host from this view.
All agent hosts that have the software installed are automatically discovered and added to the Hosts view. This view is accessed from the left tab in the navigation window. All agent hosts that are discovered are initially placed under a default group titled Hosts. You can further organize this view by creating new groups and moving the hosts to relevant groups.
Note –
Only those agent machines that are part of the Sun Management Center server context are loaded into the Hosts view. For more information about server context, see “Sun Management Center Architecture” in Sun Management Center 3.5 User's Guide.
The tabs and information available in the Hosts view is listed in Table 3–1.
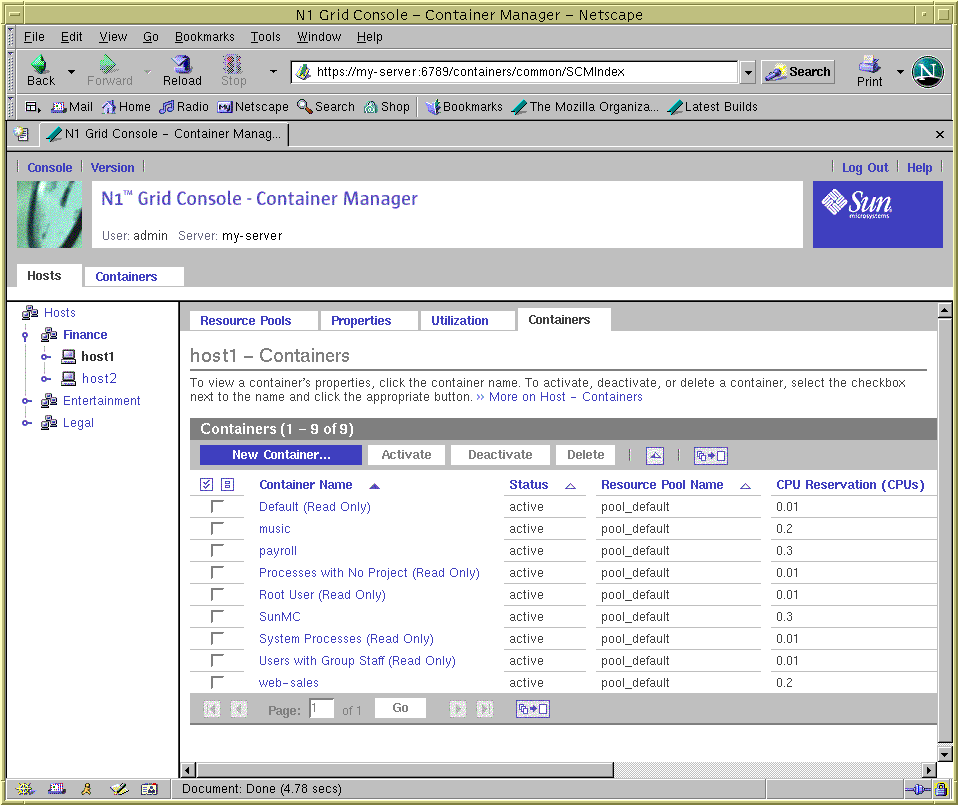
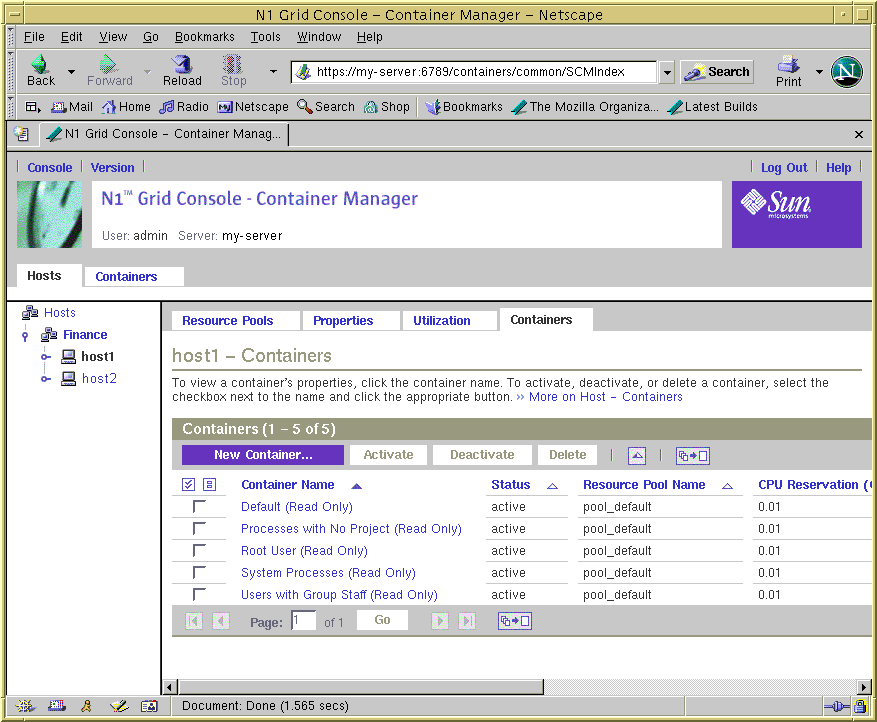
Information about every container instance that is associated with a host is listed in the Containers table. This table is available from the Containers tab after selecting a host name in the navigation window. The Containers table provides information about each container, detailing one container per row. The Containers table provides the following data:
- Container Name
-
Name of the container.
- Status
-
State of the container: active and inactive
- Resource Pool Name
-
Resource pool to which the container is bound.
- CPU Reservation (CPUs)
-
Minimum CPU reservation set for the container.
- CPU Usage (CPUs)
-
Amount of CPU the container is using.
- Memory Cap (MB)
-
Maximum memory limit in megabytes.
- Memory Usage
-
Memory used by the container in megabytes.
Figure 3–3 Sample: Hosts View Showing the Container Table
Containers View
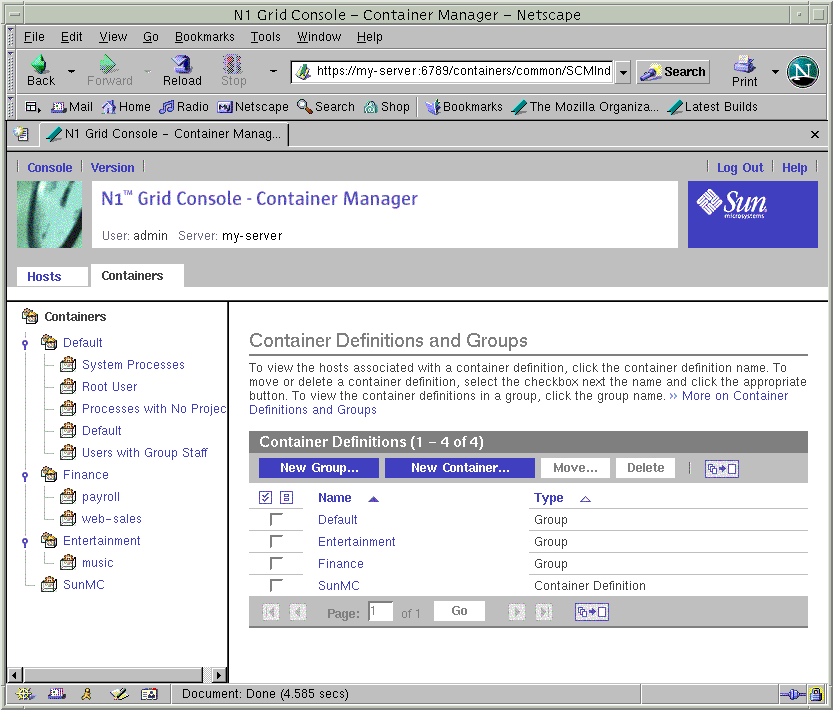
The Containers view organizes information from the container perspective. All container definitions and containers appear in the navigation window. Since container definitions can be used repeatedly to make new containers, you can readily access the definitions from this view, as well as perform other management tasks.
After installation and setup are complete, the Containers view automatically adds the Containers group as a default. Container definitions are managed from the Containers view.
The information available in the Containers view is listed in Table 3–1.
Figure 3–4 Sample: Containers View with Container Definitions Table Showing
Organizing Hosts and Containers With Groups
The Hosts view contains the default group Hosts. All hosts discovered after installation of the software are placed in this group. Likewise, the Containers view has a default group named Default in which all the default containers of a host are placed. You can create additional groups in each view for organizing the hosts and containers as you like.
To Create a Container Group or Host Group
-
If the Container Manager GUI is not already open, access it as described in To Launch the Container Manager GUI.
-
Select the appropriate view from the navigation window.
-
For a new container group, select the Containers view. The Container Definitions table is displayed in the right pane.
-
For a new host group, select the Hosts view. The Hosts and Groups table is displayed in the right pane.
-
-
Click the New Group button.
A dialog box appears.
-
Provide a name for the group, and click OK.
The name cannot exceed 32 characters.
The new group appears in the selected view.
To Move a Container or Host to a Different Group
-
If the Container Manager GUI is not already open, access it as described in To Launch the Container Manager GUI.
-
Select the appropriate view from the navigation window.
-
To move a container to a different group, select the Containers view. The Container Definitions table is displayed in the right pane.
-
To move a host to a different group, select the Hosts view. The Hosts and Groups table is displayed in the right pane.
-
-
To enable the Move button in the table, select the checkbox for the container or host that is to be moved.
-
In the right pane, click the Move button.
A dialog box appears listing the available groups.
-
Select the group to which the container or host is to be moved.
-
Click OK.
The container or host is moved to the selected group.
Default Containers
After the software is set up, the Containers view is initially loaded with a group titled Default. This group holds the following five default containers on a host running the Solaris 9 Operating System (OS):
-
Default
-
Processes with No Project
-
Root User
-
System Processes
-
Users with Group Staff
Note –
On a host running the Solaris 8 release, the Users with Group Staff (group.staff) container does not exist. Otherwise, the default containers are the same.
Figure 3–5 Sample: Default Containers Group With Container Definitions Showing
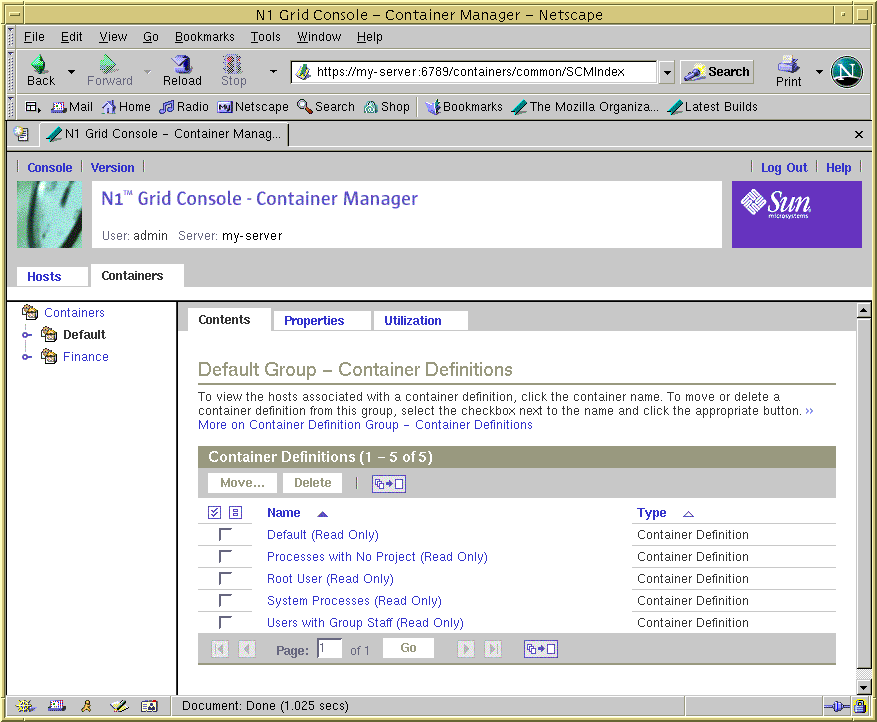
Each default container is in the active state, and the boundaries are set at .01 minimum CPU reserved and no memory cap. A default container is always bound to the default resource pool (pool_default) of the host. You can monitor the resource utilization and run reports on each default container if you have Performance Reporting Manager installed.
These default containers cannot be deactivated, edited, or deleted. Each is labeled Read Only accordingly.
Every UNIX user is assigned to a default project, and is correspondingly assigned to a default container. Initially, the default containers hold all processes that are running on the system. As you create custom containers, processes are moved from the corresponding default container into the container you create.
About Container Creation
Every container starts with a container definition. A container can be one of three types, depending upon the project type selected during its creation. The project type determines how processes are tracked.
Container Types
When creating a new container definition, you must select the project type. A project is a network-wide administrative identifier (ID) for related work. All processes running in a container have the same project ID, and a container tracks the resources being used with the project ID. The container type is based on which project-type is selected when creating the container definition. For more information about projects and resource management, see “Projects and Tasks” in System Administration Guide: Resource Management and Network Services.
Every container definition has a project name that is a permanent part of its information. When a container is activated on a host, this project name is added to that host's /etc/project file. This entry remains as long as the container is active on that host.
It is not possible to have two containers with the same project name active on a host at the same time. This is because processes running in a container are tracked with the project ID, so every project name on a host must be unique.
When creating user and group-based containers, the user or group name becomes part of the project name. For user-based containers, the project name becomes user.username. For group-based containers, the project name becomes group.groupname. Therefore, when creating user or group-based containers, you cannot use a user or group name that duplicates the /etc/project entries for the default containers. For more information, see Default Containers.
You provide a project name of your choosing as part of the creation process for application-based containers. The Container Creation wizard will accept duplicate project names for different application-based container definitions. But two application-based containers that have the same project name cannot be active on the same host at the same time. If you want to reuse project names when creating application-based containers, do this only if you plan to activate these containers on different hosts. If you try to activate a second container on a host that already has an active container with the identical project name, the activation will fail.
The following table provides details about the three project types available and what changes occur based on the selection.
Table 3–2 Project Type Details|
Project Type |
OS Version |
Details |
|---|---|---|
|
User-Based |
Solaris 8 |
Only type of project supported in the Solaris 8 release. The project name in the /etc/project file becomes user.username. The project becomes the user's primary default project. |
|
User-Based |
Solaris 9 |
The project name in the /etc/project file becomes user.username, with a list of UNIX users who can join this project. Valid forms are username. |
|
Group-Based |
Solaris 9 |
The project name in the /etc/project file becomes group.groupname. Valid form is groupname. |
|
Application-Based |
Solaris 9 |
The project name can be the application name or any other name chosen. The name provided is added to the /etc/project file. A match expression can be provided for automatically moving the matching processes to the project name. This expression is case sensitive. The corresponding username or groupname under which the processes currently run must be provided. |
About Making Resource Reservations
Before you begin using containers to manage an application's resources, it is important that you first know the resource trends for the application. The performance of certain applications, such as ORACLE®, will be significantly degraded if the amount of the memory cap is inadequate. Every active container must have resource reservations set: a minimum CPU reservation, and optionally, a maximum memory reservation (memory cap). You should only begin using containers to manage these reservations after you have established the resource requirements for the applications.
Do not set a physical memory cap for a container that is less than what the application typically uses. This practice will affect the application's performance adversely and might result in significant delays due to higher paging and swapping as the application is required to use more virtual memory.
You must have your server consolidation plan finalized before you start using containers to manage system resources. An important related task is to trend the resource consumption of the applications you are considering including in your consolidation plan. It is recommended that you trend resource utilization of the application for at least a month in your test environment before implementing your plan in your production environment. Once you have established the CPU and memory consumption trends, you should allow at least a few percentage points above the typical memory requirement.
When making a reservation for the amount of CPU resources needed by the container, you assign the amount of CPU in integer or decimal units. For example, .25, 1, and 3.75 are all valid amounts. Container Manager uses the fair share scheduler (FSS) to ensure the minimum CPU reservation you set. The convention used by the software is 1 CPU equals 100 shares. Likewise, .25 CPU equals 25 shares, and so on. CPU shares are not the same as CPU percentages. Instead, the number of shares defines the relative importance of the project when compared to others. FSS only limits the CPU resource allotment when there is competition for those resources. For example, if there is only one active container on a system at the time, then the corresponding application can utilize all of the CPU resources regardless of the number of shares it has. For more information about the fair share scheduler, see System Administration Guide: Resource Management and Network Services.
You can use Container Manager in your test environment as a tool to help trend application resource consumption by doing the following:
-
Install and set up the Container Manager software along with any required software.
For information, see Chapter 2, Container Manager Installation and Setup.
-
Install Performance Reporting Manager on all agent machines you want to monitor.
For more information, see Chapter 2, Container Manager Installation and Setup and Sun Management Center 3.5 Performance Reporting Manager User's Guide.
-
Create an active application-based container for the application you want to trend. In the New Creation wizard, make a minimum CPU reservation only. Do not set a memory cap.
For more information, see Creating an Application-Based Container and To Create an Active Application-Based Container.
-
Monitor the resources used for a couple of weeks with daily, weekly, or real-time graphs. Two graphs, one for CPU and memory resources used, are available for the container running on an individual host. You can also view the Processes table to monitor processes running in the application.
For more information, see To Request a Resource Utilization Report for an Active Container and Viewing Container Processes.
-
Once you have established the maximum physical memory requirement for the application, modify the container's properties to include a memory cap. Be sure not to set a cap that is less than the maximum memory the application has been using.
For more information, see To Modify a Container Using a Property Sheet.
-
Set an alarm so you are notified if the memory used starts to exceed the memory cap set. Make any adjustments to the memory cap using the Properties sheet.
For more information, see To Set an Alarm Threshold and To Modify a Container Using a Property Sheet.
After you have established resource utilization trends by using Container Manager or other suitable resource management software, you are ready to begin using containers as a tool for implementing the server consolidation plan in your production environment.
For more information about how to plan and execute a server consolidation, you can read the Sun Blueprints book Consolidation in the Data Center by David Hornby and Ken Pepple. For more information about server consolidation on systems running the ORACLE database, you can read the Sun white paper Consolidating Oracle RDBMS Instances Using Solaris Resource Manager Software available at http://wwws.sun.com/software/resourcemgr/wp-oracle/.
Creating Containers
You can create custom containers in addition to the default containers that are available after the software has been installed and set up. The combined use of both types of containers aids you in the implementation of your server consolidation plan.
Use the New Container wizard to create custom containers. You have the option to create just the container definition and save that to the Containers view. Or, you can complete all wizard steps in order to create an active container. The same wizard is used for both situations.
If you choose to create just the container definition, the name will be saved in the Containers view. You can use the container definition to create one or more active containers at a later time. For more information about how to activate a container definition, see Activating or Deactivating Containers.
If you choose to create an active container, you also make a container definition as part of the process. After you finish creating the active container, the container definition is saved to the navigation window of the Containers view. You can use this same definition to create additional containers that are associated with multiple hosts. The definition for all these containers, including the name and project type, will be the same for each of the hosts. You can vary the resource reservations of the container per host, or you can make them all the same. This flexibility is provided so you can meet resource needs as conditions vary. For more information, see About Container Definitions.
The New Container wizard guides you through the container creation process. You should have the following information available when creating an active container in order to move readily through the wizard:
-
The name and description for the container.
-
The project type the container will be assigned. For more information, see Table 3–2.
-
The name of the host to which the container will be associated.
-
The name of the resource pool to which the container will be bound.
-
The resource boundaries that the container will be assigned, namely the minimum CPU reservation and memory cap amounts.
To Launch the New Container Wizard
The New Container wizard can be accessed from three places in the GUI. Depending upon the access point to the wizard, you might not be required to complete all its panels because certain information will be completed automatically.
-
If the Container Manager GUI is not already open, access it as described in To Launch the Container Manager GUI.
-
In the navigation window, determine the relationship of the container definition you want to create.
-
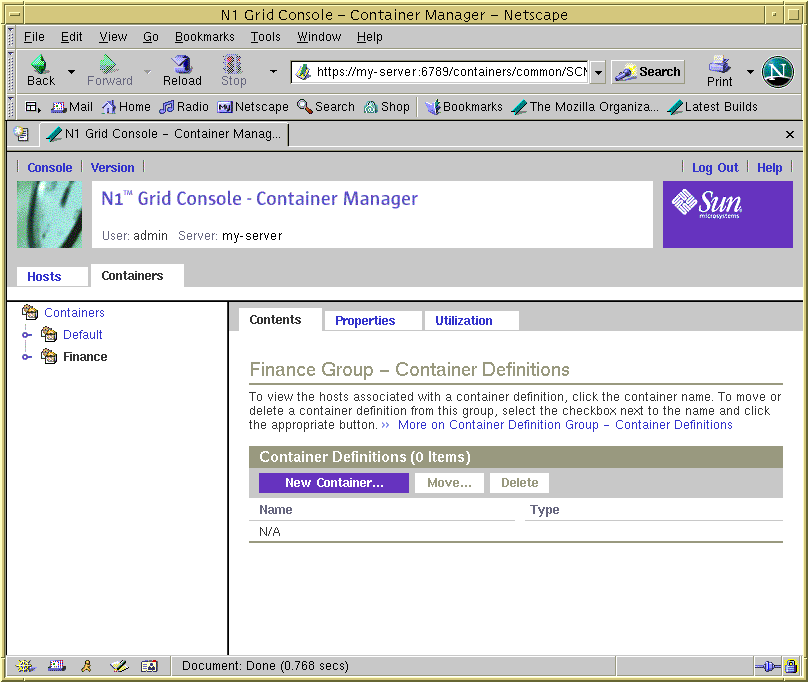
To place the container definition in the navigation tree under a specific group name, select the group name from the Containers view. The Container Definitions table appears in the right pane.
Figure 3–6 Sample: Accessing the New Container Button From a Group Name
-
To automatically associate a specific host with the container:
-
Select the host name in the navigation window from the Hosts view.
If needed, click the host group name in order to expand the list.
-
Select the Containers tab located in the right pane.
The Containers table appears
You will not be required to select a host during the container creation process using this method.
Figure 3–7 Sample: Accessing New Container Button From a Host Name
-
-
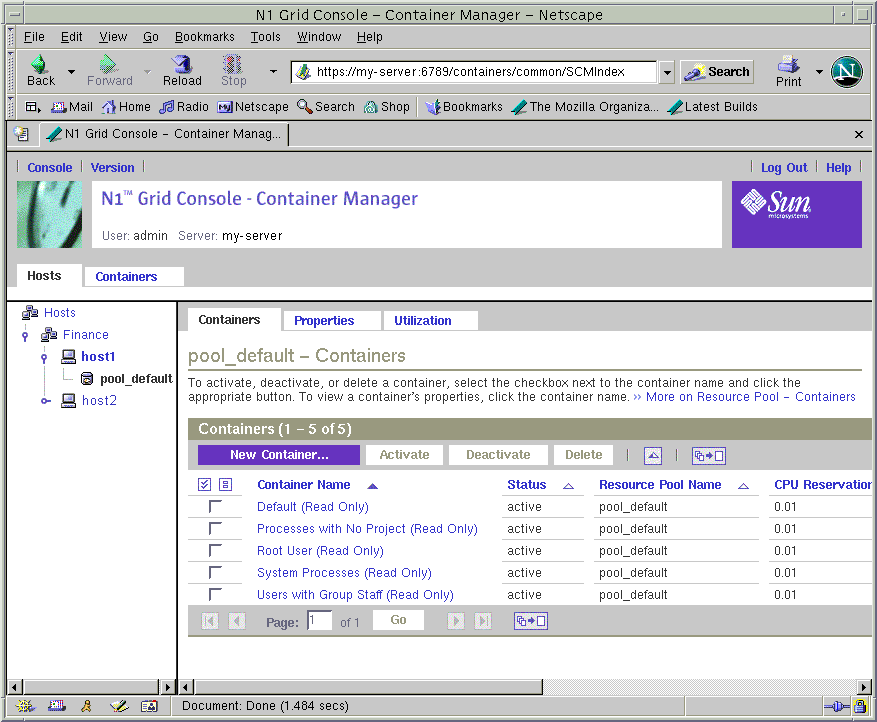
To automatically bind a container to specific resource pool:
-
Select the resource pool name from the navigation window in the Hosts view.
If needed, click the key symbol next to the host name in order to expand the list and the resource pools assigned to the host are displayed.
-
Select the Containers tab located in the right pane.
The Containers table appears.
You will not be required to assign a resource pool as part of the container creation process.
-
Figure 3–8 Sample: Accessing New Container Button From a Resource Pool
-
-
Click the New Container button.
Note –The New Container button is always available from a table appearing in the right pane, regardless of which of the three methods you selected.
The New Container wizard is displayed. The Overview panel is the first to appear.
Figure 3–9 Sample: New Container Wizard Overview Panel
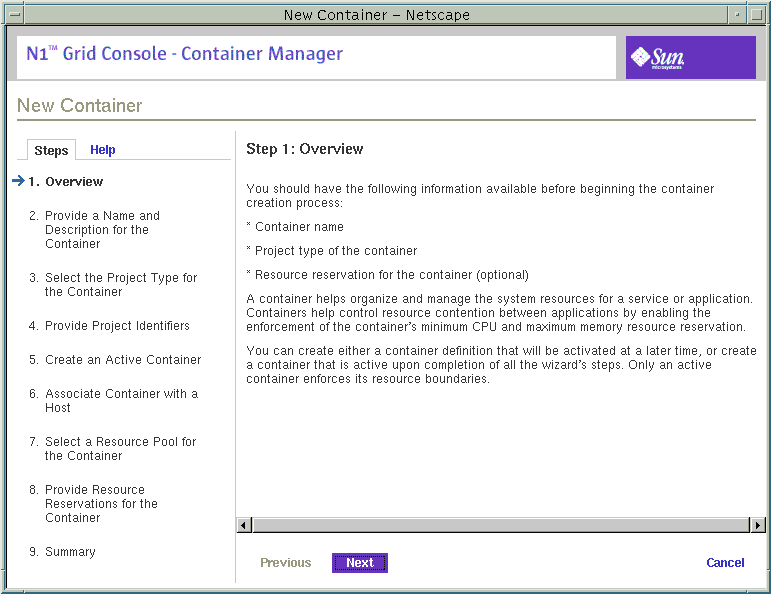
For more samples of the New Container wizard, see Creating an Application-Based Container.
Creating a User-Based or Group-Based Container
Note –
Only the user-based container type is available if you are running the Solaris 8 release.
If you want the container to manage processes that are identified by either a UNIX user or UNIX group name, you should create a user-based or group-based container. The project-type selected during the creation process will determine whether the finished container definition or container is user-based or group-based.
To Create a User-Based or Group-Based Container Definition
-
Launch the New Container wizard, as described in To Launch the New Container Wizard.
The Overview panel appears. Use the Next button to move through the wizard. Use the Previous button to return to any panel in the wizard to make any changes.
-
Provide a name for the container.
The name must be unique and not exceed 32 characters. This name will identify the container in the navigation window, status tables, and resource utilization reports. If a duplicate name is entered, the creation of the container definition will fail.
A container name cannot be changed after the creation procedure is finished.
-
(Optional) Provide a description for the container.
-
Select User or Group as the project type for the container.
A container with a user-based project type tracks processes with the same UNIX user name.
A container with a group-based project type tracks processes with the same UNIX group name.
Note –In the Solaris 8 OS, only the user-based container type is supported.
-
Provide project type identifiers according to the following:
-
User-Based Project - You must provide a valid UNIX user name in the first field. UNIX user names of those users that can join the project can be added in the second field. UNIX group names of those groups that can join the project can be added in the third field. Separate multiple entries with a comma.
Do not provide a user name that is being used in another user-based container or in a Default Container in the first field.
-
Group-Based Project - You must provide a valid UNIX group name in the first field. UNIX group names of those groups that can join the project can be added in the second field. UNIX user names of those users that can join the project can be added in the third field. Separate multiple entries with a comma.
Do not provide a group name that is being used in another group-based container or in a Default Container in the first field.
-
-
Select Later in the Create an Active Container panel.
All the required information to create the container definition has been supplied.
-
Review the information in the Summary panel.
Use the Previous button to move backward through the wizard to make any changes.
-
Click Finish.
The container definition is saved in the navigation window in the Containers view. The wizard is dismissed.
To Create a User-Based or Group-Based Active Container
-
Launch the New Container wizard, as described in To Launch the New Container Wizard.
The Overview panel appears. Use the Next button to move through the wizard. Use the Previous button to return to any panel in the wizard to make any changes.
-
Provide a name for the container.
The name must be unique and not exceed 32 characters. This name will identify the container in the navigation window, status tables, and resource utilization reports. If a duplicate name is entered, the creation of the container definition will fail.
A container name cannot be changed after the creation procedure is finished.
-
(Optional) Provide a description for the container.
-
Select User or Group as the project type for the container.
A container with a user-based project type tracks processes with the same UNIX user name.
A container with a group-based project type tracks processes with the same UNIX group name.
Note –In the Solaris 8 OS, only the user-based container type is supported.
-
Provide project type identifiers according to the following:
-
User-Based Project - You must provide a valid UNIX user name in the first field. UNIX user names of those users that can join the project can be added in the second field. UNIX group names of those groups that can join the project can be added in the third field. Separate multiple entries with a comma.
Do not provide a user name that is being used in another user-based container or in a Default Container in the first field.
-
Group-Based Project - You must provide a valid UNIX group name in the first field. UNIX group names of those groups that can join the project can be added in the second field. UNIX user names of those users that can join the project can be added in the third field. Separate multiple entries with a comma.
Do not provide a group name that is being used in another group-based container or Default Container in the first field.
-
-
Select Now in the Create an Active Container panel.
-
Depending upon the entry point from which you launched the wizard, choose from the following actions:
-
If you accessed the wizard from a host name in the navigation window of the Hosts view, the container is automatically associated with that host. Continue with Step 11.
-
If you accessed the wizard from a location other than the host name, you must associate this container with a host. Continue with Step 8.
-
-
The container must be associated with a host that supports its resource reservation. Select from the following options:
-
To begin the search for available hosts, provide the following information.
- Name
-
Default is '*' for searching all hosts. If you want to specify a particular host, you can provide the name here.
- Operating System
-
Select an operating system from this drop-down menu. Default is ALL.
- Platform
-
Select a platform from this drop-down menu. Default is ALL.
- Total Processors
-
Provide an integer that specifies the minimum number of processors required. The results returned will be hosts that have an equivalent, or more, number of CPUs.
- Total Physical Memory (MB)
-
Provide an integer that specifies the minimum amount of required memory in Mbytes. The results returned will be hosts that have an equivalent, or more, amount of total physical memory.
- Clock Speed
-
Provide an integer that specifies the minimum required processor clock speed in MHz. The results returned will be hosts that have at least that clock speed.
A list is returned of all hosts that meet the search criteria.
-
Make your selection from the list of the matching hosts.
The container is now associated with this host.
-
Assign a resource pool that supports the resource requirements of the container.
New processes started in a project are bound to the corresponding resource pool. Once the container is activated, the new processes the container is holding are bound to its resource pool.
-
To assign a new resource pool:
-
Select Create a New Resource Pool.
-
Provide a name for the resource pool.
The name must be alphanumeric and contain no spaces. The characters dash (-), underscore (_), and dot (.) are allowed.
-
Assign the number of CPUs.
The number of CPUs must be an integer not less than one and cannot exceed the number of CPUs available on the host. The total number of CPUs on the host and the number that are currently available are shown.
-
-
-
Select Use an Existing Resource Pool.
A list of available resource pools is displayed.
-
Select the radio button next to the pool's name in the list.
The total number of CPUs assigned to each resource pool is given, as well as the amount of unreserved CPU still available in each pool. The container is bound to the selected resource pool.
-
-
-
Provide the resource reservations for the container.
The amount of unreserved CPU and memory resources available on the host is provided.
The minimum CPU reservation is required, and must be provided in integer or decimal units. Decimal units up to 100th decimal place are accepted. If you provide a value at 1000th decimal place, the value will be treated as zero. For example, a CPU reservation of 0.002 is treated as zero. A container with a CPU reservation of zero receives CPU resources only when no processes are running in any other container that is associated with the same host.
The memory cap is optional, and must be provided in Mbytes.
-
Review the information in the Summary panel.
Use the Previous button to move backward through the wizard to make any changes.
-
Click Finish.
The selections are saved, and the container is now active. The Solaris kernel begins enforcing the container's resource reservations.
Creating an Application-Based Container
Note –
In the Solaris 8 OS, only the user-based container type is supported.
Use an application-based container to manage the processes that run in a particular software application. You can create an application-based container definition that moves the processes automatically, or one that allows you to move the processes manually.
If you can provide a match expression that is truly unique to the application, you can add this expression to the container definition. You must also provide the UNIX user or UNIX group ID under which the processes will run. Additional users or groups that have the right to join the container at a later time can be added as well. To automatically move processes into the container, you must provide all required project identifiers when the corresponding wizard panel appears. The software will then move all matching processes automatically for all the containers that are based upon this definition.
If the application does not create truly unique identifiers, then you will want to move the processes manually or start the application inside the container. If you want to move the processes manually, create the container definition with only the UNIX user or UNIX group ID under which the processes will run. Additional users or groups that have the right to join the container at a later time can be added as well. Then move the processes with the newtask -p command. For more information, see Moving or Starting Processes in a Container.
To Determine the Match Expression for an Application
Use this procedure to determine the correct match expression to identify the processes corresponding to the application you want to manage. This expression is required in the New Container wizard to move processes automatically into a container.
-
From a terminal window, launch the application that the application-based container will manage.
-
To see a list of all processes running, in a terminal window type:
% ps -cafe
-
In the CMD column, locate the corresponding executable name.
Choose the expression that will uniquely identify the application's processes.
Example 3–1 Determining a Match Expression For Mozilla
The following is an example of output from the ps - cafe command when searching for Mozilla:
% ps -cafe
     UID   PID  PPID  CLS PRI    STIME TTY      TIME CMD
    ...
username  8044  7435   IA  50 19:47:09 pts/11   0:00 /bin/ksh -p /usr/sfw/lib/mozilla/mozilla
|
In this example, the unique executable name is mozilla. Likewise, a correct match expression is mozilla.
Example 3–2 Determining a Match Expression for Tomcat Server
When you know the name of the application, you can use the grep command in conjunction with ps -cafe to locate the correct match expression. The following is an example of output from the ps - cafe | grep tomcat command when searching for Tomcat server. This example has been trimmed for space, leaving the relevant information.
% ps -cafe | grep tomcat nobody 27307 /usr/j2se/bin/java -classpath //usr/apache/tomcat/bin/bootstrap.jar:/usr/j2se/l |
In this example, the executable name is java. However, the correct match expression is tomcat. In this case the match expression is the argument instead of the executable name as java does not uniquely identify the Tomcat processes.
Example 3–3 Verifying a Match Expression for Tomcat Server
The following is an example of how to use the pgrep command to find the PID, in order to verify that you have identified the unique match expression for finding the desired process:
% pgrep -f tomcat 27307 |
The PID for Tomcat server is 27307. This matches the PID from Example 3–2. This confirms that the match expression tomcat corresponds to the Tomcat server process.
To Create an Application-Based Container Definition
-
Launch the New Container wizard, as described in To Launch the New Container Wizard.
The Overview panel appears. Use the Next button to move through the wizard. Use the Previous button to return to any panel in the wizard to make any changes.
-
Provide a name for the container.
The name must be unique and not exceed 32 characters. This name will identify the container in the navigation window, status tables, and resource utilization reports. If a duplicate name is entered, the creation of the container definition will fail.
A container name cannot be changed after the creation procedure is finished.
-
(Optional) Provide a description for the container.
-
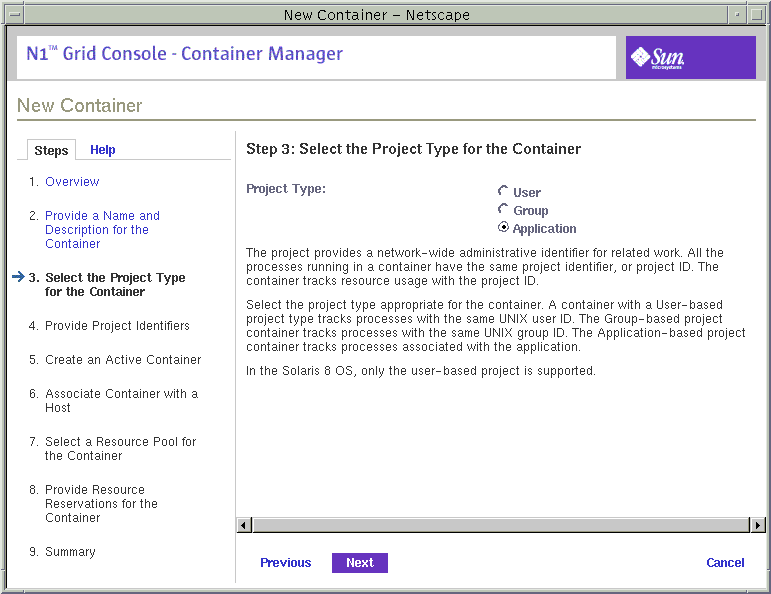
Select Application as the project type for the container.
The application-based project container tracks processes associated with the application. For more information about this project type, see Table 3–2.
Figure 3–10 Sample: Project Type Panel Showing Selected Type as Application
-
Provide the project name in the Project Name filed.
A project name is required. You can choose the name of the application itself, or any other name that is suitable for your needs. A corresponding project name is added to the /etc/project file on the host when the container is activated.
If you want to provide a project name that is already being used by another application-based container, both containers cannot be activated on the same host. For more information, see Container Types.
-
Determine whether you want to move the application processes under the container automatically when the container is activated or to move them yourself from the command line.
-
To indicate that you want to move the application processes yourself from the command line, select the checkbox Do Not Use Match Expression.
-
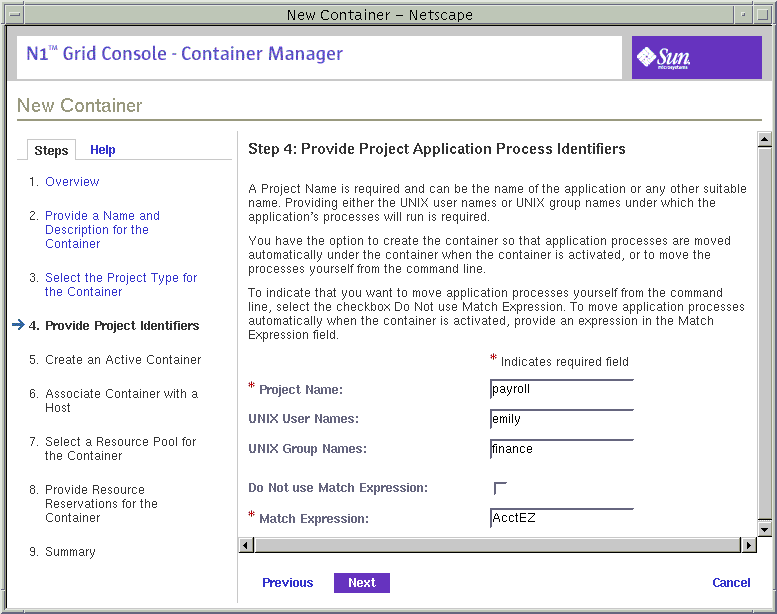
To move application processes under the container automatically when the container is activated, provide an expression in the Match Expression field.
The match expression must be supplied in order to automatically move the application's processes to the container. This expression is case sensitive. To determine the correct match expression, see To Determine the Match Expression for an Application.
If a match expression is not provided at this time, the application's processes will not be moved automatically to this container until this expression is supplied.
-
-
Provide the UNIX user names or UNIX group names under which the application's processes will run.
The UNIX user names or UNIX group names under which the application's processes will run must be supplied. If these are not provided, the corresponding processes will not be moved under the container upon activation until they are supplied. Separate multiple entries with a comma.
Figure 3–11 Sample: Completed Project Identifiers Panel Without a Match Expression
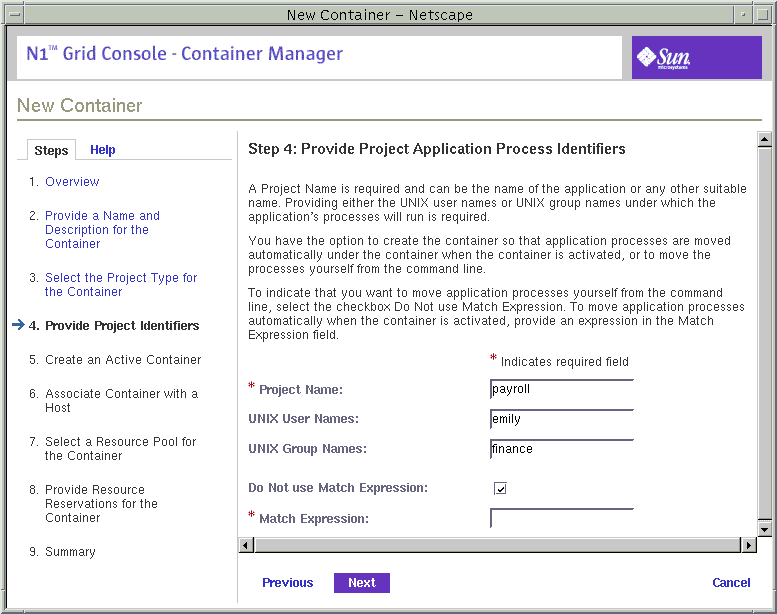
Figure 3–12 Sample: Completed Project Identifiers Panel With a Match Expression
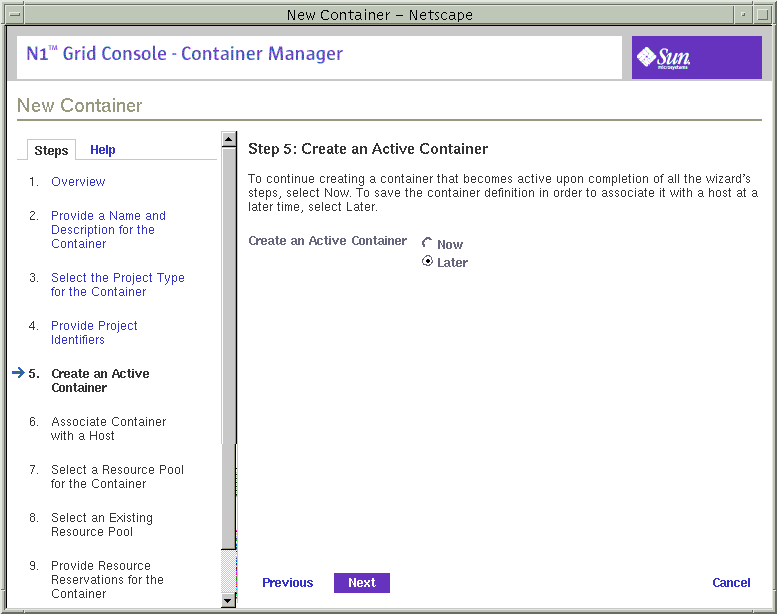
-
Select Later in the Create an Active Container panel.
All the required information to create the container definition has been supplied.
Figure 3–13 Sample: Creating Active Container Later Panel
-
Review the information in the Summary panel.
Use the Previous button to move backward through the wizard to make any changes.
-
Click Finish.
The container definition is saved in the navigation window in the Containers view. The wizard is dismissed.
To Create an Active Application-Based Container
-
Launch the New Container wizard, as described in To Launch the New Container Wizard.
The Overview panel appears. Use the Next button to move through the wizard. Use the Previous button to return to any panel in the wizard to make any changes.
-
Provide a name for the container.
The name must be unique and not exceed 32 characters. This name will identify the container in the navigation window, status tables, and resource utilization reports. If a duplicate name is entered, the creation of the container definition will fail.
A container name cannot be changed after the creation procedure is finished.
-
(Optional) Provide a description for the container.
-
Select Application as the project type for the container.
The application-based project container tracks processes associated with the application. For more information about this project type, see Table 3–2.
-
Provide the project name.
A project name is required. You can choose the name of the application itself, or any other name that is suitable for your needs. A corresponding project name is added to the /etc/project file on the host when the container is activated.
If you want to provide a project name that is already being used by another application-based container, both containers cannot be activated on the same host. For more information, see Container Types.
-
Determine whether you want to move application processes under the container automatically when the container is activated or to move them yourself from the command line.
-
To indicate that you want to move application processes yourself from the command line, select the checkbox Do Not Use Match Expression.
-
To move application processes under the container automatically when the container is activated, provide an expression in the Match Expression field.
The match expression must be supplied in order to automatically move the application's processes to the container. This expression is case sensitive. To determine the correct match expression, see To Determine the Match Expression for an Application.
If a match expression is not provided at this time, the application's processes will not be moved under this container until this expression is supplied.
-
-
Provide either the UNIX user names or UNIX group names under which the application's processes will run.
The UNIX user names or UNIX group names under which the application's processes will run must be supplied. If these are not provided, the corresponding processes will not be moved under the container until they are supplied. Separate multiple entries with a comma.
-
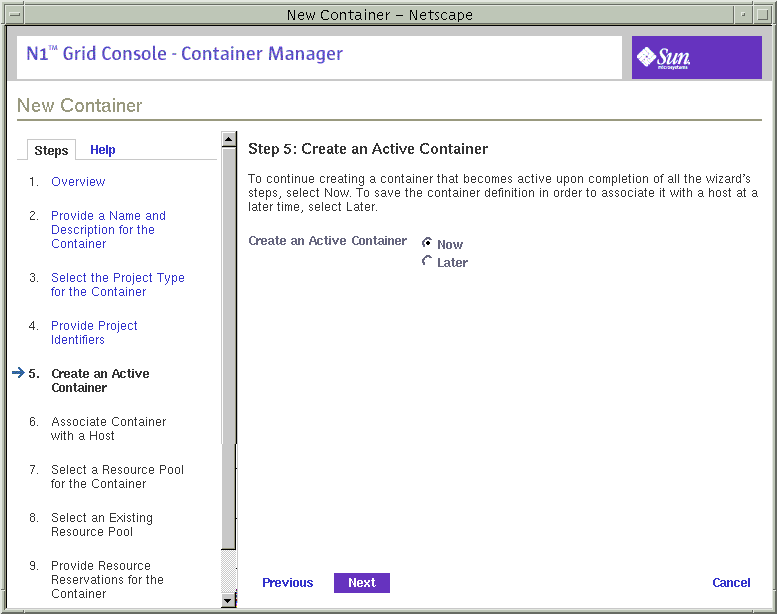
Select Now in the Create an Active Container panel.
Figure 3–14 Sample: Creating an Active Container Now
-
Depending upon the entry point from which you launched the wizard, choose from the following actions:
-
If you accessed the wizard from a host name in the navigation window of the Hosts view, the container is automatically associated with that host. Continue with Step 13.
-
If you accessed the wizard from a location other than the host name, you must associate this container with a host. Continue with Step 10.
-
-
The container must be associated with a host that supports its resource reservation. Select from the following options:
-
To begin the search for available hosts, provide the following information.
- Name
-
Default is '*' for searching all hosts. If you want to specify a particular host, you can provide the name here.
- Operating System
-
Select an operating system from this drop-down menu. Default is ALL.
- Platform
-
Select a platform from this drop-down menu. Default is ALL.
- Total Processors
-
Provide an integer that specifies the minimum number of processors required. The results returned will be hosts that have an equivalent, or more, number of CPUs.
- Total Physical Memory (MB)
-
Provide an integer that specifies the minimum amount of required memory in Mbytes. The results returned will be hosts that have an equivalent, or more, amount of physical memory.
- Clock Speed
-
Provide an integer that specifies the minimum required processor clock speed in MHz. The results returned will be hosts that have at least that clock speed.
Figure 3–15 Sample: Completed Search For a Host Panel
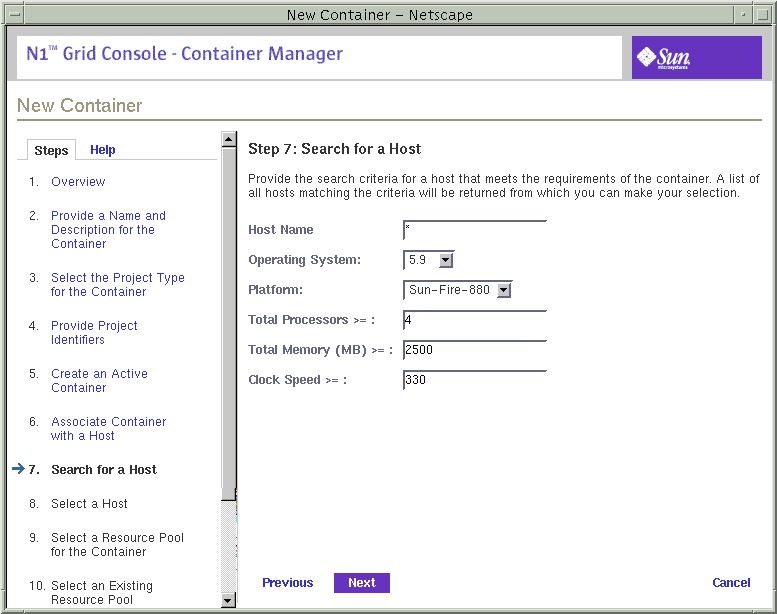
A list is returned of all hosts that meet the search criteria.
-
Make your selection from the list of the matching hosts.
The container is now associated with this host.
-
Assign a resource pool that supports the resource requirements of the container.
New processes started in a project are bound to the corresponding resource pool. Once the container is activated, the new processes being held in the container are bound to its resource pool.
-
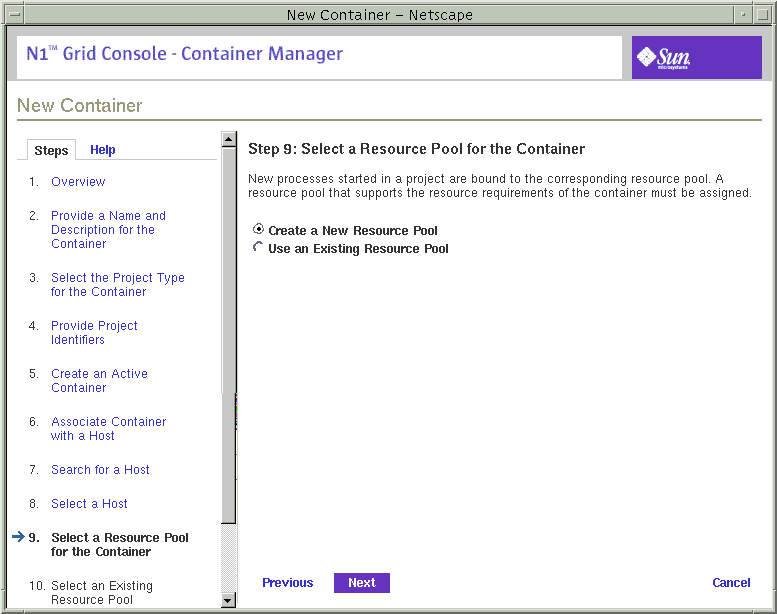
To assign a new resource pool:
-
Select Create a New Resource Pool.
Figure 3–16 Sample: Selecting Create a New Resource Pool
-
Provide a name for the resource pool.
The name must be alphanumeric and contain no spaces. The characters dash (-), underscore (_), and dot (.) are allowed.
-
Assign the number of CPUs.
The number of CPUs must be an integer not less than one and cannot exceed the number of CPUs available on the host. The total number of CPUs on the host and the number that are currently available are shown.
-
-
-
Select Use an Existing Resource Pool.
A list of available resource pools is displayed.
-
Select the radio button next to the pool's name in the list.
To total number of CPUs assigned to each resource pool is given, as well as the amount of unreserved CPU still available in each pool. The container is bound to the selected resource pool.
-
-
-
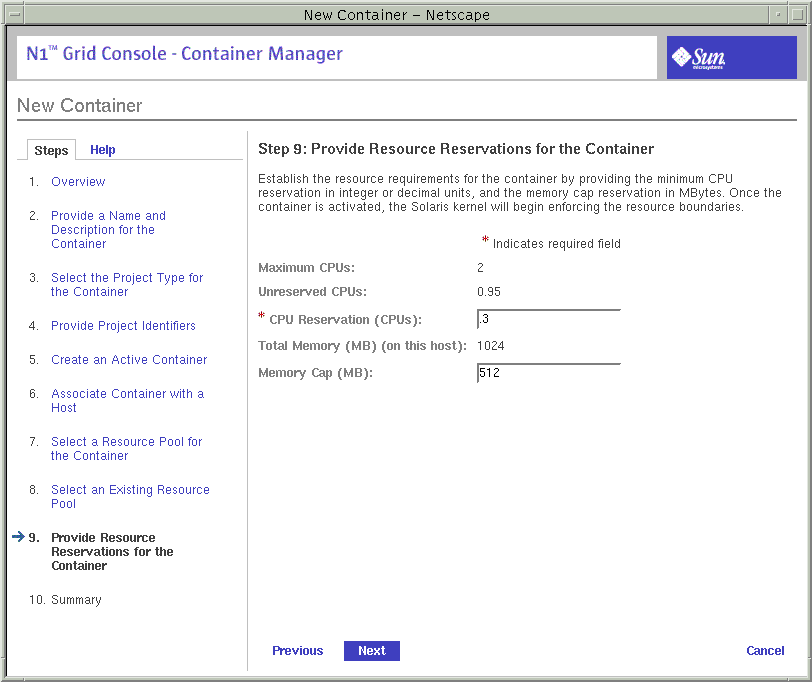
Provide the resource reservations for the container.
The amount of unreserved CPU and memory resources available on the host is provided.
The minimum CPU reservation is required, and must be provided in integer or decimal units. Decimal units up to 100th decimal place are accepted. If you provide a value at 1000th decimal place, the value will be treated as zero. For example, a CPU reservation of 0.002 is treated as zero. A container with a CPU reservation of zero receives CPU resources only when no processes are running in any other container that is associated with the same host.
The memory cap is optional, and must be provided in Mbytes.
Figure 3–17 Sample: Completed Resource Reservations Panel
-
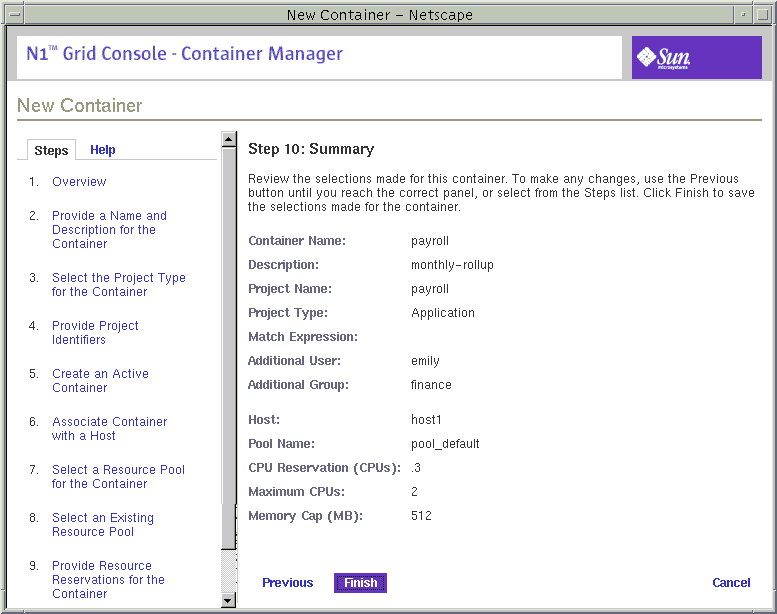
Review the information in the Summary panel.
Use the Previous button to move backward through the wizard in order to make any changes.
Figure 3–18 Sample: Summary Panel
-
Click Finish.
The selections are saved, and the container is now active. The Solaris kernel begins enforcing the container's resource reservations.
Moving or Starting Processes in a Container
If the application being managed by the container does not have a unique executable name, then you will want to move processes into the container manually. This method ensures you track only the processes of the desired application. You have the following options for moving processes into a container:
-
You can start the application and move the processes individually, one at a time. The owner of the processes must be specified in the container definition to move the processes.
-
You can start the application inside the container with the newtask -p command. This causes all corresponding processes to be placed under the container without need to move them individually. The owner of the processes must be specified in the container definition to move the processes.
To Move Processes Into an Application-Based Container Individually
Use this procedure if you did not provide a match expression for an application-based container definition and want to move the application's processes into the container individually.
-
Create an application-based container definition for managing the application. Select the checkbox Do Not Use Match Expression.
For detailed steps, see To Create an Application-Based Container Definition.
-
Review the/etc/project file to determine the project name for the container by typing:
% cat /etc/project
You will need this project name in Step 5.
-
If needed, start the application in a terminal window.
-
Determine the processes corresponding to the application.
For examples of how to do this, see Example 3–1, Example 3–2, and Example 3–3.
-
Move the corresponding processes by typing:
# newtask -p project_name -c pid
where project_name is the corresponding name found in the /etc/project file and pid is the process ID of the process to be moved.
You must move each process one at a time.
-
Repeat Step 5 until all processes are moved.
Example 3–4 Moving ORACLE Processes Individually
The following example shows how to use the command ps with egrep to identify ORACLE processes associated with an application named AcctEZ. These three processes (17773, 17763, 17767) will be moved into a container named Accounting with the newtask -p command. The project name for this container is named payroll, which has been verified in the /etc/project file.
% ps -cafe | egrep 'UID|ora_'
     UID   PID  PPID  CLS PRI    STIME TTY      TIME CMD
 smcorau 17773     1  FSS  28 14:55:25 ?        0:00 ora_reco_AcctEZ
 smcorau 17763     1  FSS  59 14:55:24 ?        0:00 ora_pmon_AcctEZ
 smcorau 17767     1  FSS  59 14:55:25 ?        0:00 ora_lgwr_AcctEZ
% newtask -p payroll -c 17773
% newtask -p payroll -c 17763
% newtask -p payroll -c 17767
|
Example 3–5 Verifying That the Processes Were Moved Into the Container With ps
You can use the ps command in combination with grep to verify that the processes have been moved into a container. The following is an example showing that the processes moved individually in Example 3–4 are now in the container payroll:
% ps -ae -o pid,project,comm | grep payroll 17773 payroll ora_reco_AcctEZ 17763 payroll ora_pmon_AcctEZ 17767 payroll ora_lgwr_AcctEZ |
Example 3–6 Verifying That the Processes Were Moved Into the Container With prstat
You can use the command prstat to verify that the processes were moved into a container if you know the project name. In this example, the project name is payroll.
% prstat -J payroll PID USERNAME SIZE RSS STATE PRI NICE TIME CPU PROCESS/NLWP 17773 admin 216M 215M cpu2 1 0 0:05:08 29% ora_reco_AcctEZ/1 17763 admin 834M 782M sleep 1 0 0:35:02 0% ora_pmon_AcctEZ/1 17767 admin 364M 352M run 1 0 0:22:05 23% ora_lgwr_AcctEZ/1 |
To Start an Application in a Container
-
Create an application-based container definition for managing the application. Select the checkbox Do Not Use Match Expression.
For detailed steps, see To Create an Application-Based Container Definition.
-
Select from the following according to the OS version:
-
For the Solaris 8 OS, type:
% srmuser user_name newtask -p project_name application_name
where user_name is the UNIX user name, and project_name is in the form user.username. In the Solaris 8 OS, since only the user-based container is supported, user_name and project_name will be the same.
-
For the Solaris 9 OS, type:
% newtask -p project_name application_name
where project_name is the project associated with the container, and application_name is the command that starts the application, including any command arguments.
The application is started in the container.
-
Example 3–7 Starting an Application Inside a Container on Solaris 9 OS
The following is an example of starting an application named tracks inside a container named music:
% newtask -p music tracks -z 0 mozart.au |
where -z 0 mozart.au are the command line arguments for the application tracks.
Example 3–8 Verifying Which Project an Application is Associated
After the application has been started, you can verify which project the application is associated with by typing:
% ps -ae -o pid,project,comm |
The following is an example of the output from this command:
PID PROJECT COMMAND ... 17771 default ora_smon_SunMC 16246 system rquotad 26760 group.staff /bin/csh 16266 music tracks 17777 default ora_d000_SunMC 17775 default ora_s000_SunMC 17769 default ora_ckpt_SunMC |
In this example, the application named tracks has PID 16266, the project is music, and the executable is tracks. This is the same application started in Example 3–7.
Activating or Deactivating Containers
A container's resource boundaries are not enforced while in a defined or inactive state. You must activate the container to enable this enforcement. Conversely, when you do not want these limits enforced, you must deactivate the active container. An active container can be deactivated without losing the resource boundaries you've established. For more information, see Container States.
An existing container definition can be used to create new active containers with the Associate Host to Container wizard. You activate an inactive container or deactivate an active container with a button.
To Activate a Defined Container
-
If the Container Manager GUI is not already open, access it as described in To Launch the Container Manager GUI.
-
In the Containers view, select the name of the container definition.
If the container definition is part of a group, select the group from the navigation window to display the container definitions in the right pane.
-
Select the Hosts tab in the right pane.
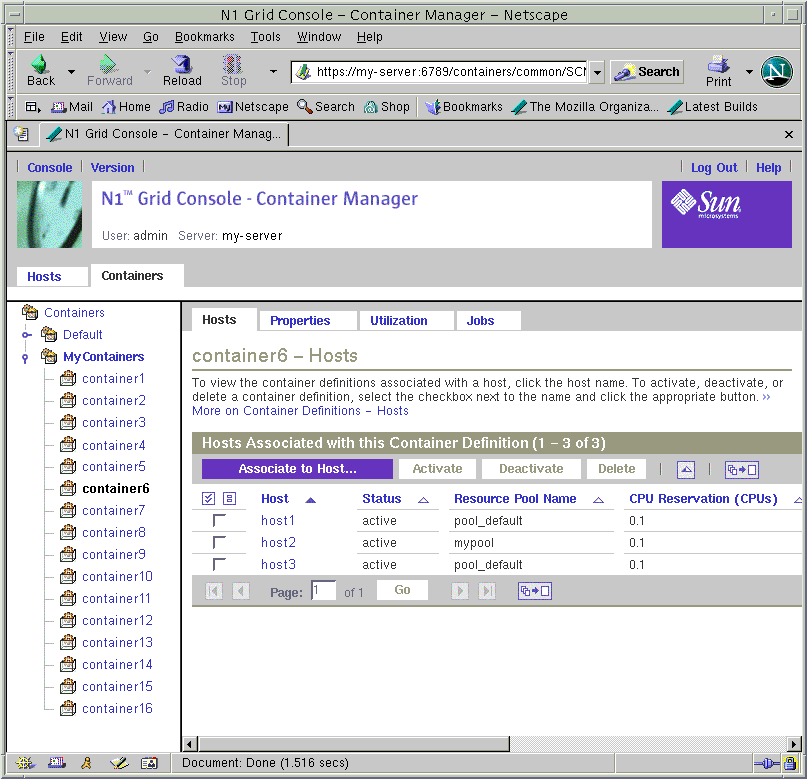
The Hosts Associated with this Container Definition table appears. All hosts that the selected container definition is currently associated with are listed in the table.
Figure 3–19 Sample: Hosts Associated with this Container Definition Table
-
Click the Associate Host to Container button.
The Associate Host to Container wizard appears. This wizard is similar to the New Container wizard.
-
For the remaining steps to finish activating the container, complete steps 8 - 14 of To Create a User-Based or Group-Based Active Container.
To Activate an Inactive Container
-
If the Container Manager GUI is not already open, access it as described in To Launch the Container Manager GUI.
-
In the Hosts view, select the host with which the container is associated.
-
Select the Containers tab in the right panel.
A table appears that lists all containers that are associated with that host.
-
To enable the Activate button, select the checkbox of the container to be activated.
-
(Optional) Select the Properties tab.
You can modify the properties of the container. For more information, see Modifying Containers.
-
Click the Activate button.
The container is activated and the resource boundaries are being enforced by the kernel.
To Deactivate an Active Container
-
If the Container Manager GUI is not already open, access it as described in To Launch the Container Manager GUI.
-
In the Hosts view, select the host with which the container is associated.
-
Select the Containers tab in the right panel.
A table appears that lists all containers that are associated with that host.
-
To enable the Deactivate button, select the checkbox of the container to be activated.
Figure 3–20 Sample: Containers View with Deactivate Button Enabled

-
(Optional) Select the Properties tab.
You can modify the properties of the container. For more information, see Modifying Containers.
-
Click the Deactivate button.
The container is activated and the resource boundaries are not being enforced by the kernel.
Viewing Container Processes
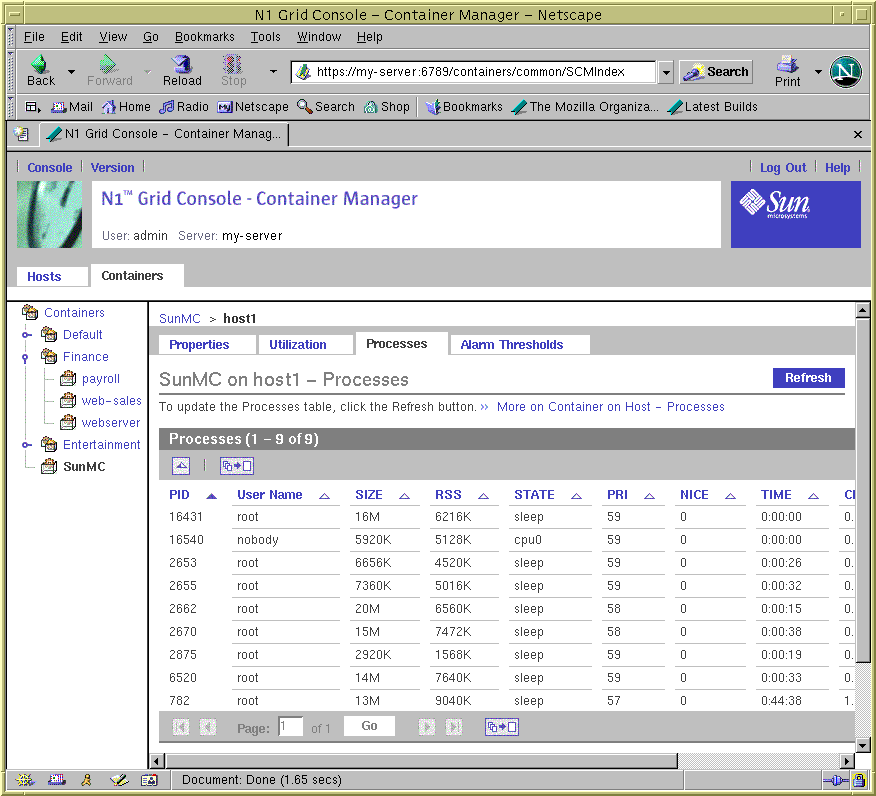
Information about the processes running in an active container can be obtained from a table in either the Hosts view or the Containers view. The same Processes table and identical information is provided in both views. Processes are listed one per row and the following information is available:
- PID
-
The process ID.
- User Name
-
The owner of the process (the UNIX user name or login name).
- SIZE
-
The total virtual memory size of the process in Mbytes.
- RSS
-
The resident set size of the process in Mbytes.
- STATE
-
The state of the process. Values include:
-
cpuN – The process is running on CPU N where N is an integer
-
sleep – The process is sleeping, or waiting
-
run – The process is running
-
zombie – The process is terminated
-
stop – The process is stopped
-
- PRI
-
The priority of the process. The higher the number, the higher the process.
- NICE
-
Nice value used in priority computation.
- Time
-
The cumulative execution time for the process.
- CPU
-
The percentage of recent time used by the process.
- PROCESS/NLWP
-
The name of the process, which is the name of executed file. The number of light weight processes (lwps) in the process.
Figure 3–21 Sample: Processes Table For an Active Container
To View the Processes Running in a Container From the Hosts View
Use this procedure if you know the name of the host to which the container is associated.
-
If the Container Manager GUI is not already open, access it as described in To Launch the Container Manager GUI.
-
Select the Hosts view by clicking the left tab in the navigation window.
-
In the navigation window, select the host with which the container is associated.
-
In the right pane, select the Containers tab.
The Containers table is displayed and lists all the containers that are associated with the host. The list included active and inactive containers. You must select an active container in order to see information about its processes .
-
Select the container.
The properties page for the container instance on the selected host is displayed.
-
The processes running inside the container are displayed in the Processes table. The name of the container and the host it is associated with is displayed above the table.
If no processes are listed, you might have selected an inactive container.
To View the Processes Running in a Container From the Containers View
Use this procedure when you know the name of the container and want to select from the list of hosts to which the container is associated.
-
If the Container Manager GUI is not already open, access it as described in To Launch the Container Manager GUI.
-
Select the Containers view by clicking the right tab in the navigation window.
-
In the navigation window, select the desired container.
A table listing all hosts that the container is associated with displays in the right pane.
-
In the table, select the name of the host.
The properties page for the container instance on the selected host appears.
-
Select the Processes tab.
The name of the container and the host it is associated with is displayed in the table title. The processes running inside the container are displayed in the Processes table.
If no processes are listed in the table, you might have selected an inactive container.
Modifying Containers
Two property sheets are available for modifying either a container definition or an active or inactive container. The following table highlights the differences between the property sheets.
Table 3–3 Property Sheet Details|
Property Sheet |
Used For |
Accessible From |
|---|---|---|
|
Container definition |
Changes to description, project type, project identifiers (users, groups), match expression. |
Properties tab in Containers view after selecting the container definition. |
|
Container instance (active or inactive container) |
Changes to resource pool association, CPU reservation, memory cap. |
Properties tab in Hosts view or Containers view. |
Each container instance has a container definition with which it is associated. Any change made to the container definition will apply to all the container instances using that definition. For example, if you change the project type in a container definition, the project type changes for all container instances using the same definition. Therefore, you can use both property sheets to make all modifications needed.
Each container instance also has a property sheet that is used to change only its own resource pool association or the resource reservations. You can change one container at a time when using this property sheet. For example, you can increase the current minimum CPU reservation or the current memory cap. Changes take effect once the new values have been saved. Modifications made to the resource boundaries on an inactive container have no effect until you reactivate the container.
Figure 3–22 Sample: Property Sheet For Changing Resource Reservations and Resource Pool
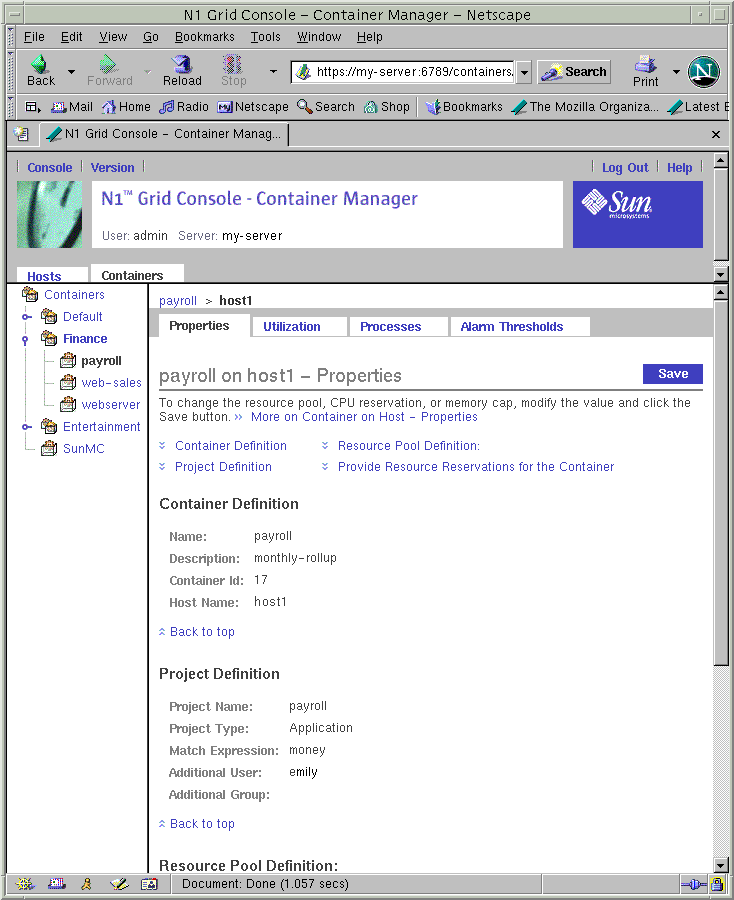
If you need to make resource changes to multiple containers that are active on multiple hosts, you should use the resource change job feature. For more information, see Modifying Containers With a Resource Change Job.
From the Containers view, a separate property sheet is available from which you can modify the container definition. Changes can be made to one container definition at a time. You cannot use the resource change job feature to make changes to multiple container definitions.
Figure 3–23 Sample: Property Sheet For Modifying a Container Definition
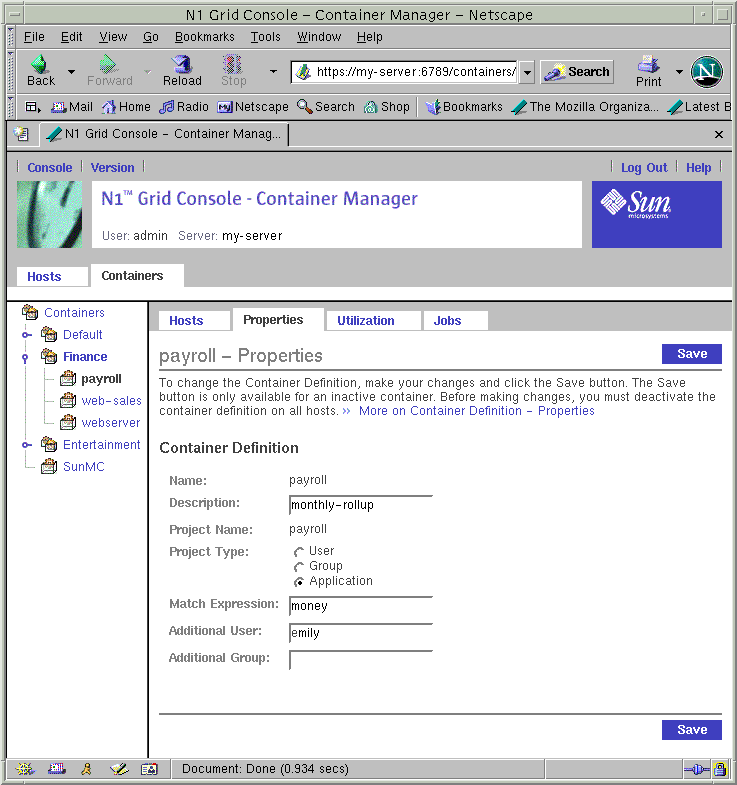
You cannot modify the properties of a default container. Therefore, neither property sheet is available if a default container is selected.
Note –
Only a container definition or an inactive container can have its properties modified. You must first deactivate an active container from every host that the container is associated with before modifying any properties. Once the changes are saved, you can reactivate the container.
To Modify a Container Definition Using a Property Sheet
-
If the Container Manager GUI is not already open, access it as described in To Launch the Container Manager GUI.
-
Select the Containers view.
-
Select the container definition.
-
If the container definition is not currently used for any active container, select the Containers Group from the navigation window. This method displays the Container Definitions and Groups table in the right pane. Select the container definition from the table.
-
If the container definition is being used with any active containers, select the container definition from the navigation window. If needed, click the different Container groups to expand the list of individual container definitions. This method displays the Hosts Associated with this Container Definition table from which you can deactivate the container instances.
Note –All container instances that use this container definition must be deactivated before you can change the properties. If any show the status as Active, use the Deactivate button in the Hosts Associated with this Container Definition table after selecting all hosts before continuing.
-
-
Select the Properties tab from the right pane.
The property sheet for the selected container definition appears. You can make the following changes in the text fields:
-
Description – The description of the container definition.
-
Project Type – User, Group, or Application.
-
Additional User – Change existing entries or provide additional valid UNIX user names. Separate multiple entries with a comma.
-
Additional Group – Change existing entries or provide additional valid UNIX group names. Separate multiple entries with a comma.
Note –If the Save button is not available and the text fields are greyed out, the container definition is being used in one or more container instances. Verify that the state is Inactive for all hosts listed in the Hosts Associated with this Container Definition table. If any show status as Active, you must deactivate them.
-
-
Click Save to save the changes.
The property sheet remains displayed.
To Modify a Container Using a Property Sheet
Use this procedure to makes changes the resource pool or resource reservations for only one container . If you want to make the same change to multiple containers, see Modifying Containers With a Resource Change Job.
-
If the Container Manager GUI is not already open, access it as described in To Launch the Container Manager GUI.
-
Choose from the following methods to select the desired container instance:
-
If you know the name of the host that the container is associated with, select the host name from the navigation window in the Hosts view. Then select the Containers tab in the right pane to access a table that lists all containers associated with the host.
-
If you know the name of the container, select its name from the navigation window in the Containers view. The Hosts Associated with this Container Definition table appears in the right pane.
Note –All containers that use this container definition must be deactivated before you can change the properties. If any show the status as Active, use the Deactivate button in the table before continuing. The tables in both views have this button.
-
-
Select the name of the container or host from the table, depending upon the method selected in the previous step.
The property sheet for the container instance is displayed.
-
-
Resource Pool Definition. To change the pool that the container is associated with, select from the drop-down list.
-
CPU Reservation (CPUs). Provide the new value in the text box in integer or decimal units.
-
Memory Cap (MB). Provide the new value in the text box.
-
-
Click Save.
The requested changes to the resource reservations have been saved.
-
(Optional) To reactivate the container, return to the table used in Step 3 and click Activate.
Modifying Containers With a Resource Change Job
Use the resource change job feature to change resource limits on multiple containers that are spread across multiple hosts. These containers must all be using the same container definition. You can either run the resource change job immediately so that the changes are implemented at the same time, or you can schedule the changes to occur later.
Note –
Changes to CPU reservations are immediate. Changes to memory caps can take time to write to swap. Any big change to the memory cap will affect system performance while the memory cap is being adjusted.
The following information is available in the Resource Change Job table:
- Resource Change Job Name
-
The name of the job that was provided during job creation.
- Hosts
-
The names of the hosts with which the container is associated.
- Schedule
-
The interval the job is scheduled to run. Options include One Time, Hourly, Daily, Weekly, Monthly.
- State
-
The status of the job. Values include Queued, Succeeded, Failed.
The following example using containers named Webserver and Rollup illustrates how the resource change job feature can be used to manage system resources across the enterprise. In this example, an online store provides order taking from its web site. The Webserver container was created to manage the CPU and memory resources used by the web server across North America. The Rollup container was created to manage the resources required by the database. During the day and early evening hours, web server resource demands are high as people use the web site to place orders. But in the evening, the demand on the webserver typically drops dramatically after midnight. During overnight hours, the database is scheduled to run reports on the day's sales.
To manage the resources required by these two containers on an 8 CPU system with 6,000 Mbytes of physical memory, you could create a total of four resource change jobs as shown in the following table:
Table 3–4 Sample of Resource Change Job Scheduling|
Container Name |
Resource Change Job Name |
Start Time |
Interval |
Resource Change |
|---|---|---|---|---|
|
Webserver |
webserver-day |
6:00 am |
Daily |
CPU: 6 Memory: 2500 MB |
|
Rollup |
rollup-day |
6:00 am |
Daily |
CPU: 1 Memory: 2000 MB |
|
Webserver |
webserver-night |
Midnight |
Daily |
CPU: 1 Memory: 2000 MB |
|
Rollup |
webserver-night |
Midnight |
Daily |
CPU: 6 Memory: 2500 MB |
Two resource change jobs run every morning at 6:00 am to change the resources for the Webserver and Rollup containers. During the day, the Webserver container is given the majority of CPU and physical memory resources as the demand of the webserver is high. Then at midnight each day a second set of resource change jobs run, and they reallocate the system's resources to accommodate the changing need: the database requires the resources to tally the daily sales while the web server requires fewer resources as demand is low.
This feature is similar to the job management feature found in Sun Management Center, but you should use the Container Manager GUI to administer all Container Manager jobs . For more information about the Sun Management Center job feature, see “Job Management Concepts” in Sun Management Center 3.5 User's Guide.
To Modify a Container Using a Resource Change Job
-
If the Container Manager GUI is not already open, access it as described in To Launch the Container Manager GUI.
-
Select the Containers view.
-
In the navigation window, select the container name.
The container must be associated with a host in order to proceed.
-
Select the Jobs tab from the right pane.
The Resource Change Job table is displayed.
Figure 3–24 Sample: Resource Change Jobs Table
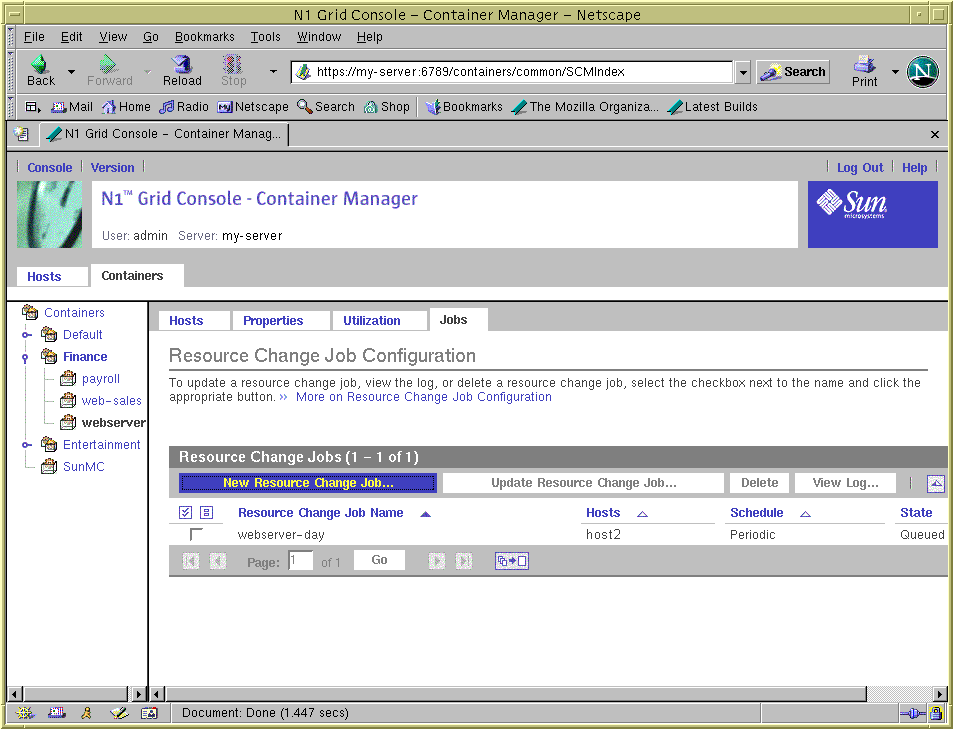
-
Click the New Resource Change Job button located in the table.
The Resource Change Job wizard appears. The Overview panel is the first. Move through the wizard by providing information as requested, and clicking the Next button when finished with each panel.
-
Provide a name for the resource change job. Providing a description is optional.
Length of the name cannot exceed 32 characters. Spaces, dash (-), underscore (_), and dot (.) are all accepted. A space will be converted to an underscore (_).
The Select Hosts panel appears. The names of all the hosts for which the selected container is associated with appears in the Available list. You can change the resource limits for one or more hosts by selecting them from this window.
-
Select each host from the Available list, and click Add to move each to the Selected list. Or click Add All to move all hosts.
The host names move to the Selected field.
-
Provide a new minimum CPU reservation. A memory cap is optional.
The new resource limits will apply to all the hosts selected in the previous step. Use the Previous button to return to make any changes.
-
Provide a start date, start time, and interval for the resource change job.
The changes to the resource limits will take effect at the requested time.
-
Review your selections in the Summary panel. Use the Previous button to return to make any corrections. When done, click Finish.
Figure 3–25 Sample: Summary Panel in Resource Change Job Wizard
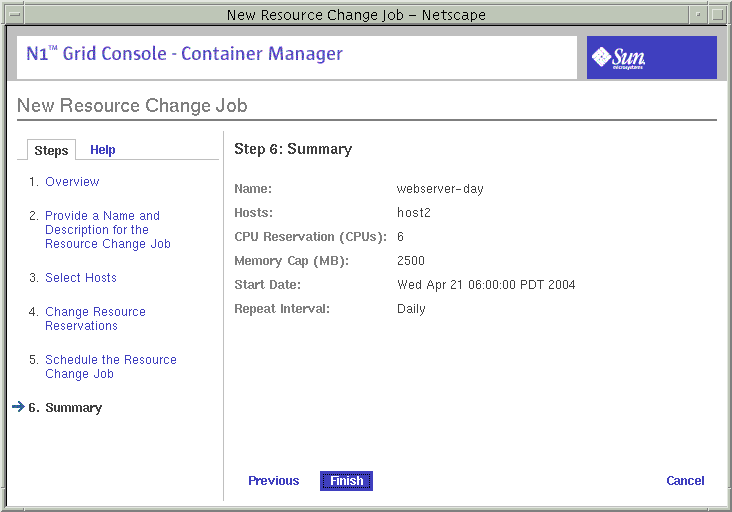
The wizard is dismissed. The job is added to the Jobs table. The status is listed as queued until the day and time when the Job is scheduled to run. The changes to the resource limits will take effect at the time requested.
To Edit a Pending Resource Change Job
Use this procedure to make changes to a pending job whose status still shows as Queued in the Jobs table.
-
If the Container Manager GUI is not already open, access it as described in To Launch the Container Manager GUI.
-
Select the Containers view in the navigation window.
-
Select the Jobs tab from the right pane.
-
From the Resource Change Job table, select the job to be changed by selecting the checkbox next to the name.
A checkmark appears in the box.
-
To launch the Update Resource Change Job wizard, click the Update Resource Change Job button.
Move through the wizard by changing information as needed, and clicking the Next button when finished with each panel. For a detailed description of the steps to move the panels, see To Modify a Container Using a Resource Change Job.
-
When done, click Finish.
The wizard is dismissed. The edits made to the job have been saved.
To View a Resource Change Job Log
Use this procedure to view the log for a change job that has completed. If the job included changes to multiple hosts, the status for the jobs per host is located in the log.
-
If the Container Manager GUI is not already open, access it as described in To Launch the Container Manager GUI.
-
Select the Containers view in the navigation window.
-
Select the Jobs tab from the right pane.
-
From the Resource Change Jobs table, select the completed job whose log you want to view by selecting the checkbox next to the name.
A checkmark appears in the box.
-
Click the View Log button.
The log file for the resource change job appears.
Alarm Management
You can set alarm thresholds for a container's use of CPU and physical memory resources. Three levels of alarms are available: Critical, Major, and Minor. You can also request that an email be sent when alarms are generated. The alarms are displayed as icons in the navigation window and the Containers table. Each icon displays a tool tip containing alarm details when the cursor is placed over it.
The Container Manager GUI displays only those alarms generated by its own module. Alarms generated by the Container Manager module are visible in both the Sun Management Center Java and Web consoles in addition. If you will use Sun Management Center to view the Container Manager alarms, the alarm names match up according to the following table.
Table 3–5 Alarm Threshold Names|
Container Manager |
Sun Management Center |
|---|---|
|
Critical |
Critical |
|
Major |
Alert |
|
Minor |
Information |
To Set an Alarm Threshold
-
If the Container Manager GUI is not already open, access it as described in To Launch the Container Manager GUI.
-
In the Hosts view, select the host with which the container is associated.
-
Select the Containers tab in the right panel.
A table appears that lists all containers that are associated with that host.
-
In the table, select the name of the container for which you want to set an alarm.
The Properties page for the container appears.
-
Click the Alarm Thresholds tab.
The alarm setting page appears. Three levels of alarms are available: Critical, Major, Minor.
-
Locate the level of alarm to be set, and provide the alarm values in the text fields.
Three alarm settings are available:
-
CPU Threshold Less Than – Provide an integer or decimal value. The alarm is triggered when the CPU level goes below the level.
-
Memory Threshold Greater Than – Provide an integer in Mbytes. The alarm is triggered when the memory level exceeds this level.
-
Mail To – Prove a valid email address. An email alert is sent to this address once the alarm is triggered.
Note –You can set one, two, or three levels of alarms at once. If more than one alarm is triggered, the alarm with the highest value appears as an icon in the GUI. Likewise, an email alert is sent for the alarm with the highest value.
-
-
Click Save.
The alarm is now set.
To Remove an Alarm Threshold
-
If the Container Manager GUI is not already open, access it as described in To Launch the Container Manager GUI.
-
In the Hosts view, select the host with which the container is associated.
-
Select the Containers tab in the right panel.
A table appears that lists all containers that are associated with that host.
-
In the table, select the name of the container for which you want to remove an alarm.
The Properties page for the container appears.
-
Click the Alarm Thresholds button.
The alarm setting page appears. The values for the alarms set for the container are displayed.
-
Remove the alarm values from the text fields.
-
Click Save.
The alarm is no longer set.
Resource Utilization Reports and Extended Accounting Data
If you have the Performance Reporting Manager software installed, you can generate reports that detail the CPU and the memory resources used per container, host, or resource pool. Both of these graph reports are available from the Utilization tab located in the Container Manager GUI. These graph reports become available in the GUI two hours after the Performance Reporting Manager software is installed. This waiting period is needed to allow data to be collected and stored in the database for use in the graph reports. The waiting period for weekly and monthly graphs is 24 to 48 hours.
The following six types of resource usage graph reports are available from the Container Manager GUI.
- Container Definition
-
Data returned is the average of the resources used by all containers, which can include both active and inactive containers. Historical data is provided for inactive containers. The addition of historical data enables you to determine whether your containers are controlling resource consumption effectively. The data is represented as a percentage of the resource reservations for minimum CPU and memory cap for all active containers. This percentage compares the actual resources used to the resources reserved.
- Active Container
-
Data returned is the number of CPUs and memory currently being used for the selected active container.
- Container Group
-
Data returned is the average of the resource used for all containers in the selected group. This percentage compares the actual resources used to the resources reserved for the selected containers.
- Host
-
Data returned is the aggregation of all active containers on the selected host.
- Host Group
-
Data returned is the average resource utilization of all hosts located in that group. The data is represented as a percentage used of the total host resources.
- Resource Pool
-
Data returned is the aggregation of all the active containers in the selected resource pool.
Report data can also be exported to a text file in comma-separated values (CSV) format for an active container, resource pool, or host. The text file can be used as an interface file for a billing and accounting application, for example. A report in CSV format is available 2 hours after installation of the Performance Reporting Manager software. This waiting period enables report data to be collected and stored in the database for use in a CSV report. The exported data is more detailed and granular than the data that appears in the graph reports. Data for the last 24 hours is available in a CSV report.
The exported CSV reports contains the following categories of information:
- Host name
-
Name of the host with which the container is associated
- Timestamp
-
Date and time for the record.
- CPU Reservation
-
CPU reservation of the container
- CPU Usage
-
Combined CPU usage of all processes in the container
- CPU Return of Investment
-
CPU utilization compared to CPU reserved, expressed as a percentage.
- CPU Extended Accounting Information
-
CPU extended accounting information
- Memory Cap
-
Physical memory cap
- Memory Usage
-
Physical memory used
- Percentage of Memory Used
-
Physical memory utilized of the host expressed as a percentage
- Memory Return of Investment
-
Memory utilized compared to memory reserved, expressed as a percentage.
- Container Project ID
-
Project ID of the container
- Project Name
-
Project name of the container
Data Collection Process
Container Manager uses the Performance Reporting Manager data collection service, which is located on the server layer. This data collection service in turn uses the history logging capabilities of Sun Management Center, which is located on the agent layer. The data collection service on the server layer collects the data from the agent machines and stores it in the database. Additionally, data collected by Performance Reporting Manager is summarized, or “rolled-up,” at predefined intervals. The minimum, maximum, and average values for data are calculated and are stored as hourly data, weekly data, or monthly data. Finally, the minimum, maximum, and average values are calculated for these same intervals.
The reports generated with Container Manager can incorporate any of this data, depending upon the report request parameters. For more information about Performance Reporting Manager data collection methods, see “Data Collection Process” in Sun Management Center 3.5 Performance Reporting Manager User's Guide.
Requesting a Report
Both CPU and memory resource utilization reports are available per host, container, container definition, or resource pool. Before trying to view a report, be sure to set the browser's cache to refresh every time. For a list of the six types of reports available, see Resource Utilization Reports and Extended Accounting Data. Reports for CPU and memory resources used are available for the following intervals:
-
Daily – Shows data for the last 24 hours, one point per hour
-
Weekly – Shows data for the last 7 days, one point per day
-
Monthly – Shows data for the last 30 days, one point per day
-
Real Time - Shows data every 30 seconds per graph point. Available for active containers only.
Real time reports for CPU and memory resources being used are available for active containers only.
Figure 3–26 Sample: Real Time CPU Utilization Graph Report For an Active Container

Figure 3–27 Sample: Real Time Memory Utilization Graph Report For an Active Container

To Request a Resource Utilization Report For a Host
Use this procedure if you want to obtain a daily, weekly, or monthly report for a host.
-
Set the browser's cache to refresh every time.
-
In the Hosts view, select the host from the navigation window.
-
Select the Utilization tab.
-
Select the desired report: daily, weekly, monthly.
Real time reports are not available for a host. The graphs for CPU and memory resources used by the selected host appears.
-
(Optional) To export the last 24 hours of data to a CSV file, click Export Data.
You must wait at least 2 hours after installation of the Performance Reporting Manager software for a CSV report to be available. Data must first be collected and stored in the database from which the report can be drawn. You cannot preview this data in a graph.
Data exported contains the hourly data for the container for the last 24 hours. Therefore, it is not identical to the data obtained from a daily graph.
To Request a Resource Utilization Report for an Active Container
-
Set the browser's cache to refresh every time.
-
In the Containers view, select the container from the navigation window.
The Hosts Associated with this Container Definition table appears. All the hosts that the container is associated with are listed in the table.
-
Select the host for which you want a report by clicking the name.
The Properties sheet for the container on this host appears.
-
Select the Utilization tab.
-
Select the desired report: daily, weekly, monthly, real time.
The CPU and memory resource utilization graphs appear. If a Real Time report was selected, use the Refresh button to see more real time data.
-
(Optional) To export the last 24 hours of data to a CSV file, click Export Data.
You must wait at least 2 hours after installation of the Performance Reporting Manager software for a CSV report to be available. Data must first be collected and stored in the database from which the report can be drawn. You cannot preview this data in a graph.
Data exported contains the hourly data for the container for the last 24 hours. Therefore, it is not identical to the data obtained from a daily graph.
To Request a Resource Utilization Report for a Container Definition
Use this procedure to request CPU and memory utilization reports for a container definition. The data is based on historical data and is an average of the resources used by active containers that are based on the container definition.
-
Set the browser's cache to refresh every time.
-
In the Containers view, select the container definition.
-
Select the Utilization tab in the right panel.
-
Select the desired report: daily, weekly, monthly.
The CPU and memory resource utilization graphs appear.
To Request a Resource Utilization Report for a Resource Pool
-
In the Hosts view, select the host to which the resource pool is bound.
A list of all resource pools bound to this host appears in the Resource Pools table in the right pane.
-
Select the name of the resource pool in the table.
A table listing all containers that are bound to this resource pool appears.
-
Select the Utilization tab in the right panel.
-
Select the desired report: daily, weekly, monthly.
The CPU and memory resource utilization graphs appear.
-
(Optional) To export the last 24 hours of data to a CSV file, click Export Data.
You must wait at least 2 hours after installation of the Performance Reporting Manager software for a CSV report to be available. Data must first be collected and stored in the database from which the report can draw from. You cannot preview this data in a graph.
Data exported contains the hourly data for the container for the last 24 hours. Therefore, it is not identical to the data obtained from a daily graph.
Deleting Containers
You can delete a container and its definition when both is no longer needed. Before deleting, you must first remove the container from all the hosts with which it is associated. Deletion removes the container definition from the database, and the data previously collected for the container is no longer stored. Therefore, you can not obtain any historical data for a deleted container as all data for the container is removed from the database. Being deleted is not considered a container state because the record and all historical data has been removed.
You cannot delete a container on the Solaris 8 OS unless all processes running in that container have been stopped.
When a container is deleted, the following happens depending on the Solaris version you are running:
- Solaris 8 OS
-
The lnode is deleted, followed by the project.
- Solaris 9 OS
-
Processes running in the container are moved to the default project, and the entry is deleted from the /etc/project database.
To Delete a Container Definition
-
If the Container Manager GUI is not already open, access it as described in To Launch the Container Manager GUI.
-
Verify that no inactive or active containers exist for the container definition.
-
Select the Containers view in the navigation window.
-
Select the container definition that is to be deleted.
-
Click Delete.
The container definition is removed from the Containers view, and is removed from the database.
- © 2010, Oracle Corporation and/or its affiliates
