Modifying Containers
Two property sheets are available for modifying either a container definition or an active or inactive container. The following table highlights the differences between the property sheets.
Table 3–3 Property Sheet Details|
Property Sheet |
Used For |
Accessible From |
|---|---|---|
|
Container definition |
Changes to description, project type, project identifiers (users, groups), match expression. |
Properties tab in Containers view after selecting the container definition. |
|
Container instance (active or inactive container) |
Changes to resource pool association, CPU reservation, memory cap. |
Properties tab in Hosts view or Containers view. |
Each container instance has a container definition with which it is associated. Any change made to the container definition will apply to all the container instances using that definition. For example, if you change the project type in a container definition, the project type changes for all container instances using the same definition. Therefore, you can use both property sheets to make all modifications needed.
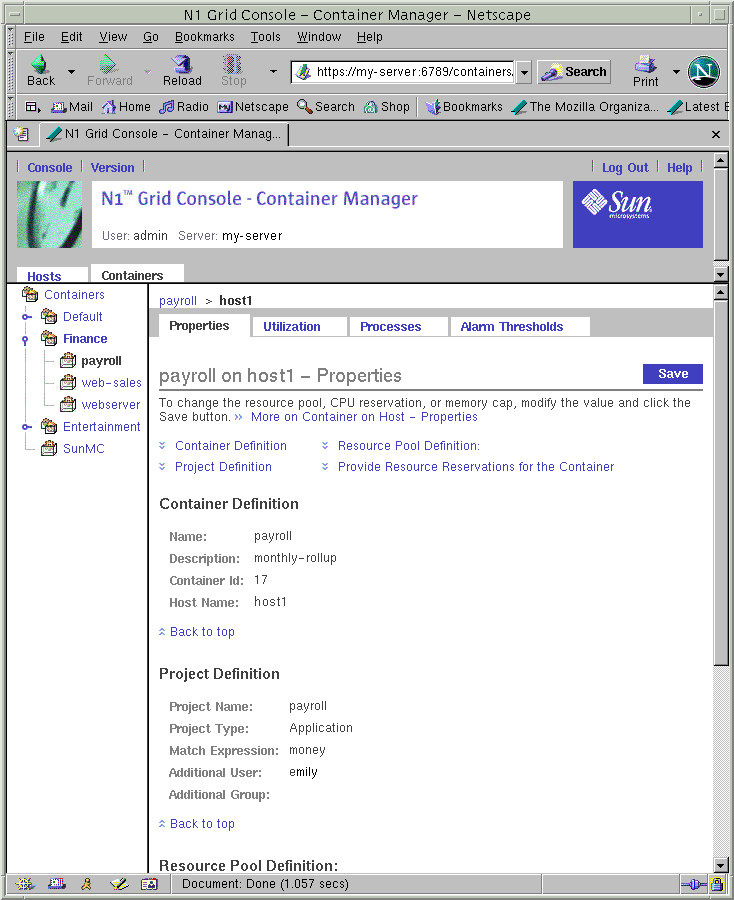
Each container instance also has a property sheet that is used to change only its own resource pool association or the resource reservations. You can change one container at a time when using this property sheet. For example, you can increase the current minimum CPU reservation or the current memory cap. Changes take effect once the new values have been saved. Modifications made to the resource boundaries on an inactive container have no effect until you reactivate the container.
Figure 3–22 Sample: Property Sheet For Changing Resource Reservations and Resource Pool

If you need to make resource changes to multiple containers that are active on multiple hosts, you should use the resource change job feature. For more information, see Modifying Containers With a Resource Change Job.
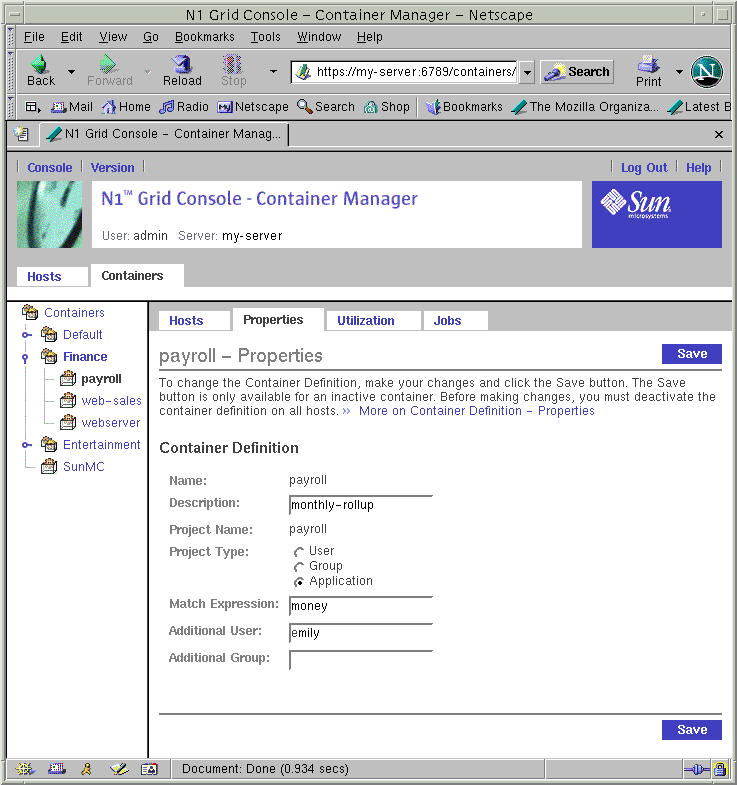
From the Containers view, a separate property sheet is available from which you can modify the container definition. Changes can be made to one container definition at a time. You cannot use the resource change job feature to make changes to multiple container definitions.
Figure 3–23 Sample: Property Sheet For Modifying a Container Definition

You cannot modify the properties of a default container. Therefore, neither property sheet is available if a default container is selected.
Note –
Only a container definition or an inactive container can have its properties modified. You must first deactivate an active container from every host that the container is associated with before modifying any properties. Once the changes are saved, you can reactivate the container.
To Modify a Container Definition Using a Property Sheet
-
If the Container Manager GUI is not already open, access it as described in To Launch the Container Manager GUI.
-
Select the Containers view.
-
Select the container definition.
-
If the container definition is not currently used for any active container, select the Containers Group from the navigation window. This method displays the Container Definitions and Groups table in the right pane. Select the container definition from the table.
-
If the container definition is being used with any active containers, select the container definition from the navigation window. If needed, click the different Container groups to expand the list of individual container definitions. This method displays the Hosts Associated with this Container Definition table from which you can deactivate the container instances.
Note –All container instances that use this container definition must be deactivated before you can change the properties. If any show the status as Active, use the Deactivate button in the Hosts Associated with this Container Definition table after selecting all hosts before continuing.
-
-
Select the Properties tab from the right pane.
The property sheet for the selected container definition appears. You can make the following changes in the text fields:
-
Description – The description of the container definition.
-
Project Type – User, Group, or Application.
-
Additional User – Change existing entries or provide additional valid UNIX user names. Separate multiple entries with a comma.
-
Additional Group – Change existing entries or provide additional valid UNIX group names. Separate multiple entries with a comma.
Note –If the Save button is not available and the text fields are greyed out, the container definition is being used in one or more container instances. Verify that the state is Inactive for all hosts listed in the Hosts Associated with this Container Definition table. If any show status as Active, you must deactivate them.
-
-
Click Save to save the changes.
The property sheet remains displayed.
To Modify a Container Using a Property Sheet
Use this procedure to makes changes the resource pool or resource reservations for only one container . If you want to make the same change to multiple containers, see Modifying Containers With a Resource Change Job.
-
If the Container Manager GUI is not already open, access it as described in To Launch the Container Manager GUI.
-
Choose from the following methods to select the desired container instance:
-
If you know the name of the host that the container is associated with, select the host name from the navigation window in the Hosts view. Then select the Containers tab in the right pane to access a table that lists all containers associated with the host.
-
If you know the name of the container, select its name from the navigation window in the Containers view. The Hosts Associated with this Container Definition table appears in the right pane.
Note –All containers that use this container definition must be deactivated before you can change the properties. If any show the status as Active, use the Deactivate button in the table before continuing. The tables in both views have this button.
-
-
Select the name of the container or host from the table, depending upon the method selected in the previous step.
The property sheet for the container instance is displayed.
-
-
Resource Pool Definition. To change the pool that the container is associated with, select from the drop-down list.
-
CPU Reservation (CPUs). Provide the new value in the text box in integer or decimal units.
-
Memory Cap (MB). Provide the new value in the text box.
-
-
Click Save.
The requested changes to the resource reservations have been saved.
-
(Optional) To reactivate the container, return to the table used in Step 3 and click Activate.
Modifying Containers With a Resource Change Job
Use the resource change job feature to change resource limits on multiple containers that are spread across multiple hosts. These containers must all be using the same container definition. You can either run the resource change job immediately so that the changes are implemented at the same time, or you can schedule the changes to occur later.
Note –
Changes to CPU reservations are immediate. Changes to memory caps can take time to write to swap. Any big change to the memory cap will affect system performance while the memory cap is being adjusted.
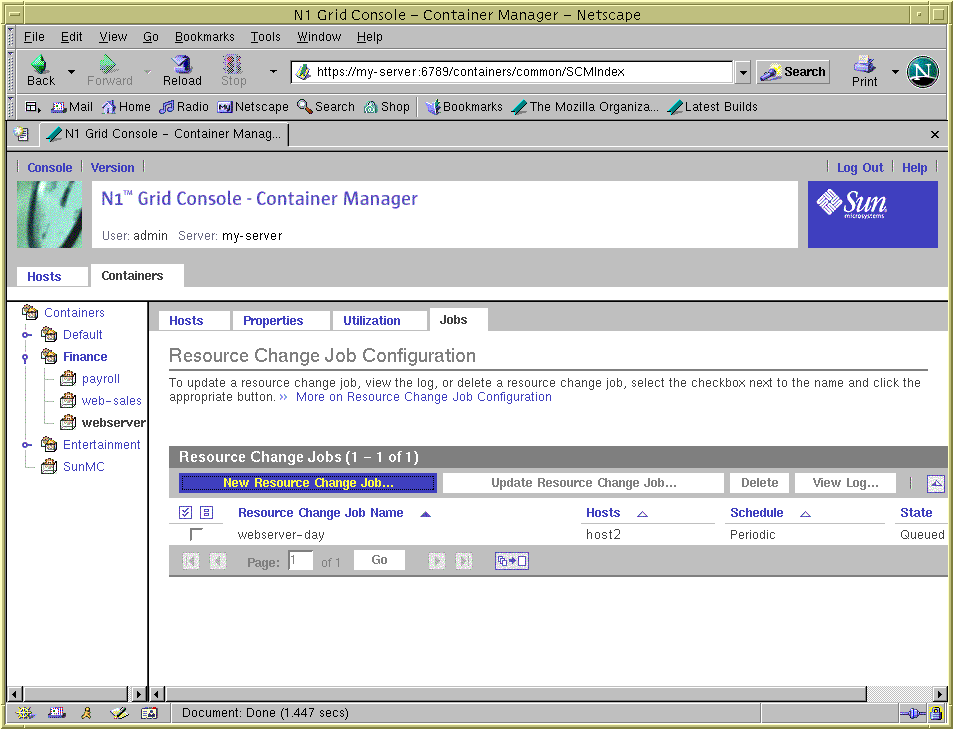
The following information is available in the Resource Change Job table:
- Resource Change Job Name
-
The name of the job that was provided during job creation.
- Hosts
-
The names of the hosts with which the container is associated.
- Schedule
-
The interval the job is scheduled to run. Options include One Time, Hourly, Daily, Weekly, Monthly.
- State
-
The status of the job. Values include Queued, Succeeded, Failed.
The following example using containers named Webserver and Rollup illustrates how the resource change job feature can be used to manage system resources across the enterprise. In this example, an online store provides order taking from its web site. The Webserver container was created to manage the CPU and memory resources used by the web server across North America. The Rollup container was created to manage the resources required by the database. During the day and early evening hours, web server resource demands are high as people use the web site to place orders. But in the evening, the demand on the webserver typically drops dramatically after midnight. During overnight hours, the database is scheduled to run reports on the day's sales.
To manage the resources required by these two containers on an 8 CPU system with 6,000 Mbytes of physical memory, you could create a total of four resource change jobs as shown in the following table:
Table 3–4 Sample of Resource Change Job Scheduling|
Container Name |
Resource Change Job Name |
Start Time |
Interval |
Resource Change |
|---|---|---|---|---|
|
Webserver |
webserver-day |
6:00 am |
Daily |
CPU: 6 Memory: 2500 MB |
|
Rollup |
rollup-day |
6:00 am |
Daily |
CPU: 1 Memory: 2000 MB |
|
Webserver |
webserver-night |
Midnight |
Daily |
CPU: 1 Memory: 2000 MB |
|
Rollup |
webserver-night |
Midnight |
Daily |
CPU: 6 Memory: 2500 MB |
Two resource change jobs run every morning at 6:00 am to change the resources for the Webserver and Rollup containers. During the day, the Webserver container is given the majority of CPU and physical memory resources as the demand of the webserver is high. Then at midnight each day a second set of resource change jobs run, and they reallocate the system's resources to accommodate the changing need: the database requires the resources to tally the daily sales while the web server requires fewer resources as demand is low.
This feature is similar to the job management feature found in Sun Management Center, but you should use the Container Manager GUI to administer all Container Manager jobs . For more information about the Sun Management Center job feature, see “Job Management Concepts” in Sun Management Center 3.5 User's Guide.
To Modify a Container Using a Resource Change Job
-
If the Container Manager GUI is not already open, access it as described in To Launch the Container Manager GUI.
-
Select the Containers view.
-
In the navigation window, select the container name.
The container must be associated with a host in order to proceed.
-
Select the Jobs tab from the right pane.
The Resource Change Job table is displayed.
Figure 3–24 Sample: Resource Change Jobs Table

-
Click the New Resource Change Job button located in the table.
The Resource Change Job wizard appears. The Overview panel is the first. Move through the wizard by providing information as requested, and clicking the Next button when finished with each panel.
-
Provide a name for the resource change job. Providing a description is optional.
Length of the name cannot exceed 32 characters. Spaces, dash (-), underscore (_), and dot (.) are all accepted. A space will be converted to an underscore (_).
The Select Hosts panel appears. The names of all the hosts for which the selected container is associated with appears in the Available list. You can change the resource limits for one or more hosts by selecting them from this window.
-
Select each host from the Available list, and click Add to move each to the Selected list. Or click Add All to move all hosts.
The host names move to the Selected field.
-
Provide a new minimum CPU reservation. A memory cap is optional.
The new resource limits will apply to all the hosts selected in the previous step. Use the Previous button to return to make any changes.
-
Provide a start date, start time, and interval for the resource change job.
The changes to the resource limits will take effect at the requested time.
-
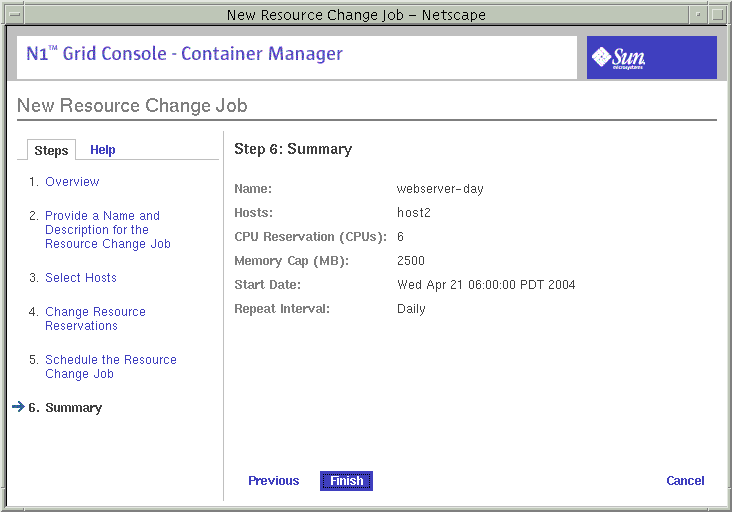
Review your selections in the Summary panel. Use the Previous button to return to make any corrections. When done, click Finish.
Figure 3–25 Sample: Summary Panel in Resource Change Job Wizard

The wizard is dismissed. The job is added to the Jobs table. The status is listed as queued until the day and time when the Job is scheduled to run. The changes to the resource limits will take effect at the time requested.
To Edit a Pending Resource Change Job
Use this procedure to make changes to a pending job whose status still shows as Queued in the Jobs table.
-
If the Container Manager GUI is not already open, access it as described in To Launch the Container Manager GUI.
-
Select the Containers view in the navigation window.
-
Select the Jobs tab from the right pane.
-
From the Resource Change Job table, select the job to be changed by selecting the checkbox next to the name.
A checkmark appears in the box.
-
To launch the Update Resource Change Job wizard, click the Update Resource Change Job button.
Move through the wizard by changing information as needed, and clicking the Next button when finished with each panel. For a detailed description of the steps to move the panels, see To Modify a Container Using a Resource Change Job.
-
When done, click Finish.
The wizard is dismissed. The edits made to the job have been saved.
To View a Resource Change Job Log
Use this procedure to view the log for a change job that has completed. If the job included changes to multiple hosts, the status for the jobs per host is located in the log.
-
If the Container Manager GUI is not already open, access it as described in To Launch the Container Manager GUI.
-
Select the Containers view in the navigation window.
-
Select the Jobs tab from the right pane.
-
From the Resource Change Jobs table, select the completed job whose log you want to view by selecting the checkbox next to the name.
A checkmark appears in the box.
-
Click the View Log button.
The log file for the resource change job appears.
- © 2010, Oracle Corporation and/or its affiliates
