Sun Enterprise 10000 SSP 3.5 Installation Guide and Release Notes 10000 SSP 3.5 Installation Guide and Release Notes
|
|
| Sun Enterprise 10000 SSP 3.5 Installation Guide and Release Notes
|
|
| C H A P T E R 2 |
Preparing for SSP 3.5 Installation or Upgrade |
SSP installation refers to the installation of SSP 3.5 on a new disk. An upgrade refers to the update of SSP software to version 3.5.
This chapter describes the information you need to know before installing or upgrading to SSP 3.5:
The procedures in this guide use the conventions shown in TABLE 2-1 for command line prompts.
This section describes how to begin the SSP installation or upgrade process:
If you intend to use the SSP automatic failover capability, review Failover Configurations , which explains the physical architecture and components required for failover.
If you want to run third-party applications on the SSP (referred to as an OpenSSP), review SSP 3.5 Hardware and Software Requirements and Chapter 7 .
First install or upgrade the SSP 3.5 software on the main SSP, then install or upgrade the SSP 3.5 software on the spare SSP.
You must run the same version of the SSP software (SSP 3.5) on both the main and spare SSP. It is also suggested that you run the same version of the Solaris operating environment on both the main and spare SSP.
If you are upgrading from SSP 3.4 to SSP 3.5 or are installing SSP patches, synchronize your main and spare SSP and disable failover before starting the SSP upgrade or patch installation. For further information, see To Prepare for SSP 3.5 Upgrade or SSP Patch Installation .
If you are currently running SSP software, determine which version of the SSP software you are using.
For details, see To Determine Your Current SSP Version . You can also use this procedure after installation or upgrade to verify that SSP 3.5 is running.
Obtain the SSP software from one of the following sources:
For details, see To Obtain SSP Software From the Web and To Obtain SSP Software From the CD-ROM .
Create a backup file of your SSP environment.
If you are currently running SSP software, create a backup file of the SSP environment by using the ssp_backup command. This command creates a backup file named ssp_backup.cpio in a directory that you specify. This backup file can be used to restore the SSP environment. For details, see To Create an SSP Backup File .
If you have a dual SSP configuration, verify that the main and the spare SSP can talk to each other through the control board network.
For more information, see To Verify the Control Board Network Connection Between the Main and Spare SSP .
Verify that the rsh (1M) command is enabled.
For details, see To Verify that the rsh(1) Command is Enabled .
Remove any stty commands from the .cshrc file for user ssp on the main and spare SSP.
The stty command affects the use of rcp or rsh commands. For details, refer to Info Docs Article 11371, available through SunSolve at http://sunsolve.Sun.com .
For failover purposes, establish the floating IP address of the working main SSP and place the address in the /etc/hosts file (see To Determine Your Current SSP Version ).
This floating IP address must be different from the IP addresses used for your main and spare SSP. The floating IP address is a logical interface that eliminates the need for a specific SSP host name to communicate between the Sun Enterprise 10000 system and the main SSP.
Upon an SSP failover, the floating IP address is registered on the new main SSP. The floating IP address enables communication between external monitoring software and the working main SSP.
If you have a single SSP configuration, you must still assign a floating IP address to your SSP.
|
Note Note - If you need to revert to a previous release of SSP after installing or upgrading to SSP 3.5, see Chapter 6. |
2. Look for the VERSION line, for example:
where nn represents the date (month and day) and time (hours and minutes). The version number for SSP 3.5 is shown as 3.5.0 .
1. Using your web browser, go to http://www.sun.com/servers/sw/ .
2. Click the link Enterprise 10000 System Service Processor (SSP) Software .
3. In the SSP 3.5 section, click the link Click here to download .
The file that will be downloaded is named ssp_3_5_sparc.zip .
4. On the SSP, log in as superuser.
5. Change directory to the location where you downloaded the SSP software.
The SSP 3.5 packages are located in the directory
/
download_directory
/ssp_3_5_sparc/System_Service_Processor_3.5/Product
The install and upgrade scripts are located in the directory
/
download_directory
/ssp_3_5_sparc/System_Service_Processor_3.5/Tools
7. Check the SunSolve Web site ( http://sunsolve.Sun.COM ) for any SSP patches that might be available for SSP 3.5 and apply them to the main and spare SSP.
Be sure to review To Prepare for SSP 3.5 Upgrade or SSP Patch Installation before installing SSP patches.
1. Insert the Solaris Sun Computer Systems Supplement CD-ROM into the CD-ROM drive.
Allow time for the volume manager to mount the CD-ROM.
The SSP 3.5 packages are located in the directory
/cdrom/cdrom0/System_Service_Processor_3.5/Product
The install and upgrade scripts are located in the directory
/cdrom/cdrom0/System_Service_Processor_3.5/Tools
2. Check the SunSolve Web site ( http://sunsolve.Sun.COM ) for any SSP patches that might be available for SSP 3.5 and apply them.
Be sure to review To Prepare for SSP 3.5 Upgrade or SSP Patch Installation before installing SSP patches.
Create an SSP backup file whenever the SSP configuration changes, which can occur when:
Domains are created, removed, or modified (this includes changes due to dynamic reconfiguration operations)
Board locations are changed
New hardware is installed or existing hardware is upgraded or replaced
The autoconfig (1M) command is run
A control board failover occurs
An SSP patch is installed
If you do not maintain a current SSP backup file and you restore an out-of-date SSP backup file, be aware that you can overwrite any SSP configuration changes that occurred after the backup file was created. For instance, if you install an SSP patch that updates the scantool database or the ssp_resource file, but you restore an old SSP backup file after installing the patch, the scantool database or the ssp_resource file will be overwritten by the SSP backup file. The out-of-date scantool database or ssp_resource file can cause unpredictable system behavior.
1. As superuser on the main SSP, change directory to the following:
2. Back up the SSP environment on the SSP.
A backup file named ssp_backup.cpio is created in target_directory . You may want to rename this file so that you can identify the SSP release associated with this backup file.
Do not make any changes to the Sun Enterprise 10000 environment, such as domain state or power status of boards, until you have completed the SSP installation or upgrade procedure and restored the SSP environment.
3. If you want to view a list of the SSP files that were backed up, type the following:
|
|
1. As superuser on the main SSP, type the following:
where host represents the control board network interfaces of the spare SSP. This command prints the route that packets take to the specified host.
The following example shows the information displayed.
In the previous example, the main SSP (xf12-ssp) and spare (xf12-ssp2) are communicating through xf12-ssp-qfe1 to xf12-ssp2-qfe1 .
Be sure to check all the control board network interfaces, which are described in Appendix A .
1. As superuser on the main SSP, type the following:
where hostname is the name of the spare SSP. If a shell window opens, it indicates that rsh (1M) and related commands, such as rcp (1M), are enabled. Both of these commands are used by automatic failover.
If a shell window does not open, check the /etc/inetd.conf file. Be sure the following line, which enables rsh , is contained in the file:
2. Repeat Step 1 on the spare SSP and specify the main SSP as the hostname .
|
|
1. If you use Network Information Services (NIS), update the NIS map with the IP address to be used as the floating IP.
2. If you have private domains that do not use NIS, enter the floating IP address in the /etc/hosts file on the main and spare SSP.
For an example /etc/hosts file, see To Configure Your SSP Network .
3. If you have private domains that do not use NIS, enter the floating IP address and host name of the floating SSP in the
/etc/hosts
file for each domain.
|
Note Note - You do not need to specify this floating IP address in the /etc/hostname.interface files. The SSP software automatically enables the main SSP to use the floating IP address. |
If you have a dual SSP configuration and you are upgrading from SSP 3.4 to SSP 3.5 or are installing SSP patches on SSPs running SSP 3.4 or 3.5 software, you must synchronize data between the main and spare SSP and then disable failover, as explained in the following steps. For further information on data synchronization and SSP failover, refer to the Sun Enterprise 10000 SSP 3.5 User Guide .
1. Determine if you have sufficient disk space in the /tmp directory on the main SSP for the data synchronization process to copy files from the main SSP to the spare.
Review the size of the /tmp directory and remove any unnecessary files from the following directories on the main SSP to reduce the size of the data synchronization backup file:
$SSPLOGGER/messages. x
$SSPLOGGER/domain/Edd-recovery_files
$SSPLOGGER/domain/messages. x
$SSPLOGGER/domain/netcon. x
$SSPLOGGER/domain/post/ files
where x is the archive number of the file.
2. As user ssp on the main SSP, run the showdatasync (1M) command to verify that the data synchronization queue is empty and that all data file propagations have completed before you perform data synchronization.
If the data synchronization queue is not empty or file propagations are in progress, wait for the file propagations to complete before performing the next step.
3. Synchronize the data between the main and spare SSP by using the setdatasync (1M) command:
This data synchronization process backs up the main SSP and restores the backup on the spare SSP. You can run the showdatasync (1M) command on the main SSP to review the data synchronization queue on the main SSP. An empty queue indicates that the synchronization backup and restore operations have been completed.
4. Disable SSP failover by using the setfailover (1M) command:
SSP failover remains off until both SSPs are rebooted or you re-enable SSP failover using the command setfailover on .
5. If you installed an SSP patch, run ssp_backup (1M) to back up the SSP configuration.
SSP 3.5 now supports an OpenSSP environment, in which an SSP workstation or server can run third-party software, provided that the SSP meets the OpenSSP resource requirements (for details, see Chapter 7 ). TABLE 2-2 describes the minimum SSP 3.5 resources required if you are running an SSP-only or OpenSSP environment.
Note: Check the SunSolve website for the current KU patches available (http://sunsolve.Sun.com ). For details on required patches, see TABLE 1-4 . |
||
|
Solaris operating environment on Sun Enterprise 10000 domains |
DR model 3.0 domains must run Solaris 8 or 9 operating environment. |
|
|
Before SSP upgrade, review Getting Started . |
Same as SSP minimum requirement. Before installation, review Chapter 7 . |
|
|
Same as SSP minimum requirement. Before installation, review Chapter 7 . |
|
|
SPARCstation 5 (supports 1 to 8 domains), Sun Ultra 5, or Sun Enterprise 250 workstation (supports 1 to 16 domains); or a Netra T1 server (which runs the Solaris 8 or 9 operating environment) |
Sun Ultra 5 or Sun Enterprise 250 workstation; or a Netra T1 server (which runs the Solaris 8 or 9 operating environment) |
|
|
Version 3.47 (included with SSP 3.5 in the SUNWsspfp package) |
||
|
Minimum two hubs for failover purposes. For details, see Failover Configurations . |
||
|
Identifies the working main SSP, as explained in Getting Started |
||
|
2.1 GBs for the Solaris operating environment and SSP software |
3.2 GBs for the Solaris operating environment, SSP software, and third-party software This includes 1.1 GBs for the Solaris operating environment, 1 GB for SSP software and log files (in /var/opt/SUNWssp/ and /var/adm/ ), 512 MBs swap space, and 512 MBs or more for third-party applications |
|
|
Note that automatic failover uses the /tmp directory for data propagation purposes. Any user or SSP files that are larger than the /tmp directory cannot be propagated. |
Memory requirements vary depending on the software used on the SSP. The amount of real memory required usually ranges from 128 MBs to 256 MBs. The swap space amount usually ranges from 512 MBs to 1042 MBs. For details, see Calculating Memory Usage by Third-Party Applications . |
The SSP software provides a failover capability that automatically switches the main SSP or the primary control board to its spare counterpart if a failover condition is detected. The spare counterparts serve as a backup if the main SSP or primary control board fails.
There are three failover scenarios, and each scenario requires a specific physical configuration:
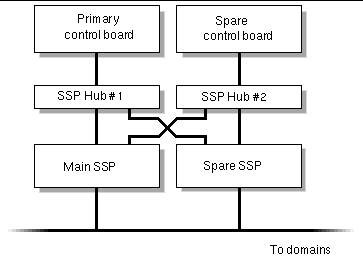
SSP and control board failover
The configuration for dual SSP and control board failover requires two SSPs, two hubs, and two control boards, as shown in FIGURE 2-1 . Both the main and spare SSP must be running the same version of the SSP software.
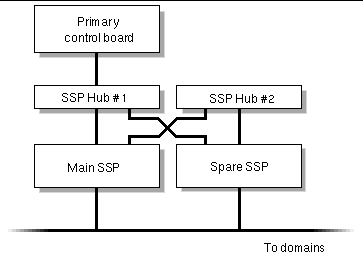
SSP-only failover
The configuration for SSP-only failover requires two SSPs, two hubs, and one control board, as illustrated in FIGURE 2-2 . Both the main and spare SSP must be running the same version of the SSP software.
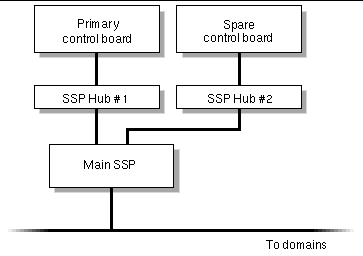
Control-board only failover configuration
The configuration required for control board-only failover consists of one SSP, two hubs, and two control boards, as shown in FIGURE 2-3 .
|
Note Note - Failover also requires that the SSP network files be configured as described in Appendix A. Otherwise, failover does not work. |
For details on how automatic failover works, see the Sun Enterprise 10000 SSP 3.5 User Guide .
TABLE 2-3 describes the basic SSP and domain installation and upgrade options and where to find detailed instructions on each option:
|
Sun Enterprise
10000 SSP 3.5 Installation Guide and Release Notes
| 816-3626-10 |
|
Copyright © 2002, Sun Microsystems, Inc. All rights reserved.
