Configuring Solstice X.25 to Route IP
The TCP/IP protocol suite is the de facto standard for networking. IP can be run above X.25, creating a Wide Area Network using TCP/IP. This allows for the use of rlogin, ftp and other useful facilities. The TCP/IP protocol suite is delivered as part of the Solaris system software.
To route IP over Solstice X.25, you must set up a mapping between the X.121 addresses used by the X.25 software and the IP addresses used by the IP software. The IP over X.25 Configuration window contains many parameters, but you only need to use a few of them. You can configure information about your local system, mapping its X.121 address to an IP address and setting any necessary parameters, and also information about remote systems.
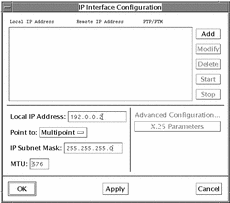
To access the IP Interface Configuration window, pull down the Services menu and choose IP => IP Interface:
Figure 6-1 Setting the Local IP Address and IP Subnet Mask

First, configure information about your local system. To do so:
-
Click on the Add button.
-
Enter the Local IP address of the interface you are configuring.
Enter either an address in IP dotted notation, or a hostname.
-
Select either Point-to-Point, or Point-to-Multipoint.
-
Enter the Remote IP Address for a Point to Point configuration, or enter the IP Subnet Mask for a Point to Multipoint configuration.
-
Click on the Apply button.
-
Select the Local Address, and click on the Modify button.
You must do this before you can access the X.25 Parameters window.
-
Select X.25 Parameters and configure any other relevant parameters.
See "IP Interface Configuration" for information about the available parameters.
-
Click on OK to apply the changes and to exit the X.25 Parameters window.
-
Click on Start to start the IP interface.
-
Click on OK to apply the changes and to exit the IP Interface window.
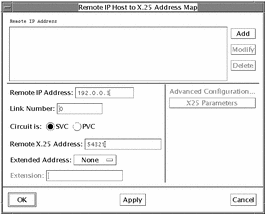
You also need to add information about remote hosts to the IP Mapping window. This lets the Solstice X.25 software translate the IP addresses it receives into X.25 addresses it can use. To access the IP Mapping window, pull down the Services menu and choose IP => IP Mapping:
Figure 6-2 Adding Information About Remote Hosts in the IP Mapping Window

-
Click on the Add button.
-
Enter the IP Address of the remote system.
-
Specify the link to be used by traffic to this destination (or use 255 for automatic routing).
-
Set the circuit to SVC (switched virtual circuit) or PVC (permanent virtual circuit).
-
Enter the X.25 (X.121) address of the remote system.
-
Click on the Apply button.
-
Select the Remote IP Address, and click on the Modify button.
You must apply the changes before you can access the X.25 Parameters window.
-
Click on the X.25 Parameters button and configure any other relevant parameters.
See "IP Interface Configuration" for information about the available parameters.
-
Click on OK to apply the changes and to exit the X.25 Parameters window.
-
Click on OK to apply the changes and to exit the IP Mapping Window.
Once you have carried out the configuration described above, you should be able to use the TCP/IP protocol suite over your X.25 connection. To check that all is working properly, make sure that you can ping and rlogin to the hosts you added to the IP Host to X.25 Address Map.
- © 2010, Oracle Corporation and/or its affiliates
