Configuring PAD Printer
The PAD Printer enables a user who is logged on to a remote terminal to print to the remote user's local printer.
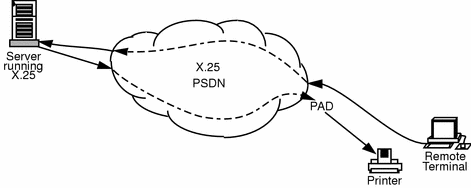
Figure 6-5 shows how the print information is routed through the network to the server running X.25. The print information is then routed back to the local printer through PAD.
Figure 6-5 Using PAD to Print to a Remote User's Local Printer

-
Use admintool to set up the printer.
Do this as you normally would, but make certain that you set it up as a Local Printer, and specify an X.25 printer port that also includes a unique printer number, for example /dev/xtp7. See User Account, Printers and Mail Administration for more information.
-
In x25tool, access the PAD Printer window.
Pull down the Services menu and choose PAD => PAD Printer.
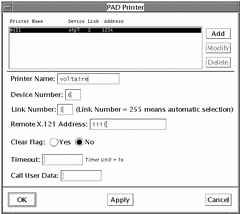
Figure 6-6 The PAD Printer Window

-
Click on Add.
-
Type in the printer name.
-
Type in the device number.
This is the printer port number. For example, if you entered /dev/xtp7 for the printer port in admintool, then the device number is 7.
-
Type in the link number.
This is the link to use for the outgoing printer connection. If you set this to 255, the link number will be selected automatically.
-
Type in the remote X.121 address.
This enables X.25 to open a connection. The print information can then be routed from the remote terminal, through PAD, to the local printer.
-
Set Clear Flag to Yes or No.
If set to Yes a Clear Invitation packet is sent at the end of the data transfer, and the connection will then be cleared by the remote PAD after all of the data is received. This ensures that all data have reached the remote PAD, but can lead to the connection staying up if the remote does not support Clear Invitation packet.
If Clear Flag is set to No, then a Clear Invitation packet will not be sent at the end of the data transfer. If the remote PAD does not support Clear Invitation, you should set Clear Flag to No and enter a value for the Timeout.
-
This is the amount of time, in seconds, that the X.25 server will keep the connection open after the last print packet has been sent. Setting a timeout value can help prevent loss of print data, however, you will have to use your own knowledge of the network to determine how long the connection needs to stay open.
You only need to set a timeout if Clear Flag is set to No.
-
Enter the Call User Data.
This is the call user data used to establish the virtual connection. Before this information is included, it should have been agreed upon by both sides of the connection.
-
Click on OK to apply the changes and to exit the PAD Printer window.
- © 2010, Oracle Corporation and/or its affiliates
