Configuring the X.25 Routing Table
The final step in configuring a dial-up machine is to add the telephone number for the network point of connection to the X.25 routing parameters table so that it is mapped to the X.121 address of the machine you want to be able to access. In the example, this is a host on the remote network that is configured to act as an IP router, providing access to the remainder of the network.
To display the X.25 Routing table, in the x25tool window, pull down the Services menu and click on Routing. The X.25 Routing parameters table applies across all links. To configure:
-
Click on Add, then select Top.
When the window first appears, the parameters are all grayed out. Clicking on Add, Top creates a new template entry and specifies that the entry will go at the top of the list.
-
Select the Route Type.
The example uses a route to an individual host, so choose X.121 Host.
-
Enter the number of the link that reaches this destination.
This is the number you assigned to the link when you created it. In the example this is link 0.
-
Enter the address of the server on the corporate network that also has a connection to the X.25 PSDN.
-
Enter the Telephone Number used to reach this destination.
In a dial-up configuration, this is the address of your point of attachment to the X.25 PSDN, in most cases a modem.
-
Enter a comment (optional).
You could identify the destination that this link reaches, for example.
-
Save your changes.
Pull down the File menu and choose the Save option.
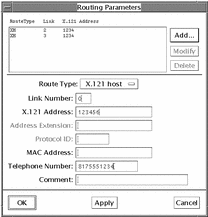
The completed Routing window for this example looks like this:
Figure 8-15 Routing Parameters Window

This configuration creates a mapping between the telephone number and the X.121 address of the remote host. When the machine has traffic for the remote host, it knows to dial into the X.25 PSDN. The traffic will then be routed to the remote machine.
- © 2010, Oracle Corporation and/or its affiliates
