| C H A P T E R 4 |
|
Preparing for Servicing |
This chapter describes how to prepare the server for servicing.
The following topics are covered:
For a list of FRUs, see Appendix A.
|
Note - Never attempt to run the system with the cover removed. The cover must be in place for proper air flow. The cover interlock switch immediately shuts the system down when the cover is removed. |
Before you can remove and replace parts that are inside the server, you must perform the following procedures:
The corresponding procedures that you perform when maintenance is complete are described in Chapter 6.
The server can be serviced with the following tools:
Performing a graceful shutdown ensures that all of your data is saved and the system is ready for restart.
1. Log in as superuser or equivalent.
Depending on the nature of the problem, you might want to view the system status or the log files, or run diagnostics before you shut down the system. Refer to the Sun SPARC Enterprise T1000 Server Administration Guide for log file information.
Refer to your Solaris system administration documentation for additional information.
3. Save any open files and quit all running programs.
Refer to your application documentation for specific information on these processes.
At the Solaris OS prompt, issue the uadmin command to halt the Solaris OS and to return to the ok prompt.
# shutdown -g0 -i0 -y WARNING: proc_exit: init exited syncing file systems... done Program terminated ok |
This command is described in the Solaris system administration documentation.
5. Switch from the system console prompt to the SC console prompt by issuing the #. (Hash-Period) escape sequence.
6. Using the SC console, issue the poweroff command.
|
Note - You can also use the Power On/Off button on the front of the server to initiate a graceful system shutdown. |
Refer to the Sun SPARC Enterprise T1000 Server Administration Guide for more information about the ALOM poweroff command.
If the server is installed in a rack with the extendable slide rails (outer and middle section) that were supplied with the server, use this procedure to remove the server chassis from the rack.
1. (Optional) Issue the following command from the ALOM sc> prompt to locate the system that requires maintenance:
Once you have located the server, press the Locator button to turn it off.
2. Check to see that no cables will be damaged or interfere when the server chassis is removed from the rack.
3. Disconnect the power cord from the power supply.
|
Note - After you have disconnected the power cord from the power supply, you must wait about five seconds before reconnecting the power cord to the power supply. |
4. Disconnect all cables from the server and label them.
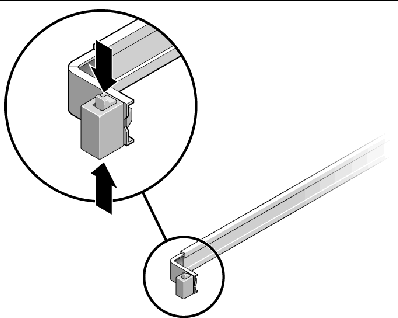
5. From the front of the server, unlock both mounting brackets and pull the server chassis out until the brackets lock in the open position (FIGURE 4-1).

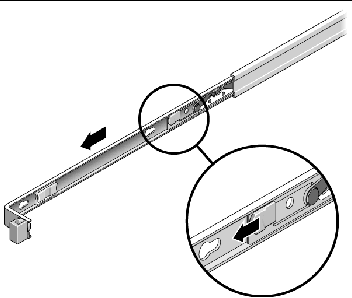
6. Press the gray release tab on both mounting brackets to release the right and left mounting brackets, then pull the server chassis out of the rails (FIGURE 4-2).
The mounting brackets slide approximately 4 in. (10 cm) farther before disengaging.

7. Set the chassis on a sturdy work surface.
1. Prepare an antistatic surface to set parts on during removal and installation.
Place ESD-sensitive components, such as the printed circuit boards, on an antistatic mat. The following items can be used as an antistatic mat:
2. Use an antistatic wrist strap.
Access to all field-replaceable units (FRUs) requires the removal of the top cover.
|
Note - Never run the system with the top cover removed. The top cover must be in place for proper air flow. The cover interlock switch immediately shuts the system down when the cover is removed. |

|
Caution - The system supplies 3.3 Vdc standby power to the circuit boards even when the system is powered off if the AC power cord is plugged in. |
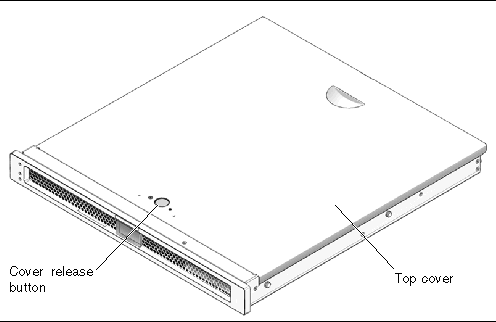
1. Press the cover release button (FIGURE 4-3).
2. While pressing the release button, grasp the rear of the cover and slide the cover toward the rear of the server about one half inch (1.2 cm).
3. Lift the cover off the chassis.

Copyright © 2007, Sun Microsystems, Inc. All Rights Reserved.