Table of Contents
MySQL Workbench provides an extension and scripting system that allows
the developer to extend MySQL Workbench according to requirements. While
the core of MySQL Workbench is developed using C++, it is possible to
harness this core functionality using both the Lua and Python
scripting languages. MySQL Workbench also provides access to a
cross-platform GUI library, mforms, which enables
the creation of extensions that feature a graphical user interface.
The extension capabilities enable the following:
Automate common tasks
Extend the Workbench user-interface
Create plugins (code which can be invoked from the Workbench menu system)
Manipulate schemata
Create custom Workbench features
The GRT, or Generic RunTime, is the internal system used by Workbench to hold model document data. It is also the mechanism by which Workbench can interact with Modules and Plugins. Workbench model data, such as diagrams, schemata and tables, is stored in a hierarchy of objects that can be accessed by any plugin. The data is represented using standard data types: integers, doubles, strings, dicts, lists and objects.
The GRT can be accessed using external scripting languages such as Lua and Python. Awareness is required of how the GRT data types map into the scripting language. In Python, for example, the GRT data types integers, doubles and strings are seen as corresponding Python data types. Lists and dicts are kept in their internal representation, but can however generally be treated as Python lists and dicts, and accessed in the usual way. Objects contain data fields and methods, but the GRT only recognizes objects from a pre-registered class hierarchy.
It is possible to fully examine the classes contained within the
GRT using the Workbench Scripting Shell. Note that dots in class names are changed to
underscores in their Python counterparts. For example,
db.mysql.Table becomes
db_mysql_Table in Python.
The Application Objects Tree (GRT Tree)
As mentioned previously the Workbench document data is stored in an object hierarchy. This hierarchy is known as the GRT Tree. The GRT Tree can be accessed and modified from supported external scripting languages such as Python. Care should be taken when modifiying the GRT Tree, in case a mistake leads to corruption of the document. Backups should be made before manipulating the tree. Read-only access to the tree is the safest approach, and is sufficient in most cases.
The main nodes in the Application Object Tree
| Node | Description |
|---|---|
| wb.registry | Application data such as plugin registry, list of editors, and options. |
| wb.customData | A generic dictionary for data you can use to store your own data. This dictionary is saved and reloaded with Workbench and is global (not document specific). |
| wb.options | Contains some default options that are used by Workbench |
| wb.rdbmsMgmt | Internal registry of supported RDBMS modules, known data types. |
| wb.doc | The currently loaded model document. |
| wb.doc.physicalModels[0] | The currently loaded model object, containing the database catalog and diagrams. |
| wb.doc.physicalModels[0].catalog | The database catalog for the model. Contains the list of schemata. |
| wb.doc.physicalModels[0]catalog.schemata | List of schemata in the model. Individual schema can be accessed as a list: schemata[0], schemata[1] ... |
| wb.doc.physicalModels[0].catalog.schemata[0].tables (.views, .routines, ...) | Lists of tables, views, routines in the schema. |
| wb.doc.physicalModels[0].diagrams | List of EER diagrams in the model |
| wb.doc.physicalModels[0].diagrams[0].figures (.layers, .connections, ...) | List of figures, layers, connections (relationships) in the diagram. |
In the GRT Modules are libraries containing a list of functions that are exported for use by code in other modules, scripts or Workbench itself. Modules can currently be written in C++, Lua or Python, but the data types used for arguments and the return value must be GRT types.
GRT modules are similar to Python modules. They are however
imported from the built-in grt module, instead
of directly from an external file. The list of modules loaded into
the grt module is obtained
grt.modules. Modules can be imported in Python
using statements such as from grt.modules import
WbModel.
To export functions as a module from Python code you need to carry out the following:
The source file must be located in the user modules folder. This path is displayed in the Workbench Scripting Shell with the label Looking for user plugins in.... It is also possible to install the file using the main menu item , .
The source file name must have the extension
_grt.py, for example,my_module_grt.py.Some module metadata needs to be defined. This can be done using the
DefineModulefunction from the wb module:from wb import * ModuleInfo = DefineModule(name='MyModule', author='Your Name', version='1.0')
Functions to be exported require their signature to be declared. This is achieved using the export decorator in the previously created ModuleInfo object:
@ModuleInfo.export(grt.INT, grt.STRING)
def checkString(s):
   ...
Note, for the export statement, the return type is listed first, followed by the input parameter types. These types are specified as GRT typenames. The typenames that can be used are as follows:
grt.INT: Integer values. Also used for boolean values.
grt.DOUBLE: Floating-point numeric values.
grt.STRING: UTF-8 or ASCII string data.
grt.DICT: A key/value dictionary item. Keys must be strings.
grt.LIST: A list of other values. It is possible to specify the type of the contents as a tuple in the form
(grt.LIST, <type-or-class>). For example, (grt.LIST, grt.STRING) for a list of strings. For a list of table objects the following would be specified:(grt.LIST, grt.classes.db_table).grt.OBJECT: An instance of a GRT object or a GRT class object, from grt.classes.
Note these types are defined in the
grtmodule, which must first be imported before they can be used.
The following code snippet illustrates declaring a module that exports a single function:
from wb import *
import grt

ModuleInfo = DefineModule(name='MyModule', author="your name", version='1.0')

@ModuleInfo.export(grt.DOUBLE, grt.STRING, (grt.LIST, grt.DOUBLE))
def printListSum(message, doubleList):
   sum = 0
   for d in doubleList:
      sum = sum + d
   print message, sum
   return sum
Plugins are special Modules that are exposed to the user through the Workbench GUI. This is typically done using the main menu, or the context-sensitive menu. Much of the MySQL Workbench functionality is implemented using plugins, for example, tabel, view, and routine editors are native C++ plugins, as are the forward and reverse engineering wizards. The Administrator facility in MySQL Workbench is implemented entirely as a plugin in Python.
A plugin can be a simple function that performs some action on an
input, and ends without further interaction with the user.
Examples of this include auto-arranging a diagram, or making batch
changes to objects. To create a simple plugin, the function needs
to be located in a module and then declare it as a plugin using
the plugin decorator of the
ModuleInfo object.
Plugins can have an indefinite runtime, such as when they are driven by the user through a graphical user interface. This is the case for the various object editors and wizards within MySQL Workbench. Although this latter type of plugin will need to be declared in the usual way, only the entry point of the plugin will need to be executed in the plugin function, as most of the additional functionality will be invoked as a result of the user interacting with the GUI.
The syntax for declaring a plugin is as follows:
@ModuleInfo.plugin(plugin_name, caption, [input], [groups], [pluginMenu])
These parameters are defined as follows:
plugin_name: A unique name for the plugin. It may only contain alphanumeric characters, dots, and underscores.
caption: A caption to use for the plugin in menus.
input: An optional list of input arguments.
groups: Optional list of groups the plugin belongs to. Recognized values are:
Overview/Utility: The menu in the Model Overview.Model/Utility: The menu for diagram objects.Menu/<category>: The menu in the main menu.
pluginMenu: Optional name of a submenu in the Plugins menu where the plugin should appear. For example, , , . This is equivalent to adding a
Menu/<category>in the groups list.
MySQL Workbench is implemented with a C++ core back-end, and a native
front-end for each supported platform. Currently the front-end is
implemented with Windows Forms on Microsoft Windows, GTK+ on
Linux, and Cocoa on Mac OS X. This approach allows the application
to have a native look and feel, while reducing the amount of work
required to maintain the project. However, the GUI functionality
required by MySQL Workbench can be met by a subset of graphical
operations. These are implemented in a cross-platform GUI library,
MForms. This further reduces the development effort, as plugin
developers can use MForms, rather than having to write front-end
specific code for each supported platform. This also helps
consistency of operation across all platforms. MForms is coded in
C++, but provides a Python interface. To use it the Python code
needs to import the mforms module.
MForms Containers
Given problems of using an absolute co-ordinate system across different platforms, MForms employs containers that perform automatic layout. The basic containers that MForms provides include:
Form: A top-level window which can contain a single control, usually another container. The window will be sized automatically to fit its contents, but can also be sized statically.
Box: This is a container that can be filled with one or more controls in a vertical or horizontal layout. Each child control can be set to use either the minimum of required space, or fill the box in the direction of the layout. In the direction perpendicular to the layout, for example vertical in a horizontal layout, the smallest possible size that can accommodate all child controls will be employed. So, in this example, the smallest height possible to accommodate the controls would be used.
Table: This is a container that can organize one or more controls in a grid. The number of rows and columns in the table, and the location of controls within the grid, can be set by the developer.
ScrollView: This is a container that can contain a single child control, and will add scrollbars if the contents do not fit the available space.
The Workbench Scripting Shell provides a means for entering and executing scripts. Through the use of the scripting shell, MySQL Workbench can support new behavior and data sources using code written in Lua and Python. The shell can also be used to explore the current Workbench GRT (Generic Runtime) facilities.
The scripting shell is not only useful for expanding MySQL Workbench. You can use a script file from the scripting shell command line to perform repetitive tasks programmatically.
The default development language is Lua, a
lightweight scripting language expressly designed for extending
applications. For more information about this language see
lua.org.
The Python language is also supported, further details of this language can be found from the official Python site.
The programming language to be used in Workbench Scripting Shell can be selected from the General tab of the Workbench Preferences dialog. The Workbench Preferences dialog can be displayed using the main menu item , .
To open the Workbench Scripting Shell, select , from the main menu. You can also open the Workbench Scripting Shell using the Ctrl+F3 key combination on Windows and Linux, cmd F3 on Mac OS X, or by clicking the shell button above the EER diagram navigator. The Workbench Scripting Shell will then open in a new dialog.
The following screenshot shows the Workbench Scripting Shell dialog:
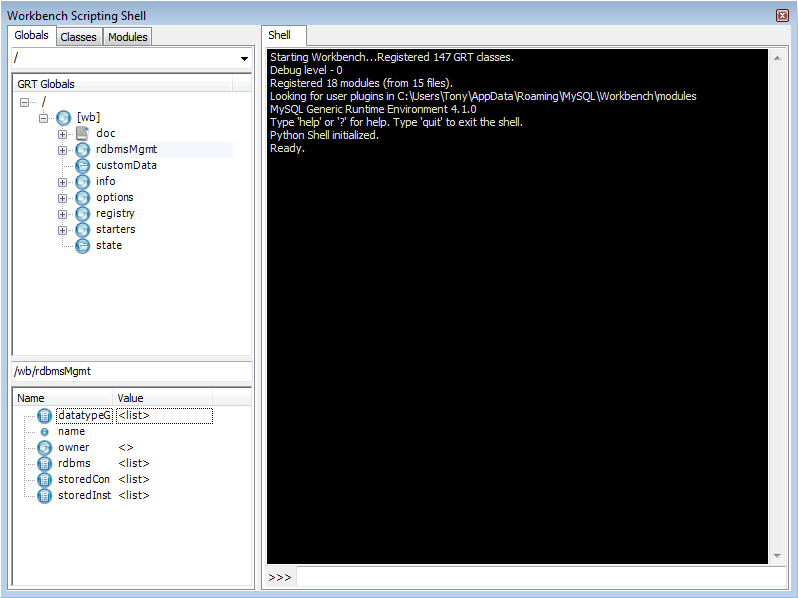
The Workbench Scripting Shell is primarily used for running Lua or Python scripts
or typing commands in these languages directly. However, you can
also use it to access the Workbench Scripting Shell Scripting Library functions and
global functions and objects. To see the available commands type
“?”. You can also cut and paste
text to and from the shell window.
While individual commands can be entered into the shell, it is also possible to run a longer script, stored in an external file, using the main menu option , . When scripts are run outside of the shell, to see the output use the main menu item , .
It is also possible to run script files directly from the shell. For details on running script files, type ? run at the Workbench Scripting Shell prompt. The following message is displayed:
  Shell Command - shell.run
  -------------------------
  Load and execute a lua script file.

  run filename

  Parameters:
  filename       File that should be loaded and executed.

  Examples:
  run scripts/test.lua
  Runs the script scripts/test.lua.
Within the Workbench Scripting Shell, on the left side panel, are three tabs: Globals, Classes, and Modules. Discussion of these additional tabs follows.
The Workbench Scripting Shell features the Globals, Classes and Modules tabs, in addition to the main Shell tab.
The Globals Tab
At the top of the window is a drop down list box that is used to select the starting point, or root, of the GRT Globals tree displayed beneath it. By default this starting point is the root of the tree, that is, '/'. The GRT Globals tree can be expanded and collapsed as required. The GRT Globals tree is the structure in which MySQL Workbench stores document data. Clicking any item will result in its name and value being displayed in the panel below the tree.
The Classes Tab
A class is a user-defined data type formed by
combining primitive data types: integers, doubles, strings,
dicts, lists, and objects. This tab shows the definitions of the
classes used by the objects in the Modules
tab. Clicking a class causes a brief description of the class to
be displayed in a panel below the classes explorer.
When the Classes tab is selected, the dropdown listbox lists the following items:
Group by Name: Group by the object name
Group by Hierarchy: Group by inheritance
Group by Package: Group by functionality
The default view for this tab is Group By Name. This view simply shows all the different objects arranged alphabetically. Click the icon or double-click a package to show the properties of the struct.
If you switch to the hierarchical view you will see
GrtObject: the parent object from which all
other objects are derived.
The Modules Tab
The Modules tab enables you to browse the MySQL Workbench installed modules and their functions. Clicking a module within the explorer causes its details to be displayed in a panel below the explorer. This facility is useful for exploring the available modules, and their supported functions. It is also a way to check if custom modules have been correctly installed.
The purpose of this tutorial is to show you how to extend MySQL Workbench by creating a plugin.
The sample plugin
EER Diagrams are useful for visualizing complex database schemata.
They are often created for existing databases, to clarify their
purpose or document them. MySQL Workbench provides facilities for
reverse engineering existing databases, and then creating an EER
Diagram automatically. In this case relationship lines between
foreign keys in the table will automatically be drawn. This
graphical representation makes the relationships between the tables
much easier to understand. However, one of the most popular storage
engines for MySQL, MyISAM, does not include support for foreign
keys. This means that MyISAM tables that are reverse engineered will
not automatically have the relationship lines drawn between tables,
making the database harder to understand. The plugin that will be
created in this tutorial gets around this problem by using the fact
that a naming convention is very often used for foreign keys:
tablename_primarykeyname. Using this convention,
foreign keys can automatically be created after a database is
reverse engineered, which will result in relationship lines being
drawn in the EER diagram.
Algorithm
The basic algorithm for this task would be as follows:
for each table in the schema
   for each column in the table
      look for another table whose name and primary key name match the current column name
      if such a table is found, add a foreign key referencing it
As iterating the complete table list to find a match can be slow for models with a large number of tables, it is necessary to optimize by pre-computing all possible foreign key names in a given schema.
import grt

def auto_create_fks(schema):
   fk_name_format = "%(table)s_%(pk)s"
   possible_fks = {}
   # create the list of possible foreign keys from the list of tables
   for table in schema.tables:
      if table.primaryKey:
         format_args = {'table':table.name, 'pk':table.primaryKey.name}
         fkname = fk_name_format % format_args
         possible_fks[fkname] = table

   # go through all tables in schema, this time to find columns that may be a fk
   for table in schema.tables:
      for column in table.columns:
         if possible_fks.has_key(column.name):
            ref_table = possible_fks[column.name]
            if ref_table.primaryKey.formattedType != column.type:
               continue
            fk = table.createForeignKey(column.name+"_fk")
            fk.referencedTable = ref_table
            fk.columns.append(column)
            fk.referencedColumn.append(ref_table.primaryKey)
            print "Created foreign key %s from %s.%s to %s.%s" % (fk.name, table.name, column.name, ref_table.name, ref_table.primaryKey.name)

auto_create_fks(grt.root.wb.doc.physicalModels[0].catalog.schemata[0])
Creating a Plugin from a Script
To create a plugin from an arbitrary script, it is first necessary to make the file a module, and export the required function from it. It is then necessary to declare the module as a plugin, and specify the return type and input arguments.
from wb import *
import grt

ModuleInfo = DefineModule(name="AutoFK", author="John Doe", version="1.0")

@ModuleInfo.plugin("sample.createGuessedForeignKeys", caption="Create Foreign Keys from ColumnNames",
input=[wbinputs.objectOfClass("db.mysql.schema")], groups=["Overview/Utility"])
@ModuleInfo.export(grt.INT, grt.classes.db_mysql_Schema)
def auto_create_fks(schema):
   ...
With the addition of the above code, the
auto_create_fks() function is exported and will
be added to the schema context menu in the model overview. When
invoked it will receive the currently selected schema as its input.