Creating a Hard Drive File
To create a new hard drive file, follow these steps:
-
Start SunPCi, if it is not already running.
-
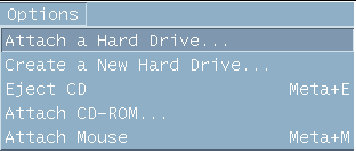
Choose the Options menu at the top of the SunPCi window.
The Options drop-down menu is displayed. Figure 3–1 shows the Options menu.
Figure 3–1 SunPCi Options Menu

-
Select the Create New Drive command from the drop-down menu.
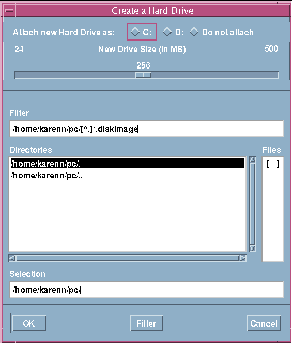
The Create a New Hard Drive dialog box is displayed. Figure 3–2 shows the Create a Hard Drive dialog box.
Figure 3–2 Create New Hard Drive Dialog Box

-
If you want to attach the disk drive as drive C:, click the button next to Attach New Hard Drive As C:. If you want to attach the new drive as drive D:, click the button next to D:. If you want to create the drive file but not attach it, click the Do Not Attach button.
-
Drag the slider to the desired drive size in MB (megabytes).
Make sure that your disk size is at least 256 Mbytes; the maximum of 2 Gbytes is preferred, depending on the available disk space on your workstation.
Note –An emulated drive is actually a large file, and SunPCi allocates disk space for emulated drives in a dynamic manner rather than in a static one. This means that although you can allocate a maximum of 2 Gbytes for a hard disk, the actual size of the disk depends on the amount of data that is stored in it at a given point in time. As the amount of data increases, the size of the emulated hard disk increases. Make sure that you have enough hard disk space on your workstation to accommodate a C: or D: drive of the size you specify.
-
Click in the Selection field at the bottom of the dialog box. Type in the file name you want to use for the new drive (for example, C.newdisk).
-
Click on OK to create the disk file.
SunPCi prompts you to shut down Windows and reboot. Click on OK.
-
Click on the Start button, then Shut Down to shut down Windows 95 or Windows NT.
-
From the File menu, choose Reset PC to reboot SunPCi.
You are now ready to install other Windows programs on your new disk drives.
- © 2010, Oracle Corporation and/or its affiliates
