Sun Enterprise 250 Server Owner's Guide

What to Do

  1. If you are installing a new PCI card, remove the filler panel from the appropriate slot. Otherwise go to step 2.

    1. Remove the Phillips screw that secures the PCI filler panel to the system rear panel.

      Use a magnetized screwdriver, if possible, to prevent the screw from falling into the system chassis.

    2. Lift out the filler panel.

  2. Insert the PCI card into the appropriate slot on the main logic board.

    To install a PCI short card:

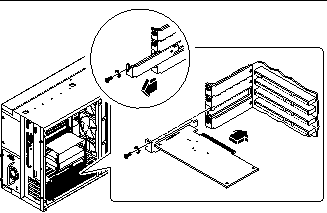
    1. Insert the faceplate end of the card into the appropriate slot opening in the rear panel.

    2. Push the card into the corresponding connector on the main logic board.

      Figure 6-12  

      Graphic

      To install a PCI long card:

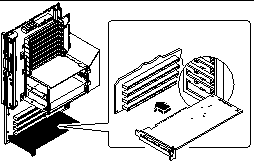
      1. Insert the faceplate end of the card into the appropriate slot opening in the rear panel, while at the same time aligning the opposite end of the card with the long card slot guide.

      2. Push the card into the corresponding connector on the main logic board.

        Figure 6-13  

        Graphic

  3. Secure the PCI card faceplate to the rear panel with the Phillips screw.

  4. If necessary, connect any internal cables to the PCI card's internal connectors.

    Read the documentation supplied with the PCI card for information about jumper settings, PCI slot requirements, and cable connections.

  5. If necessary, connect any external cables to the PCI card.

    Read the documentation supplied with the PCI card for information about external cable connections.