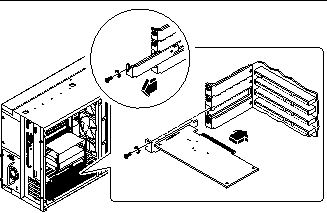
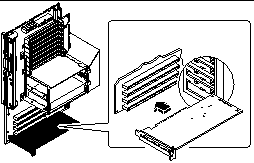
How to Install a PCI Card
Before You Begin
Complete these tasks:
Read the documentation supplied with the PCI card for information about jumper settings, PCI slot requirements, and cable connections.
Know what type of PCI card you are installing or replacing and in which slot the card belongs on the main logic board; see:
Video Demonstration
Figure 6-11

Click on the icon above for a video demonstration.
Click here for Appendix E, Video Player Help.
What to Do
-
If you are installing a new PCI card, remove the filler panel from the appropriate slot. Otherwise go to step 2.
-
Insert the PCI card into the appropriate slot on the main logic board.
To install a PCI short card:
-
Secure the PCI card faceplate to the rear panel with the Phillips screw.
-
If necessary, connect any internal cables to the PCI card's internal connectors.
Read the documentation supplied with the PCI card for information about jumper settings, PCI slot requirements, and cable connections.
-
If necessary, connect any external cables to the PCI card.
Read the documentation supplied with the PCI card for information about external cable connections.
What Next
Complete the following tasks to reassemble the system:
When you are ready to restart the system, be sure to run POST and OpenBoot Diagnostic tests to verify that the system functions correctly with the new parts you have just installed. You must also perform a reconfiguration boot so that your system is able to recognize the new device(s). For additional information, see:
- © 2010, Oracle Corporation and/or its affiliates


