Previous Next Contents Home


Chapter 3


Setting Up the System


This chapter explains how to attach all the cords and cables needed to get the server up and running. Where software is involved, this chapter explains some of what you need to do, and points you to the appropriate software manuals for the rest of the information.

Complete the following tasks to finish setting up your system:

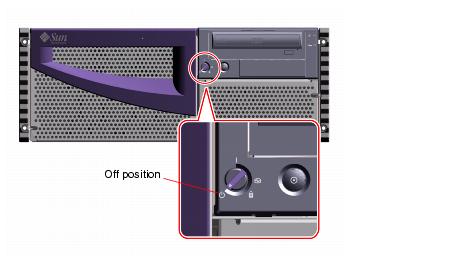
If you need to power off your system, see the Sun Fire 280R Server Owner's Guide.


Connect the Power Cord

  1. Turn the front panel keyswitch to the Off position.

    Insert the system key into the keyswitch.

  1. Connect the AC power cord to the right power inlet labeled AC-1 at the back of the system.

    Connect the second AC power cord to the power inlet labeled AC-2 (if necessary).

  2. Attach a strain relief to each AC power cord.

    Use the strain relief to prevent accidental or inadvertent removal of an AC power cord from its inlet. The strain relief is a plastic tie-wrap and pedestal that is inserted into the back panel of the system. Use these reliefs to manage the power cords after you have installed the cords into the AC inlets in the server.

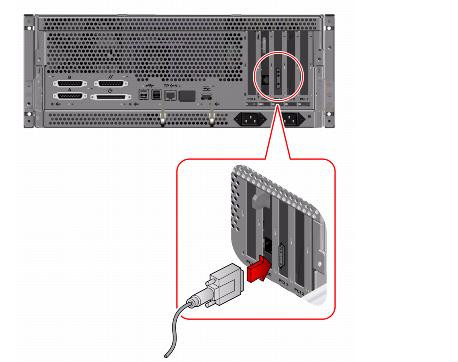
    To use a strain relief, wrap the loose end of the tie-wrap around the AC power cord and thread the tie-wrap through the opening in the relief pedestal.
    Pull the end to tighten the tie-wrap.


  1. Connect the other end of the AC power cord to the power sequencer in the rack enclosure, or to an AC outlet.

    See the instructions provided with your rack enclosure for information about the power sequencer. The outlet must connect the system to a 15A circuit in North America and Japan, and to a 10A circuit in Europe.

Note - You can connect the second power cord to the same AC circuit as the first supply. However, for increased system redundancy, connect the two power cords to separate circuits.


Connect the Twisted-Pair Ethernet (TPE) Cable

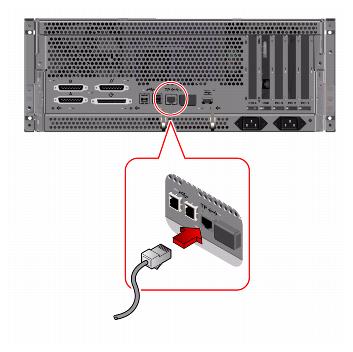
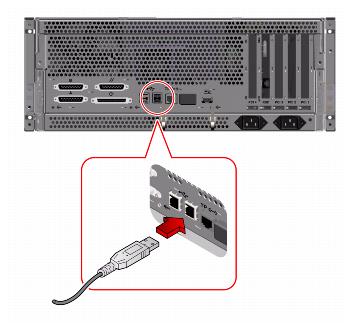
Connect the twisted-pair Ethernet (TPE) cable to the standard Ethernet port on the back of your system.

  1. Connect the TPE cable to the RJ-45 connector on the server's back panel.

  1. Connect the other end of the cable to the TPE outlet in the wall or the floor.


Install a System Console

To install the server software or to diagnose a problem, you need some way to enter system commands and view system output.

Configure the system using one of the following procedures:


Note - The above components are not shipped with the server.

Set Up a tip Connection

For information about establishing a tip connection, see the Sun Fire 280R Server Owner's Guide.


Connect an ASCII Terminal

  1. Connect the terminal's data cable to serial port A on the server's back panel.

  1. Connect the terminal's power cord to a grounded AC power outlet.

  2. Set the terminal to receive:

  3. At 9600 baud

  4. An 8-bit signal with no parity and 1 stop bit

See the documentation accompanying your terminal for more information.


Install a Graphics Console

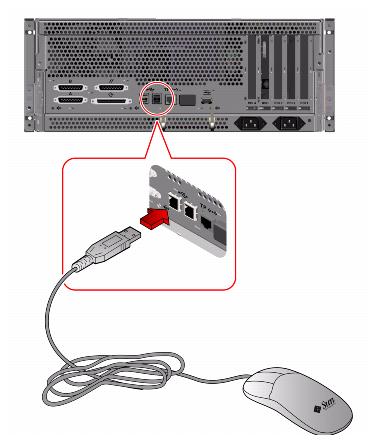
To install a local graphics console you need a Peripheral Component Interconnect (PCI)-based graphics card, a monitor, and a Sun Type 6 Universal Serial Bus (USB) keyboard, USB mouse and mouse pad. These components are not shipped with your system. See the Sun Fire 280R Server Owner's Guide for more information.

  1. Install the graphics card into a vacant PCI slot.

    For the procedure, see the Sun Fire 280R Server Service Manual or contact your qualified service provider.
  2. Connect the monitor's video cable to the graphics card's video port.

    Tighten the thumbscrews to secure the connection.

  1. Connect the monitor's power cord to a grounded AC power outlet.

  2. Connect the keyboard USB cable to a USB port on the back panel.

  1. Connect the mouse USB cable to a USB port on the back panel.


Restore the Rack Enclosure

See the instructions provided with your rack enclosure to complete these steps.

  1. Route and manage the AC cable and other cables within the rack enclosure.

  2. Retract the enclosure's anti-tip legs, if applicable.

  3. Replace the side panels, if applicable.

  4. Replace the front and back doors, if applicable.


Power On the System

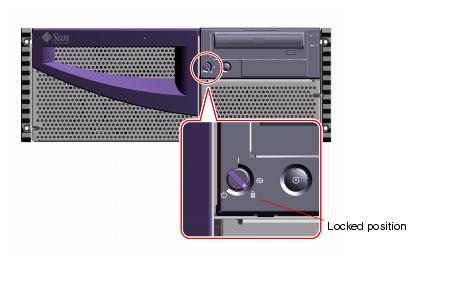
You need the system key to perform this procedure.


Caution - Never move the system when the system power is on. Movement can cause catastrophic disk drive failure. Always power off the system before moving it.


Caution - Before you power on the system, make sure that the cover is properly installed.
  1. Turn on power to any peripheral and external storage devices.

  2. Turn on power to the monitor or terminal, if applicable.

  3. Turn the front panel keyswitch to the Power-On/Off position.

    Insert the system key into the keyswitch (if necessary).

  1. Press the front panel Power button once.


Note - The system may take anywhere from 30 seconds to two minutes before video is displayed on the graphics console, or the OK prompt appears on an attached terminal. This time depends on the level of power-on self-test (POST) diagnostics being performed.
  1. Turn the keyswitch to the Locked position.

    The Locked position prevents accidentally powering-off the system and locks the front doors.

Note - If you need to power off the system, see the Sun Fire 280R Server Owner's Guide for more information.
  1. Remove the key from the keyswitch, and keep it in a secure place.


Install the Operating System

If you are installing the Solaris 8 or later compatible operating environment, refer to the documentation accompanying your Solaris software and see the Sun Fire 280R Server Owner's Guide for installation information.


Install Online Documentation

The documentation kit contains a CD-ROM compatible disc with online documentation that describes how to use, service, and maintain your system. Refer to the documents supplied with the CD for installation instructions.


Previous Next Contents Home

Copyright © 2001 Sun Microsystems, Inc. All Rights Reserved.