| Sun Fire V880z Server and Sun XVR-4000 Graphics Accelerator Installation and User's Guide |
| Sun Fire V880z Server and Sun XVR-4000 Graphics Accelerator Installation and User's Guide |
| C H A P T E R 4 |
|
Installing the Sun XVR-4000 Graphics Accelerator Hardware |
This chapter provides Sun XVR-4000 graphics accelerator hardware installation information for the Sun Fire V880z server.
Refer to the Sun Fire V880 Server Service Manual for proper procedures on how to shut down the system safely before installing or removing any internal boards and how to reboot the system after installation. A complete set of documentation is located at: http://www.sun.com/documentation
Refer to the following hardware documentation for detailed service information for the Sun Fire V880z server:
The Sun Fire V880z server supports up to two Sun XVR-4000 graphics accelerators. With two Sun XVR-4000 graphics accelerators installed, the system supports up to four video display devices. The Sun XVR-4000 graphics accelerators are installed in the Sun Fire V880z CPU slots (B and C). A Sun Fire V880z server with one
Sun XVR-4000 graphics accelerator may have up to six CPUs. A Sun Fire V880z with two Sun XVR-4000 graphics accelerators may have up to four CPUs.

|
Caution - The Sun XVR-4000 graphics accelerator is not hot-swappable. |
1. Turn off the power to your system.
2. Disconnect the monitor cabling on the system back panel.

|
Caution - The chassis AC power cord must remain connected to ensure a proper ground. Leave at least one power cord connected. |
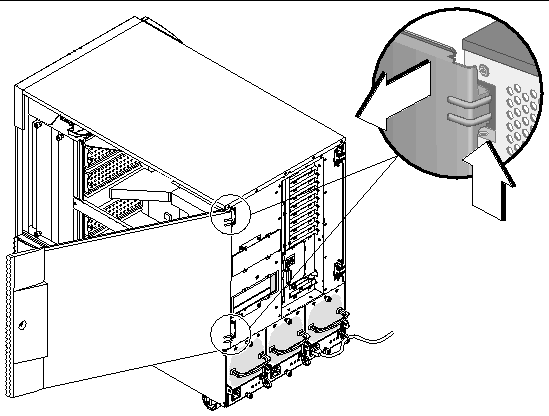
3. Remove the system back panel covers for the slots to be used for the Sun
XVR-4000 graphics accelerator (FIGURE 4-1).
The back panel filler slot covers are secured by four Phillips screws. Remove them and retain them for later use.

4. Open the Sun Fire V880z server enclosure door (FIGURE 4-2).
a. Unlock the side door using the system key.
c. To remove the door from the chassis, open the door 90 degrees and pull it up until its mounting pins clear the brackets on the rear panel.
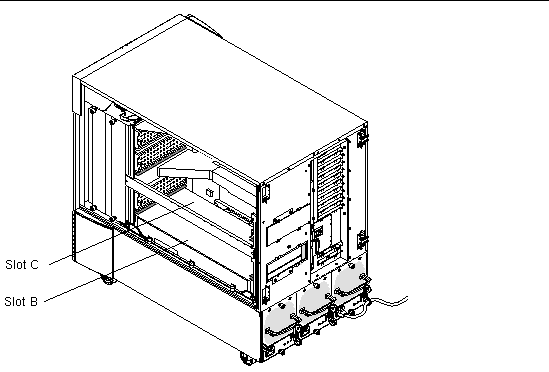
5. Locate slots B and C (FIGURE 4-4).
If you are installing a single Sun XVR-4000 graphics accelerator, you can use either slot B or C. The Sun Fire V880z server motherboard slots are identified from A to D, from bottom to top.
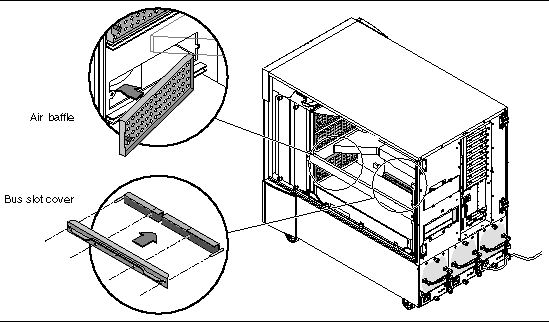
6. Remove the air baffle from the CPU bracket and remove the dust cover from the motherboard VHDM connector (slot B for one Sun XVR-4000 graphics accelerator, slots B and C for two graphics accelerators). (FIGURE 4-4).

7. Store the air baffle by sliding it under the metal storage slot located on the enclosure interior ceiling.
When the air baffle is properly aligned in the storage slot, the air baffle black pin will easily insert into the metal slot hole to lock it in place. (If you are replacing the air baffle for the chassis board slot, properly align the air baffle in the slot and the black pin will easily insert into the hole to lock the air baffle in place.)
8. Be sure to attach the antistatic wriststrap provided with the Installation Kit.
Refer to section "How to Avoid Electrostatic Discharge" in the Sun Fire 880 Server Owner's Guide.
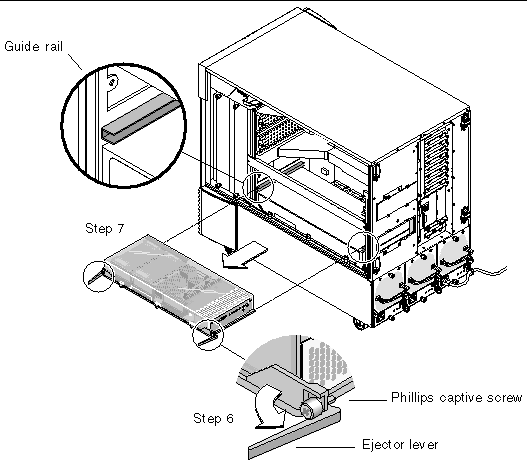
9. Position the Sun XVR-4000 graphics accelerator into the chassis guide rails for the selected slot (B or C).
10. Make sure that the Sun XVR-4000 graphics accelerator ejector levers are rotated out to 90 degrees (FIGURE 4-5)
11. Holding the two ends of the graphics board, slide the Sun XVR-4000 graphics accelerator into the card guide frame.
Use slot B for one Sun XVR-4000 graphics accelerator, slots B and C for two graphics accelerators.
Stop once the Sun XVR-4000 graphics accelerator ejector levers begin to contact the frame.
|
Note - If the ejectors are unable to contact the metal card guide frame, do not try and force the board into place. Damage to the Sun XVR-4000 graphics accelerator or motherboard may occur. |
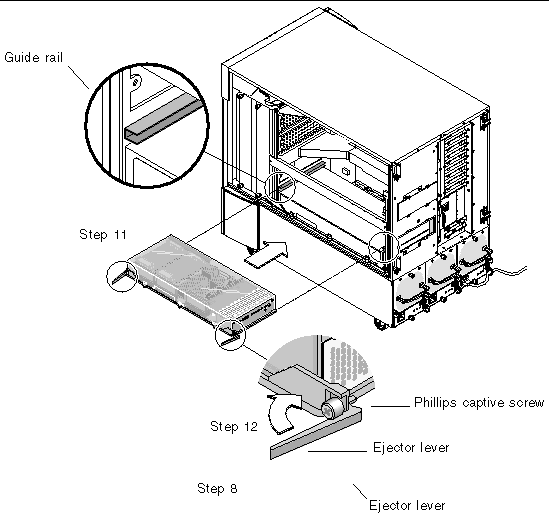
12. Grasp both ejector levers and rotate them inward simultaneously.
Avoid rocking the board in the card guides. The board has a tendency to pull to the left (front) side of the chassis (as viewed from the CPU module/Sun XVR-4000 graphics accelerator side). Installation should be smooth and uniform.
13. Once the ejector levers are fully rotated in, hand tighten both captive screws.
|
Note - It is important to try to hand tighten prior to using a torque driver. |
14. Using a No. 2 Phillips screwdriver or torque driver, tighten the right-side captive screw and then the left-side captive screw.
If using a torque driver, fully seat the right-side captive screw first to 8 in-lbs
(0.90 meter-newtons), then repeat for the left-side captive screw.
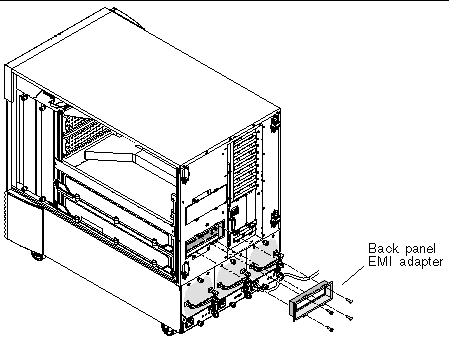
15. Secure the back panel I/O slot EMI adapter to the slot now containing the
Sun XVR-4000 graphics accelerator (FIGURE 4-6).
Secure the EMI adapter with the four Phillips screws used for the back panel filler cover.
16. Attach the appropriate monitor cables to the Sun XVR-4000 graphics accelerator backplate on the system back panel.
17. Reconnect the remaining power cords.
19. After the Sun XVR-4000 graphics accelerator has been installed and power is applied to the system, look at the green LEDs on the Sun XVR-4000 graphics accelerator and the appropriate centerplane CPU slot indicator (FIGURE 4-7).
The green LED power indicators on each Sun XVR-4000 graphics accelerator are a positive indication of the power state of each Sun XVR-4000 graphics accelerator.
The Sun XVR-4000 graphics accelerator has two LED indicators: the left LED is a green power indicator, the right LED is an amber temperature indicator
(FIGURE 4-7). When the amber LED is lit, it indicates an over-temperature-induced power-down of the Sun XVR-4000 graphics accelerator module. Normally, the Sun Fire V880z server software should take corrective action to power-down the slot in over-temperature situations before the emergency back-up power-down indicated by the amber LED. Thus, it should be quite rare to see the amber LED lit.
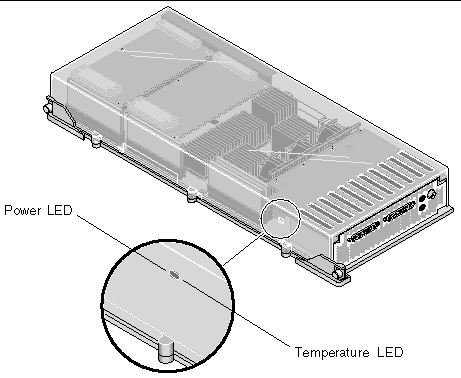
After you install the Sun XVR-4000 graphics accelerator and power on the system, confirm that the board is properly installed by verifying that the power LED indicator is lit; that is, the green power LED indicator on each Sun XVR-4000 graphics accelerator and the chassis centerplane CPU slot indicator.
The CPU indicator LEDs are located on the centerplane bar between slots B and C of the system (FIGURE 4-8). On the centerplane bar, you will see icons to the left of the LEDs that indicate that slot "D" is the topmost slot.
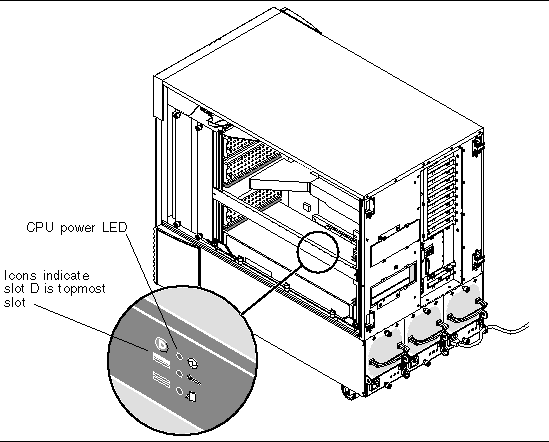
If there is a CPU module/Sun XVR-4000 graphics accelerator in any slot, ensure that the corresponding green LED is lit. The green power LEDs of both the CPU and Sun XVR-4000 graphics accelerator should always be in agreement, but the one on the Sun XVR-4000 graphics accelerator is the most positive indicator that the board is in fact powered up.
If any of the green power indicator LEDs on installed Sun XVR-4000 graphics accelerators are not illuminated after attempting to power-up the system, power off the system and apply thumb pressure to the center of any Sun XVR-4000 graphics accelerator whose green LED failed to light. Note if any additional board travel is experienced. If the board is not completed seated, push the board fully into place. Then you may recheck the right-hand and left-hand captive screw torques with the torque driver to ensure the screws are tightened to 8 in-lbs (0.90 meter-newtons).
|
Note - Only do this with Sun XVR-4000 graphics accelerators where the green LED fails to illuminate. |
20. Close the Sun Fire V880z server enclosure door.
a. If you removed the side door, remount it to the chassis.
Position the side door mounting pins over the corresponding holes in the chassis rear panel and lower the side door into place.
Make sure that the door is firmly seated in its frame.
c. Lock the side door with the system key.
21. Boot the system to the ok prompt and see if the Sun Fire V880z server detects the Sun XVR-4000 graphics accelerator.
For example, to list your system graphics, type:
ok show-displays a) /SUNW,zulu@4,0 b) /SUNW,zulu@1,0 c) /pci@9,600000/TSI,gfxp@1 q) NO SELECTION Enter Selection, q to quit: q |
If the Sun XVR-4000 graphics accelerator is not detected, power down the system and apply thumb pressure to the center of the Sun XVR-4000 graphics accelerator board and note if any additional board travel is experienced.
|
Note - Never attempt to re-seat a Sun XVR-4000 graphics accelerator with power applied to the system. |
If the board is not completed seated, push the board fully into place.
|
Note - Only do this with Sun XVR-4000 graphics accelerators that are not detected at the ok prompt. |
If errors, note the serial number and revision level of the Sun Fire V880 enclosure and that of the motherboard. Report information to Sun Support Services at:
http://www.sun.com/service/online/

|
Caution - The Sun XVR-4000 graphics accelerator is not hot-swappable. |
1. Turn off the power to your system and disconnect the system back panel monitor cabling.
Leave one power cord connected.
2. Remove the back panel I/O slot EMI adapter from the selected slot containing the
Sun XVR-4000 graphics accelerator (FIGURE 4-6).
Four Phillips screws secure the EMI adapter.

|
Caution - If the EMI adapter is not removed, the Sun XVR-4000 graphics accelerator video connectors could be damaged when you attempt to slide the graphics board out of the card guide rails. |
3. Open the Sun Fire V880z server enclosure door (FIGURE 4-2).
a. Unlock the side door using the system key.
c. To remove the door from the chassis, open the door 90 degrees and pull it up until its mounting pins clear the brackets on the rear panel.
4. Using a No. 2 Phillips screwdriver, loosen the right-side captive screw and then the left-side captive screw (FIGURE 4-9).
5. Hand-loosen the two captive screws on the graphics board.
6. Pull the graphics board ejector levers until they are rotated out to 90 degrees (FIGURE 4-9).
7. Holding the two ends of the graphics board, carefully pull the board straight out of the connector slot.
8. Remove the air baffle from under the metal storage slot located on the enclosure interior ceiling.
9. Replace the air baffles on the chassis slots, and replace the bus slot covers on the motherboard bus connectors.
10. Close the Sun Fire V880z server enclosure door.
11. Replace the system back panel covers for the slots used for the Sun XVR-4000 graphics accelerator (FIGURE 4-1).
The back panel filler slot covers are secured by four Phillips screws.
12. Reconnect the remaining power cords and turn the power on.
13. Boot your system at the ok prompt.
Refer to the section "How to Initiate a Reconfiguration Boot" in the Sun Fire V880 Server Owner's Guide.
The following lists cables available for use with the Sun XVR-4000 graphics accelerator.
You can order these cables through the Sun store (http://store.sun.com).
The Sun XVR-4000 graphics accelerator device automatically configures itself to a single video stream of 1280 × 1024 at 76Hz, using the maximum sample density support (8) at that resolution. To change the screen resolution, use the fbconfig utility which is used for configuring all Sun graphics accelerators. SUNWzulu_config(1M) contains Sun XVR-4000 device-specific configuration information.
| Sun Fire V880z Server and Sun XVR-4000 Graphics Accelerator Installation and User's Guide | 817-2400-10 |
Copyright © 2003, Sun Microsystems, Inc. All rights reserved.

