Installing the Fiber Cable Organizer
Use the fiber cable organizer to route the fiber optic cable to connect the interface board and the I/O+ board. A 2-meter cable is required when utilizing the internal FC-AL disk drives. The cable organizer can help prevent damage to the fiber optic cable by helping ensure the 1.0 inch minimum bend radius rule is observed.
The fiber cable organizer kit includes two organizer sections and one screw. To install the cable organizer:
-
Remove the screw securing the power cord retainer clip to the support bracket at the rear of the system.
-
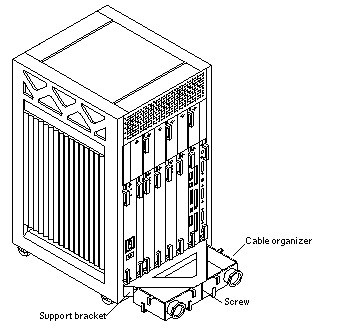
Orient one of the fiber cable organizer sections with the spool facing toward you. Set the hooks on the back of the organizer into the corresponding cutouts on the right side of the support bracket.
The top of the brace should be flush with the top of the support bracket. The organizer will extend below the bracket. See Figure 2-1.
-
Secure the organizer by pushing it outward along the support bracket until the snap at the rear of the organizer clicks audibly into place.
-
Install the left spool brace by repeating step 2 and step 3.
-
Using the screw included in the kit, fasten the spool braces to the support bracket through the center front cut out formed when both braces are in place.
-
Remount the retainer clip through the hex nut at the notch on the side of the organizer.
Set the retainer clip screw into the hex nut.
-
To wrap the 2-meter fiber cable around the organizer spools to interconnect the interface board and the I/O+ board for FC-AL disks, see "Wrapping the Fiber Cable on the Organizer".
Figure 2-1 Fiber Cable Organizer Mounted on Support Bracket

- © 2010, Oracle Corporation and/or its affiliates
