Removing a Graphics (UPA) Card
-
Use the procedures in "Removing a Board", to remove the applicable Graphics+ I/O board.
-
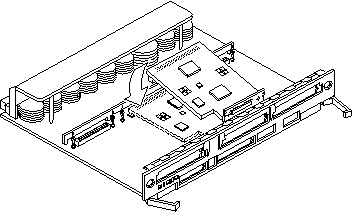
Locate the card (Figure 4-22).
-
Remove the two screws that secure the card to the Graphics+ I/O board front panel.
Save the screws for installation of a replacement card or a filler panel.
-
Unlock the card by pulling up the tips of the two standoffs (Figure 4-14).
-
Hold the card by the edges near the connector and gently rock the card back and forth to loosen it from the socket.
You may have to remove the SBus cards next to this card in order to have enough room to hold onto the graphics (UPA) card being removed.
 Caution -
 The connector housing may break if the card is tilted too far.
-
Lift the card from the socket at an angle while guiding the face plate out from the back panel opening (Figure 4-22).
Figure 4-22 Removing or Installing a Graphics (UPA) Card

-
Place the card in an antistatic bag.
-
If the graphics (UPA) card is not immediately replaced, install a filler panel (part number 340-2305) on the Graphics+ I/O board back panel opening. To secure the filler panel, use the screws that were removed in Step 1.
 Caution -
 Be sure to install the filler panel right-side up. Installing it upside down creates a gap at the top edge of the card slot opening that can impair system cooling and regulatory compliance.
-
Use the procedures in "Installing a Board", to replace the Graphics+ I/O board.
- © 2010, Oracle Corporation and/or its affiliates
