Mail Return Address Path Format
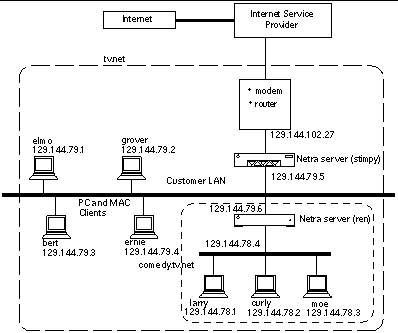
The third choice determines the format of the return address on outgoing mail, which can be either user@host.domain or user@domain. For example, suppose the Netra server's host name is stimpy and that the domain name is tv.net (as in Figure 3-1 ). With the user@host.domain format, mail from the user setup goes out as from the sender setup@stimpy.tv.net, while with the user@domain format it is stimpy@tv.net.
Figure 3-1 LAN That Uses the Netra Server as a Router

The return address is used when people reply to messages sent out by the Netra server. For mail using the user@domain format to find its way back, the domain name server needs to know that the Netra server deals with mail, so that it can be passed on. This is accomplished by adding an MX record to the DNS database. If the Netra server is acting as the primary domain name server, the MX record can be added through the Name Service module (See "Name Service Administration "). To add an MX record for stimpy, modify the primary domain by adding a line to the Mail Servers box, with Mail Addresses set to tv.net. (note the trailing dot), Preference set to 1 and Mail Server set to stimpy.
The Netra server supports both the imap4 and the pop3 mail protocols, and for mail services to work correctly, the name service must have an entry for each network interface on the server.
The choices made when activating the mail services can be changed at a later time. If the Mail Administration page is loaded when Netra mail services are active, the following links: "Modify the mail services" and "Disable the Netra mail services configuration" are displayed. The first link shows the same form as for the initial configuration, while the latter link restores the mail services to the state they were in before Netra mail services were activated.
To Configure a Server to Provide Mail Services
-
From the Main Administration page, under "Network Services Administration," click Mail, then click Configure this server as mailhost and a mailserver.
The Mail Services Administration page is displayed.
-
Complete the form using the information in Table 3-2.
Table 3-2 Mail Administration
To Modify Mail Services
-
From the Main Administration page, under "Network Services Administration," click Mail, then click Modify the mail services.
The Mail Services Administration page is displayed.
-
Complete the form using the information in Table 3-2.
To Disable Mail Services
- © 2010, Oracle Corporation and/or its affiliates
