Trusted Path Menu
The Trusted Path (TP) menu can be accessed by holding down the right mouse button in the switch area of the Front Panel. The Trusted Path menu is displayed with a different set of selections and title depending on the location of the pointer as follows:
-
Over a workspace button - core entries and Change Workspace SL, Add Workspace, Delete, and Rename for operating on that workspace (see figure below)
-
Over an area with no controls - core entries and Add Workspace
-
Over the Exit icon - core entries and ExitSession for logging out
-
Over the Lock icon - core entries and Lock Display
Note -
The core entries will vary according to your account setup. You may have different roles or none at all. If sensitivity labels are hidden, there will be no Change Workspace SL option. You may not be allowed to allocate devices.
Figure 4-7 The Workspace Version of the Trusted Path Menu
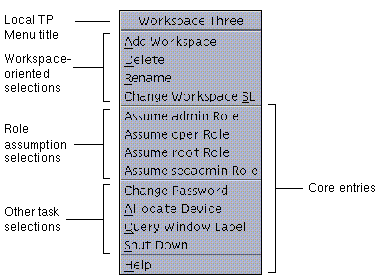
The Trusted Menu selections fall into three major categories:
-
workspace-oriented selections
-
role assumption selections
-
other task selections
The workspace selections are only displayed when the pointer is over a workspace button; the role assumption and other task selections appear in all TP menus. Note also that your system may have different selections available due to configuration differences.
Add Workspace
Add Workspace lets you add another button to the switch area for accessing another workspace. This operates similarly to the standard version of CDE, except that the new workspace button takes on the security characteristics of the workspace under the pointer or, if the pointer is not over a workspace button, the characteristics of your minimum sensitivity label.
Delete
Delete lets you remove a workspace from the switch area just as in standard Solaris CDE. It is good practice to quit all applications in a workspace prior to closing it; otherwise these applications may continue to run invisibly or in a different workspace.
Rename
Rename lets you rename a workspace from the switch area just as in standard Solaris CDE. The text in the workspace button becomes editable and lets you enter a new name.
Change Workspace SL
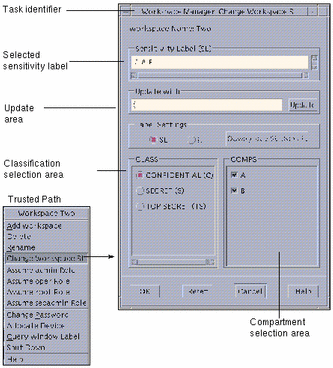
Change Workspace SL lets you change the sensitivity label of a workspace to any sensitivity label between the minimum sensitivity label assigned to you and your current session clearance (for multilabel sessions only). When you click on the changed workspace button, you enter a session at the new sensitivity label. (This option only appears in sites configured to display sensitivity labels.)
To Change a Workspace Sensitivity Label
-
Select Change Workspace SL from the Trusted Path menu.
The dialog box shown below is displayed.
Figure 4-8 Change Workspace SL Dialog Box
-
Click the desired classification in the classification selection area.
-
Click the desired compartments (if any) in the compartments selection area.
-
Check the sensitivity label you have built in the update area. Click the OK button if it is correct or go back to step 2 to build a different sensitivity label.
Role Assumption Selections
Assume <site-specific> Role lets you change roles. Remember that a role is a special user account that gives you access to certain applications and the authorization(s) you need to run these applications. The administrator at your site assigns roles. If your account has not been assigned any roles, the assume role selections do not appear in the Trusted Path menu.
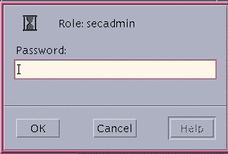
When you make a role assumption selection, a dialog box is displayed requesting the password for the role (see figure below). After successfully entering the password, a workspace button with the role name is displayed and you are shifted to this workspace. The role workspace provides you with the special set of applications, privileges, authorizations, and the UID assigned to this role. Remember that for auditing purposes your user account UID is attached to all transactions you make while in this role.
Figure 4-9 Role Password Dialog Box
Change Password
Change Password lets you change your password. Frequently changing passwords shortens the window of opportunity for intruders using illegally obtained passwords; thus, your site's policy may require you to change your password regularly. Your administrator has a number of options for changing your password:
-
minimum number of days between changes - prevents you or anyone else from changing your password for a set number of days.
-
maximum number of days between changes - requires you to change your password after a set number of days.
-
maximum number of inactive days - locks your account after the set number of days of inactivity if the password has not been changed
-
expiration date - requires you to change your password by a specific date
If your administrator has implemented one of the options requiring you to change your password, you should receive a message warning you to change your password prior to the cutoff date. You will be required to change your password by one of two methods, depending on your site's security policy
-
Direct entry
-
Choosing from a list of system-generated passwords
To Change Passwords by Direct Entry
-
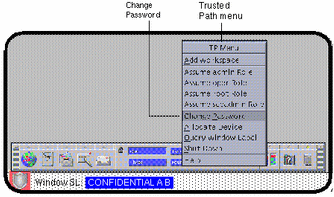
Select Change Password from the Trusted Path menu (see figure below).
You access the Trusted Path menu by holding down the right mouse button while the pointer is over the switch area in the Front Panel.
Figure 4-10 Selecting Change Password from the Trusted Path Menu
-
Choose a new password.
It must meet the following criteria:
-
The password must be 8 characters in length. (More than 8 characters can be entered but only the first 8 characters are significant.)
-
The password must contain at least two alphabetic characters and at least one numeric or special character.
-
The new password must differ from your previous password; you cannot use a reverse or circular shift of the previous password. (For this comparison, upper case letters and lower case letters are considered to be equal.)
-
The new password must have at least three characters different from the old. (For this comparison, upper case letters and lower case letters are considered to be equal.)
-
It should be difficult to guess. Do not use a common word or a proper name, as individuals attempting to break into an account occasionally use lists to try to guess users' passwords.
-
-
Type your old password in the Change Password dialog box and click OK.
Figure 4-11 Change Password Dialog Box

This confirms that you are the legitimate user associated with this user name. For the sake of security, the password is not displayed as you type it.
 Caution -
 When you enter your password, make sure that the cursor is over the Change Password dialog box and that the trusted path symbol is displayed. If the cursor is not over the dialog box, you can inadvertently type your password into a different window where it could be seen by another user. If the symbol is not displayed, then someone may be attempting to steal your password and you should notify your security administrator at once.
-
Type the new password in the Change Password Confirmation dialog box and click OK.
Figure 4-12 Change Password Confirmation Dialog Box

-
Type the new password in the Change Password Reconfirmation dialog box and click OK.
Figure 4-13 Change Password Reconfirmation Dialog Box

This step confirms your choice.
-
Click the OK button in the dialog box (not shown) that notifies you that the change has been made.
To Change Passwords by Choosing from a List
Your administrator has the option to require users to select new passwords from lists of system-generated passwords. Trusted Solaris generates passwords that are pronounceable but difficult for intruders to guess.
-
Select Change Password from the Trusted Path menu.
A dialog box requesting your current password is displayed (see Figure 4-11). After you enter your password and click OK, a dialog box similar to the one shown below is displayed (if your system is configured for system-generated entry). The Password Generator dialog box provides you with a choice of five unique system-generated passwords. The pronunciation mnemonic shown in parentheses to the right of each password divides the password into syllables to make it easier to remember.
Figure 4-14 Password Generator Dialog Box

-
Read the five password choices.
-
If you want to use one of these choices, enter it in the confirmation field and press Return or click OK.
This step establishes your choice.
-
If you want to select from a different set of choices, leave the confirmation field blank and press Return or click OK.
This step causes five new selections to be displayed. If one of these selections is suitable, enter that choice and press Return or click OK; otherwise repeat this step to get five new selections.
-
-
After you are prompted for the password again, re-enter your choice in the confirmation field and press Return or click OK.
This step confirms the spelling of your choice and gives you practice at entering it. It closes the dialog box.
To Choose a Password from a List at the Command Line
A command line version of the password generator is provided as an alternative to the Password Generator Dialog Box. Note that this version is available to users in administrative roles only.
-
Type passwd
A set of five generated password choices as follows.
-
Read the five password choices.
-
If you want to use one of these choices, enter it and press Return.
This step establishes your choice.
-
If you want to select from a different set of choices, press Return without making an entry.
This step causes five new selections to be displayed. If one of these selections is suitable, enter that choice and press Return; otherwise repeat this step to get five new selections.
-
-
After you are prompted for the password again, re-enter your choice in the confirmation field and press Return.
This step confirms the spelling of your choice and gives you practice at entering it.
Allocate Device
Allocate Device is available to authorized users only. It lets you mount and allocate a device so that you can securely move data on or off the system to another medium. If you try to use a device without allocating it, you will get the error message "Permission Denied."
To Allocate a Device
-
A) Select Allocate Device from the Trusted Path menu.
This step causes the Device Allocation Manager to be displayed.
OR
-
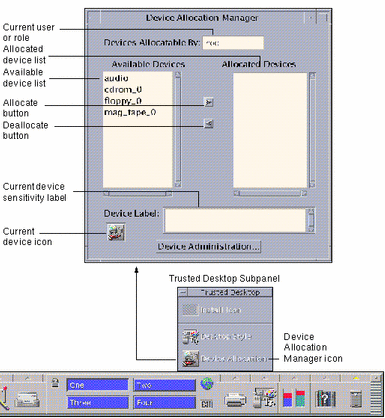
B) Select Device Allocation Manager from the Trusted Desktop subpanel in the Front Panel.
This is an alternative step for displaying the Device Allocation Manager (see below).
Figure 4-15 Selecting the Device Allocation Manager from the Trusted Desktop Subpanel
-
Look in the available device list for the device you wish to use.
The devices that you are permitted to allocate at your current sensitivity label appear in this list. Table 4-1 shows some typical device names.
Table 4-1 Device Name AbbreviationsAbbreviated Device Name
Long Version of Device Name
audio
microphone and speakers
floppy_0
floppy drive
mag_tape_0
tape drive (streaming)
cdrom_0
CDROM drive
If the device you want to use does not appear in the list, you should check with your administrator to make sure you are properly authorized. It may also be that the device is in an error state or in use by somebody else.
-
Move the device from the Available Devices list to the Allocated Devices list.
You can accomplish this by:
-
Double-clicking the device name in the Available Devices list
-
Selecting the device and clicking the Allocate (right-pointing) button
This step opens a cmdtool window running a clean script. The clean script ensures that there is no data left over on the medium from other transactions.
Note that the sensitivity label of the current workspace will be applied to the device. Any data transferred to or from the device's medium must be dominated by this sensitivity label.
-
-
Follow the instructions in the clean script, which are (1) load and make sure the medium has the correct sensitivity label, (2) mount the device, and (3) press return to close the cmdtool window.
Figure 4-16 Clean Script During Allocation
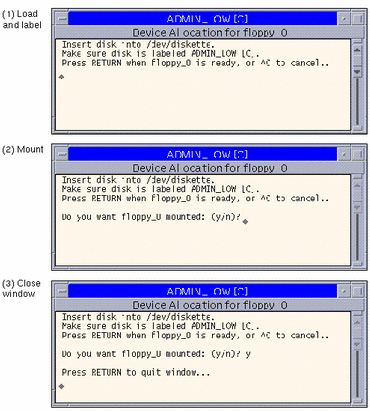
At this point, the medium has been cleaned and the device has been mounted and is ready to be used. The device name now appears in the Allocated Devices list.
Note -Until you close the command tool window, the Device Allocation Manager and the label builder windows are disabled. At this point, you will not be able to use the Device Allocation Manager in this workspace or any other.
-
Use the device to transfer data.
At any point, if you switch to a workspace with a different User ID (by assuming a role) or sensitivity label, you need to make a separate allocation of the device at the sensitivity label for that workspace. When you use the Occupy Workspace command from the window menu to move the Device Allocation Manager to the new workspace, the Available and Allocated Devices lists change to reflect the correct context.
-
Deallocate the device when you are finished.
For the sake of security, you should always deallocate a device when you are finished using it. You can accomplish this by:
-
Double-clicking the device name in the Allocated Devices list
-
Selecting the device and clicking the Deallocate (left-pointing) button
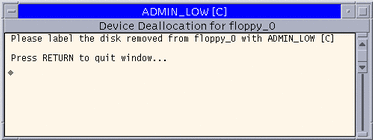
Deallocating a device opens a cmdtool window and runs a clean script that advises you about the labeling of the medium (see below). The script also unmounts the device.
Figure 4-17 Clean Script During Deallocation
If you reboot your system while devices are allocated, they become deallocated.
-
Query Window Label
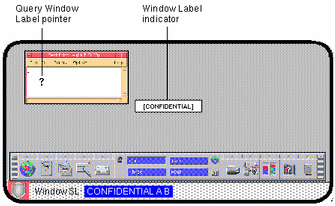
Query Window Label changes the pointer to a question mark. As you move the pointer around the screen, the sensitivity label for the region under the pointer is displayed in a small rectangular box at the center of the screen (see below). When you click the mouse button, you return to normal mode. This operation is mainly useful if your system is not configured to display labels in the window frames.
Figure 4-18 Query Window Label Operation
Shut Down (for authorized users only)
Shut Down lets you shut down your machine (if you are authorized). This is not the normal way of ending a Trusted Solaris session; the normal logout method is clicking the Exit icon in the switch area of the Front Panel. When you select Shut Down, you are first queried for confirmation and then permitted to shut down the workstation. If you need to turn off your machine, you should use the Shut Down command and then turn off your power.
Note -
If you do shut down your machine, rebooting it may require further authorization and extra passwords depending on your site's security policy.
Help
Help provides online help information including a glossary for the Trusted Solaris environment in general. Individual tools provide specific help directly through Help buttons and menus.
- © 2010, Oracle Corporation and/or its affiliates
