Managing Files and File Systems (Tasks)
To Back Up Files
-
Assume the Operator role or another role with the Media Backup rights profile.
-
Use one of the following backup methods:
-
/usr/lib/fs/ufs/ufsdump for major backups
-
/usr/sbin/tar -T with other options for small backups
-
A script calling either of the above commands
For example, the
Budtoolbackup application calls the ufsdump command.
-
Only these commands preserve security attributes and can read multilevel and single-level directories correctly.
To Restore Files
-
Assume the System Administrator role or any other role with the Media Restore rights profile.
-
Use one of the following methods:
-
/usr/lib/fs/ufs/ufsrestore for major restores
-
/usr/sbin/tar -T with other options for small restores
-
A script calling either of the above commands, such as Budtool.
-
Only these commands preserve security attributes and can restore multilevel and single-level directories correctly.
To Change Labels and Privileges With the File Manager
-
Assume the Security Administrator role and go to or create a workspace at the appropriate label.
-
Bring up the File Manager, navigate to the directory, and highlight the file whose privileges or label you wish to change.
-
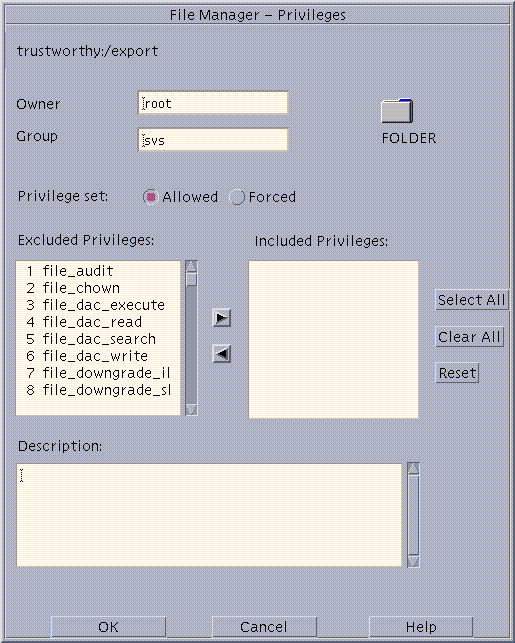
To change privileges, choose Privileges from the Selected menu.
The File Manager Privileges dialog box displays as shown below.

-
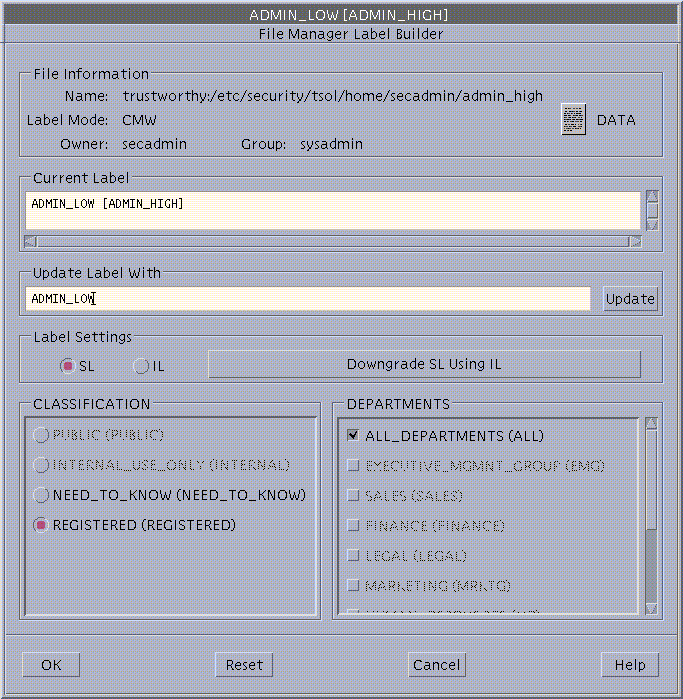
To change labels, choose Labels from the Selected menu.
The File Manager Label Builder displays.

-
Enter a label by typing a label in the Update With field, or by clicking the desired label components.
-
Click OK.
To Set Security Attributes While Creating a Local File System
-
Assume the System Administrator role and go to an
ADMIN_HIGHworkspace.See "To Work at a Different Label", if needed.
-
Using the File Manager or the mkdir command, make the mount point directory.
$ mkdir /newpublic
-
Use the Set Mount Points Action to edit the /etc/vfstab file with the following entry:
/dev/dsk/c0t3d0s3 /dev/rdsk/c0t3d0s3 /newpublic ufs 2 yes -
-
Write and quit the file.
-
Assume the Security Administrator role and go to an
ADMIN_LOWworkspace. -
Execute the newsecfs command with the options that specify the desired alternative security attributes, then mount the file system.
The following example sets a label range of SECRET to SECRET.
$ newsecfs -l "Secret;Secret" /newpublic
$ mount /spublic
See the newsecfs(1M) man page for details.
To Set Security Attributes on a File System
-
Assume the System Administrator role and go to an
ADMIN_LOWworkspace. -
Use the Set Mount Points action to open the /etc/vfstab file and make sure that an entry exists for the file system:
/dev/dsk/c0t3d0s4 /dev/rdsk/c0t3d0s4 /spublic ufs 2 yes -
-
Change to an
ADMIN_HIGHworkspace.See "To Work at a Different Label" for changing the label of your workspace.
-
Enter the umount command to unmount the file system.
$ umount /spublic
-
Assume the Security Administrator role and go to an
ADMIN_LOWworkspace. -
Enter the setfsattr command with the appropriate arguments, then remount the file system.
The following example sets a label range of SECRET to SECRET.
$ setfsattr -l "Secret;Secret" /public
$ mount /spublic
 Caution -
 Do not use proprietary names for mounted file systems. The names of mounted file systems are visible to every user.
To Specify Mount-time Security Attributes on the Command Line
The following procedure mounts a tmpfs-type file system, swap, on /mnt with all allowed and all forced privileges.
-
Assume the System Administrator role and go to an
ADMIN_LOWworkspace. -
Enter the mount command, using the -S option followed by any security attributes that you wish to specify.
$ mount -F tmpfs -S "allowed=all;forced=all" swap /mnt
To Specify Mount-time Security Attributes in the vfstab_adjunct File
-
Assume the administrator role and go to an
ADMIN_HIGHworkspace.See "To Log In and Assume a Role", if needed.
-
Use the Set Mount Points action to open the vfstab(4) file for editing.
-
Specify the mount point as described in the vfstab man page and add filesystem-specific security options in the mount options column as desired.
See the filesystem-specific options in the mount_* man page for the file system type.
The example below shows a filesystem type of ufs, mounted with the Trusted Solaris nodevices and nopriv mount options and the Solaris nosuid mount option.
/dev/dsk/c0t3d0s4 /dev/rdsk/c0t3d0s4 /spublic ufs 2 yes nodevices,nopriv,nosuid
-
Save and close the file.
:wq
-
Assume the Security Administrator role and go to an
ADMIN_HIGHworkspace. -
Use the Set Mount Attributes action to open the vfstab_adjunct(4) file for editing.
-
Copy and paste the template entry at the top of the file, and modify the copy.
#<mount point>; \
#slabel=; \
#forced=; allowed=; \
#low_range=; hi_range=; \
#mld_prefix=;
The example below gives the following security attributes to /spublic: all files in the file system get an slabel (label) of SECRET A, all allowed privileges, and all the file-related privileges.
#  Assigns the Secret A label and label range, all file-related
#   forced privileges and all allowed privileges to an unlabeled file system
#
/spublic;\
slabel="Secret A";\
forced=file_audit,file_chown,file_dac_execute,file_dac_read,\
file_dac_search,file_dac_write,file_downgrade_sl,file_lock,\
file_mac_read,file_mac_search,file_mac_write,file_owner,file_setdac,\
file_setid,file_setpriv,file_upgrade_sl;\
allowed=all;\
low_range="Secret A";\
hi_range="Secret A";
-
Save and close the file.
:wq
To Share a Directory
-
Assume the System Administrator role in an
ADMIN_LOWworkspace and invoke the Solaris Management Console. -
Under Trusted Solaris Management Console, click this-host: Scope=Files, Policy=TSOL, then Storage. Provide a password when prompted.
-
Double-click Mounts and Shares, double-click Share, then choose Add Shared Directory from the Action menu.
-
Enter the file system you want to share.
-
After adding the directory, modify its attributes by double-clicking it, then modifying its properties.
Refer to the online help to guide you.
The following dfstab entry shares a book directory with the nodevices, nopriv, nosuid, and rw options.
share -F nfs -o nodevices,nopriv,nosuid,rw -d "Books" /spare/books
-
Click OK when done.
The tool modifies the dfstab(4) file, runs the shareall(1M) command, and starts the NFS daemon.
-
To confirm that the file system is shared, enter the share(1M) command with no options.
$ share
-               /spare/books   rw   "Books"
To Mount a TMPFS File System Using the Command Line
-
Assume the system administrator role, and go to an
ADMIN_LOWworkspace. -
In a profile shell, enter the mount command, using the -S option followed by any security attributes that you wish to specify.
$ mount -F tmpfs -S "allowed=all;forced=all" swap /mnt
The example mounts a tmpfs-type file system, swap, on /mnt.
To Mount a CD-ROM with a HSFS File System
-
As any user or role, use the Device Allocation Manager to allocate the cdrom_N device.
-
If a CD in an allocated CD-ROM device contains a file system, the user is queried whether or not to mount the file system. Answer yes to mount the file system.
To Automatically Launch a CD Player for an Audio CD-ROM
As described in Chapter 12, Managing Devices, under "Mounting an Allocated CD-ROM Device", if an allocated CD-ROM device contains an audio CD and if an audio action is specified in rmmount.conf, the audio action executes.
-
Assume the Security Administrator role in an
ADMIN_LOWworkspace. -
Use the Admin Editor action to open the /etc/rmmount.conf file for editing.
-
Add an action to automatically launch a CD player.
The following example shows how the Security Administrator role could make an action in rmmount.conf for a CD player called workman installed in /usr/bin.
action cdrom action_workman.so /usr/bin/workman
-
Save and close the file.
$ :wq
To Listen to an Audio CD as any User or Role
-
Connect the speakers to the CD-ROM device and turn them on.
-
Complete the procedure "To Automatically Launch a CD Player for an Audio CD-ROM".
-
Allocate the audio and the cdrom_N devices at your working label.
-
When prompted, insert the audio CD into the device.
The specified CD player program is automatically launched.
To Troubleshoot Mount Failures
-
Make sure that the computer sharing the file system has been assigned a template on the Trusted Solaris computer doing the mounting.
Use the Security Families tool in the Solaris Management Console to confirm that an appropriate template is assigned to an IP address that includes the NFS server. Look for the entry using the toolbox for the appropriate scope. If the NIS+ naming service is being used, bring up the SMC with the NIS+ scope. If NIS is being used, bring up the SMC with the NIS scope. If no naming service is being used, use the Files scope. See "Assigning Security Attributes to Remote Hosts and Network Gateways" for more on how to assign templates to computers.
-
If the computer is not running the Trusted Solaris operating environment, make sure the computer has been assigned a valid label in its template on the Trusted Solaris host.
The label at which the host accesses the mounted directory must be the same as the label assigned in its template.
-
Ensure that the mount is being done by the administrative role with the mount command in one of its rights profiles.
In the default configuration, the Security Administrator role specifies the security attributes of mounts while the System Administrator role takes care of the Solaris aspects of mounting.
-
When mounting any file system from a NFS server running Trusted Solaris 1.x, make sure to use the vers=2 and proto=udp options to the mount command.
- © 2010, Oracle Corporation and/or its affiliates
