| Embedded Lights Out Manager Administration Guide |
| C H A P T E R 4 |
|
Accessing and Monitoring the Server Using the Web-Based Interface |
This chapter describes how to access the server using the embedded lights out manager (ELOM), and how to use the System Information and System Monitoring screens for diagnosing and troubleshooting system components. Using your web browser you can view system information, set system functions, and monitor system sensors.
This chapter includes the following sections:
The simplest way of accessing your server is through a web browser.
|
| Note - To use the web-based interface, you must have previously logged on to the service processor (SP) as described in Setting Up the Service Processor Using the Web-Based Interface. |
2. Enter the IP address of the service processor (SP) in the browser’s address bar.
See Setting Up Communications for initial communications procedures. The IP address enables you to connect directly to the Service Processor (SP) and the server system software.
3. Enter the root user name and password when the login screen appears.
The SP Version screen appears (see FIGURE 4-1).
FIGURE 4-1 The SP version Screen
This is the first screen to appear when you log in. The main menu tabs appear across the top row. The choices are:
Once you are logged on to the system, you can view component-level metadata, and set system functions by selecting the System Information tab. For example, you can use the System Information submenu screens to find the service processor (SP) version number. You can also find the manufacturer of the system’s CPUs, and the size and type of DIMM installed in the system. You can also use the System Information screen to set the Session Time-Out function.
This section contains the following procedures:
The Version screens display version information about the SP and server board. The SP and server board version information can be useful for troubleshooting and for planning updates.
|
1. Click the System Information tab.
2. Click the Version submenu tab.
The Version screen appears (see FIGURE 4-1). The available screen tabs are:
|
 Select the SP Version submenu tab.
The SP Version screen appears. The screen displays information about the SP, such as the device ID and revision numbers. The system presents this information in a tabular format. See TABLE 4-1 for a sample of the SP Version information screen.
|
Select the Server Board Version submenu tab.
The Server Board Version screen appears. The screen displays information specific to the server board, such as, BIOS version, serial number, and manufacturer (see FIGURE 4-2).
FIGURE 4-2 The Server Board Version Screen

The system presents this information in a tabular format. See TABLE 4-2 for a sample of the Server Board information.
The Session Time-out screen allows you to enable (set) or disable the inactive session time-out function. This function automatically performs a session logout from the web-based interface, when a preset period of inactive session time expires. When you enable this function, you must select an expiration time-period from the Session Time drop-down list. Setting the Session Time-out is a simple but effective security measure that prevents unauthorized access to an unattended session.
|
1. Click the Session Time-out submenu tab.
The Time-out screen appears displaying the Timeout window (see FIGURE 4-3). The status of the inactivity time-out function is displayed next to the label:
2. Select the Enable Time-out radio button.
| Note - If you are disabling the time-out function, click the Disable Time-out radio button, and click Submit. |
FIGURE 4-3 The Session Time-out Screen

3. Select a period of time from the Session Time drop-down list.
The options are: 15-minutes, 30-minutes, 1-hour, or 2-hours.
4. Click Submit to set the session time-out.
The System Components submenu screens provide information about the CPUs, the memory, and the network interface cards (NIC) installed in a system. Accessing this information is useful for creating system inventories and obtaining configuration data for diagnostic or maintenance/upgrade purposes.
|
1. Click the System Information tab.
2. Select the Components submenu tab.
The Components screen appears. The available submenu screen tabs are:
|
The CPU screen appears, displaying information about the CPUs in your system. The information includes CPU number, Status, Socket, Manufacturer, Model, and Frequency (see FIGURE 4-4).
The system displays the CPU information in a tabular format for every CPU in the system. The CPU screen in FIGURE 4-4 shows a server system containing two CPUs. TABLE 4-3 shows a sample of CPU information for one, CPU0:.
|
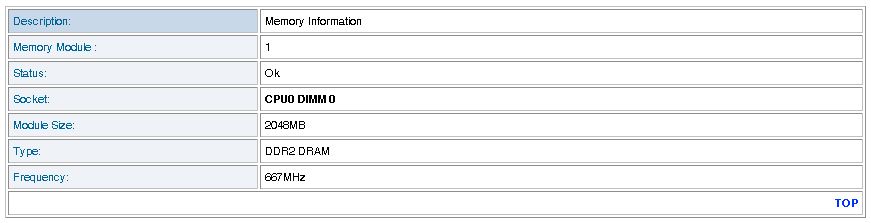
Select the Memory submenu tab.
The Memory screen appears, displaying information about the system DIMMs. The information includes, module number, status, size, type, and frequency (see FIGURE 4-5).
FIGURE 4-5 DIMM Information Displayed in the Memory Submenu
The system displays memory information in a tabular format for every DIMM in the system. The following table shows a sample of memory information for one DIMM, the DIMM installed in socket DIMM0 for CPU0:
Select Get NIC Information submenu tab.
The Get NIC Information screen appears, displaying information about the network interface cards installed in the system. The information includes, Manufacturer, Product Name, Product Part Number, Product Serial Number, Port Number, MAC Address 1, and MAC Address 2 (see FIGURE 4-6)
FIGURE 4-6 The bottom half of the screen displays specific information about the installed NIC cards: Manufacture, Product Name, Part and Serial Number, Port Number, and MAC Addresses 1 and 2.The Get NIC Information Screen
The system shown in FIGURE 4-6 has two NICs. TABLE 4-5 shows a sample of the information for one, NIC 0:
The System Monitoring screens provide the troubleshooting and diagnostic capabilities you will need to maintain your servers. The server hardware is equipped with sensors that the system uses to monitor and measure critical hardware parameters, such as the status of the power, the fan speed, the voltages from the power supply, and the CPU and chassis ambient temperatures. The system polls these sensors, and displays the readings in the Sensor Reading submenu screens.
The Summary, Fan, Temperature, and Voltage submenu screens are useful diagnostic tools that you can use to monitor and diagnose your server. The Event Logs, Locator Indicator, and Fault LED submenu screens allow you to maintain the system log, activate the System Indicator, and reset the Fault LED.
This section contains the following sub-sections:
The Summary screen provides a single-screen overview of every system critical parameter and component. With the Summary screen you can monitor the status of the Fault LED, the system power, the fans, the temperature sensors, and the DC voltage lines. If a problem occurs with a system critical component or parameter, the Summary screen will help you to identify and diagnose the problem.
|
1. Click the System Monitoring tab from the main menu (top row).
2. Select the Sensor Reading tab.
3. Select the Summary submenu tab.
The Summary submenu appears, displaying the status of all the system critical parameters (see ).

FIGURE 4-7 The screen shows readings for fans, temperature and voltages in tabular format. The Summary Screen
The system displays the status of each component and parameter as OK when the component is operational and functioning within thresholds, or Fail when it is not. The information is displayed in a tabular format. TABLE 4-6 shows a sample of the Summary screen information.
You can diagnose individual sensors in greater detail by clicking the Fan, Temperature, or Voltage submenu tabs.
With the Fan submenu tab you can view the threshold parameters and the actual tachometer readings of each fan. You can user the Fan screen to diagnose temperature-related problems by identifying under performing or non-functioning fans.
|
1. Click the System Monitoring tab.
2. Click the Sensor Reading tab.
The Fan submenu appears (see FIGURE 4-8).
FIGURE 4-8 Fan Submenu of the Hardware Monitor Screen
The system displays both the upper and lower critical speed thresholds for each fan. If the system is unable to read the thresholds, it shows the status as Unreadable, otherwise it shows the status as Readable. The system also displays a direct RPM reading from the fan sensor, and shows status indicators for the Blower and Axial fans.
The system displays the information in a tabular format for each fan in the system. The following table shows a sample of fan information for Blower Fan 0.
Temperature is one of the most important system critical parameters. The system monitors both the CPU and the chassis ambient temperature sensors, and displays the results in the Temperature submenu screen. An increase in temperature could be indicative of an under-performing or non functioning fan, a failing component, or a clogged air filter.
|
1. Click the System Monitoring tab.
2. Click the Sensor Reading tab.
3. Select the Temperature tab.
The Temperature submenu screen appears, displaying direct readings of ambient and CPU temperature sensors (see FIGURE 4-9).
FIGURE 4-9 The Temperature Submenu
Beneath the repeated menu on the left and the window interface on the right are three tabular readings for the CPU, ambient, and processor temperatures.
The system reads both the Lower and Upper Non-critical and the Lower and Upper Critical temperature thresholds, reporting back if the thresholds are readable. The system also provides a direct Celsius reading from each sensor, and reports on its status, showing it as either OK or Critical.
The system displays the information in a tabular format for each temperature sensor in the system. The following table shows a sample of temperature information for a CPU Fan (see TABLE 4-8).
The system monitors the DC power supplies, and displays the results in the Voltage submenu. You can use the Voltage screen to monitor each voltage line for low or fluctuating voltages. Low or fluctuating voltages can cause component failure, system errors, and intermittent performance issues. It can also be indicative of a failing power supply.
|
1. Click the System Monitoring tab.
2. Click the Sensor Reading tab.
The Voltage submenu appears, displaying DC voltage power supply readings for Vcc 12V, DDRP0 1.8V, DDRP1 1.8V, Vcc 3.3V, Vcc 5V, Vcc 3.3V STB (see FIGURE 4-10).
FIGURE 4-10 The Voltage Submenu Screen
The system reads both the Lower and Upper Non-critical and the Lower and Upper Critical thresholds, and reports if the voltages are readable. The system also provides a direct reading of each voltage line, and reports on the status of the line.
The system displays the information in a tabular format for each of the power supplies voltage lines. The following table shows a sample of voltage information for the Vcc 12V line (see TABLE 4-9).
With the Event Logs submenus you can examine and manage a record of system events using the View Event Logs, Save Event Logs, and Clear Event Logs screens.
|
1. Click System Monitoring tab.
2. Click the Event Logs submenu tab.
The Event Logs submenu appears (see FIGURE 4-11).
FIGURE 4-11 The Event Logs Screen
The Event Log provides a record of system events related to system critical parameters and components, such as when fans under-perform or fail, or when voltages breach threshold limits. The system logs the events, rating the level of severity, and provides a timestamp and a description of the occurrence.
| Note - Before Event logging can occur, you must define in the Platform Event Filter screen which events you would like to trap. See Defining Traps with the Platform Event Filter. |
If you want to save the event log for record keeping or diagnostic purposes, the system provides the option to save the log to a file named: eventlog.txt. To maintain a contiguous record be sure to save before you clear the Event Log.
|
1. Click the Save Event Logs tab in the Event Logs screen.
2. Click the Save Event Log button.
The browser prompts you for a save location.
Clearing the event log can be useful, especially when the log becomes too big. It can also be beneficial to clear the event log after a save, a software or firmware upgrade, or a component replacement. If necessary save before you clear the Event Log (see Saving the Event Log).
|
1. Click the Clear Event Logs tab from the System Monitoring menu.
2. Click the Clear Event Log button.
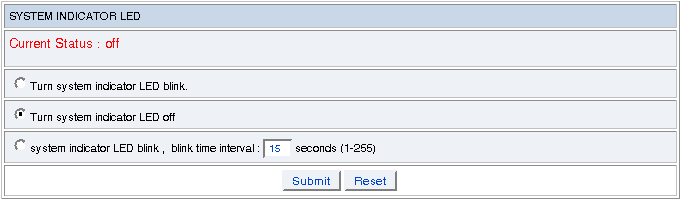
The System Indicator LED is an identification LED located on the front of the server. The purpose of the System Indicator LED is to help you find a server that might be mounted in a rack with several other servers or located in a room with many other racks of systems. By activating the System Indicator LED from the Locator Indicator screen, you can identify a server that you have designated for diagnostics or maintenance.
|
1. Click Locator Indicator submenu tab from the System Monitoring menu.
The System Indicator LED screen appears (see FIGURE 4-12).
FIGURE 4-12 The Locator Indicator Screen
The System Indicator LED screen shows the status of the LED, and provides the option to:
|
Blink the System Indicator LED for a specific number of seconds (1-255) |
2. Select one of the three LED options
The Fault LED is mounted on the front of the server cabinet. The LED lights, providing an alert that a system error has occurred, and that the server requires attention. After the required maintenance or repair has been performed you will need to reset the Fault LED. You can do this using the Fault LED screen.
|
1. Click the Fault LED submenu tab from the System Monitoring menu.
2. Select the Turn Fault ID LED off radio button.
| Embedded Lights Out Manager Administration Guide | 819-6588-14 |
Copyright © 2009 Sun Microsystems, Inc. All rights reserved.
 To Access the System Using the Web-Based Interface


")